0:00
Hi, I'm Dustin Abbott, and I am here today to give you a closer look at the
0:15
Datacolor Spider-X Capture Pro and the various tools that come as a part of this kit
0:21
Now, some of you have watched some of my reviews before, for example, of monitors, and we've talked
0:26
about calibration as a part of that and even detailed somehow to do a calibration using a color
0:32
meter like a something from data color in the spider. And so we will take a brief look at that
0:39
today. But what I want to do is look at the Capture Pro kit is a variety of different tools to help
0:46
you get really the best out of your workflow, both in terms of your color, not just in your
0:51
monitor, but also in your lenses, in your post-processing, your cameras. but also helping you to get the best out of your autofocus system
1:01
to create color calibrations, and so that you can help to offset deficiencies
1:09
be it in the color science of the camera, or maybe there's a lens that has a certain bias
1:14
maybe it's a little bit warm or a little bit cool. And so it really enables you to kind of maximize the gear that you already own
1:22
So I'm going to jump in and take a look at some of these things hands-on a little bit closer to demonstrate what is actually included in the kit, how they work
1:30
and then we'll come back with a summation as to who I think this is for, who should consider it
1:35
and maybe, you know, who should not consider it. So let's jump in and let's go hands-on and take a look
1:41
So I want to start by giving you a look at what you are getting in the bundle itself
1:45
So first of all, obviously, you get a very nice case that everything comes in
1:50
and so A4 presentation for data color on their capture pro bundle here
1:58
So inside you've got a variety of tools. And so I'm going to start down at the bottom here because the color meter is the kind of the main thing that you're typically looking to data color for for calibration of your monitor or, you know, beyond that you can even calibrate things like a projector or even a projector or even a television
2:20
screen depending on the input source. And so I find this an indispensable thing to make sure that I'm
2:25
getting accurate color because obviously there's a huge variety in the playback devices that people
2:31
use. And so, you know, for someone like myself who's trying to produce a content that is as
2:36
accurate as possible, it's really important that I have a calibration across my devices. And so
2:42
these are fairly simple, straightforward, easy to use, and do an effective job of allowing you to have
2:48
consistent color output throughout your whole workflow. And so obviously that's a very indispensable tool
2:55
You can also help to monitor the light in your workspace to see how that is affecting things
3:01
So it also comes with a cleaning cloth who can help to you know for one thing to clean your screen before you start to do any kind of assessment of that So you do get a code and a download for the Spider Elite calibration software
3:16
Then you also get access to the Checker software that works in conjunction with this particular chart
3:24
And so this is about getting accurate color. Very, very useful if you're trying to get consistent color across a variety of lenses or even camera systems
3:33
And as you, some of you may have seen some of my. episodes on color science enough or from someone else. Do you know that there is some variation
3:42
between different manufacturers? There's also variation in the temperature and the color rendition
3:47
of various lenses. Now where Checker comes in really handy is that I noted when doing a recent
3:53
review that, as I've seen with some other lenses, that skin tones tend to be a little bit warm
3:58
a little bit yellowy with this particular lens. And so the way that the process works is that you
4:04
shoot the test chart with the particular lens obviously trying to get is even a light as possible
4:10
Then in either lightroom or ACR, I can take it into this proprietary software, which is spiders checker software
4:24
So after it's done, it's a little bit here. What I'm going to do is it's got the image, and so I've already cropped it down to be as
4:30
close as possible, but it wants, you know, obviously these to be as centered as possible in their
4:36
respective boxes. And so I'm going to just make a few quick tweaks. And so once we've got there
4:41
now we've got three different options. There is a saturation, there is a colorometric, and there is a
4:48
portrait. And so those are kind of the three levels of saturation. Saturation is higher
4:54
color metric is kind of a more neutral. Portrait is a little less saturated. And so what you've got is
5:00
options. You can save the calibrations to different pieces of software. I typically use these as a
5:05
part of input presets in Lightroom. And so I can save that calibration. I can name it. In this case
5:11
this is from the Canon 24 to 240 millimeter RF lens. And so this is, and I like to make all three
5:19
presets to give me some options. And so I would click okay. And then it will save it to that. I could
5:25
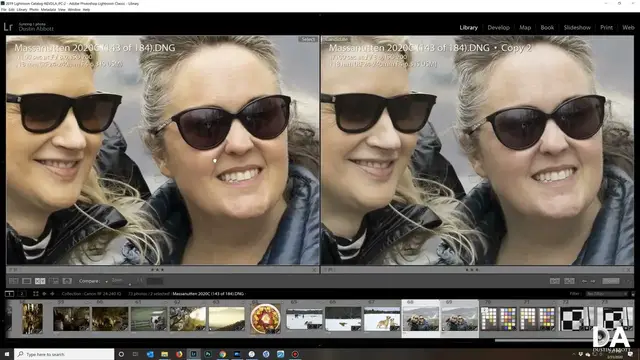
build other calibrations, but for the sake of brevity, we'll jump in. So now what I've got
5:30
is side by side I have got an image here with that profile applied to it so
5:35
that's the only change it's been made no other tweak but if we zoom in and we look
5:39
at the skin tones you can see that it is solved those highly yellow and green
5:44
tones that were there giving us a much more neutral profile for actually
5:49
dealing with color and the great news then is then you can go on and you can add saturation globally without being oversaturated in these channels that were a
5:56
little off to begin with so what the profile is doing is it's actually actually affecting what we call HsL, which is hue, saturation, and luminance
6:05
And so it is individually targeting all of these channels to give you a balanced or neutral
6:10
in result. And so you can see in the various areas it is dealing with those and calibrating and so that
6:15
you get more accurate skin tones This is very nicely made and it also cleverly made You can put it on to the top of a light pole or a quick release plate there and even on this end
6:27
You can spin it on to if you actually have a quarter inch on something you can spin it into that and so it's designed to where it's easy to use and and so very very functional
6:38
So I really really like that. I like the quality of what you're getting much like the presentation
6:43
I'm really impressed by the engineering on these various pieces Now here's another kind of somewhat more simple thing
6:49
It's also threaded to where you can put it onto a light pole. You could throw it onto the top of a stand as well
6:57
Or you can even dangle and hang it. But what this is doing is giving you some different sources for getting your color balance
7:04
even on a shot. And so you typically the medium gray is the best for that for establishing a white point
7:11
And so I don't use that as often because I, you know, I've got other methods
7:15
I've got other methods for doing that, but still, if you don't have something like that, it's useful
7:19
One other really, really useful tool that's included. And I previously used one of these in like a paper
7:26
And so how much nicer to have it in an actual design, once again, threaded to where I can put it on a quick release plate and use it
7:34
It also has a spirit level here that allows you to make sure you're getting things level
7:39
But what this allows you to do is if you set it up, it has a couple of purposes that you can use it
7:45
for. First of all, you can use it as it's called a lens cal. So you can use it in helping to establish
7:51
making sure the lens focus is calibrated properly. And so you're setting focus on the target
7:56
And then this gives you a scale to see if there is a front focus or a back focus. And it gives
8:02
you a way of kind of measuring how much that is and correcting for it. And so very useful tool for
8:08
in using that. The other tool that reason that I like this tool that I use it for is it's also
8:13
effective tool for evaluating whether or not there is longitudinal chromatic aberration
8:18
I've got two different lenses, same focal length, you know, a lot of similar attributes
8:23
but I can compare side by side, see which of these has more of longitudinal chromatic aberrations
8:29
And so I can look after the plane of focus, and I can see that there is a little bit more of the
8:34
green fringing on the lens on the left. And so that's a part of my reporting
8:38
And then here, looking before the plan of focus, now both of these are really, really good
8:43
lenses so there's not a whole lot going on here in terms of purple fringing before the plane of focus
8:49
But it's another application of this particular chart. I'm mostly testing on mirrorless and so I
8:55
don't have to do as much in terms of calibration. However, I can determine whether or not even a
8:59
mirrorless lens is focusing accurately and consistently or not by doing this. But once again
9:05
it is the quality of these various tools and the way that they are designed that allows them to be
9:12
much nicer made than equivalent other tools and of course and then having a nice place to store them and so you can run a variety of test to make sure you getting the most out of your gear So as you can see some of these tools are very very useful I obviously for someone like myself tools like this are really kind of indispensable because it allows me to report back to you with you know increasing confidence in terms of my accuracy both of what I seeing in color to make sure that I have good quality tools that I can use on a regular basis and we handle you know stand up to a little bit of abuse in terms of regular use and there a good chance you already seen some of these tools in some of my reviews at this point being used but it a good chance you already seen some of these tools in some of my reviews at this point being used but it
9:56
certainly you'll see a lot of them moving ahead because I found them to be well made, very useful
10:01
and I like the little touches that allow me to put them on lightstands and tripods
10:06
and so that I can get the tools where they are most effectively used. And so if you are someone who is really, really into color
10:15
you want your color to be very consistent across a variety of lenses
10:18
maybe even different camera systems. You want your color to be consistent throughout your workflow
10:23
Maybe you are trying to produce commercial type work where the demands for that are very, very high
10:30
And so if color accuracy is a priority, obviously that's the wheelhouse of data color and all of these various tools
10:37
If you are someone who buys maybe expensive gear and you want to get the best out of that gear, even if you're not selling your work, obviously these tools can be useful there
10:48
If you're someone that's not much into the technical side of things, a lot of this is going to be overwork
10:53
for you and you're just going to you know maybe not find it all that that useful or you know
10:59
you really can't be bothered with with doing that in a future episode I will help to demonstrate how
11:05
to create lightroom presets and and so you know maybe it will make it simpler for you in the
11:11
future to consider you know import presets but also like develop presets but you know I
11:16
understand that some of that is outside of the the technical expertise of some of you and so
11:22
that that's obviously fine. Now in terms of what you're paying for here, you're basically getting
11:28
close to doubling the cost of a typical color a meter. Just the elite color a meter runs around
11:35
$240 at B&H photo. This entire kit is around $400. And so you know, you're definitely paying a fair
11:43
bit more. At the same time, you know, you're going to have to determine for yourself whether or not
11:47
these tools are useful. It's actually cheaper to get them all in a bundle. And
11:52
Obviously, the checker and its unique proprietary software is something that's really, really valuable for certain people
11:58
And so getting that as a part of the kit, you know, and then getting to throw in maybe the cube or the lens cal for, you know, almost no additional cost and get a nice case along with the deal
12:08
Maybe that will make it worthwhile for you. That's, of course, entirely up to you
12:11
But if you are interested, there's linkage in the description down below. And so you can go and shop and take a look at whether or not it is going to be useful for your own purposes
12:19
And so take a look at that. There's also link there to follow me on social media
12:24
to become a patron or to sign it for my newsletter. And if you haven't already, please click that subscribe button right here on YouTube
12:30
Thanks for watching, and I hope this helped. Have a great day