In May of 2023 I reviewed a lens that I was very excited about. Viltrox had released a next level 16mm F1.8 autofocus lens for Sony FE, and it fill a niche previously unfilled on FE – a high quality, fast prime lens at 16mm…and even better, it was very affordable. That lens has sold a lot of copies over the past few years on first Sony FE and then Nikon Z, but its time in the spotlight may be coming to an end. Sony has now released their answer to the Viltrox, and it is smaller, lighter, wider, and even higher performing…and only costs about $220 more. The new Sony FE 16mm F1.8 G takes the formula that I loved in the FE 20mm F1.8 G and takes it wider. The 16mm F1.8 G is a lens that I quickly fell in love with. You can find out why by watching my video review or reading my text review…or just enjoying the photos below.
Thanks to Sony USA for sending me a review loaner of this lens. As always, this is a completely independent review. *The tests and most of the photos that I share as a part of my review cycle have been done with the Sony a7RV along with the Sony Alpha 1 that serve as my benchmark cameras for Sony lenses. You can visit the product listing page for the 16mm F1.8 G here.
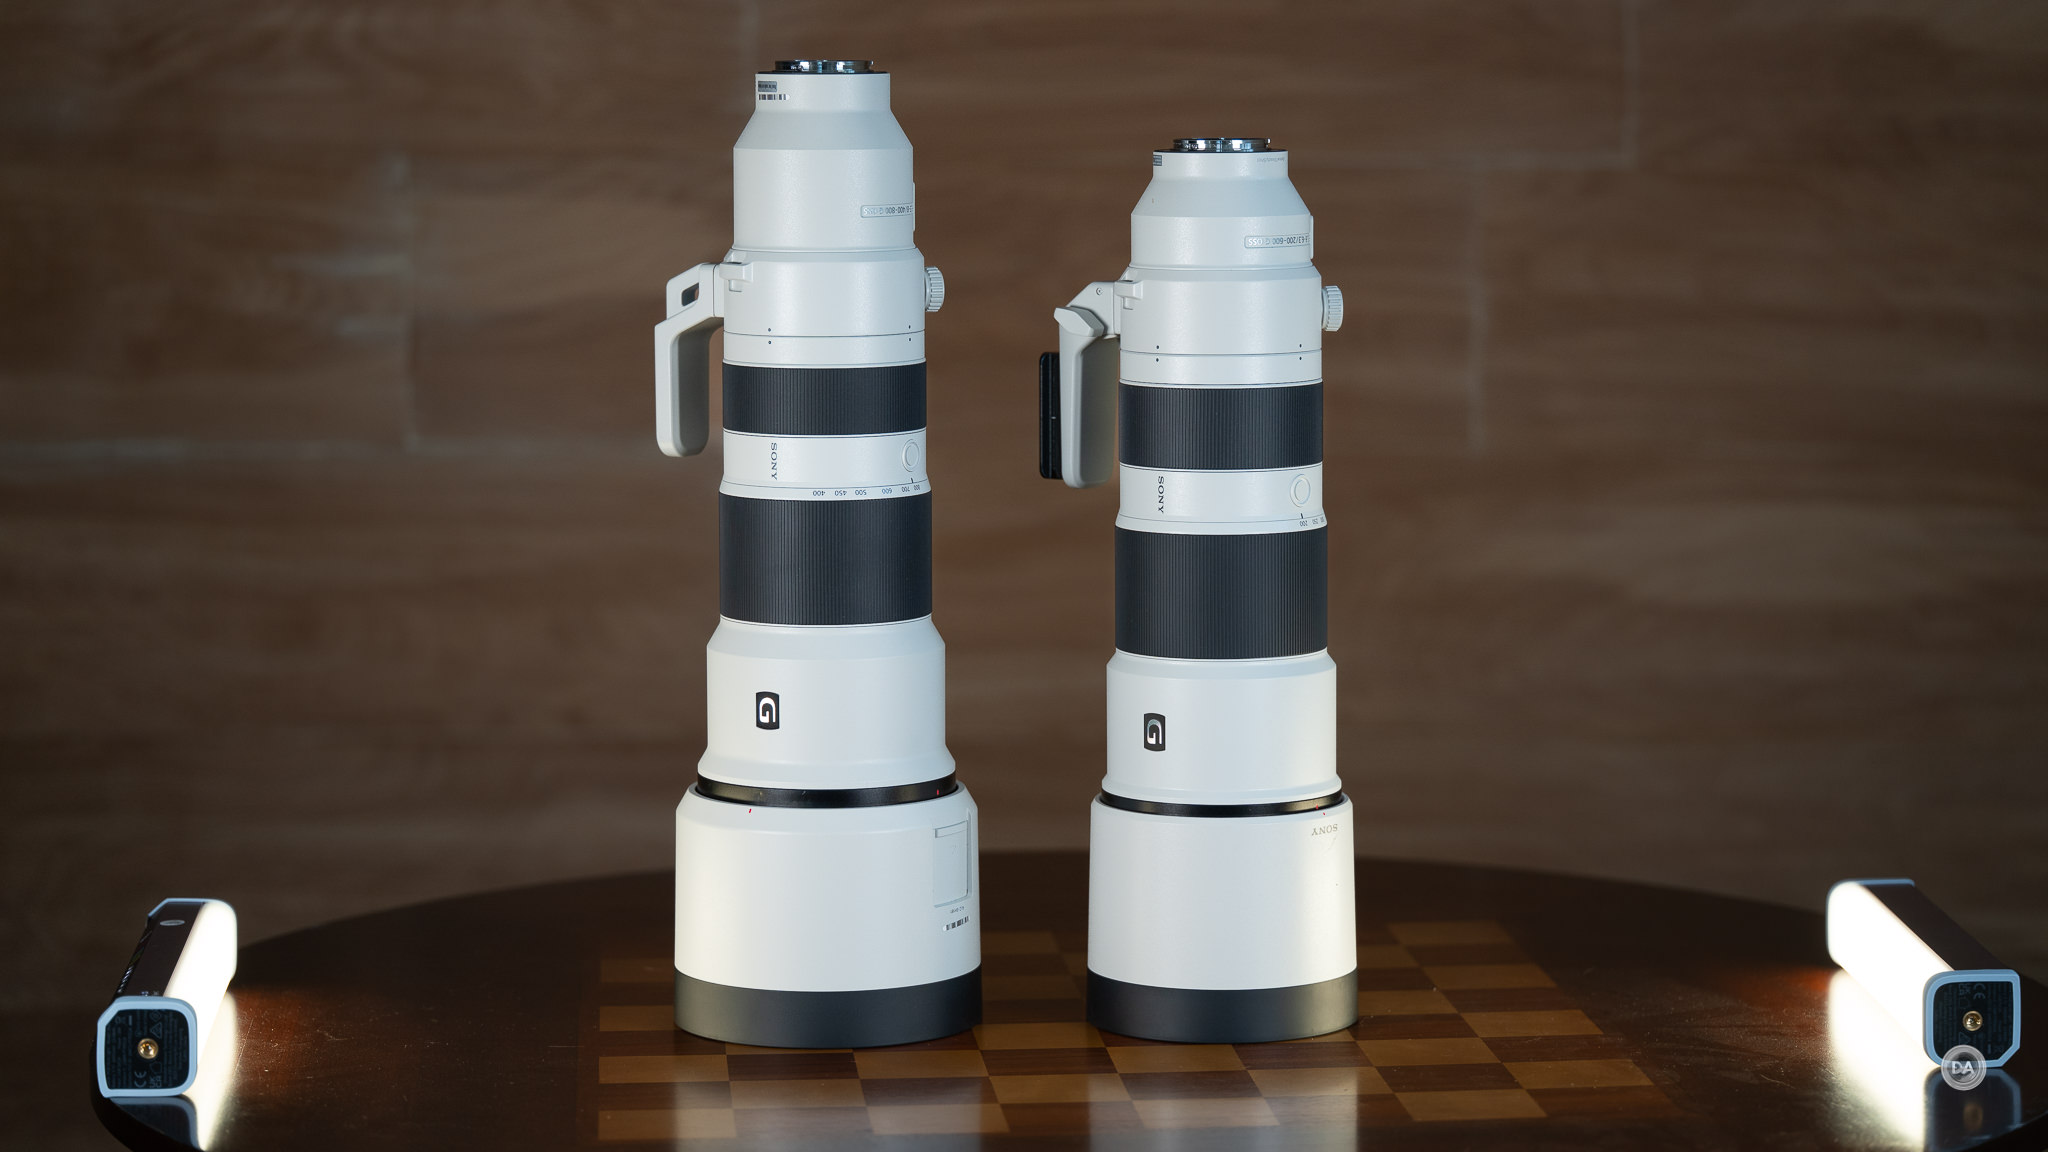
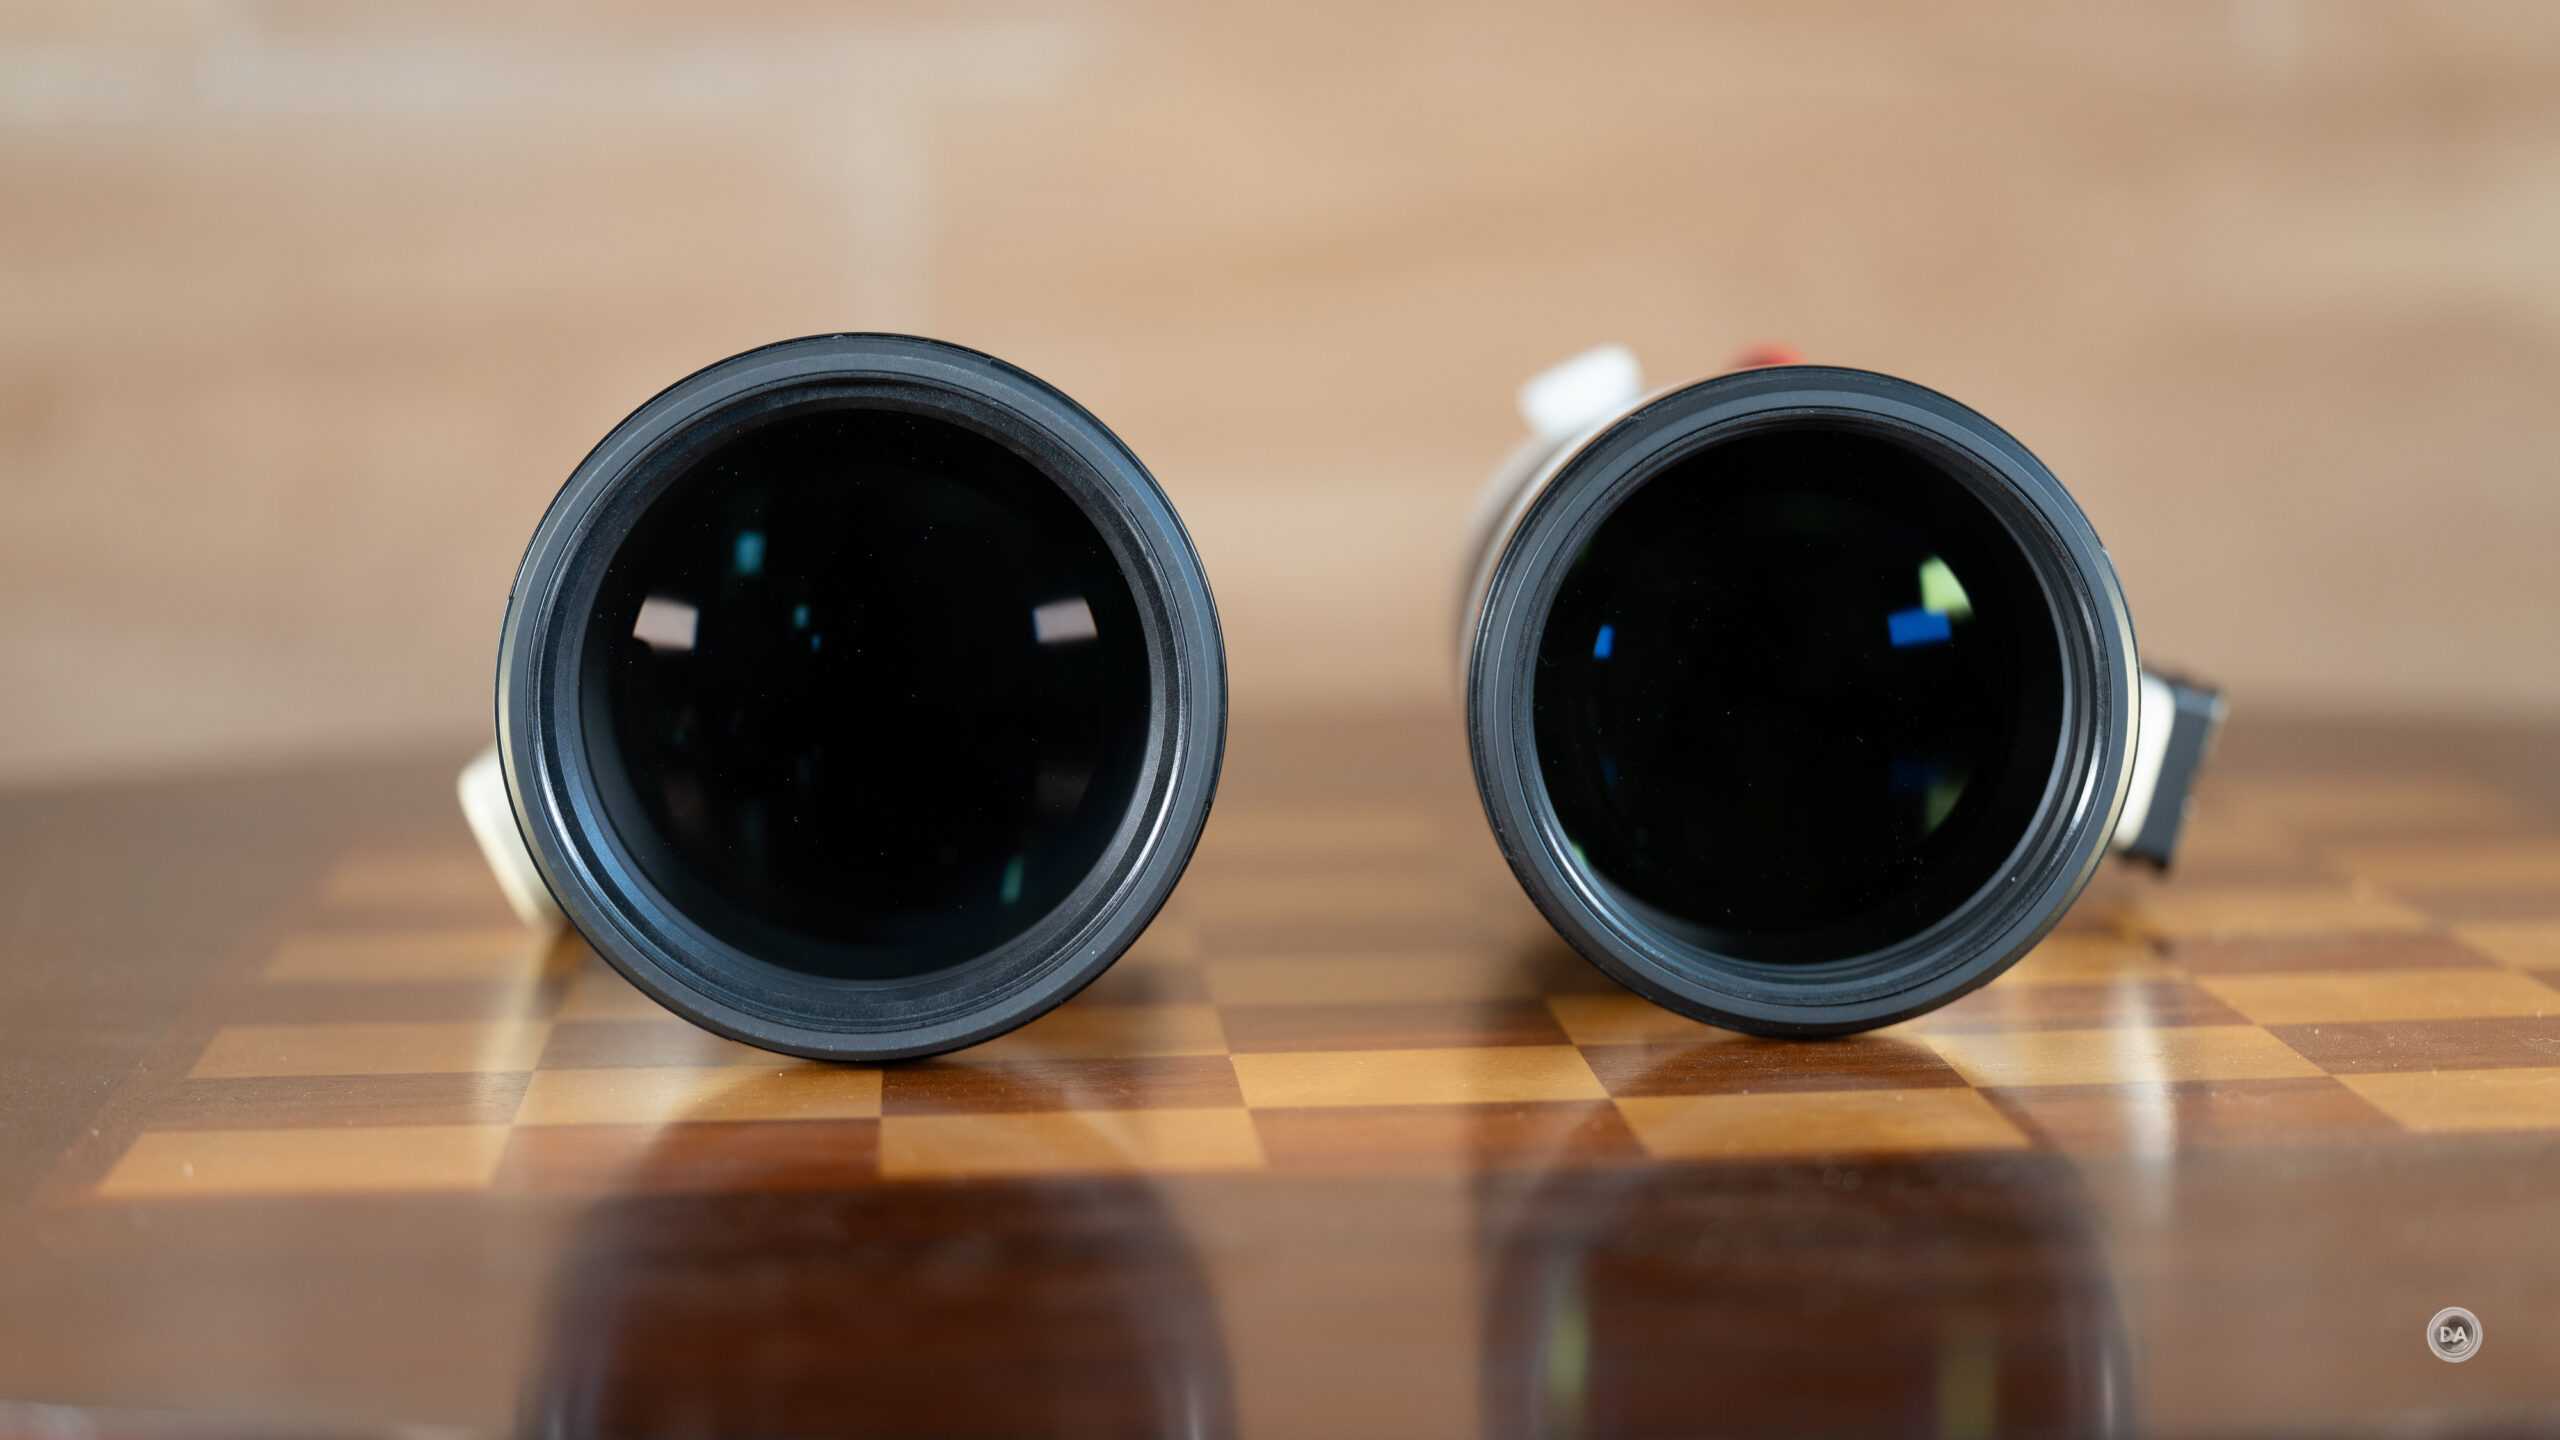
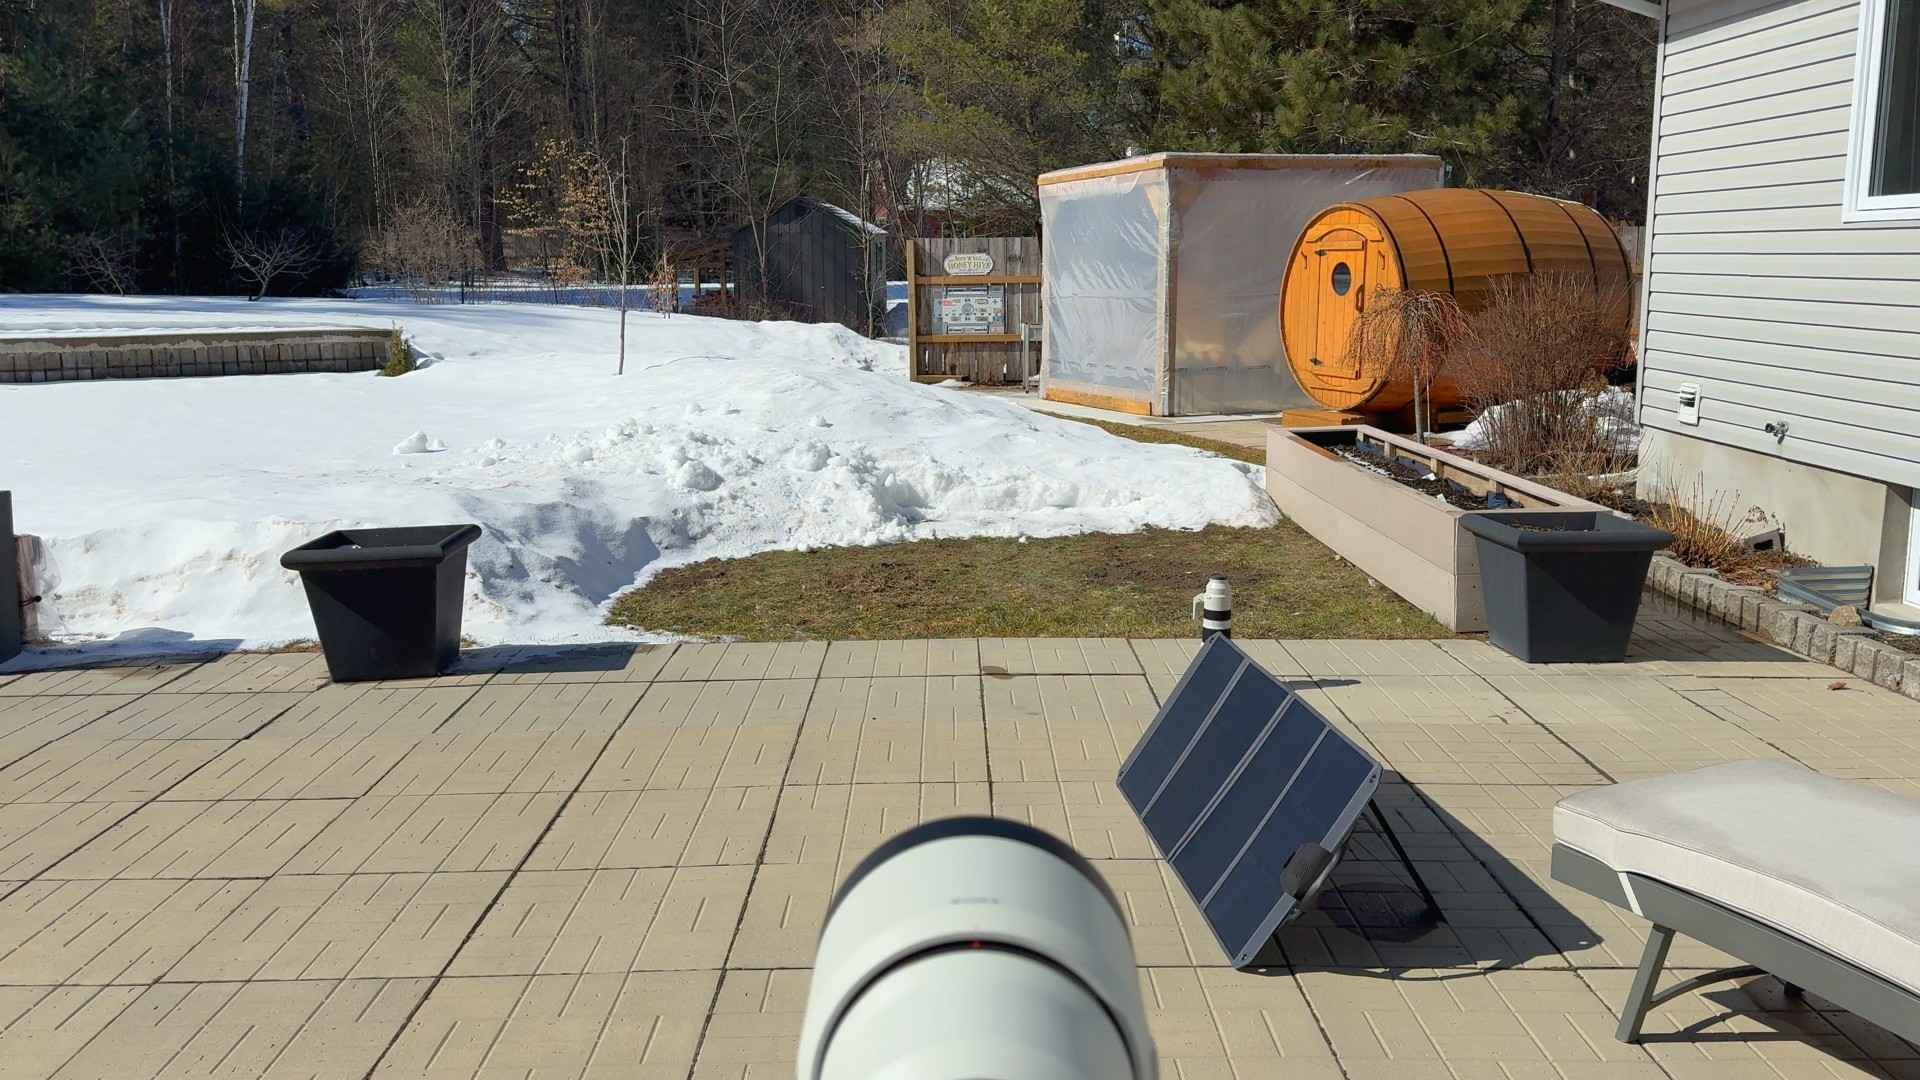
I got two lens loaners from Sony in March of 2025, and they are definitely what you would call two extremes! Here’s what the 16mm G and the 400-800mm G look like side by side:
Ummm, wow! And while that may exaggerate how small the 16mm F1.8 G is, here’s a look at it side by side with the Viltrox:
So yes, it is definitely compact. But that doesn’t mean much if it also isn’t good…which it is! Enjoy the photos in the galleries below!
Keywords: Sony FE 16mm F1.8 G, Sony 16mm G, 16mm F1.8, Sony 16mm F1.8 Revew, 16mm, F1.8, G, Sony 16mm review, Viltrox AF 16mm F1.8, Full Frame, Review, Sony Alpha 1, Sony a7RV, Review, Hands On, Dustin Abbott, Real World, Comparison, Sharpness, Bokeh, Flare Resistance, Autofocus, Image Quality, Sample Images, Video, Photography, let the light in, weathersealing, #letthelightin, DA
DISCLAIMER: This article and description contains affiliate links, which means that if you click on one of the product links, I’ll receive a small commission. As an Amazon Associate I earn from qualifying purchases.
In May of 2023 I reviewed a lens that I was very excited about. Viltrox had released a next level 16mm F1.8 autofocus lens for Sony FE, and it fill a niche previously unfilled on FE – a high quality, fast prime lens at 16mm…and even better, it was very affordable. That lens has sold a lot of copies over the past few years on first Sony FE and then Nikon Z, but its time in the spotlight may be coming to an end. Sony has now released their answer to the Viltrox, and it is smaller, lighter, wider, and even higher performing…and only costs about $220 more. The new Sony FE 16mm F1.8 G takes the formula that I loved in the FE 20mm F1.8 G and takes it wider. The 16mm F1.8 G is a lens that I quickly fell in love with…and we’ll explore the reasons why in both the video review and the text review shared here.
Thanks to Sony USA for sending me a review loaner of this lens. As always, this is a completely independent review. *The tests and most of the photos that I share as a part of my review cycle have been done with the Sony a7RV along with the Sony Alpha 1 that serve as my benchmark cameras for Sony lenses. You can visit the product listing page for the 16mm F1.8 G here.
I got two lens loaners from Sony in March of 2025, and they are definitely what you would call two extremes! Here’s what the 16mm G and the 400-800mm G look like side by side:
Ummm, wow! And while that may exaggerate how small the 16mm F1.8 G is, here’s a look at it side by side with the Viltrox:
So yes, it is definitely compact. But that doesn’t mean much if it also isn’t good. We’ll explore the answer to that question in this review.
Build and Handling
Sony’s G series hits what I consider to be a sweet spot for their lenses. These lenses are typically well made, have a good set of features, perform well optically, but, perhaps most importantly, are reasonably priced.
I’ve really felt like the 20mm F1.8 G has been one of Sony’s underrated gems since its release. It had the misfortune to release just about the time that the COVID 19 pandemic went global, which probably muted its introduction. The 16mm F1.8 G should have no such issues, and I suspect this should be a very popular lens for Sony long term.
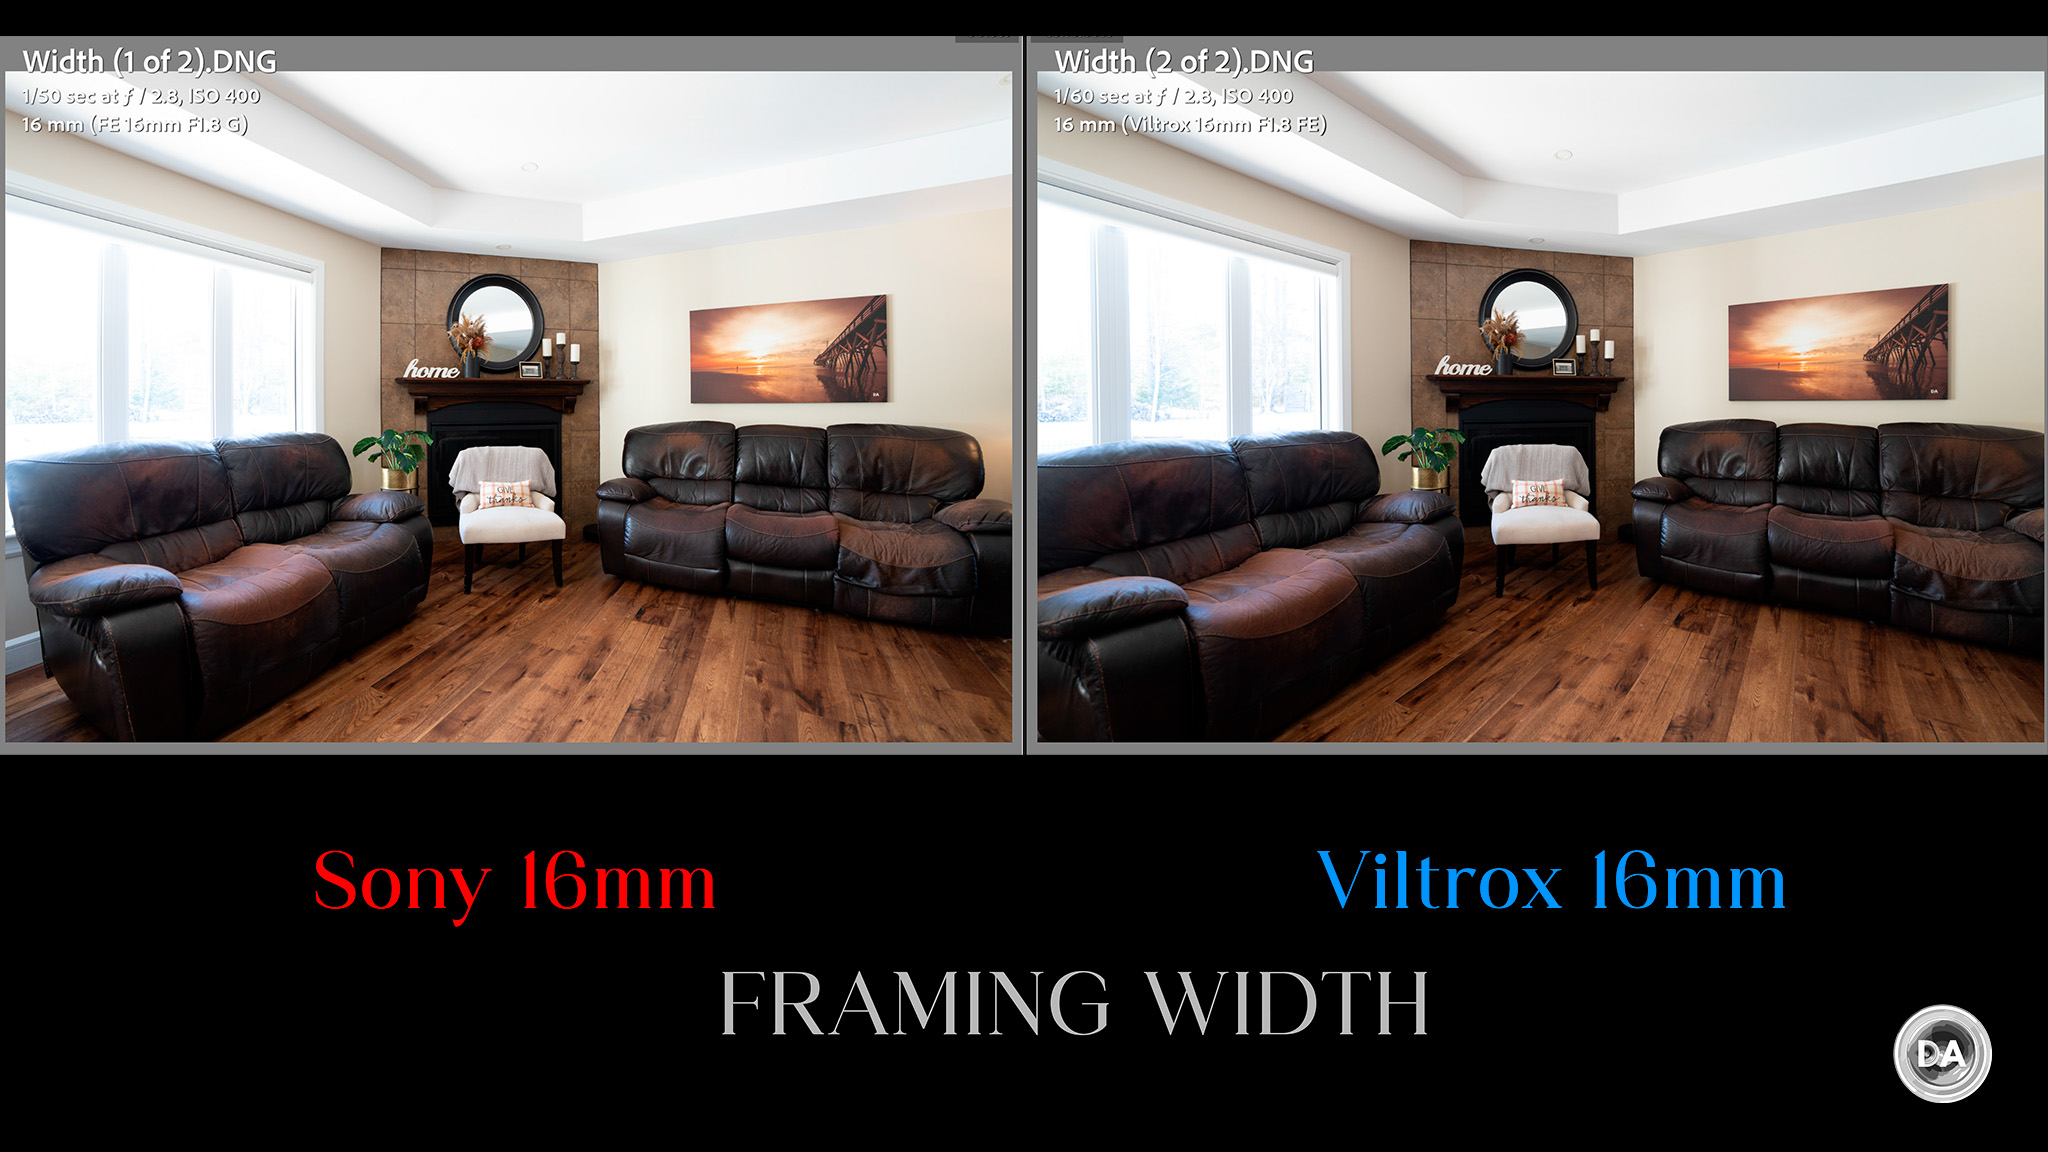
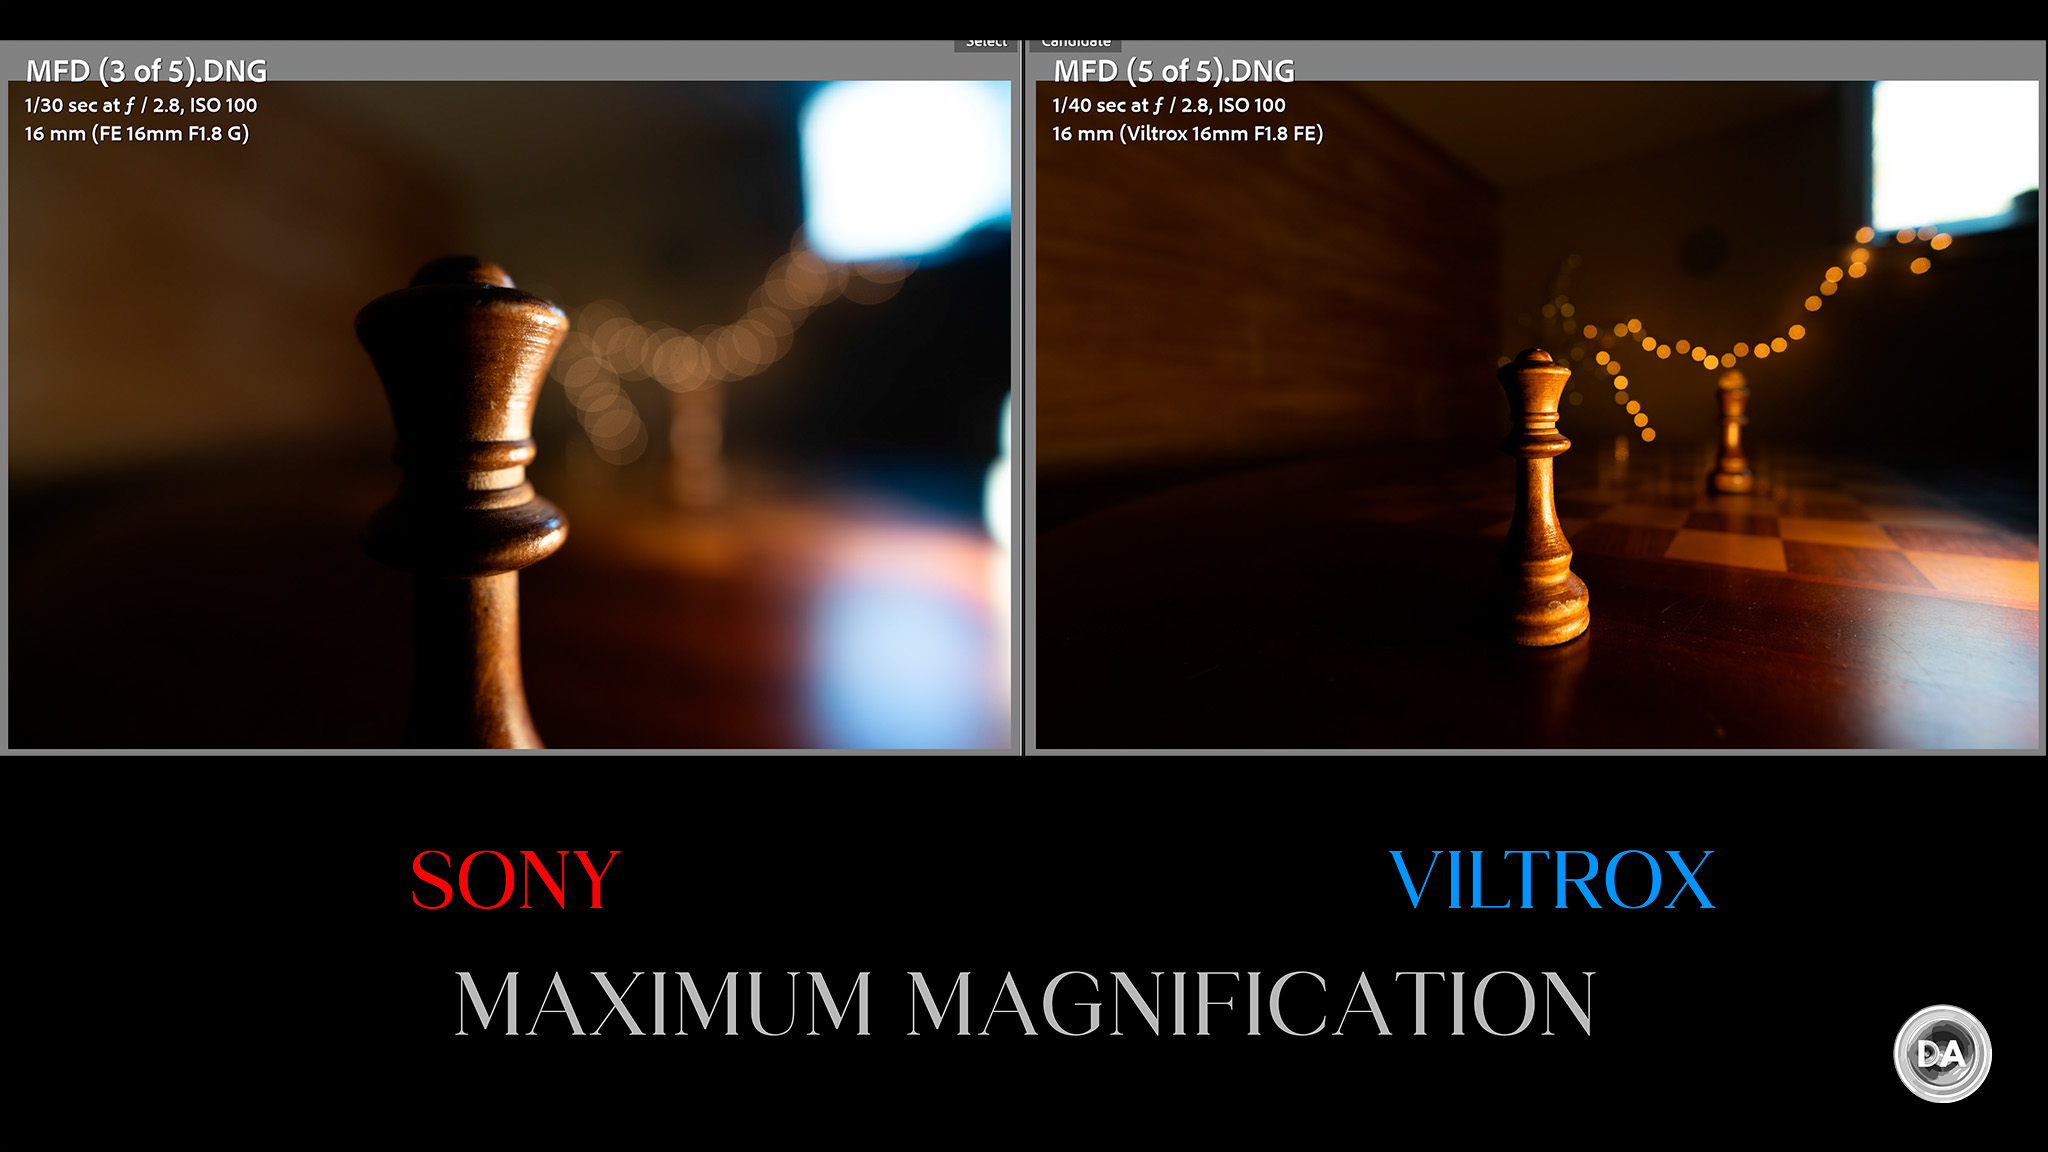
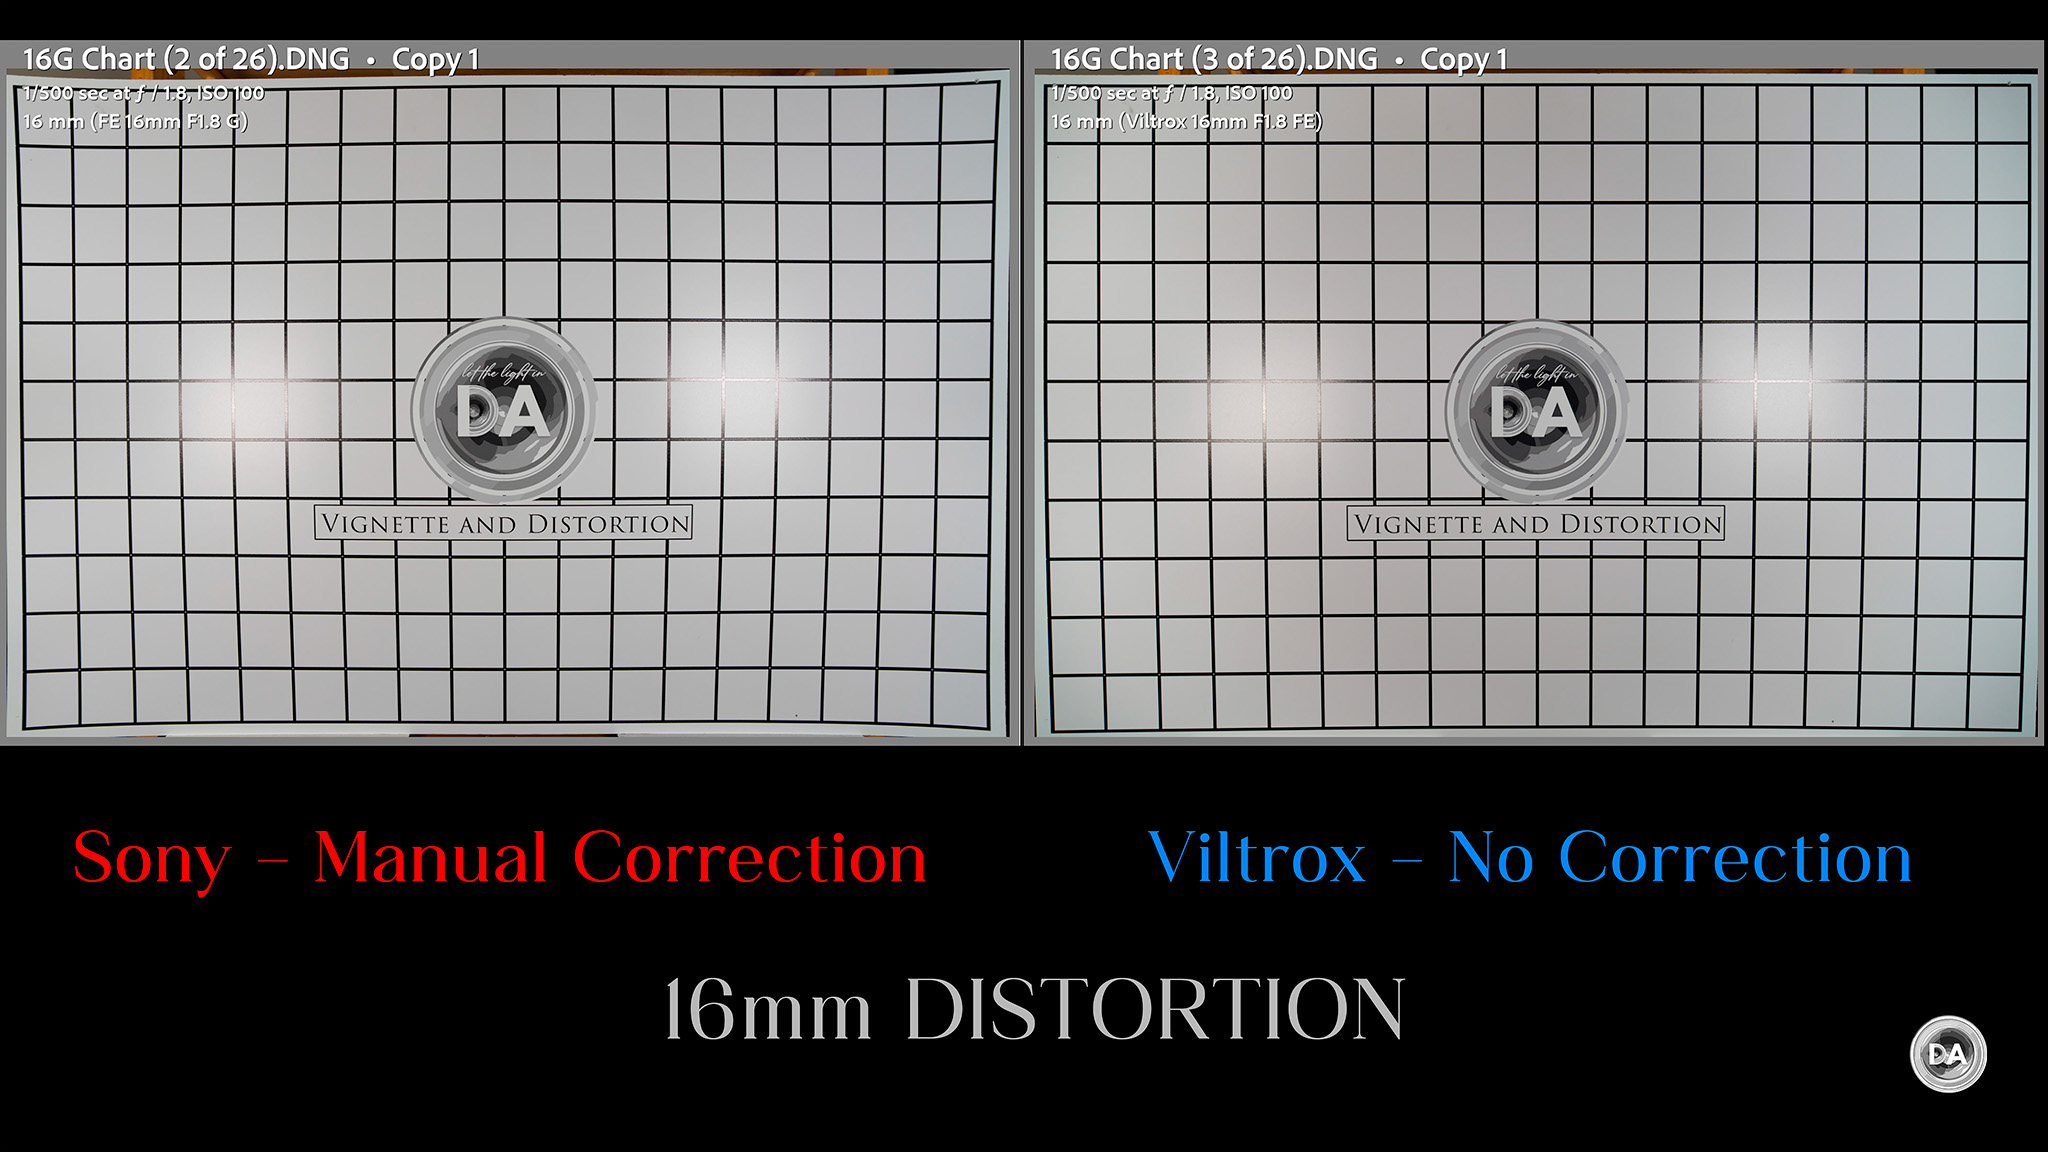
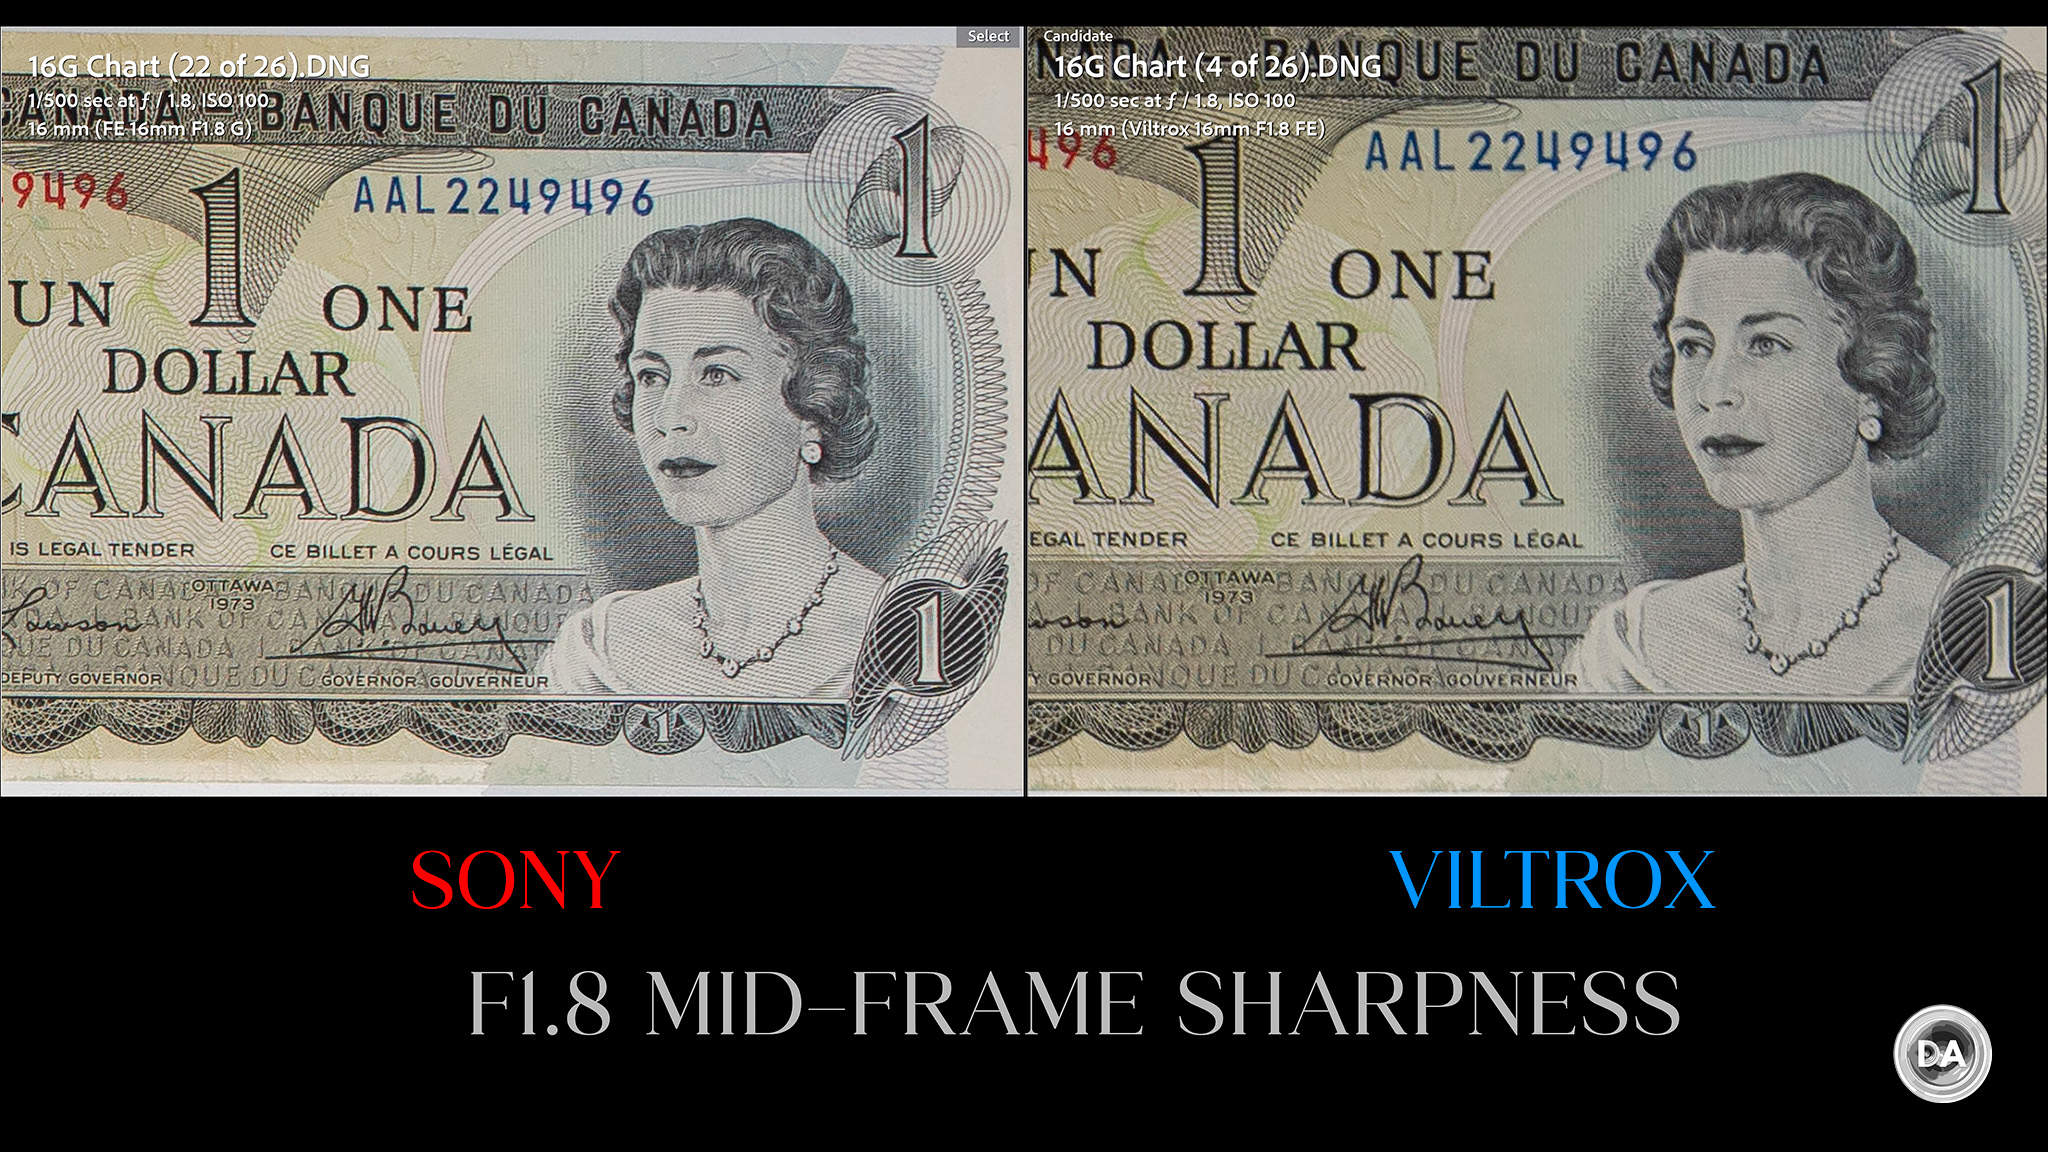
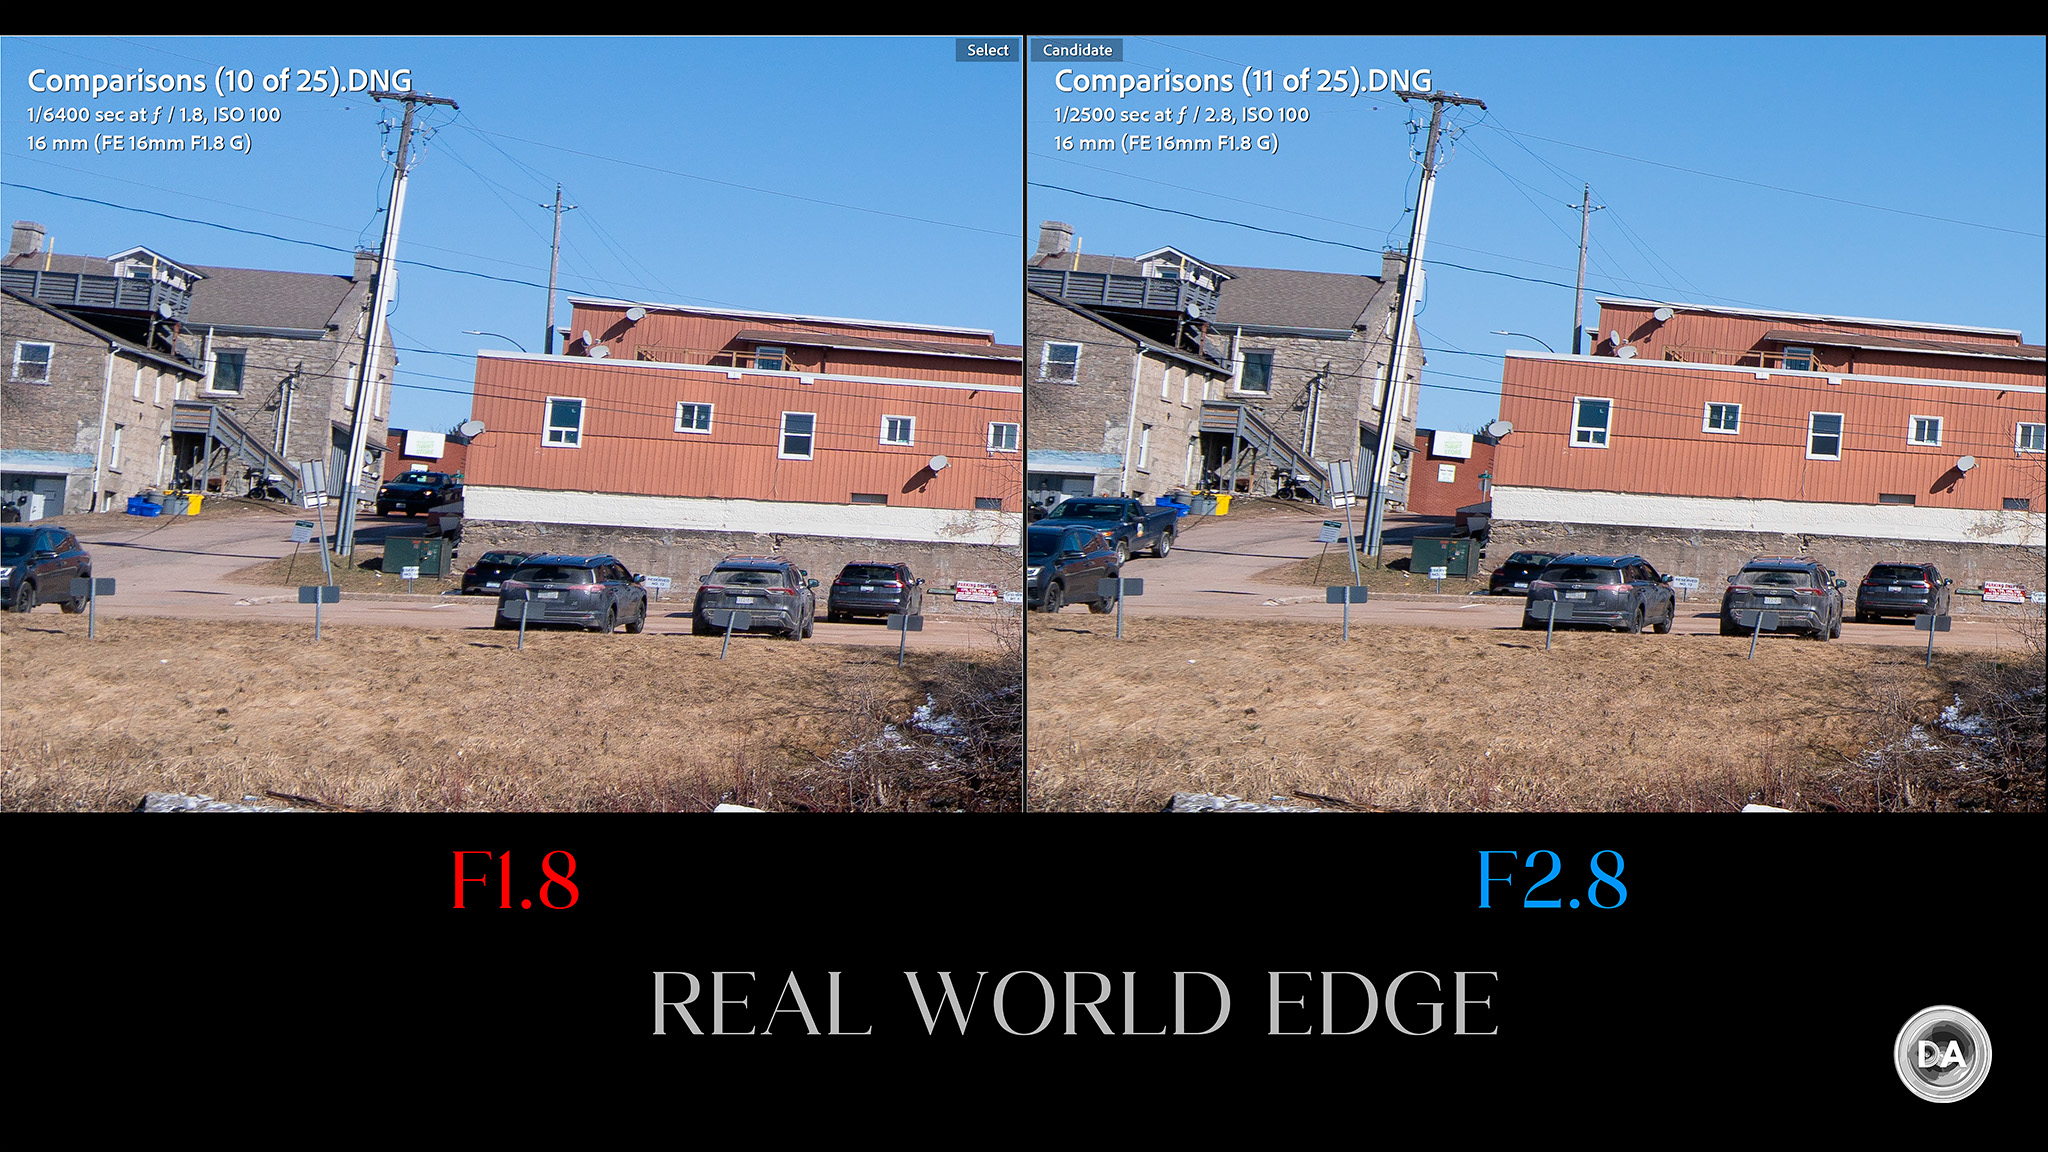
16mm is a wide focal length, allowing you to get a lot in the frame, but it isn’t so extreme as to become more difficult to compose with like 14mm or wider lenses. What I found as I compared the Sony to the Viltrox in a variety of tests was that the Sony is actually a fair bit wider than the Viltrox. Take a look at this comparison:
That’s a pretty significant difference. I went and looked at the listing for both lenses, and sure enough, the Sony’s specification is 107° while the Viltrox is rated at 105.6°. A good rule of thumb in this day of high resolution cameras is that wider is better. It’s easy to crop in a bit, but much harder to crop out!
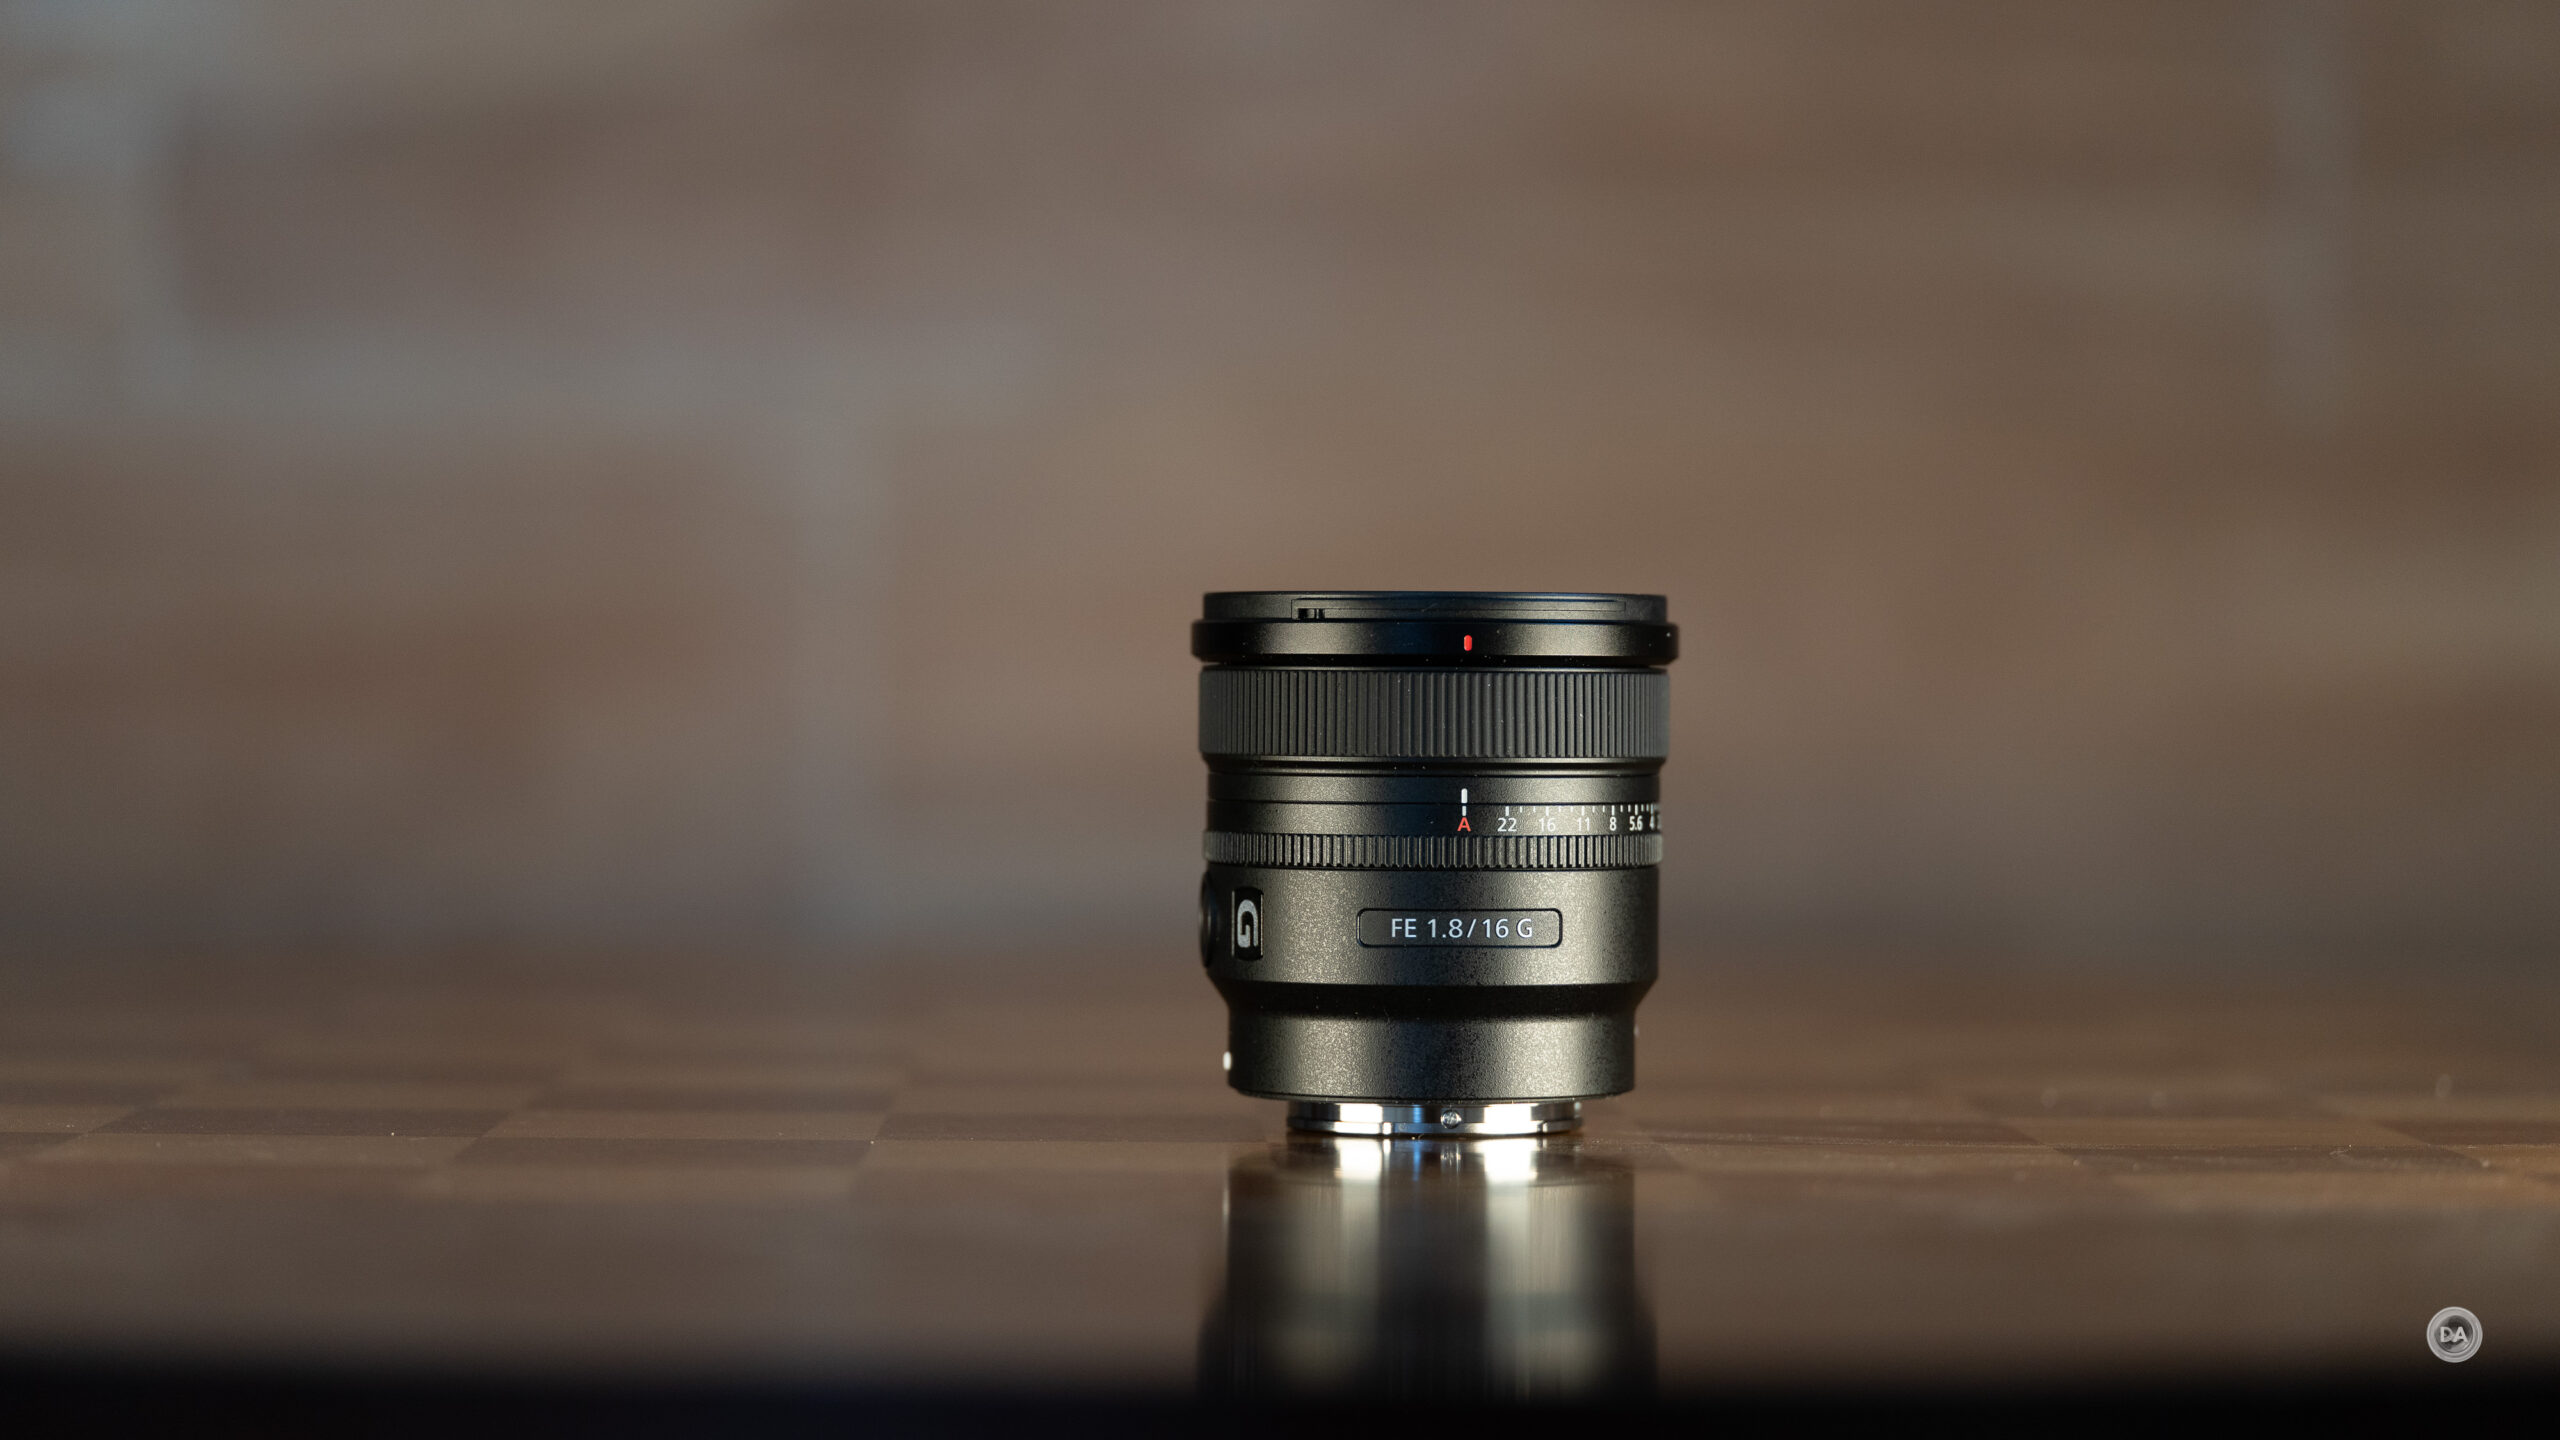
So how small is the 16mm F1.8 G?
The answer is pretty small. It is just 73.8mm (2.91″) in diameter and 75mm (3″) in length. It weighs in at a lightweight 304g, or 10.7oz, making it a full 246g less than the Viltrox. I love high quality lenses that also manage to be very small, as it means that they are far more likely to go into my bag when I’m planning for a trip or excursion. I don’t mind shooting with big lenses if I’m staying close, but small and light is better if I’m traveling.
The front filter size is 67mm, which I love, as it is shared with perhaps more lenses than any other on Sony (thanks in large part to Tamron making it their standard).
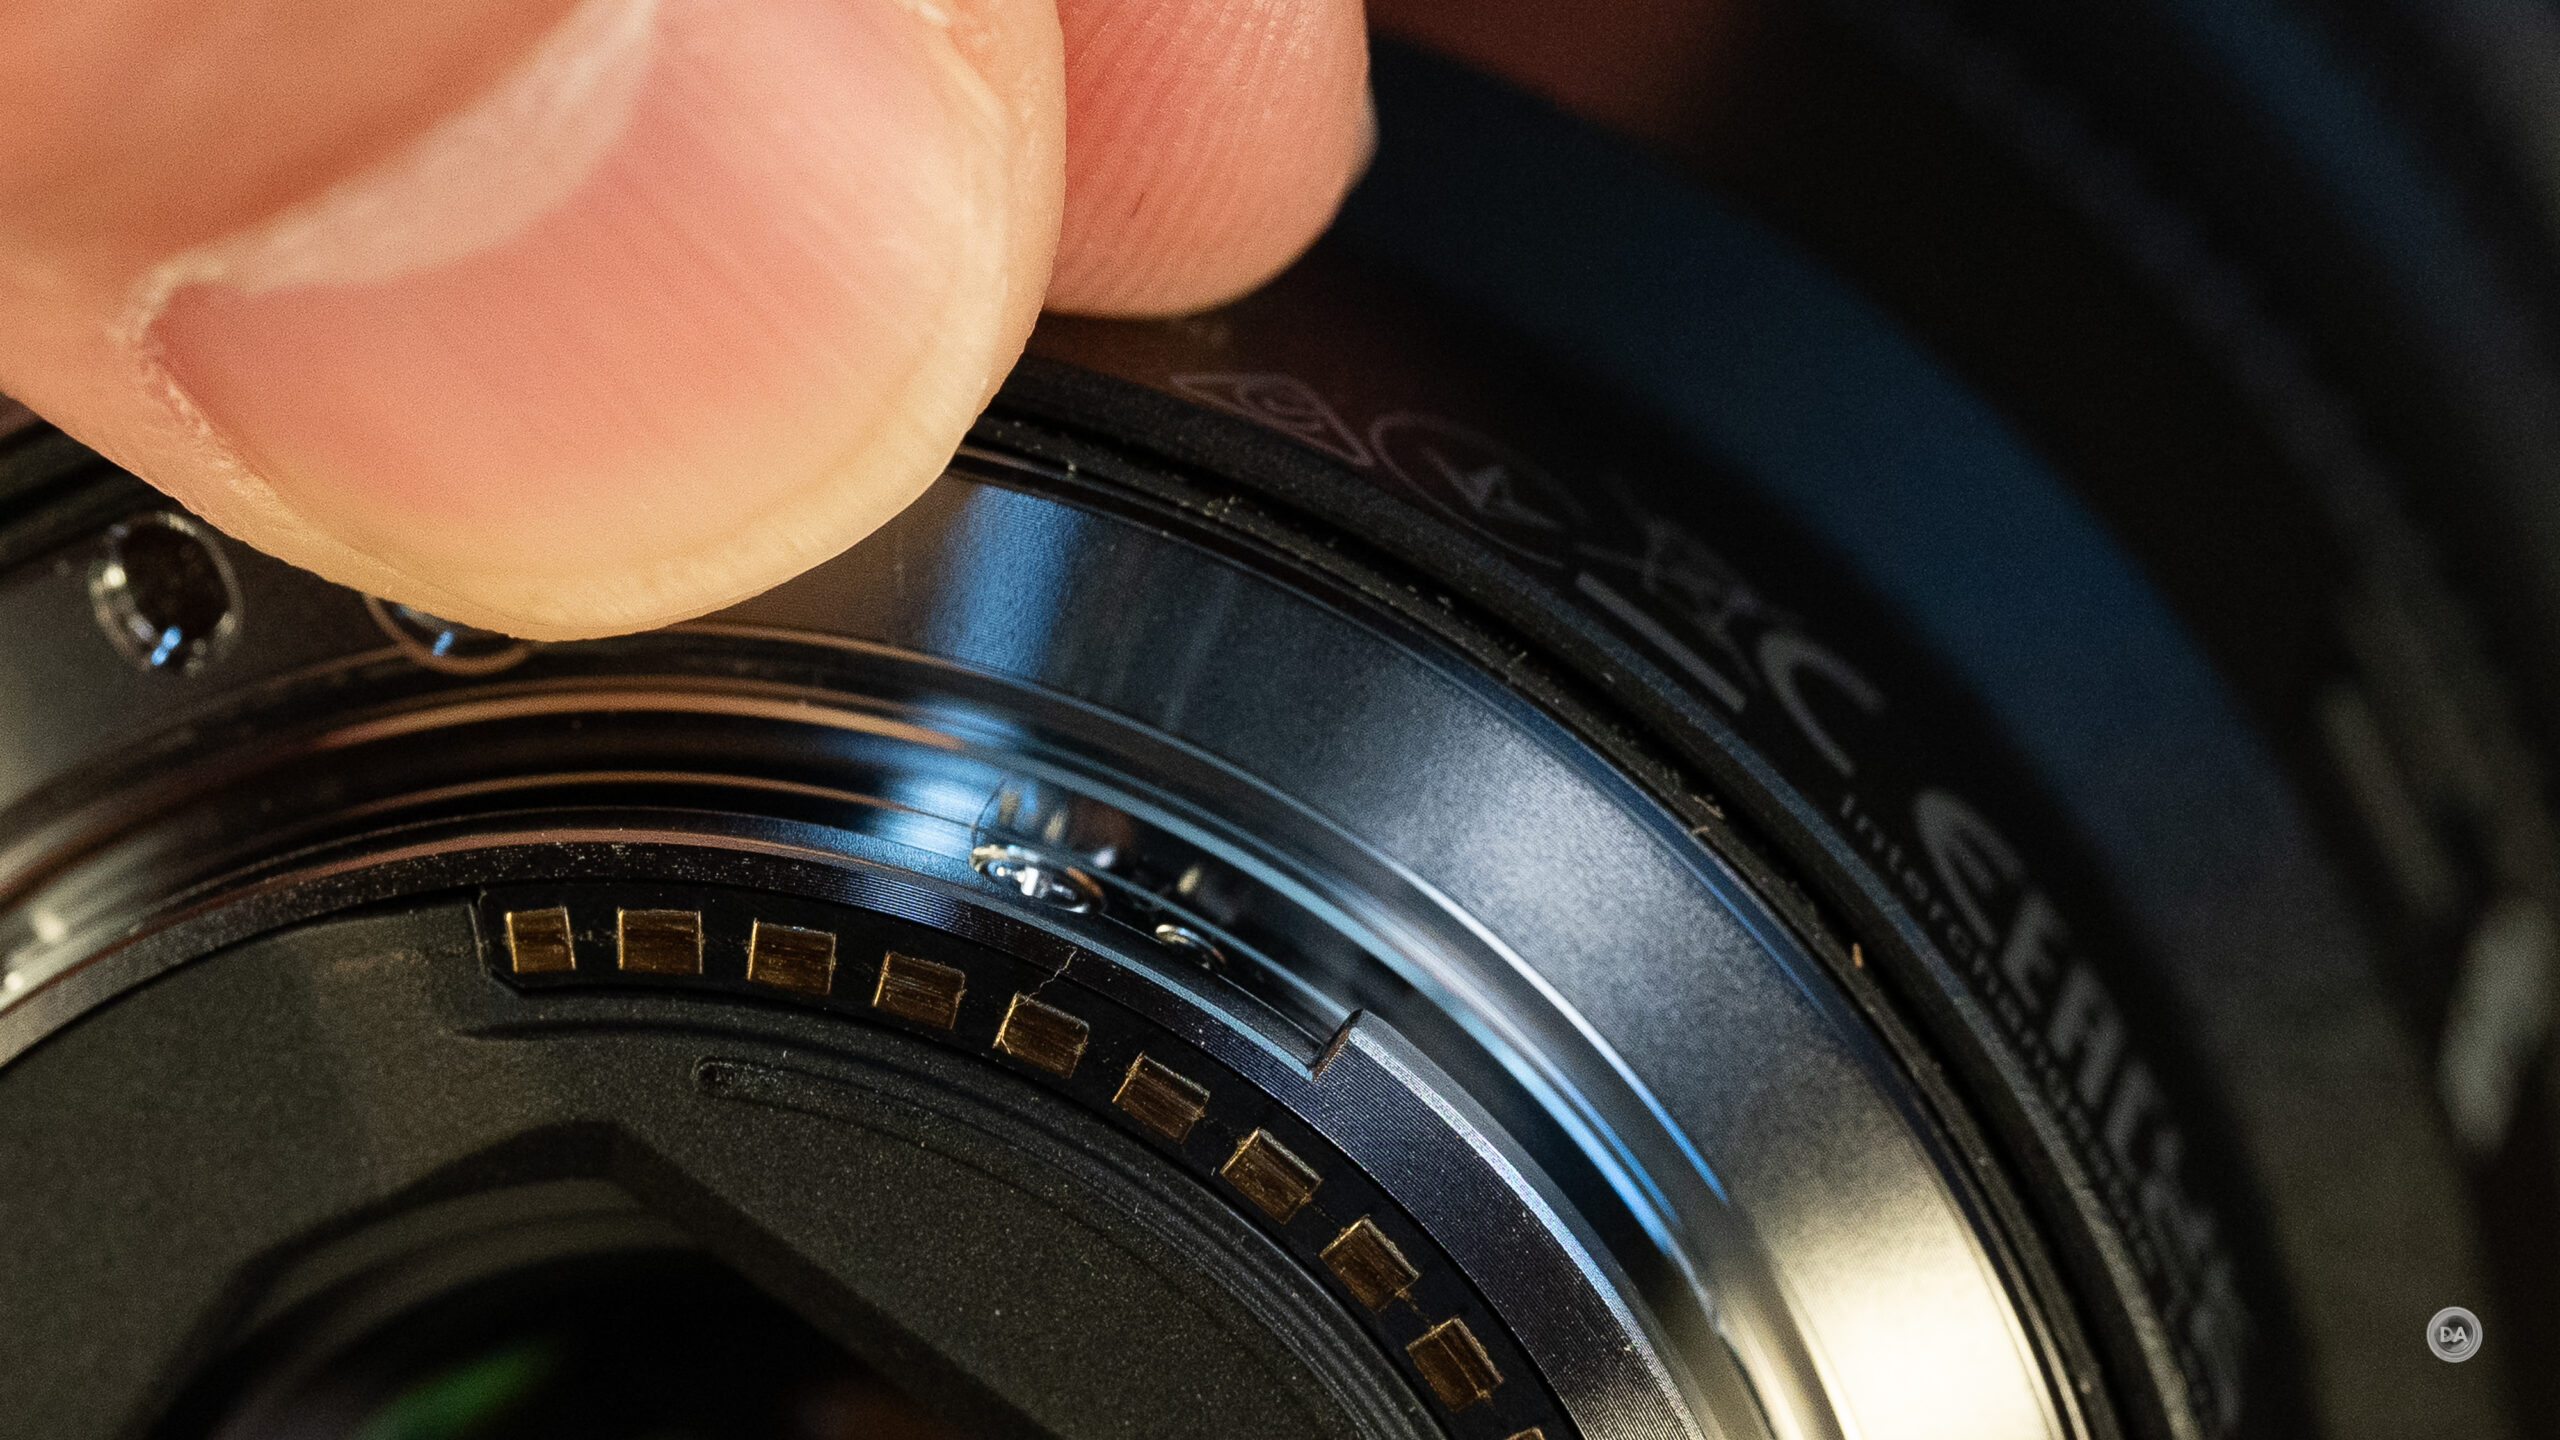
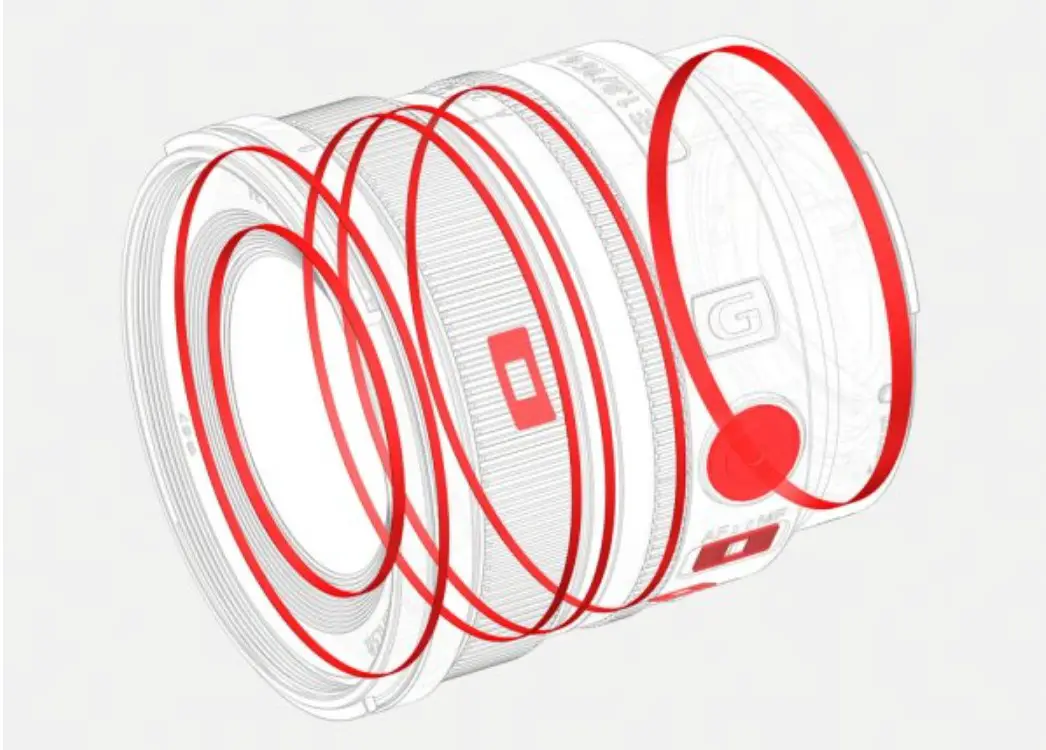
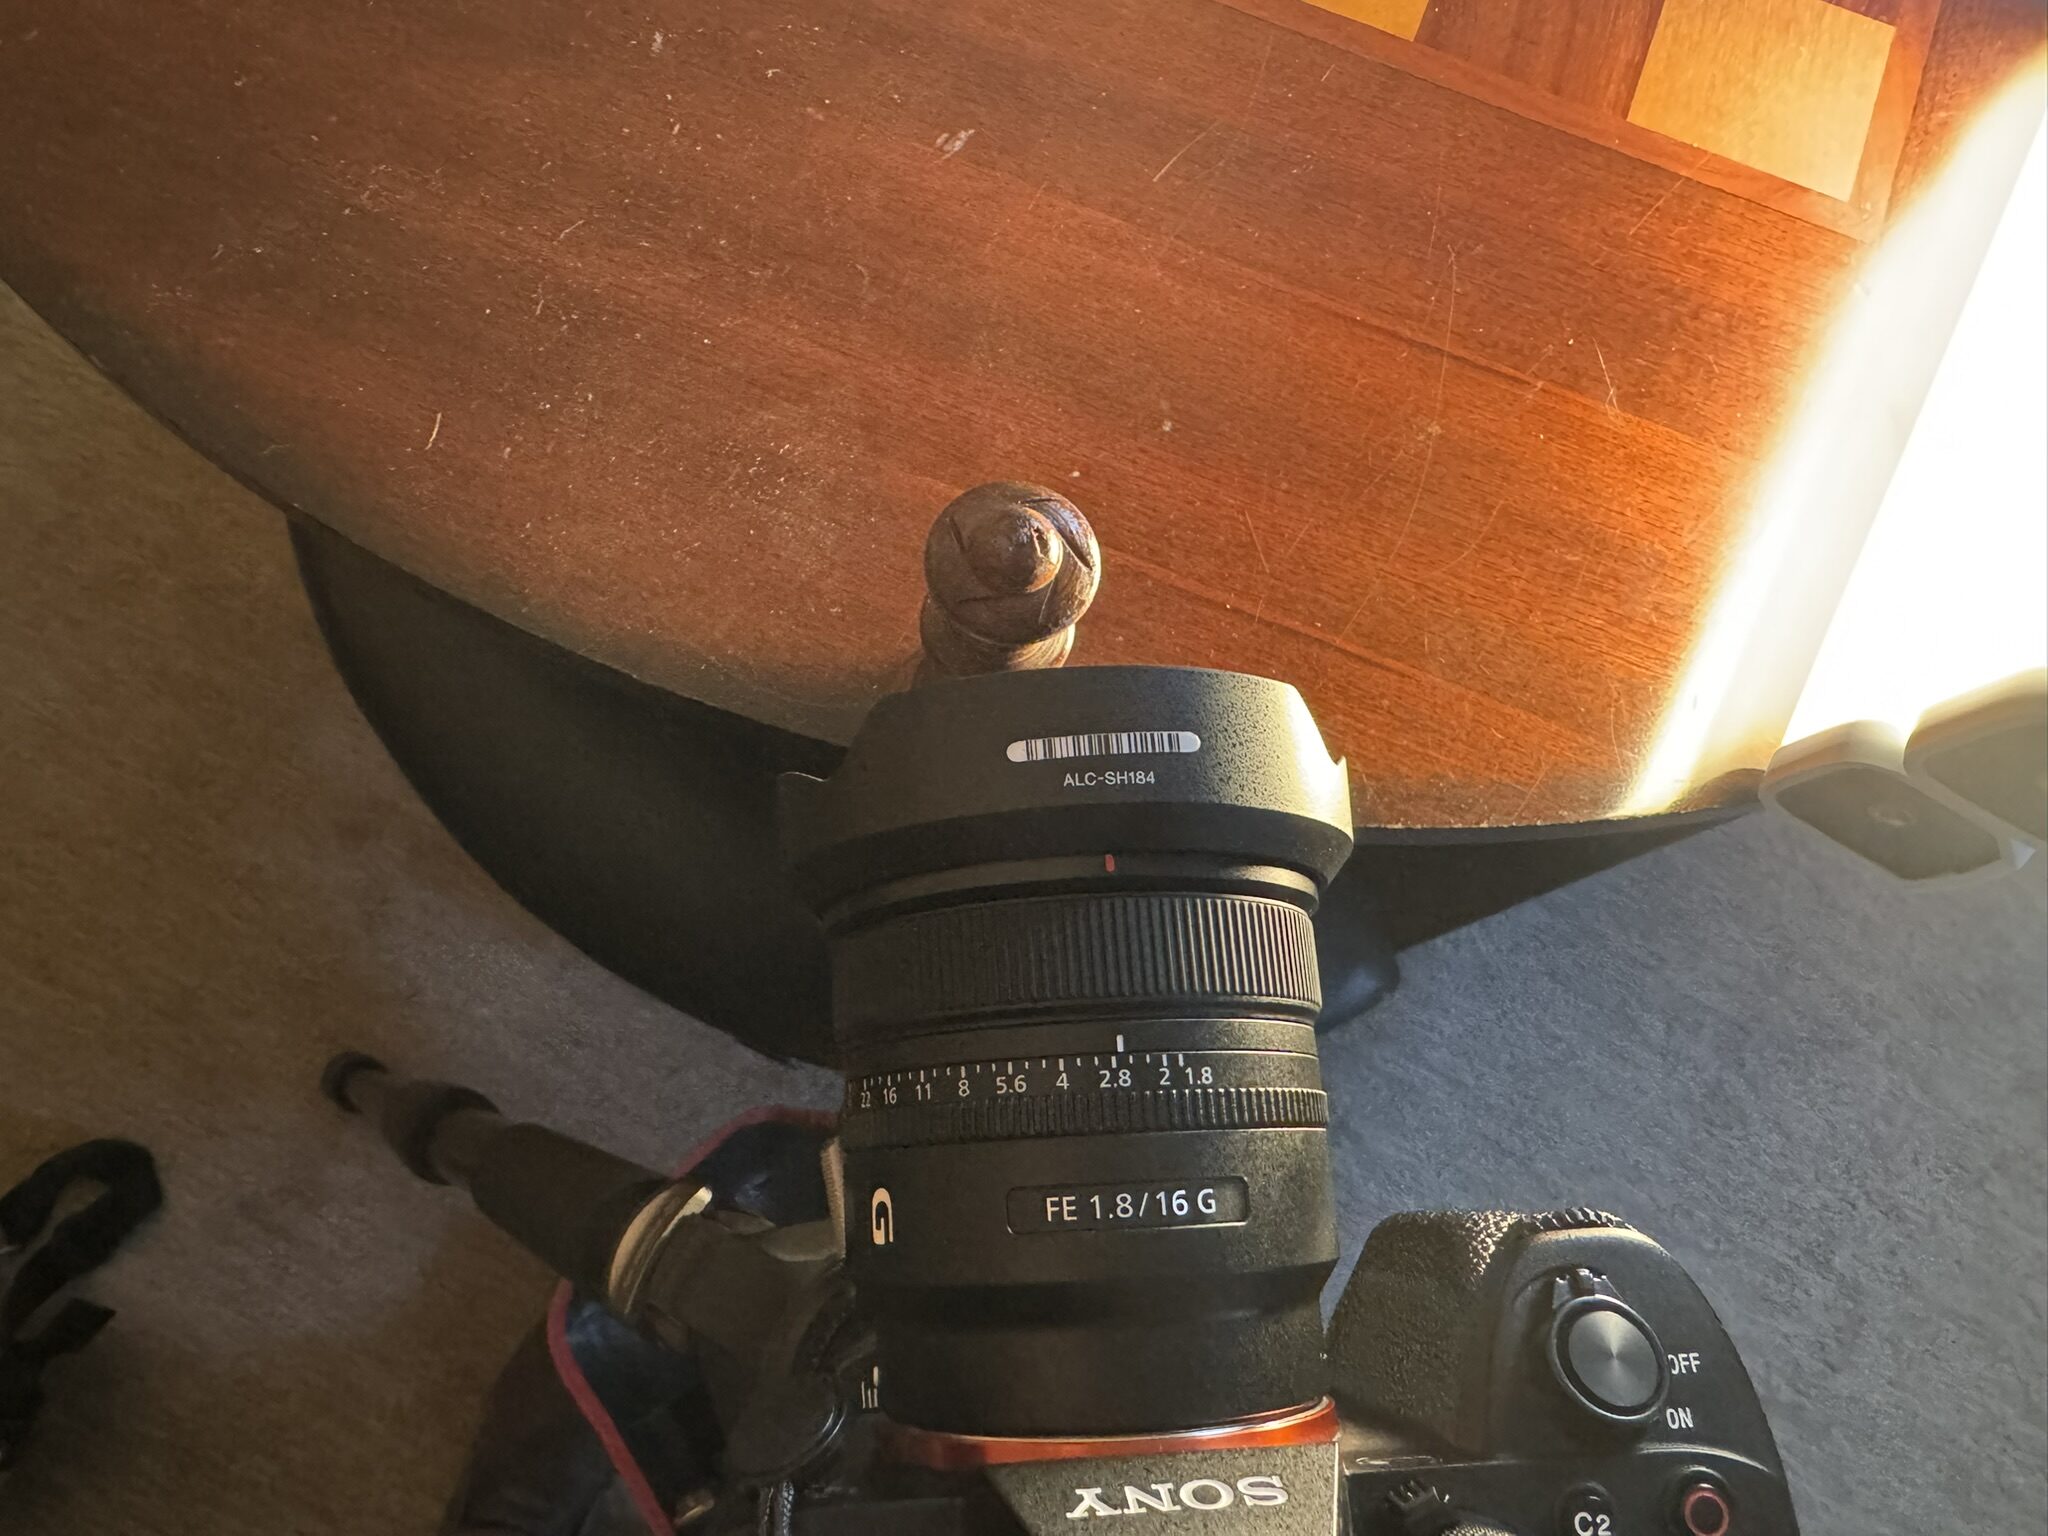
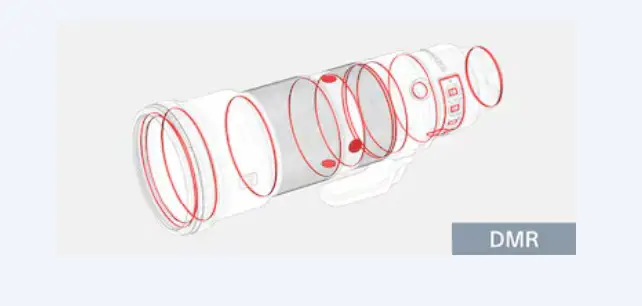
You may not be able to see it, but that front element also has a fluorine coating, which is part of the weather sealing in the design. There is a small gasket at the lens mount, and then, according to Sony, a variety of other seal points throughout the lens. I count a total of ten seals according to the diagram.
That’s fantastic, as wide angle lenses are often going to be used for capturing landscapes. Going out into the world means sometimes facing moist or dusty environments, and the 16mm F1.8 G is equipped to survive them.
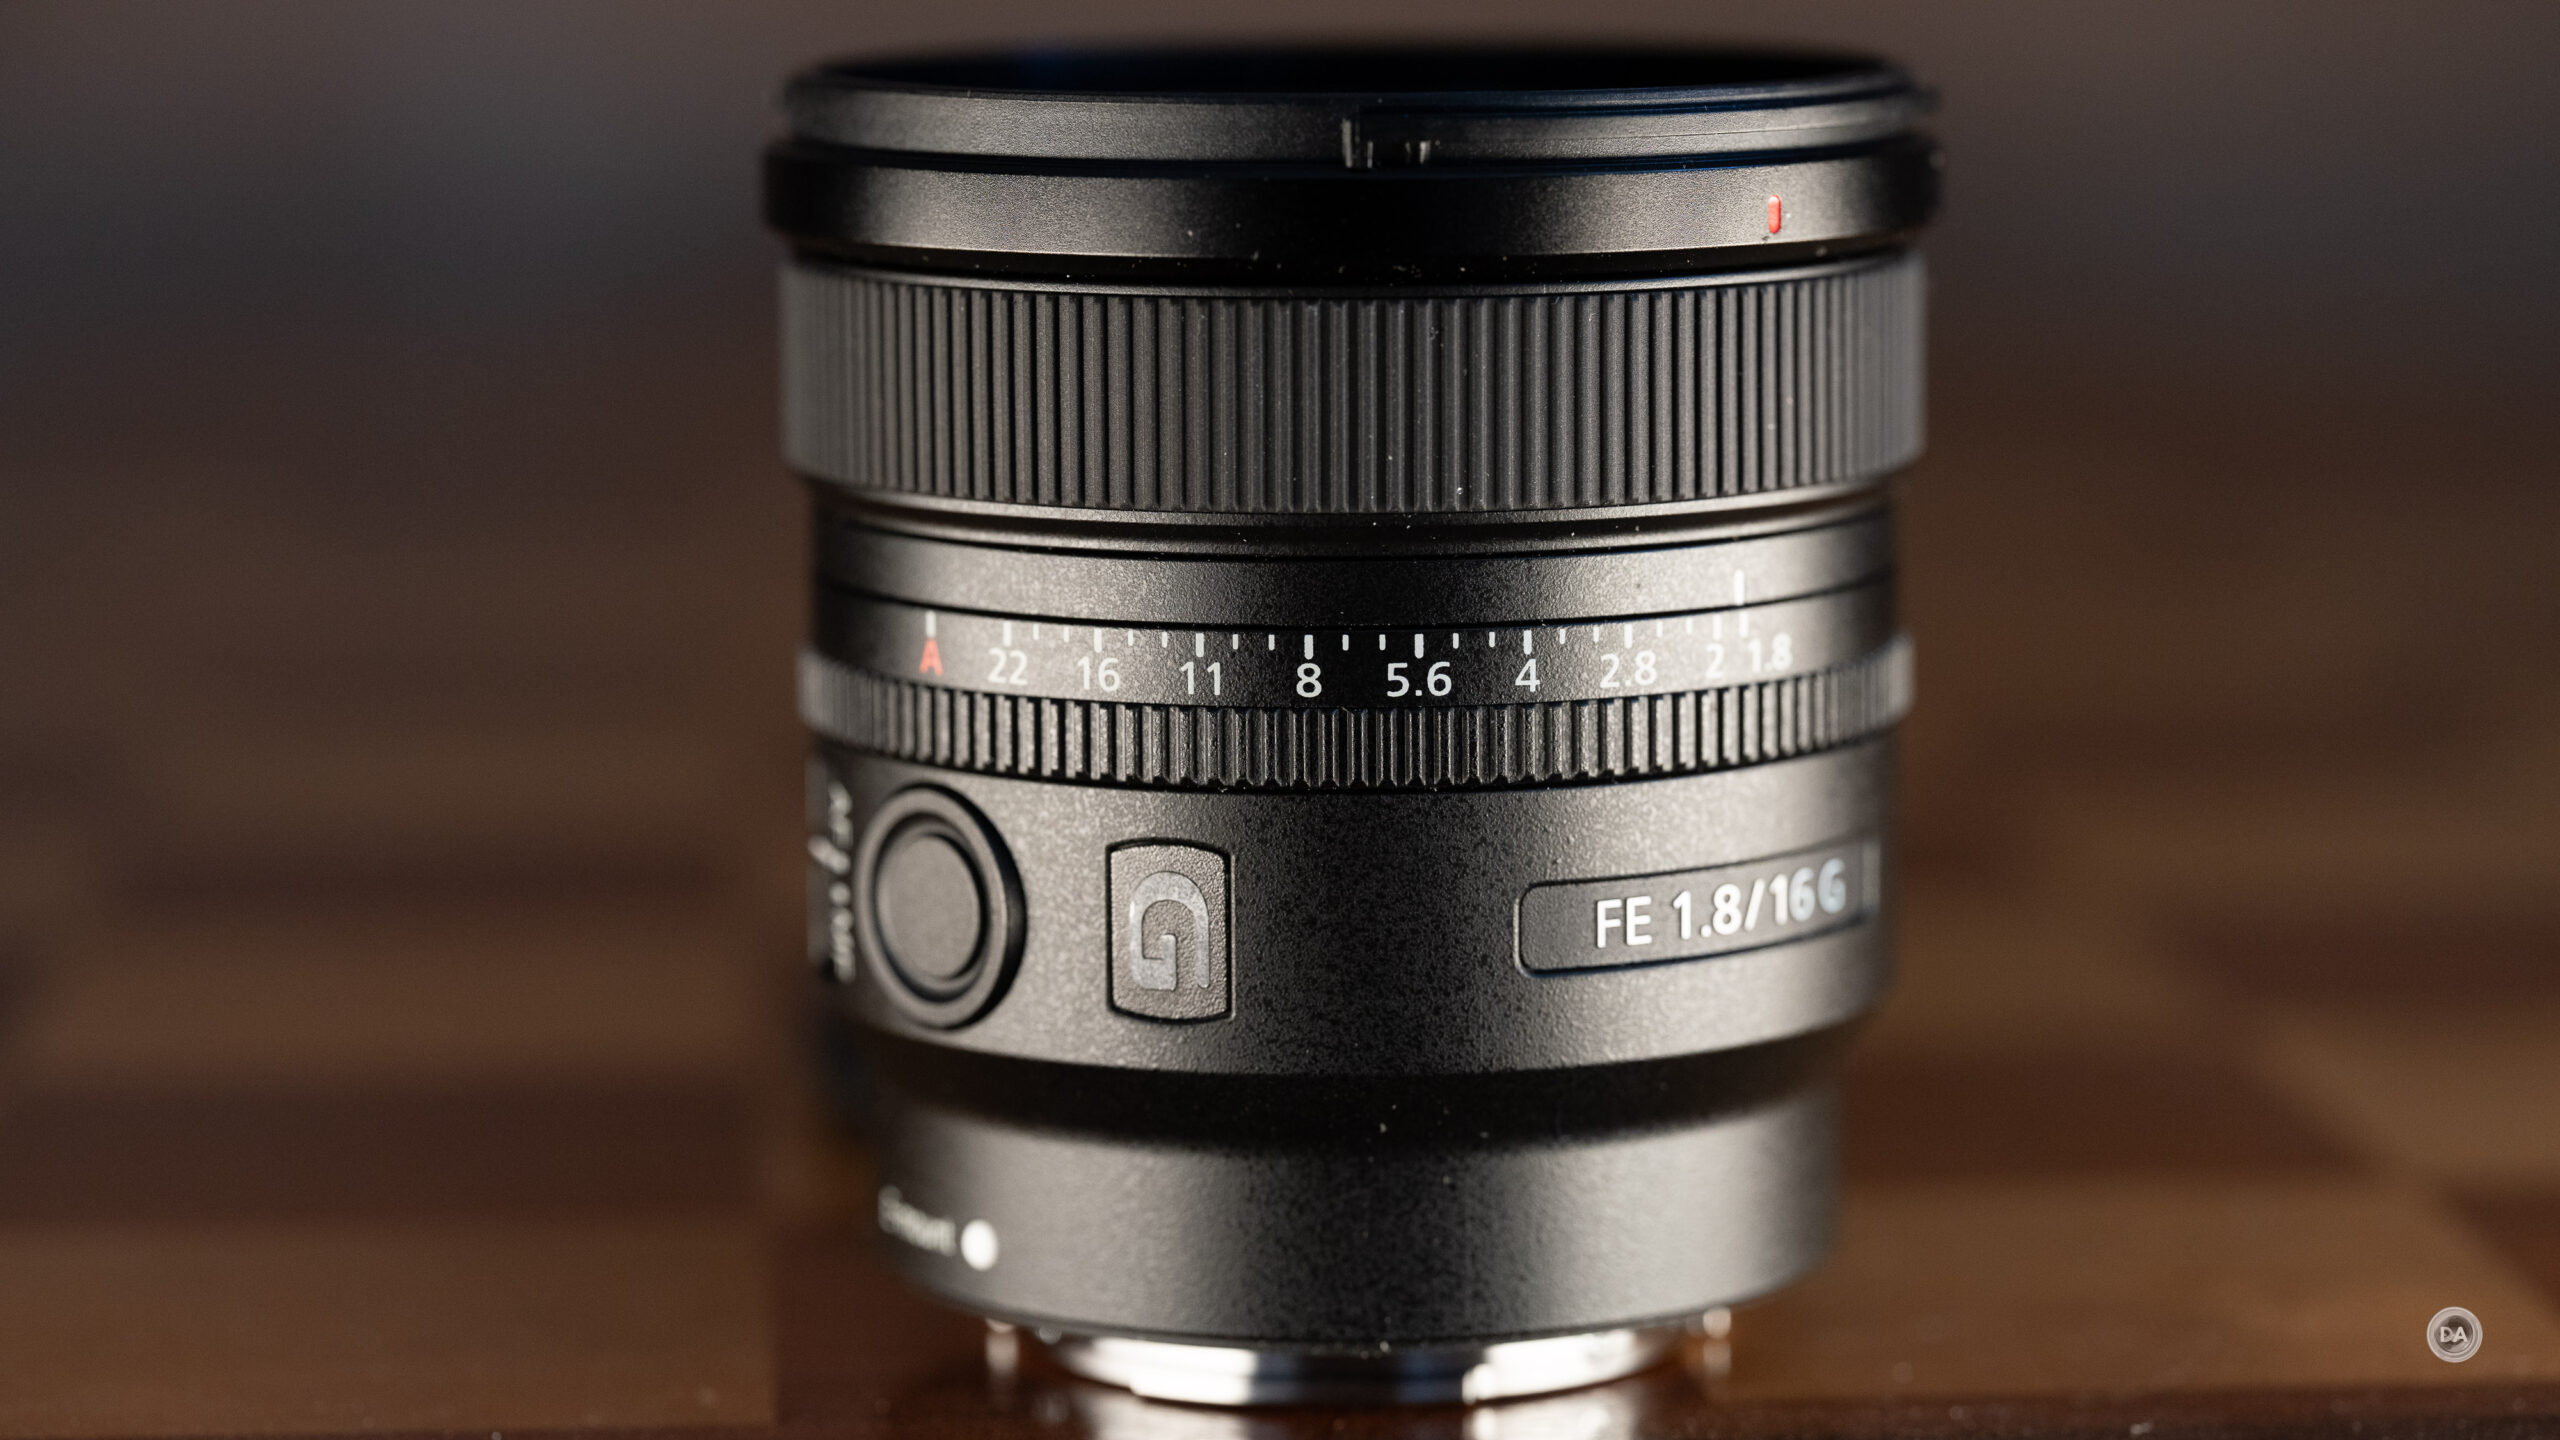
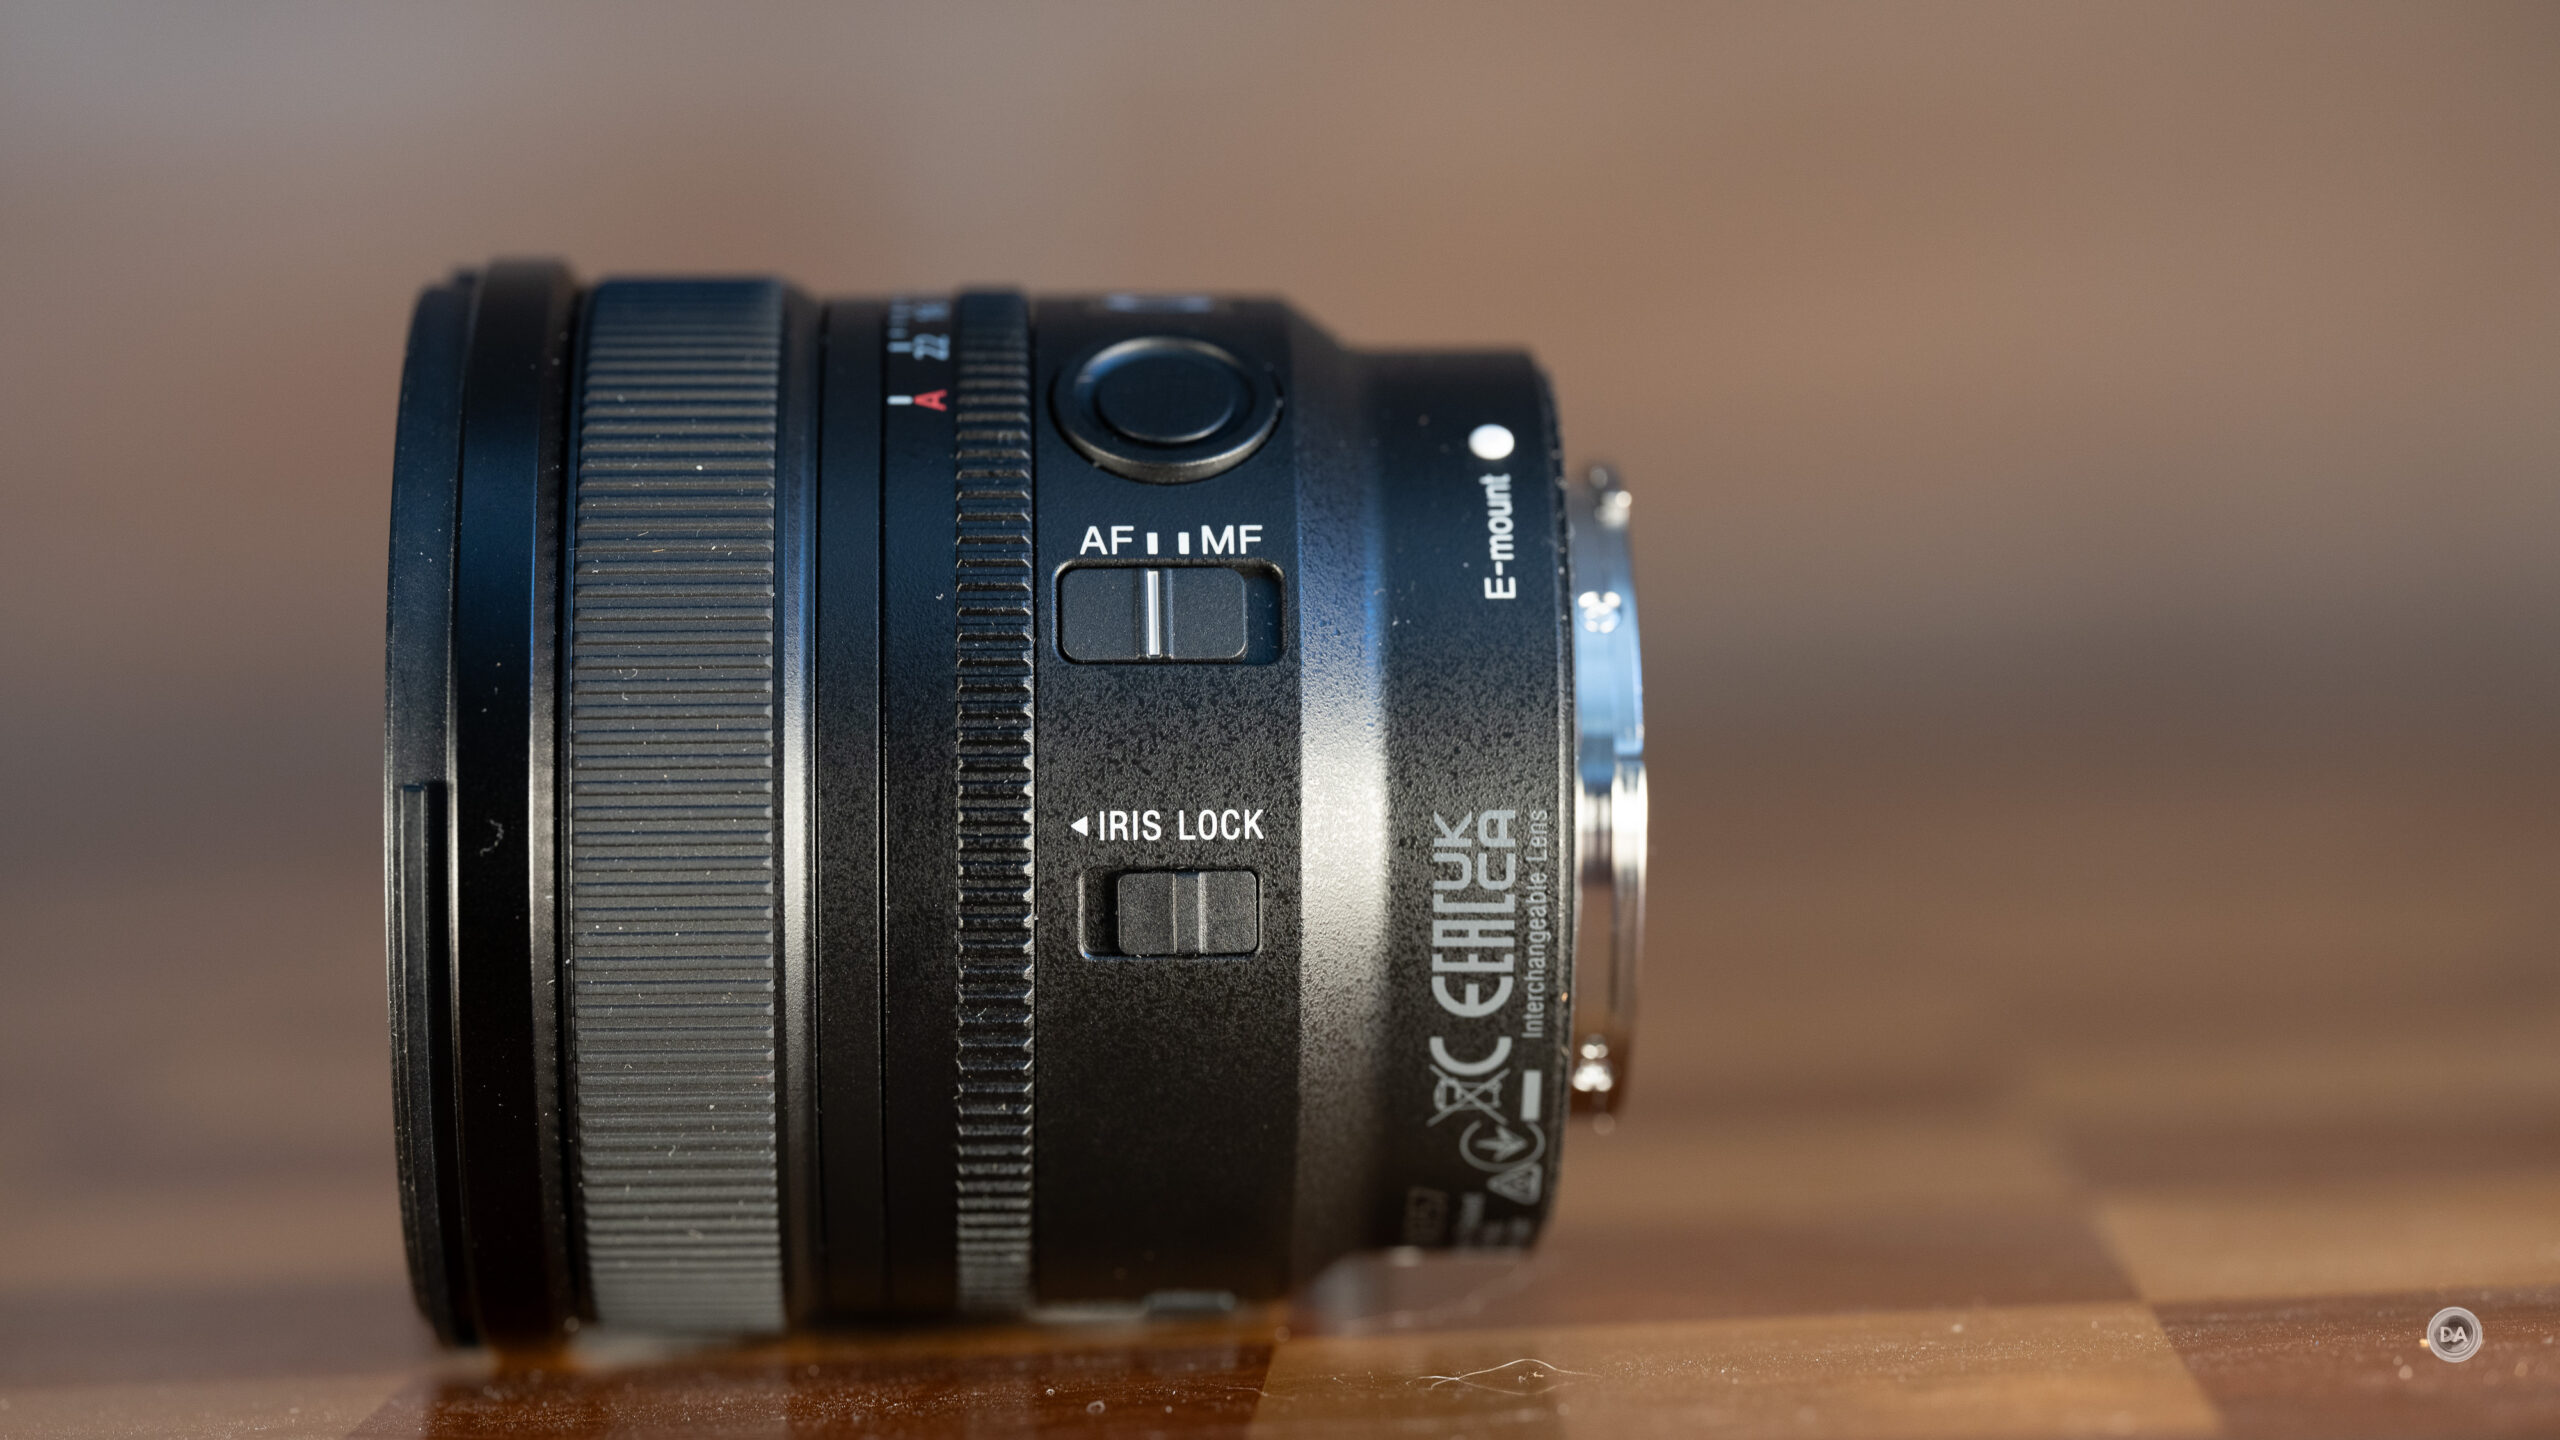
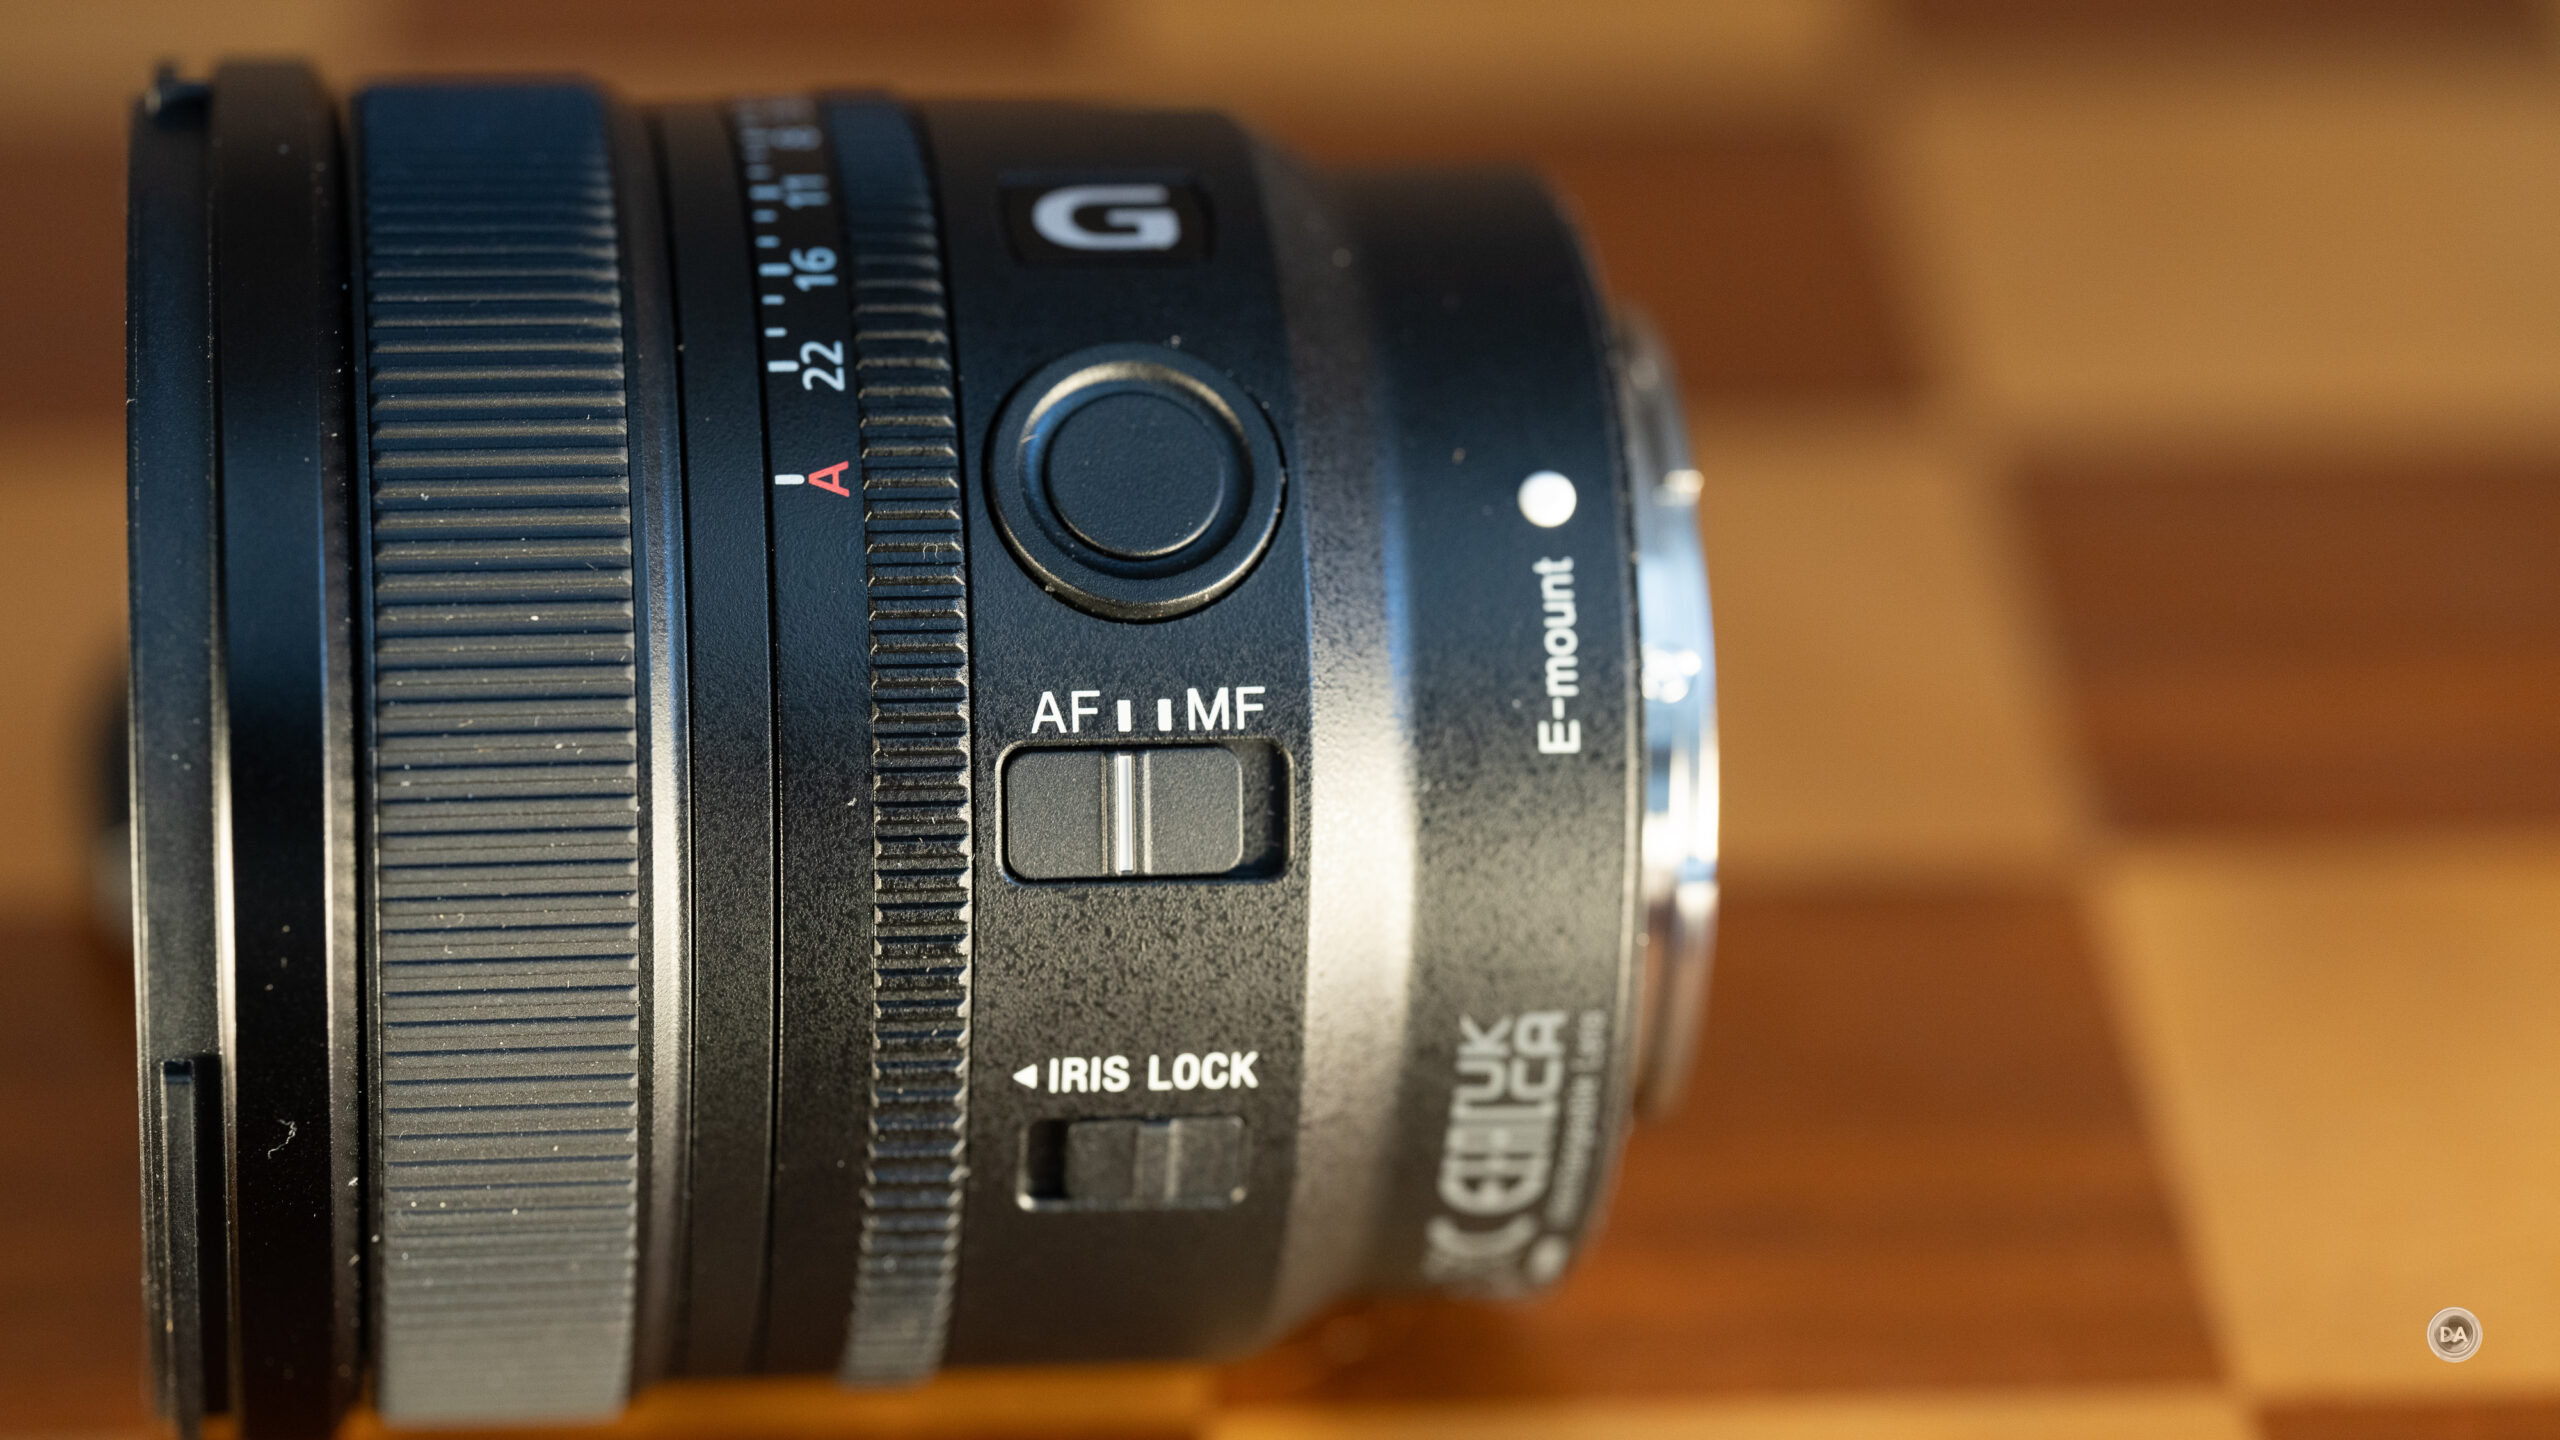
There is also a robust set of features on this compact lens. The first is Sony’s comprehensive approach to aperture control.
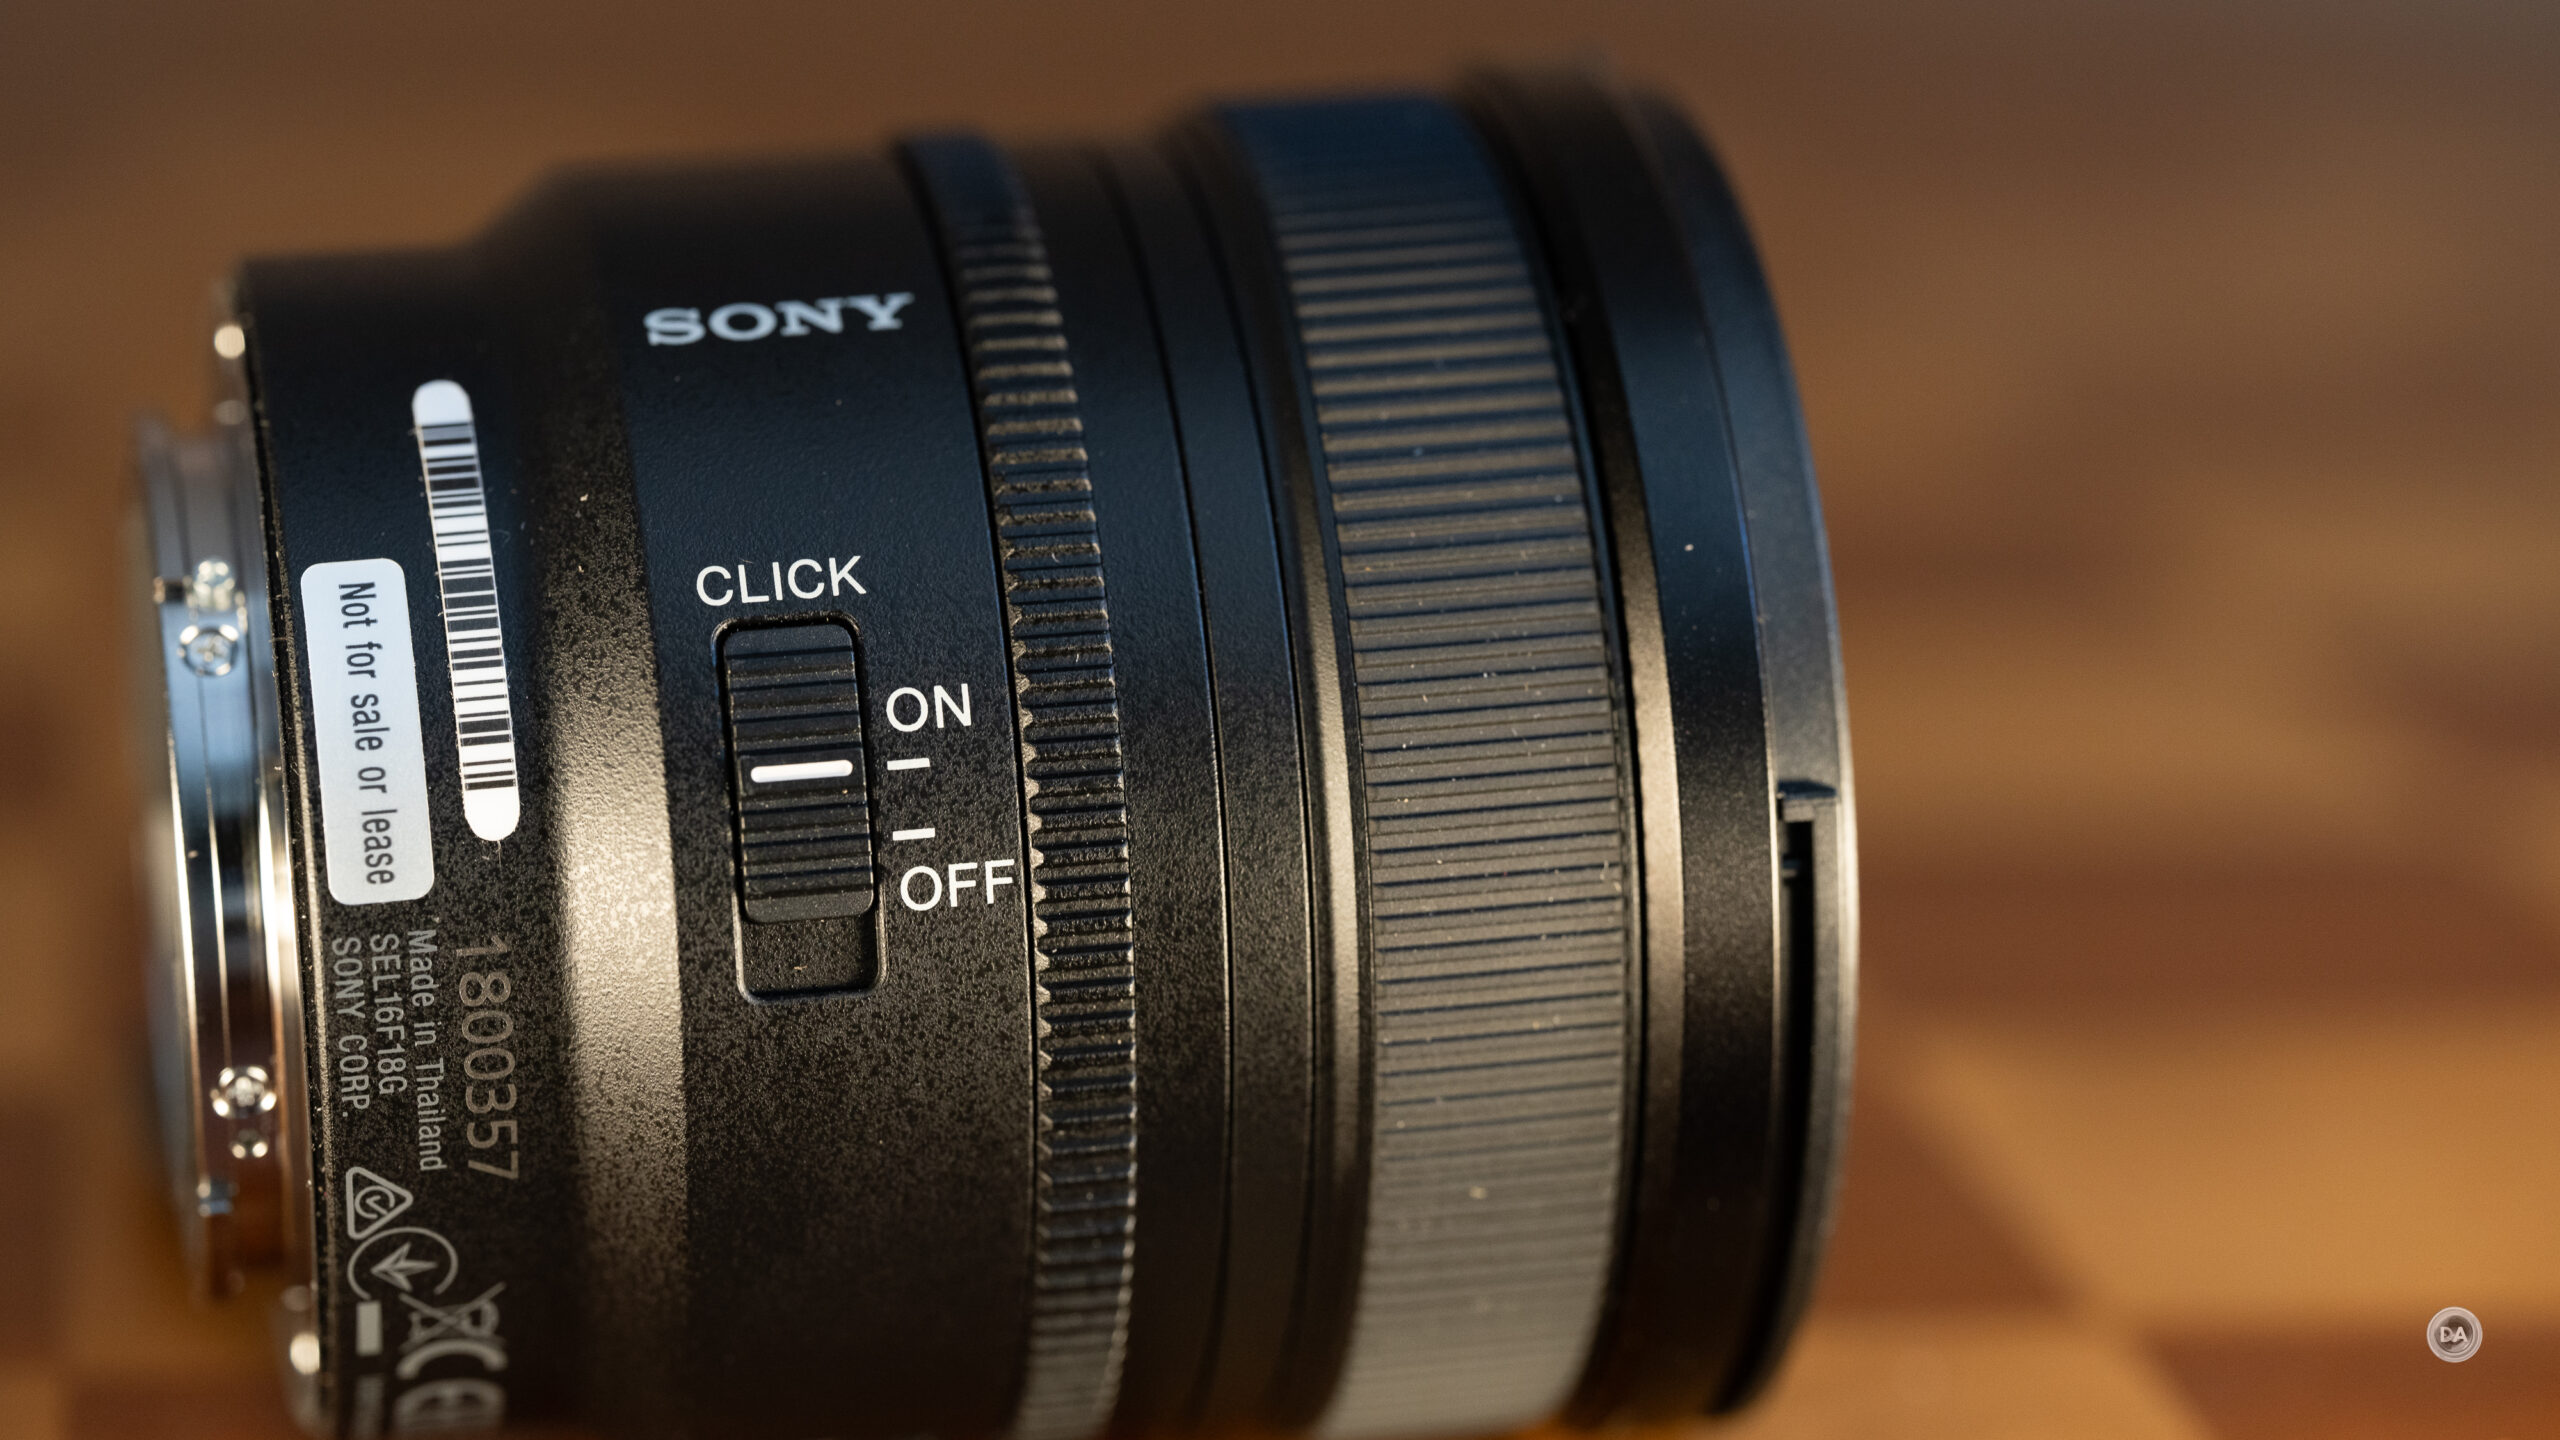
This includes the ability to use the aperture iris with clicks (one third stop detents) or in a declicked fashion.
What’s more, unluck some inexpensive lenses that sport the ability to declick the aperture, you can in fact do smooth aperture racks for video without any visible steps (that’s true of the Viltrox as well).
There is a firm detent between F 22 (minimum aperture) and “A” (Automatic mode”, but if you prefer to lock into or out of the aperture ring, there is an iris lock.
I noted while doing the aperture rack that specular highlights stay nice and round due to 11 aperture blades. Here’s a look at F2.8 (I can actually still see decent sized specular highlights at F2.8 due to the high magnification of the lens).
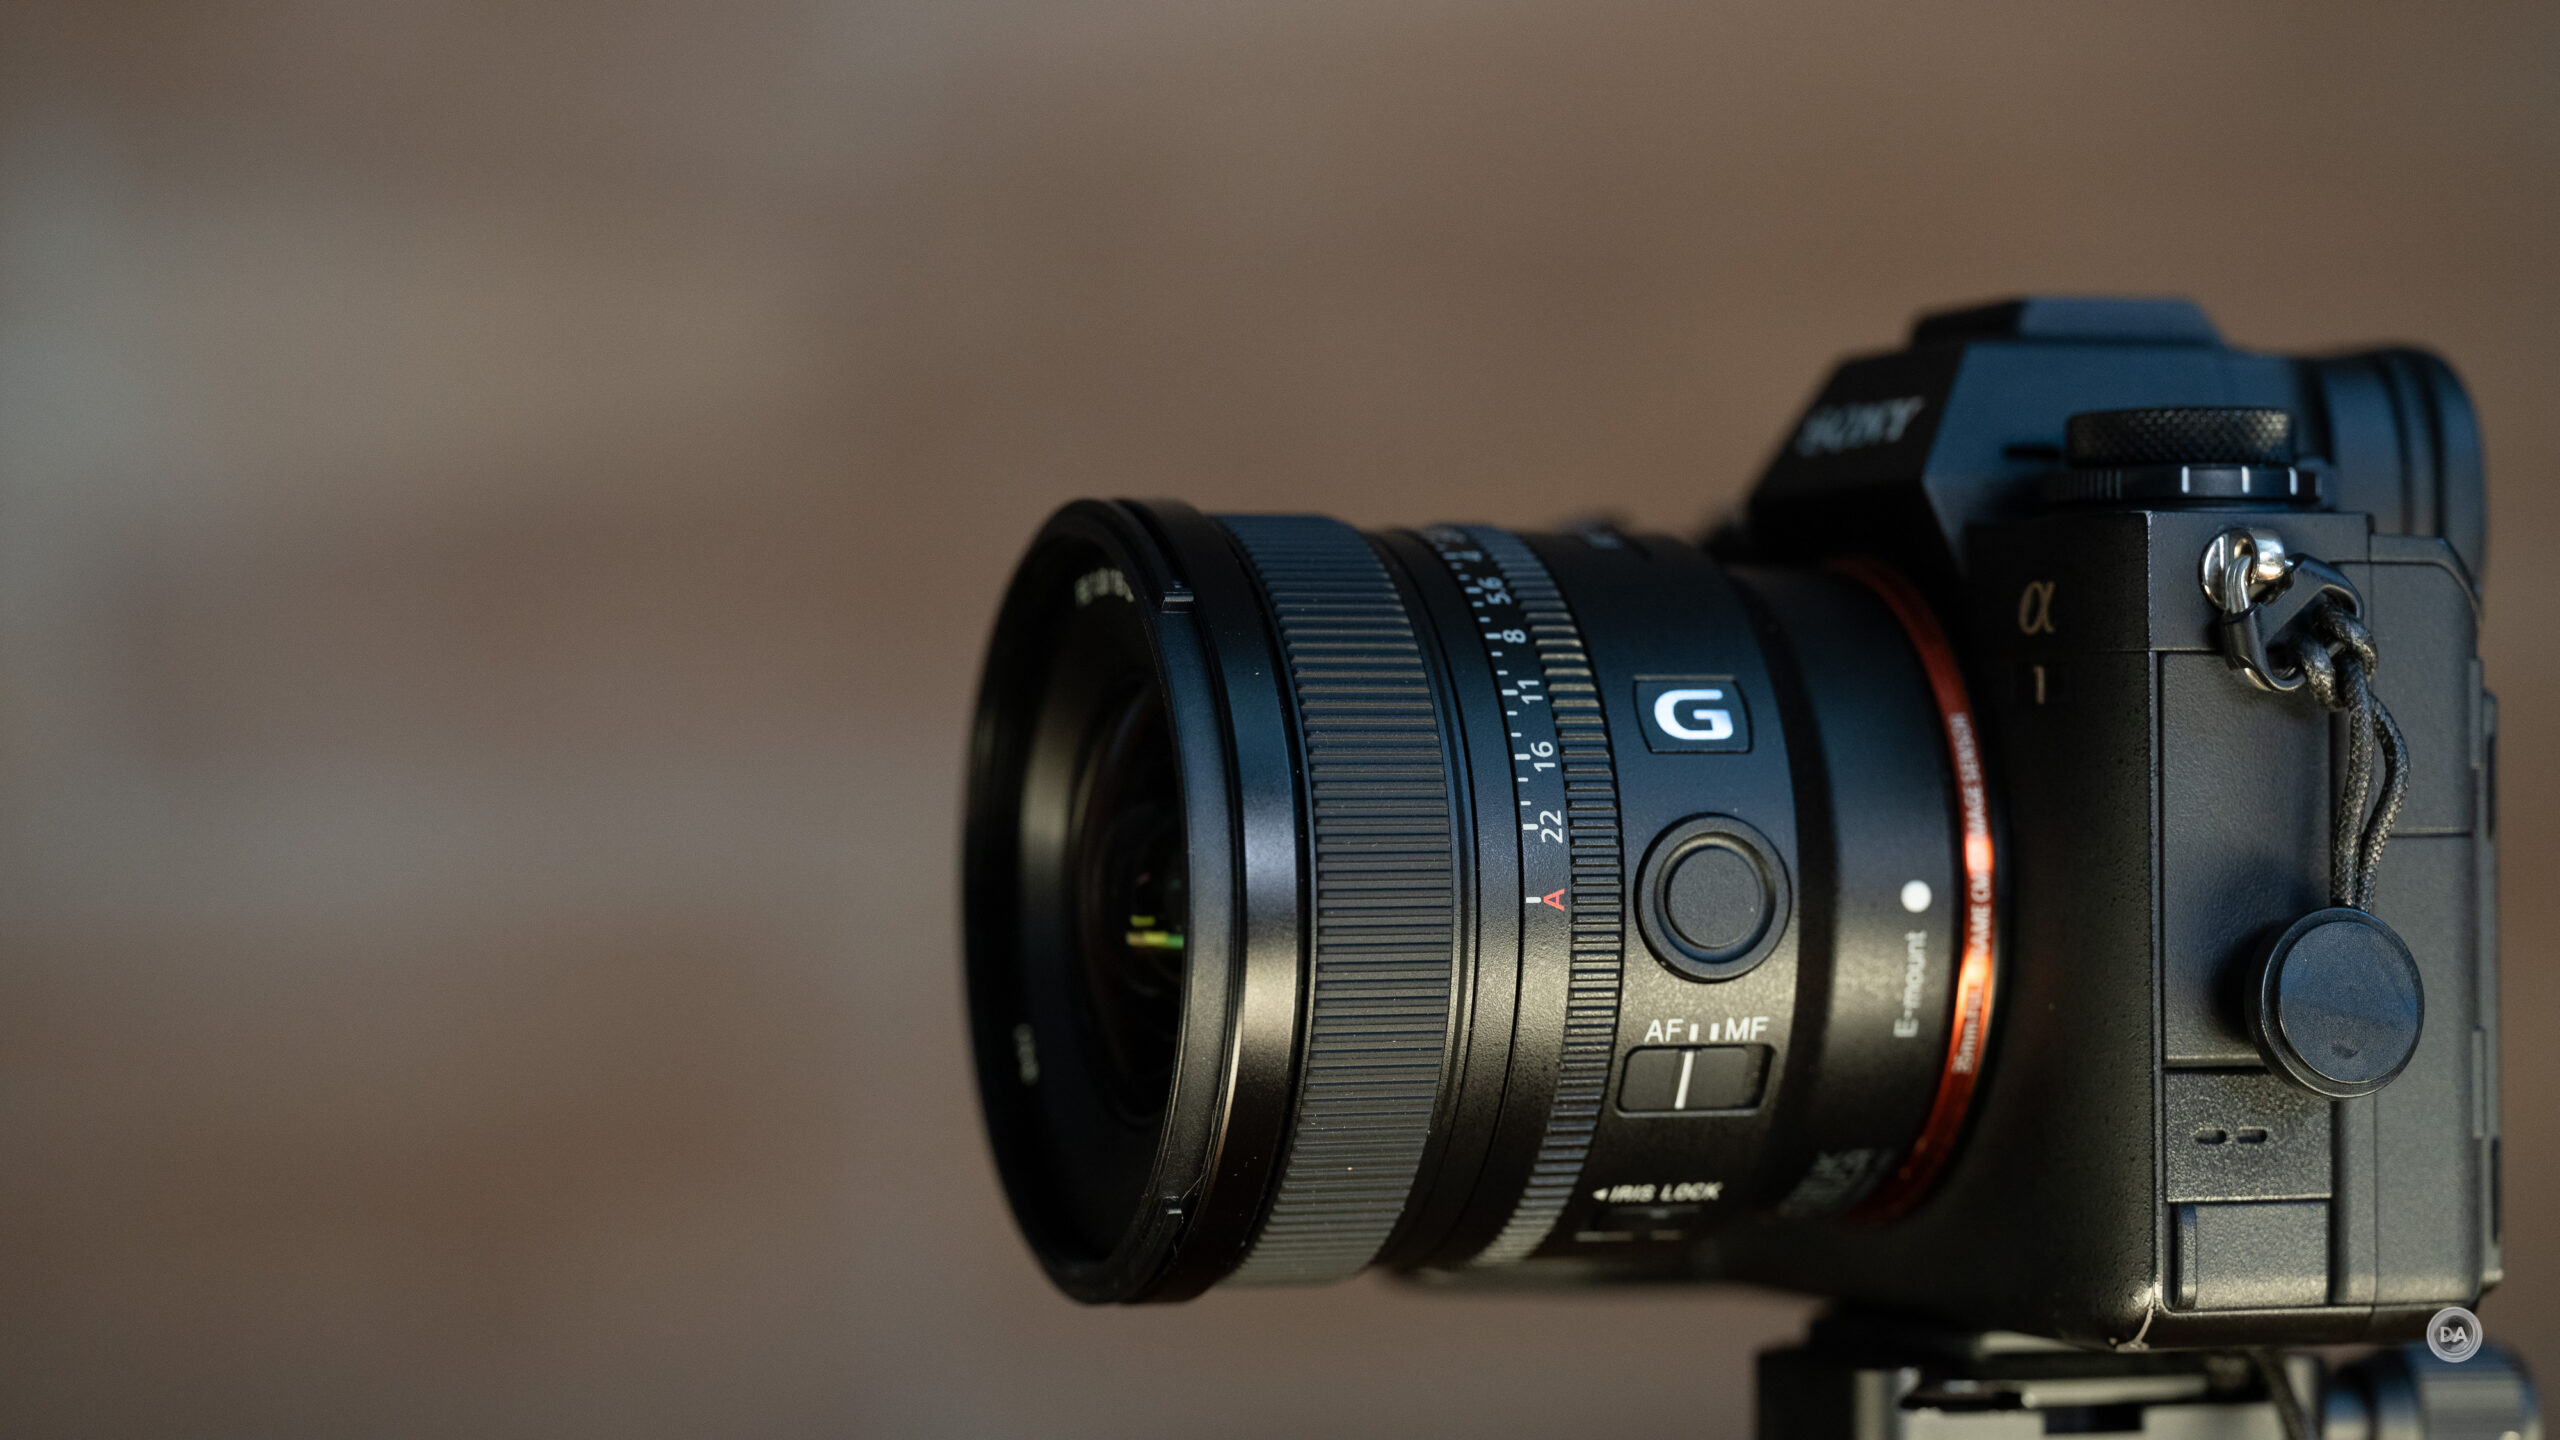
The 16mm F1.8 G also sports a function/custom button (function is set in the camera) along with an AF | MF switch on the left side.
I love all of these control points on this compact lens, as these physical controls allow you to stay more connected to the shot and out of the camera menus.
The manual focus ring works fairly well. The damping is on the light side, but I was able to successfully do smooth focus pulls and some precision focusing for formal tests.
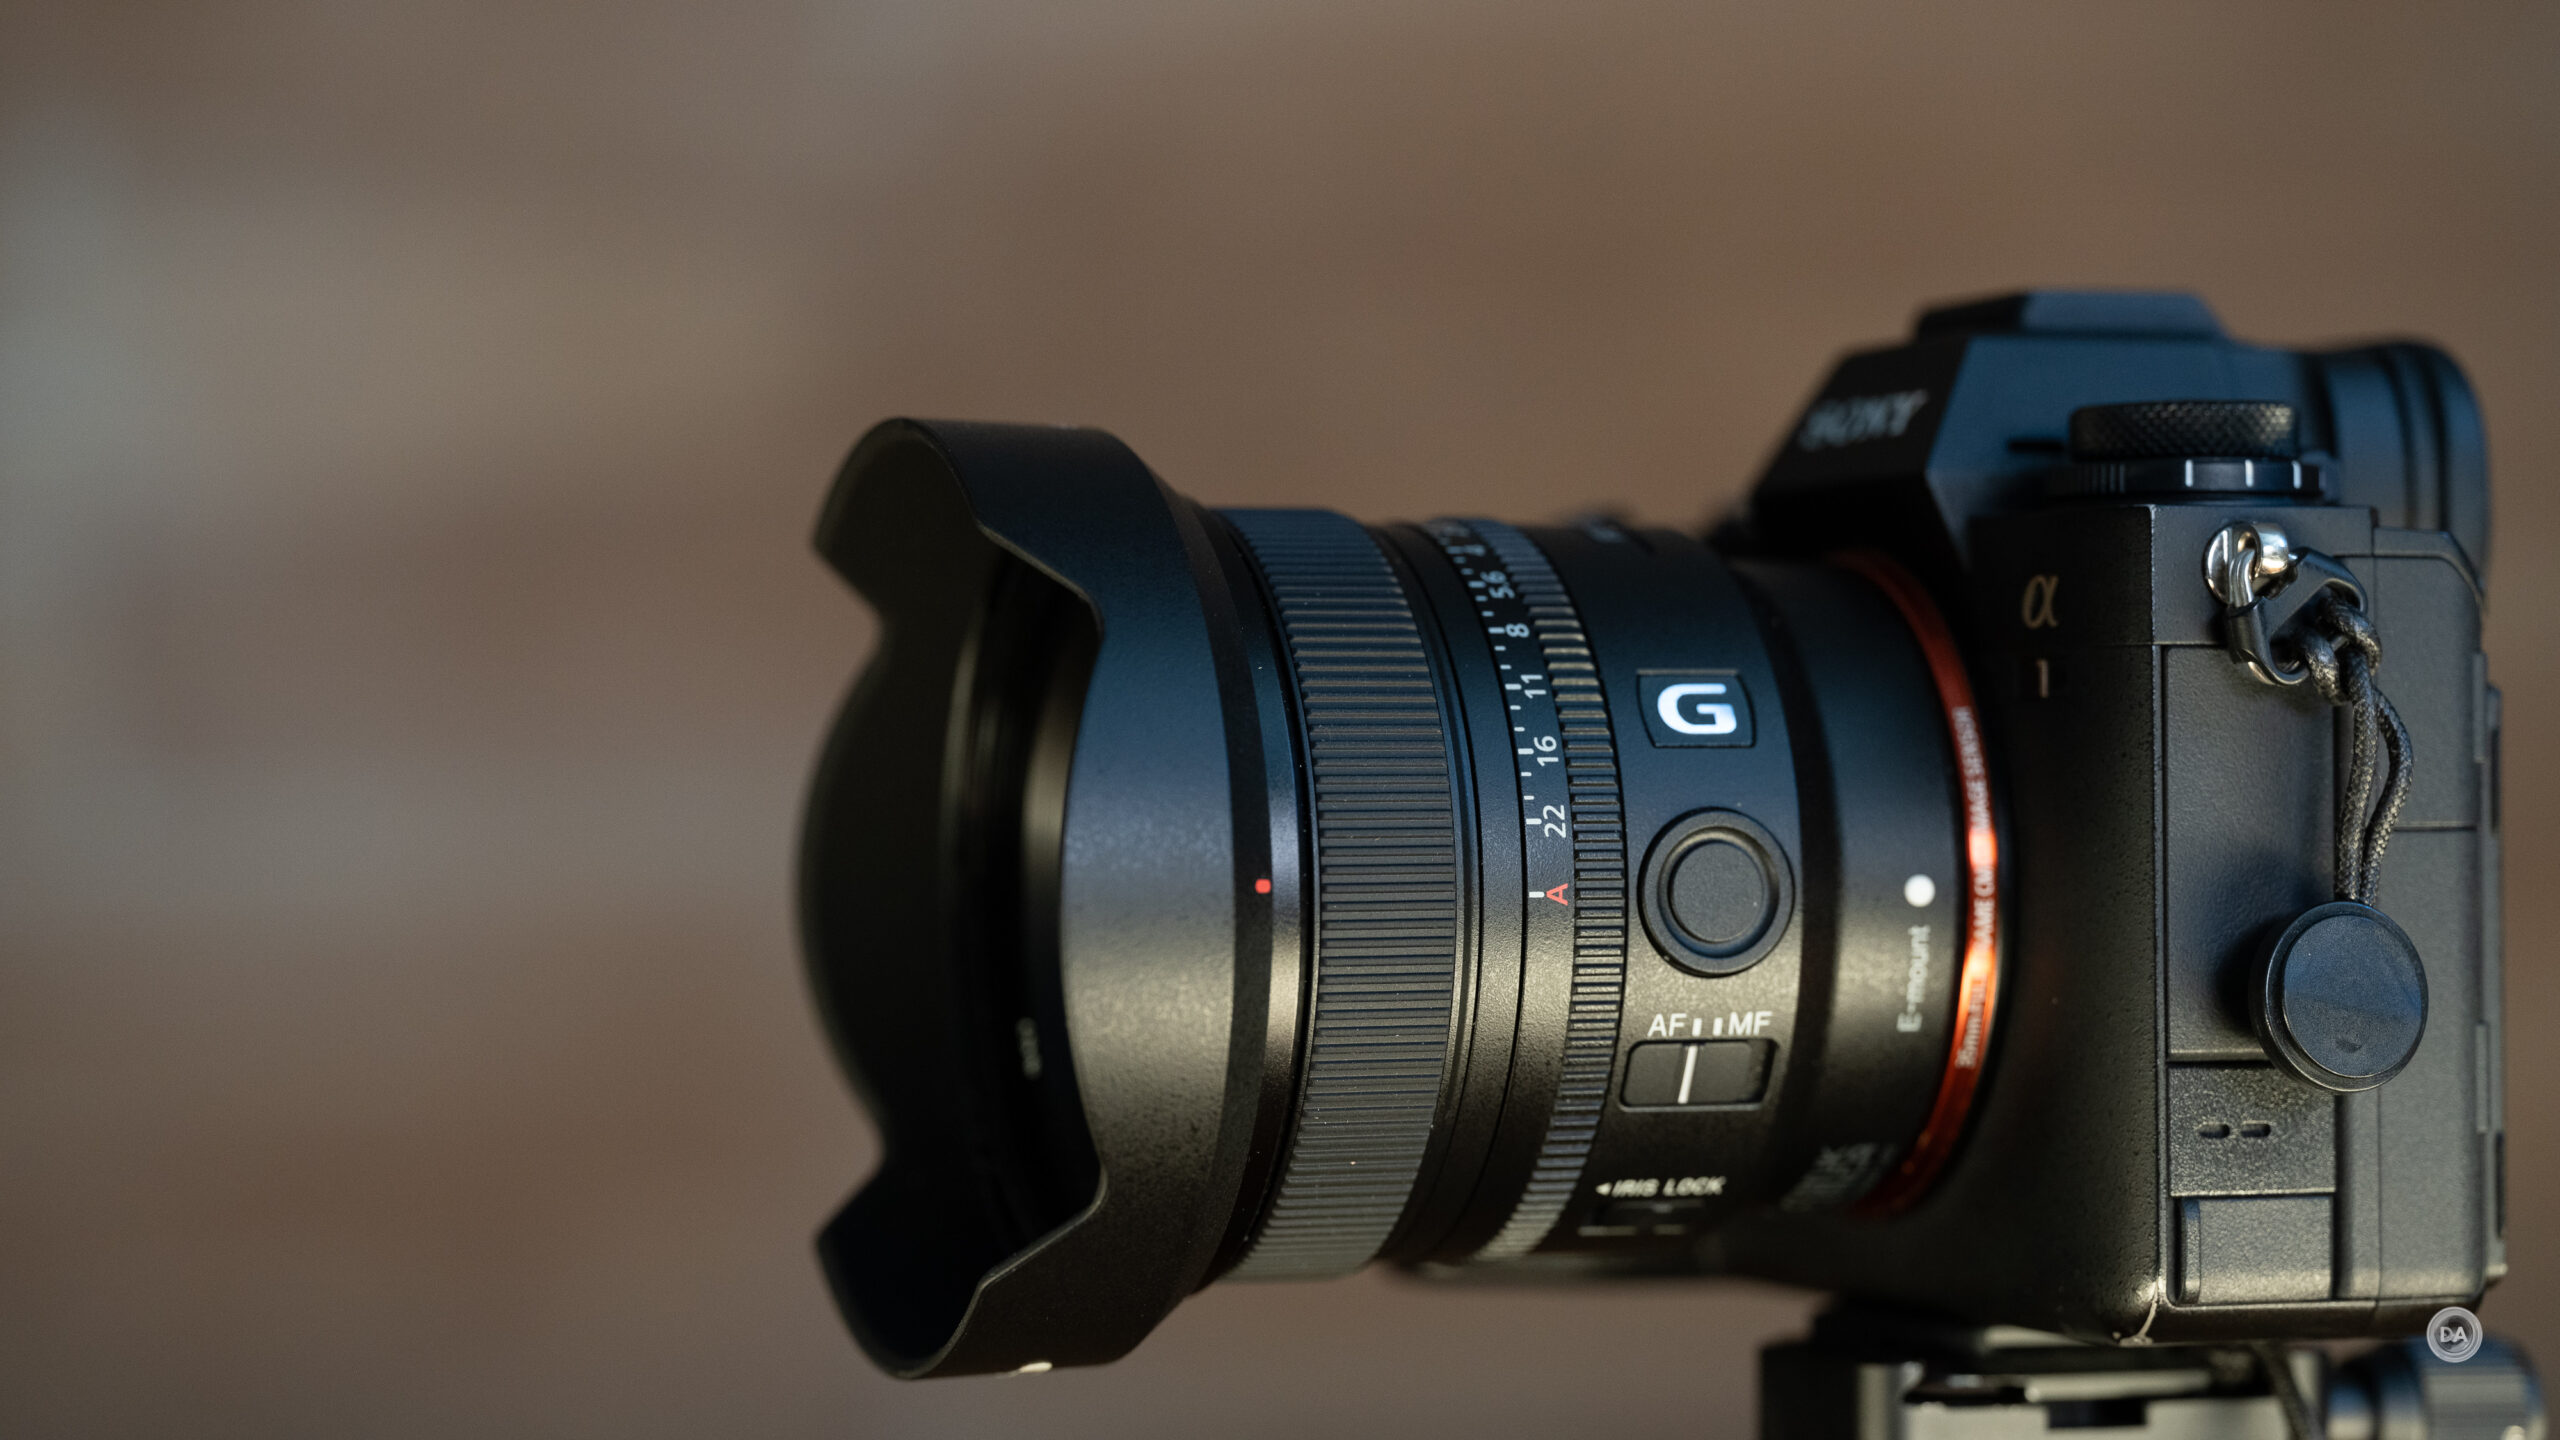
A shallow, petal shaped hood is included. It’s nothing fancy, but it also doesn’t flare out wide, making it easy to reverse for storage without adding a lot of addtional room. There is no lock, but it bayonets on with good precision and a tight “click” when locked into place.
One area of clear advantage for the Sony over the Viltrox is in maximum magnification. The Sony can autofocus as closely as 15cm and achieve a maximum magnification of 0.25x, but you can manually focus a little closer (13cm) and get an ever higher 0.30x magnification. The Viltrox, by comparison, has a MFD of 27cm, and a much lower level of magnification around 0.10x.
As you can see, this also means that you will be able to blur out a background much more strongly with the Sony than the Viltrox as well.
The downside is that you have to pretty much be right on top of your subject at that distance. If the lens is is 7.5cm, and the sensor is a little further back (we’ll call it a total of 9cm), that means that there is just 4cm between the front of the lens and the subject. You’ll need to remove the hood to give yourself any chance of not shading the subject with the lens and/or hood.
Sony does this be employing floating elements in the design of the 16mm F1.8 G, so when the lens is powered off you will feel a slight clunk if you tip the lens up and down as those non-energized elements move inside. That will go away when you attach the lens to the camera and it is powered on.
You will want to avoid getting too close to subjects that require a flat plan of focuse. This lens (as we will see) has a lot of distortion, and that gets exaggerated up close, resulting in so much field curvature that a two dimensional subject almost looks three-dimensional. Check out my test chart result!
You may see some of that with three dimensional subjects, but it probably won’t be anywhere near this pronounced. Just know that there are few caveats in the close-up performance. I’m still glad it has the option, however, as it expands the usefulness of the lens.
The bottom line is that this is a great package. Compact, lightweight, feature rich, weather sealed, and handles great. I immediately loved it.
Autofocus for Stills
Sony has employed dual XD linear motors to work in concert and drive the focus group. Sony has done perhaps a better job than any other lens maker in making sure that their lenses have plenty of autofocus thrust to ensure that you are going to get top-tier autofocus performance.
Focus is silent and near instant. There is no lag between focus on a close or distant subject. Focus happens essentialy instantly and without any drama.
Wide angle lenses like this often don’t put huge stresses on focus systems, as the difference between nothing being in focus and everything being in focus is often very small, but the 16mm F1.8 G proved very capable of quick and acurate focus changes.
Eye tracking in either my formal focus tests or real world results were consistently excellent, though note that eye tracking only really works at close focus distances. Too far away and soon the eye and then even the face won’t occupy a big enough area in the frame for dedicated tracking. It doesn’t matter, however, as at that point everything will be in focus if the focus is even on the body of the subject.
One key advantage of buying a first party lens is the simple fact that you unlock the full potential of Sony’s full autofocus potential and burst options. When shooting on a camera like my Alpha 1, for example, I can shoot at 30FPS rather being limited to 15FPS with a third party lens. For someone with an a9III, that difference becomes even more extreme.
This is a great autofocus system that is ready for whatever subjects you throw at it.
Video AF
Sony is extremely good at calibrating their focus for both stills and video, and that’s true here. That instantaneous focus speed is detuned just enough to make autofocus focus pulls a little more cinematic. Focus breathing is low, allowing focus pulls to be smooth and not eye catching.
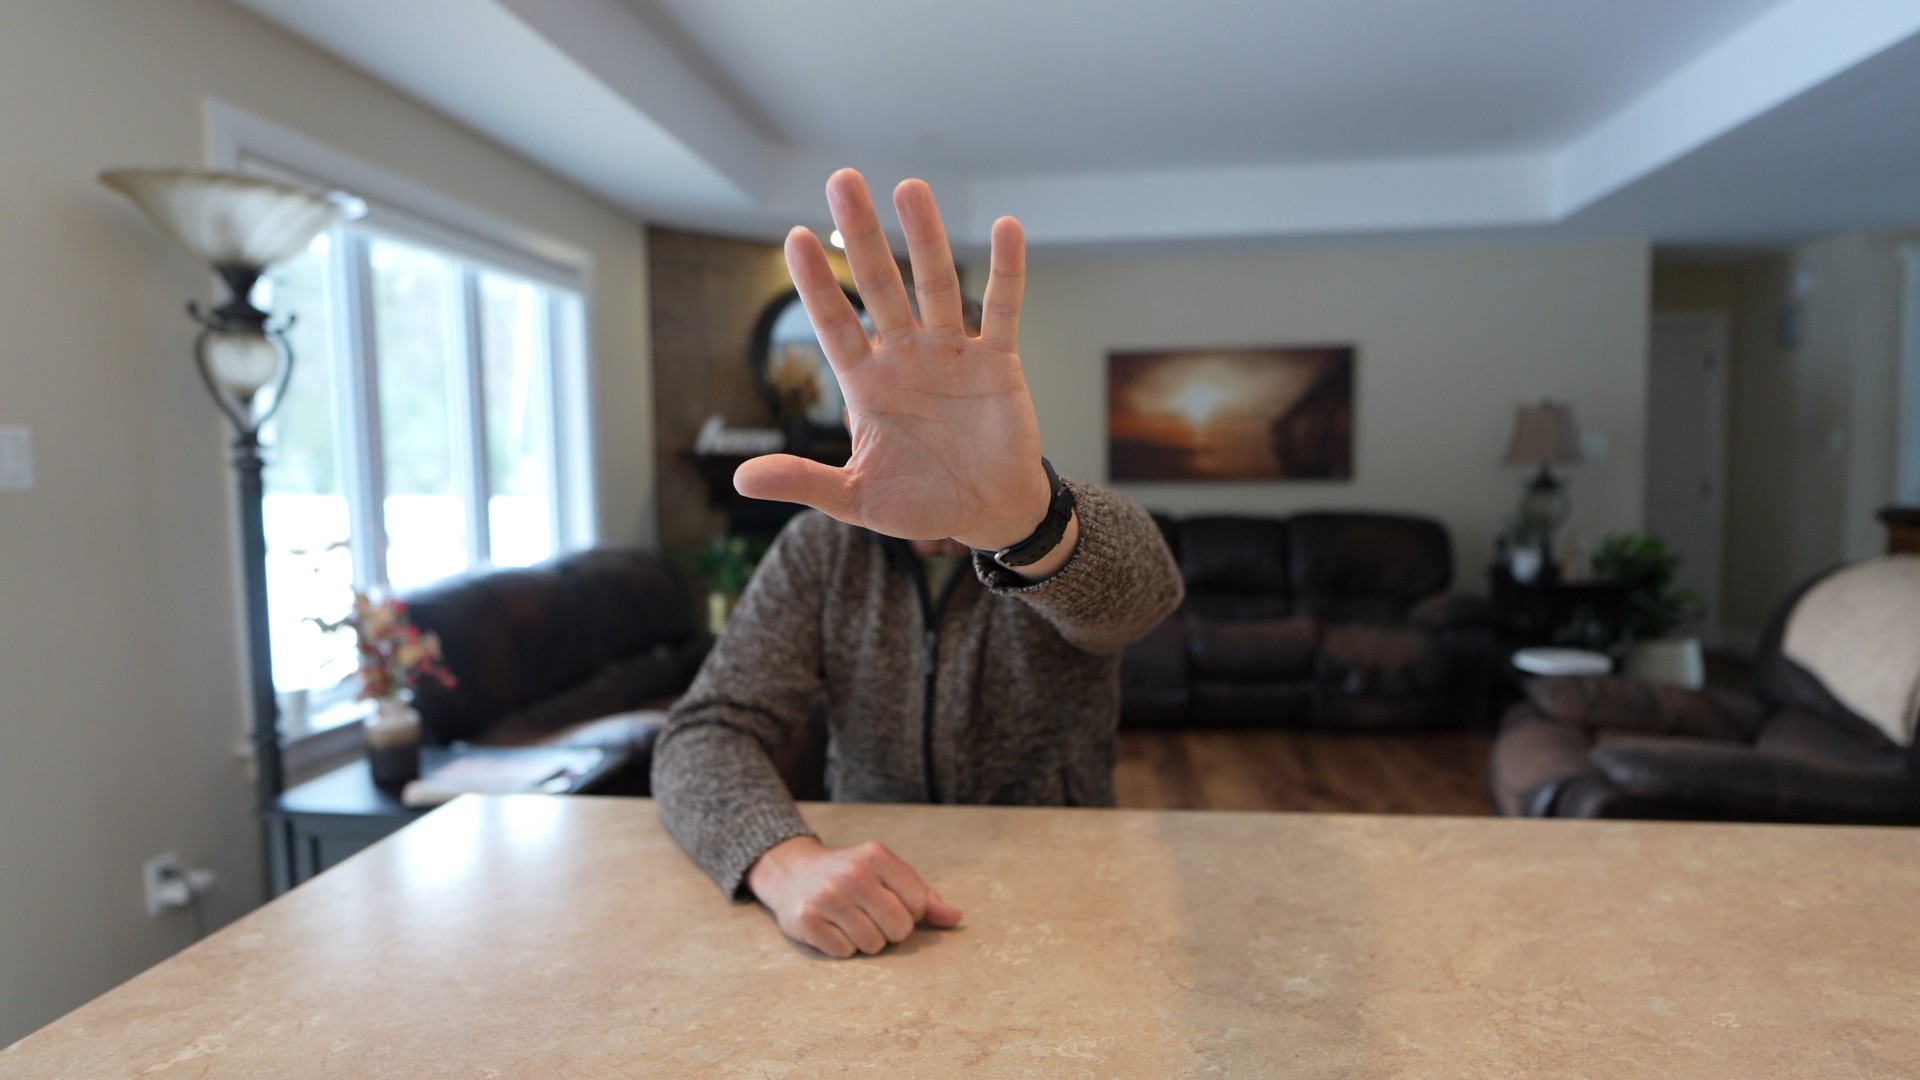
I also saw good performance in my hand test, though there was at least one cycle where focus stayed on my face rather than moving to my hand, even though the hand was dominating the frame.
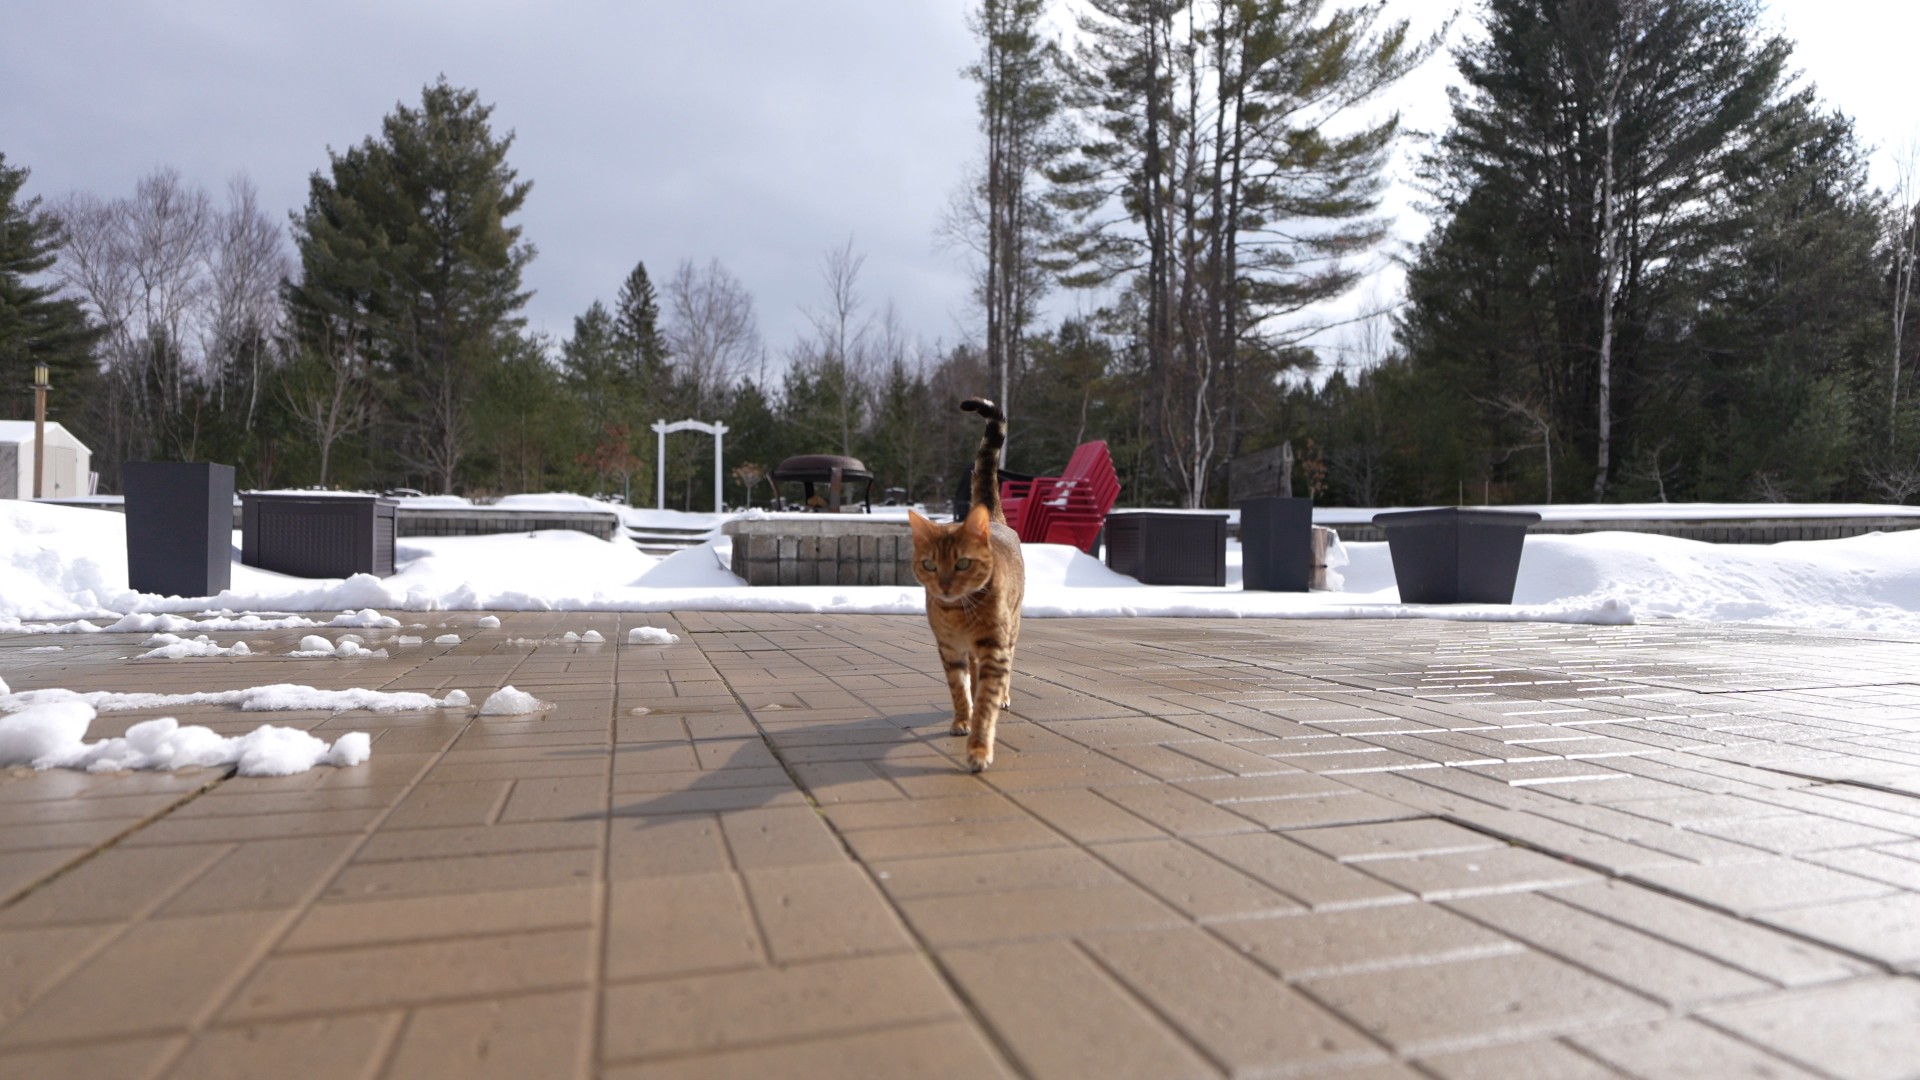
I had a clip where Nala scurried towards the camera, and focus largely kept up with her (though more at her neck rather than eye level), so I would need to tweak the focus speed in settings to really keep up. I don’t doubt there is sufficient thrust in the lens focus motors to accomplish that, however. Here’s a few screen grabs from that clip.
Static shots (landscape type clips) were nice and stable, without any microadjustments. Footage looks nice and crisp. The issues with distortion that we will visit in the image quality section are not an issue with video because Sony’s correction profiles will eliminate them.
Autofocus is great for either stills or video work.
Image Quality Breakdown
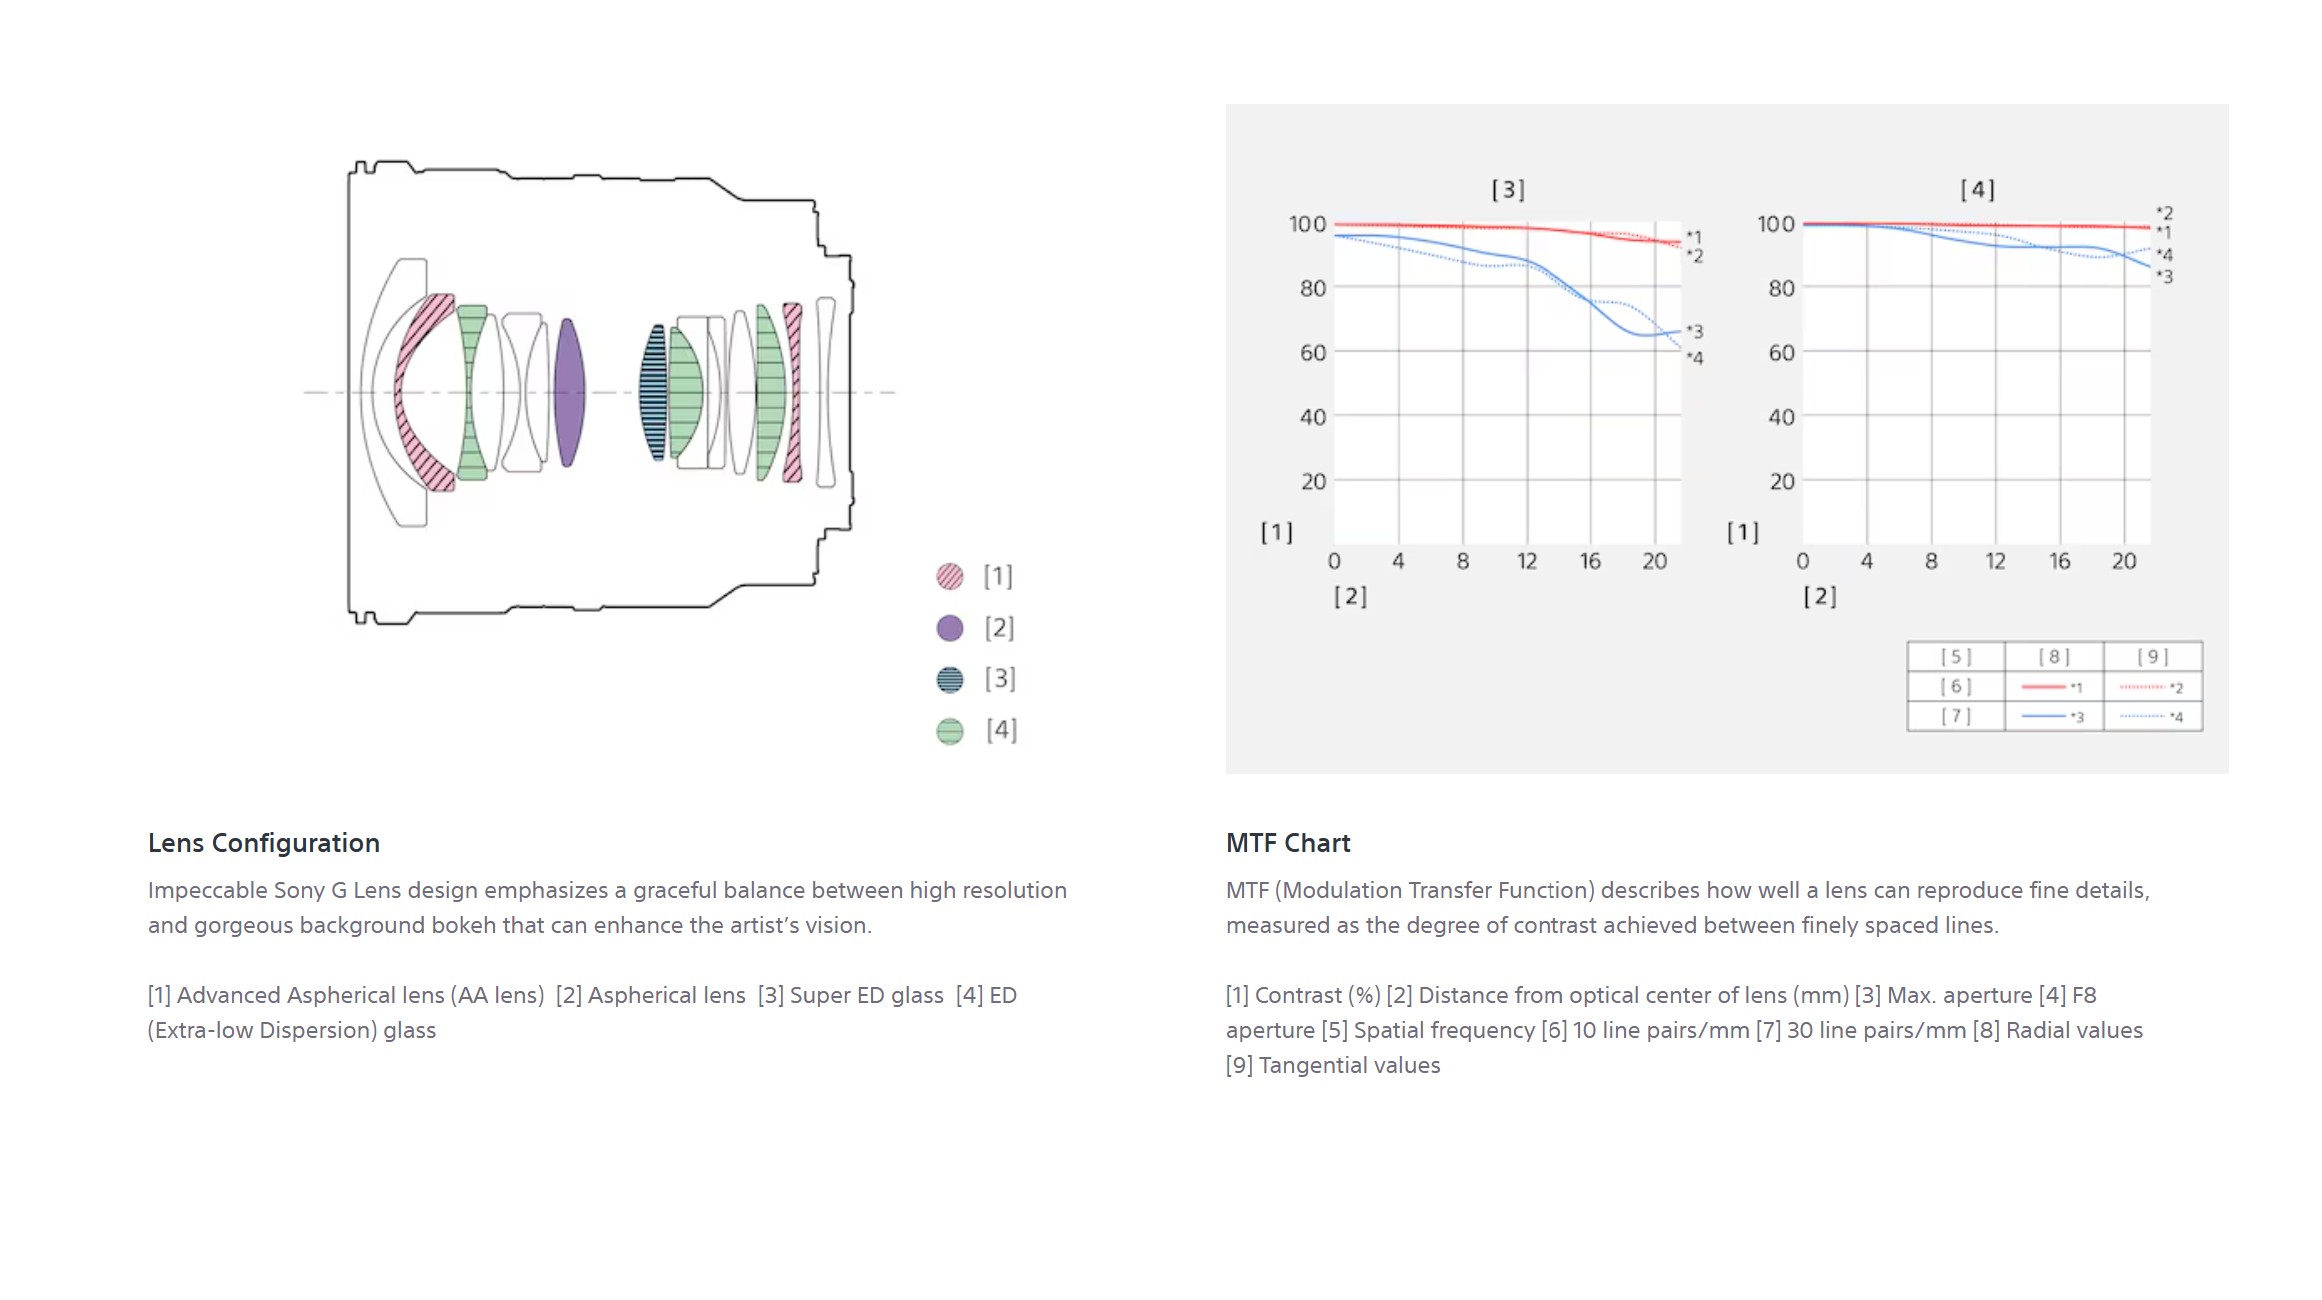
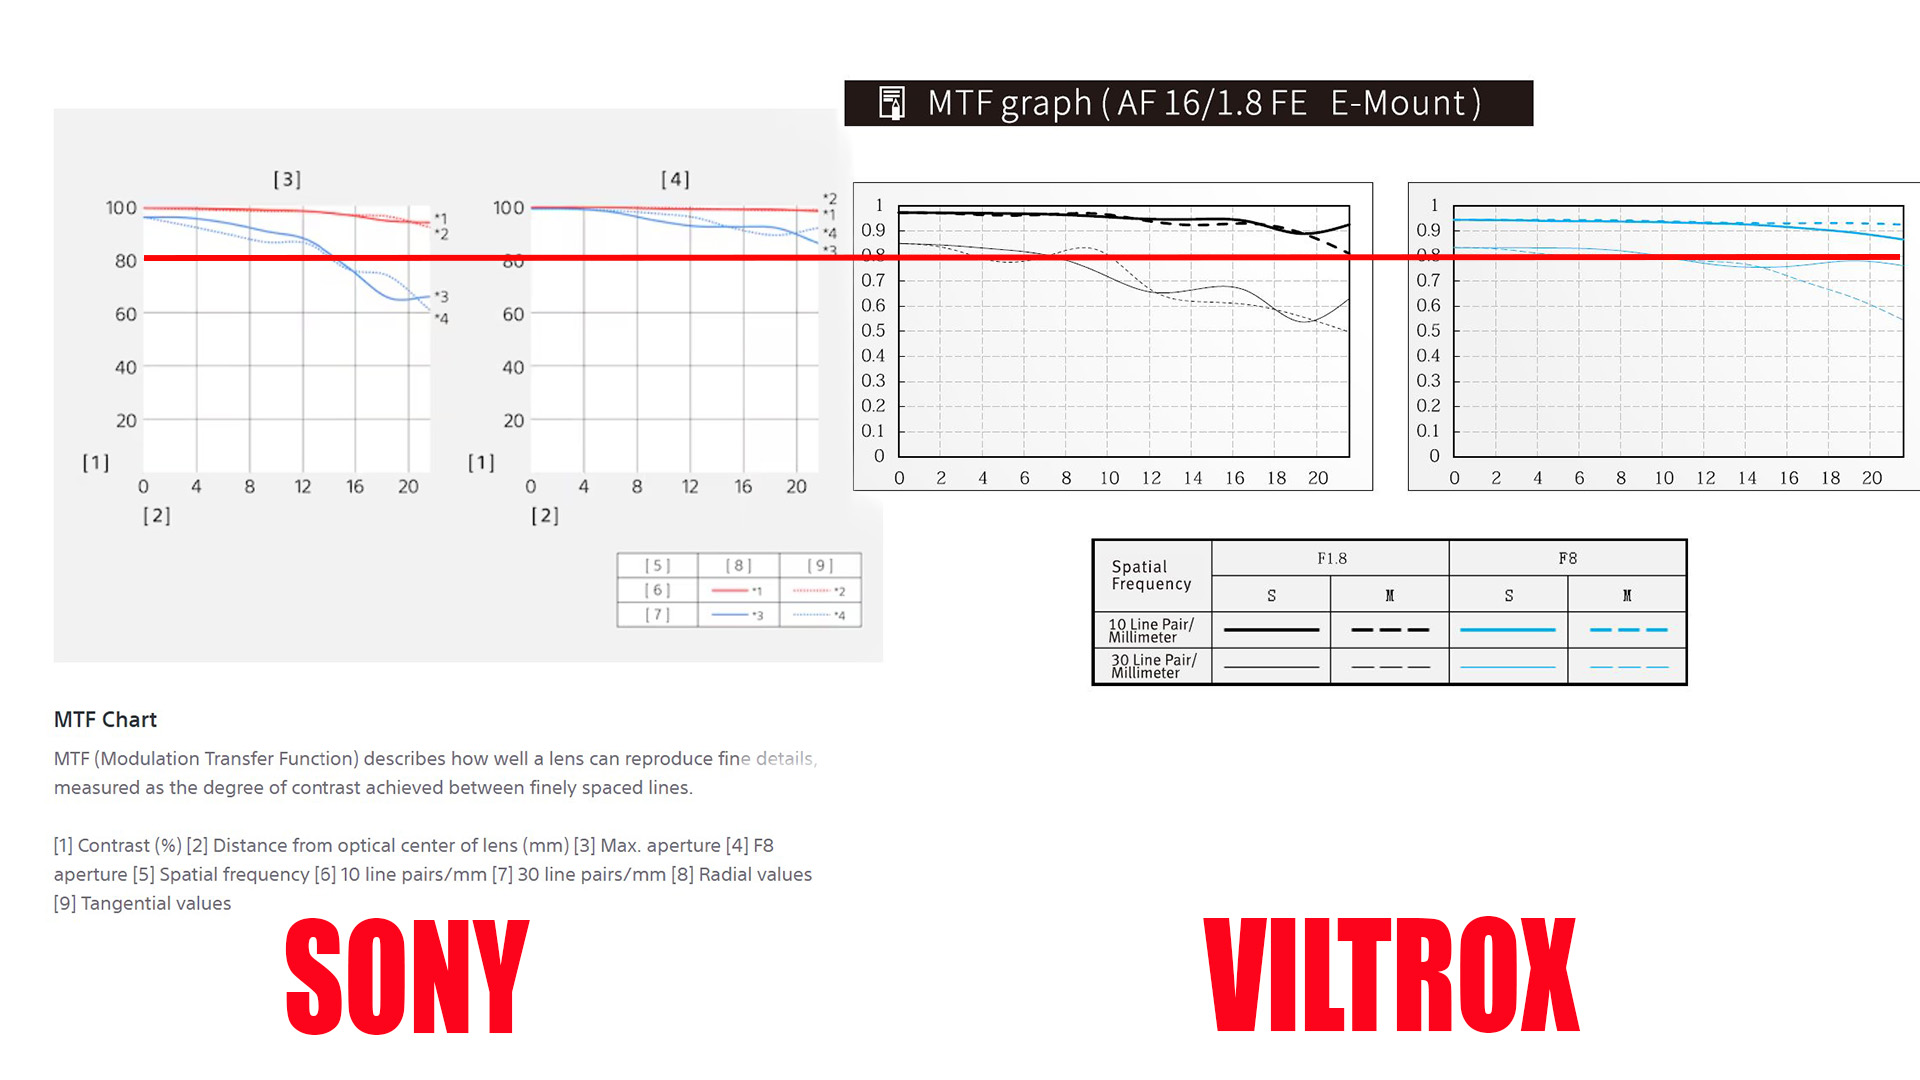
Sony has equipped this little lens with a fairly complex optical design. It has 15 elements in 12 groups, which is the same as the Viltrox lens. Included in this design are seven different exotic elements, including AA (advanced aspherical), apsherical, Super ED (Extra Low Disperation), and ED elements. the MTF chart shows an extremely sharp center at F1.8, with good mid-frame and above average corners.
I created a chart comparing the MTF results from the Sony and Viltrox lenses, and found that while both lenses are very sharp, the Sony is sharper across pretty much the whole frame. The advantage at F1.8 (left sides of each chart) only grows when both lenses are stopped down to F8 (the right side value). I put a bold red line through 80% on both charts and you’ll see that more of the sharpness performance is above that line for the Sony.
The FE 16mm F1.8 G has a lot of optical advantages and one major weakness. That weakness is NOT sharpness; this is an extremely sharp little lens.
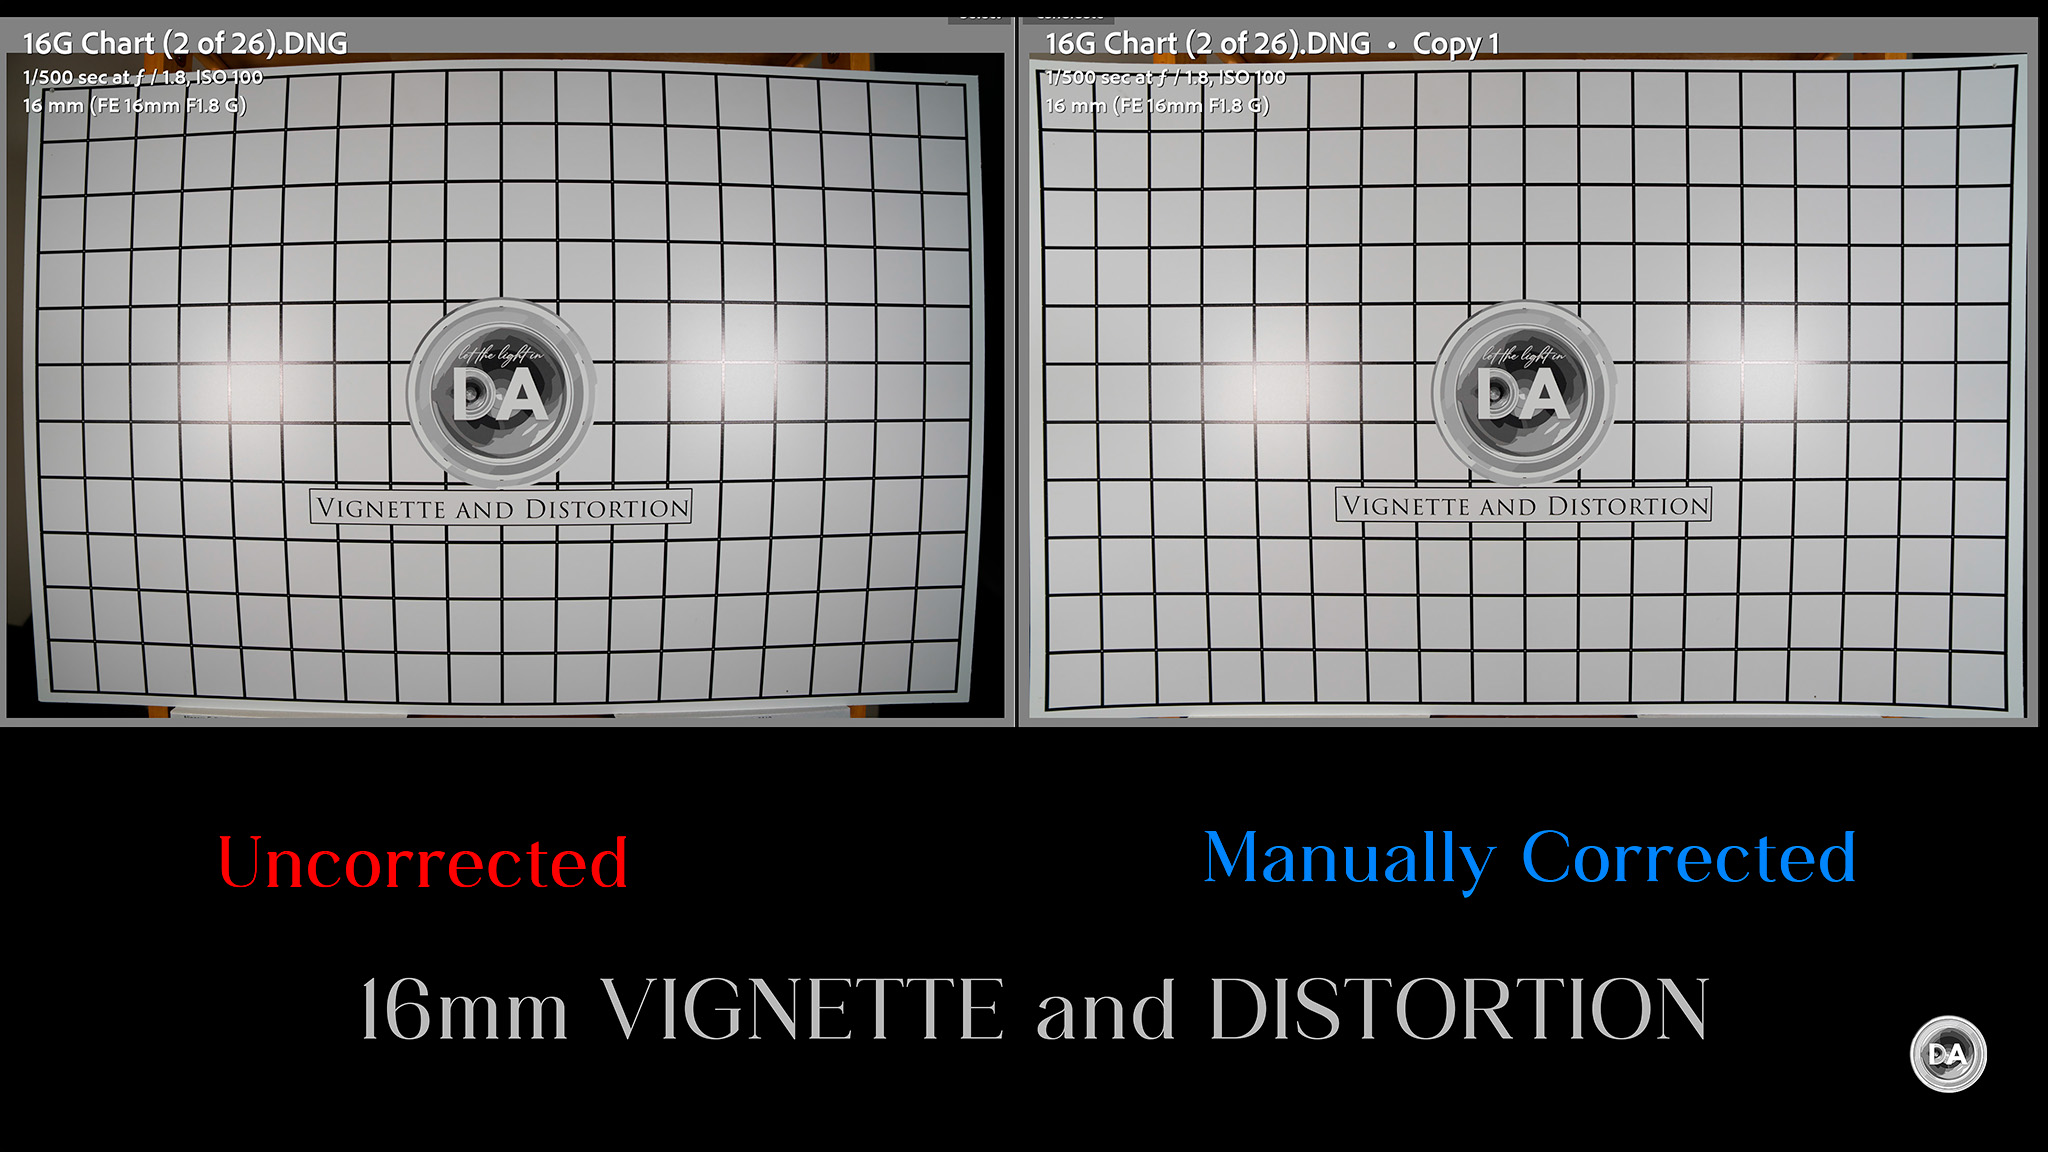
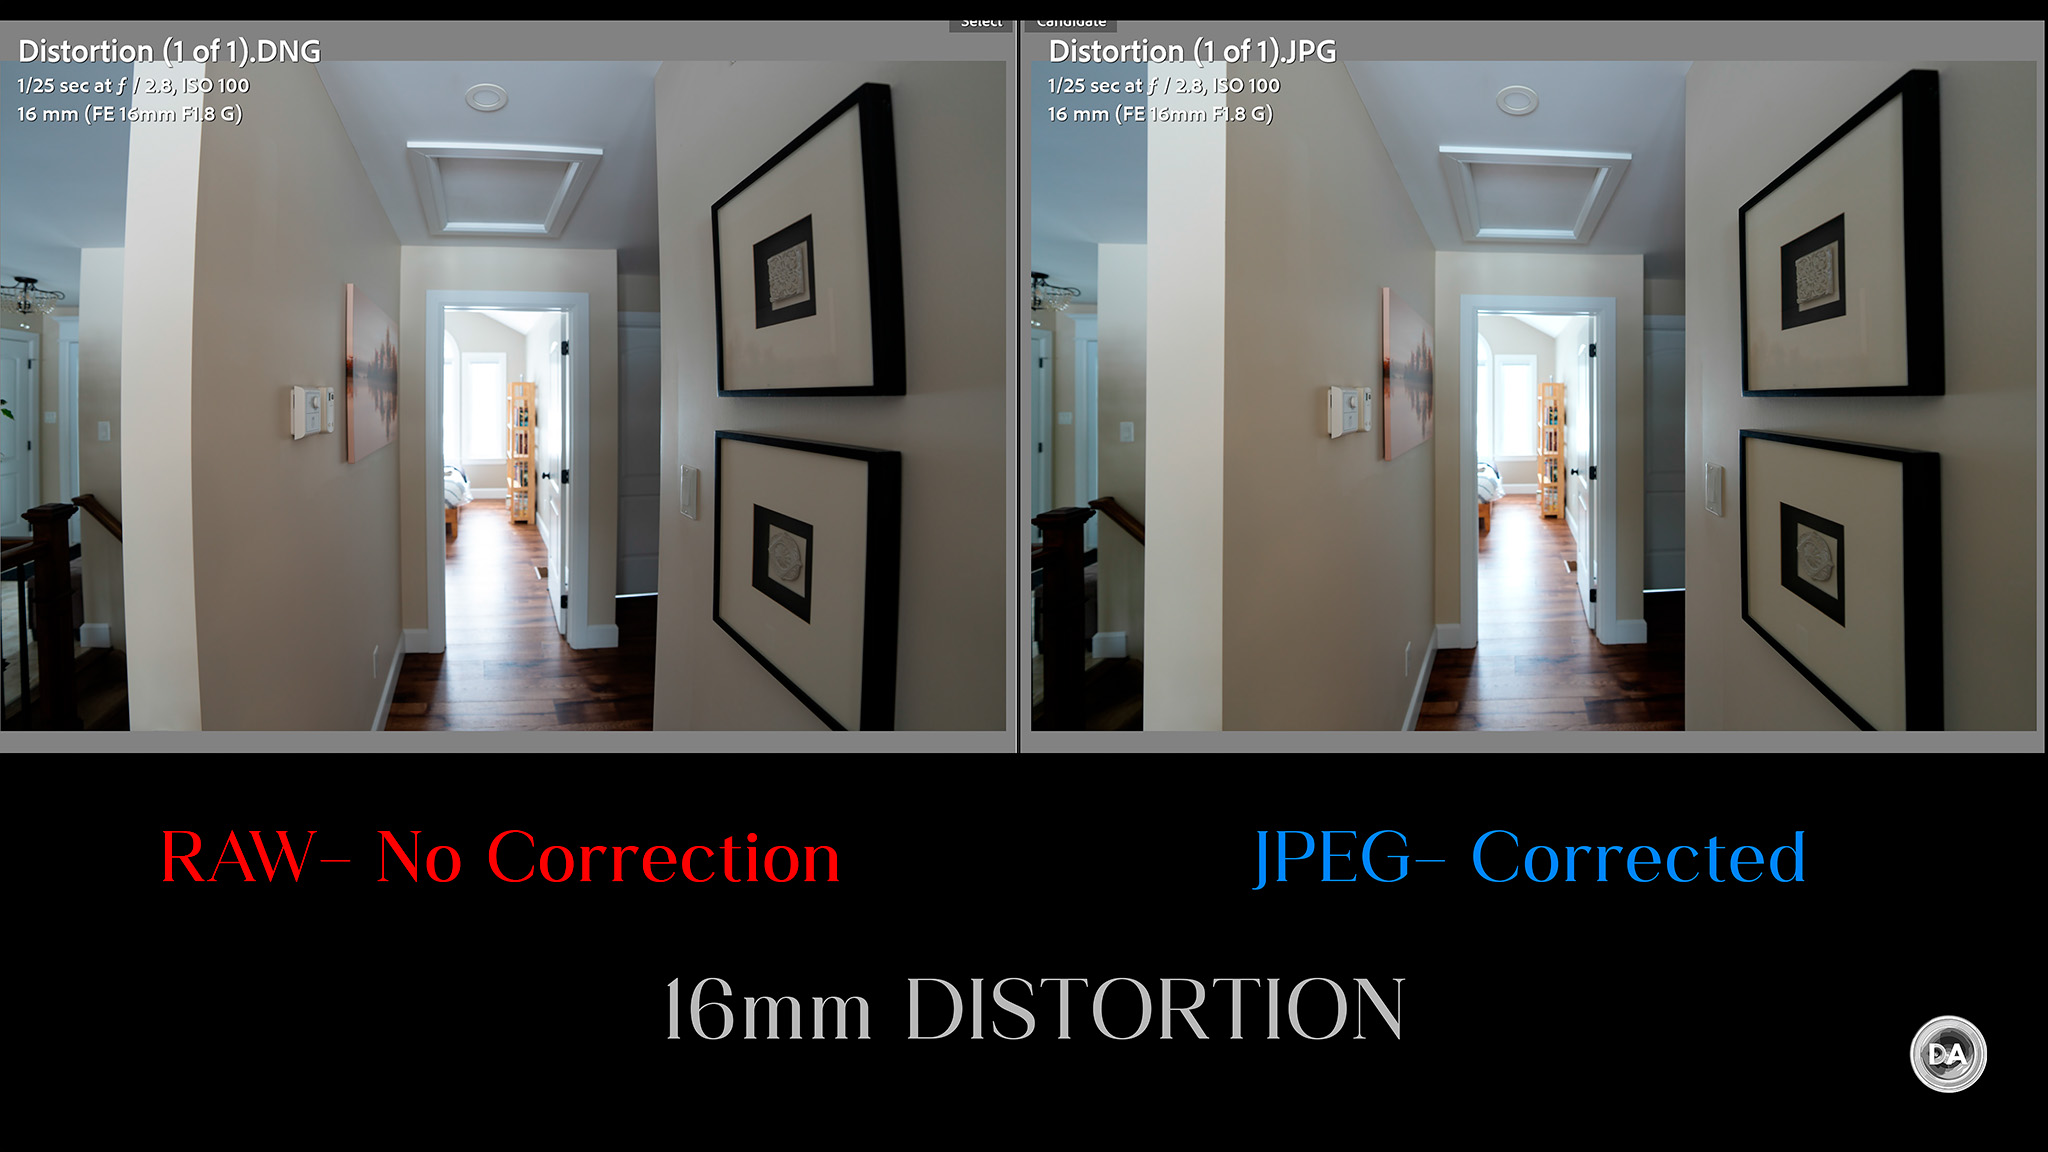
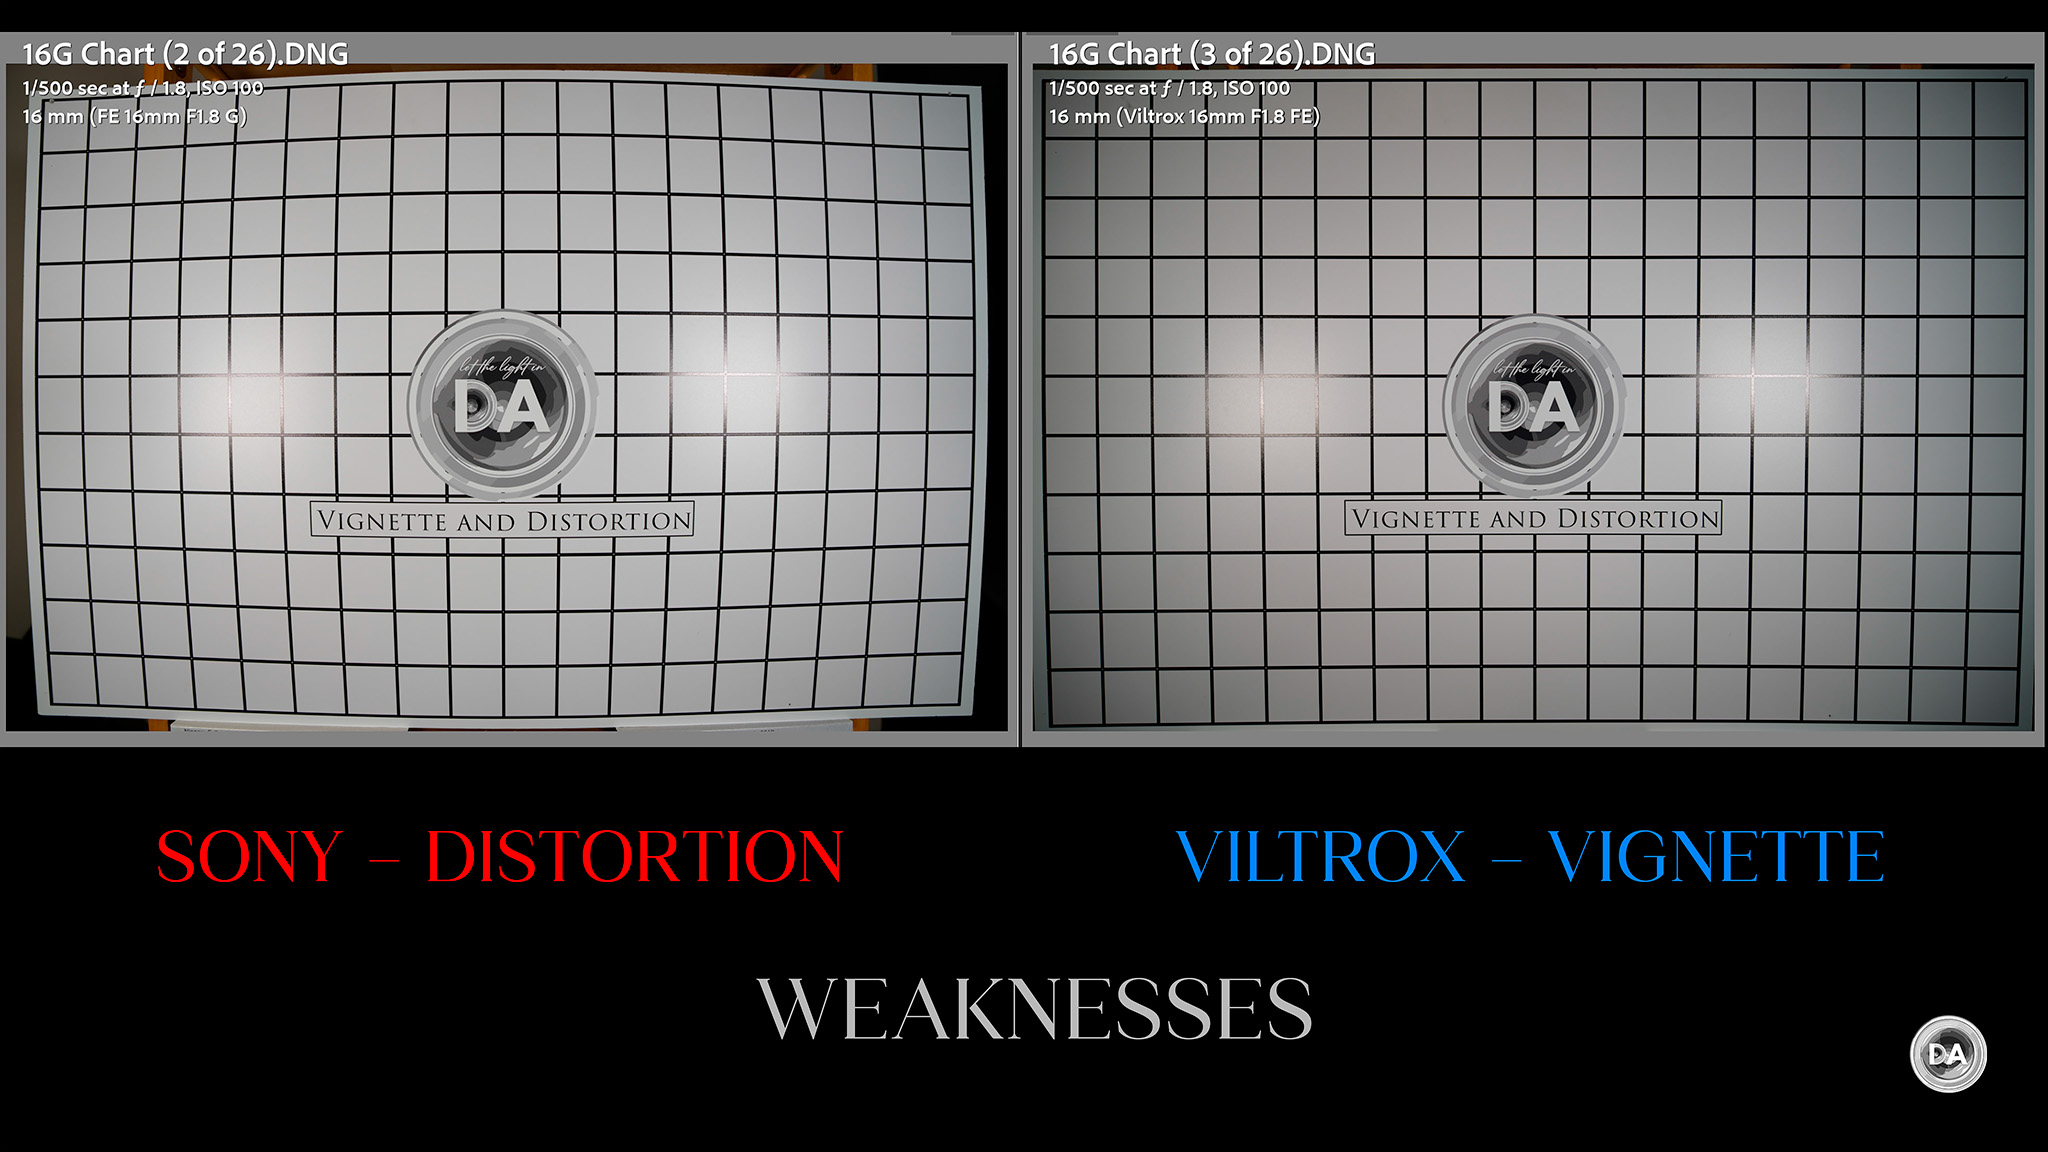
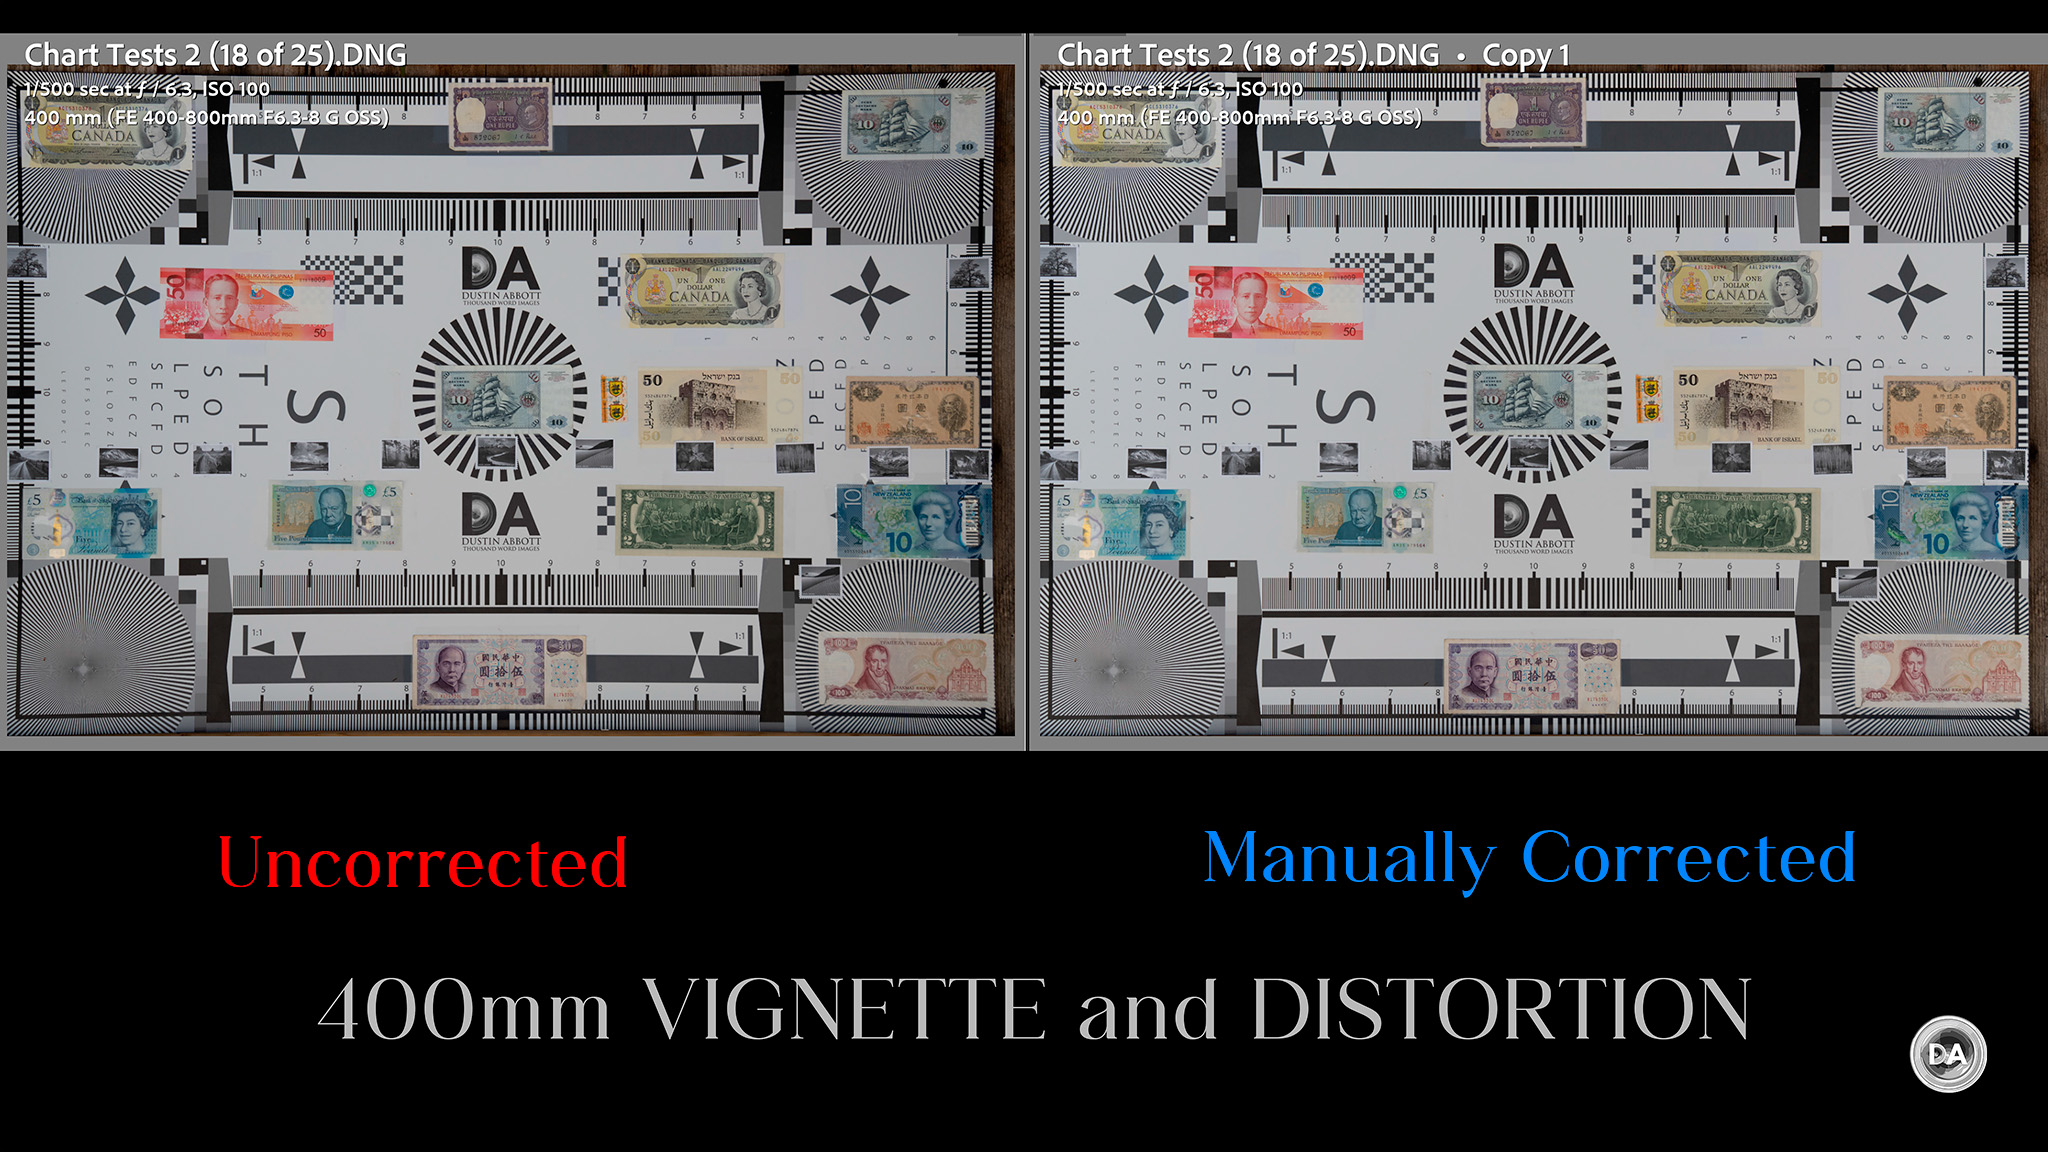
Let’s cover that major weakness first. The 16mm F1.8 G suffers from a MASSIVE amount of barrel distortion. This is clearly the area where the engineers compromised to produce a lens this compact, as both the quantity and complexity of the distortion is quite bad.
I needed to use a massive +30 to correct the barrel distortion, but even then the results are pretty terrible due to a very complex mustache-pattern effect that results in uneven correction. There is, in fact, more distortion after correction than what the Viltrox has with no correction.
It’s a good thing this lens has access to first party software profiles to help electronically correct things. There isn’t a profile available yet in Lightroom for the RAW images, but I grabbed a JPEG that received in-camera correction, and it looked like this:
Even Sony’s own correction profile doesn’t cover things perfectly, but it definitely looks better. If you don’t have corrections employed, you will DEFINITELY see this distortion.
So is this a dealbreaker? Probably not. Here’s a look at the same shot with an uncorrected RAW on the left and the in-camera corrected JPEG on the right. The latter has been well enough corrected that I doubt it will cause any problems.
If this were a third party lens with less than perfect profile support, I’d be concerned, but it’s probably not too big of a deal with a first party lens.
Vignette is actually not a real issue at all, with only a +52 required in my manual correction (about two stops). That’s impressive in a lens that is so compact, particularly when I consider that the Viltrox has a much larger front element (77mm vs 67mm filter sizes) and yet has double the vignette. If you look at an uncorrected RAW from both, you can clearly see their flaws.
Most of the time LoCA (Longitudinal Chromatic Aberrations) isn’t really an issue with wide angle lenses because depth of field tends to be pretty deep. That’s a little less true of the 16mm F1.8 G because it is capable of focusing much closer than most lenses in this class, but I didn’t really notice much of an issue with fringing in my chart tests.
I also didn’t notice an issue with lateral style aberrations near the edges of the frame. Transitions from black to white are largely unmarred by any fringing.
Lateral CA is far more common on wide angle lenses, and I really hate it because it often messes with edge performance even after correction, but fortunately I saw zero real world issues with LaCA. You can see that the bare branches at the edge of the frame in this deep crop show no issues with fringing.
So yes, the barrel distortion is very unfortunate, but fortunately these other areas are all areas of strength.
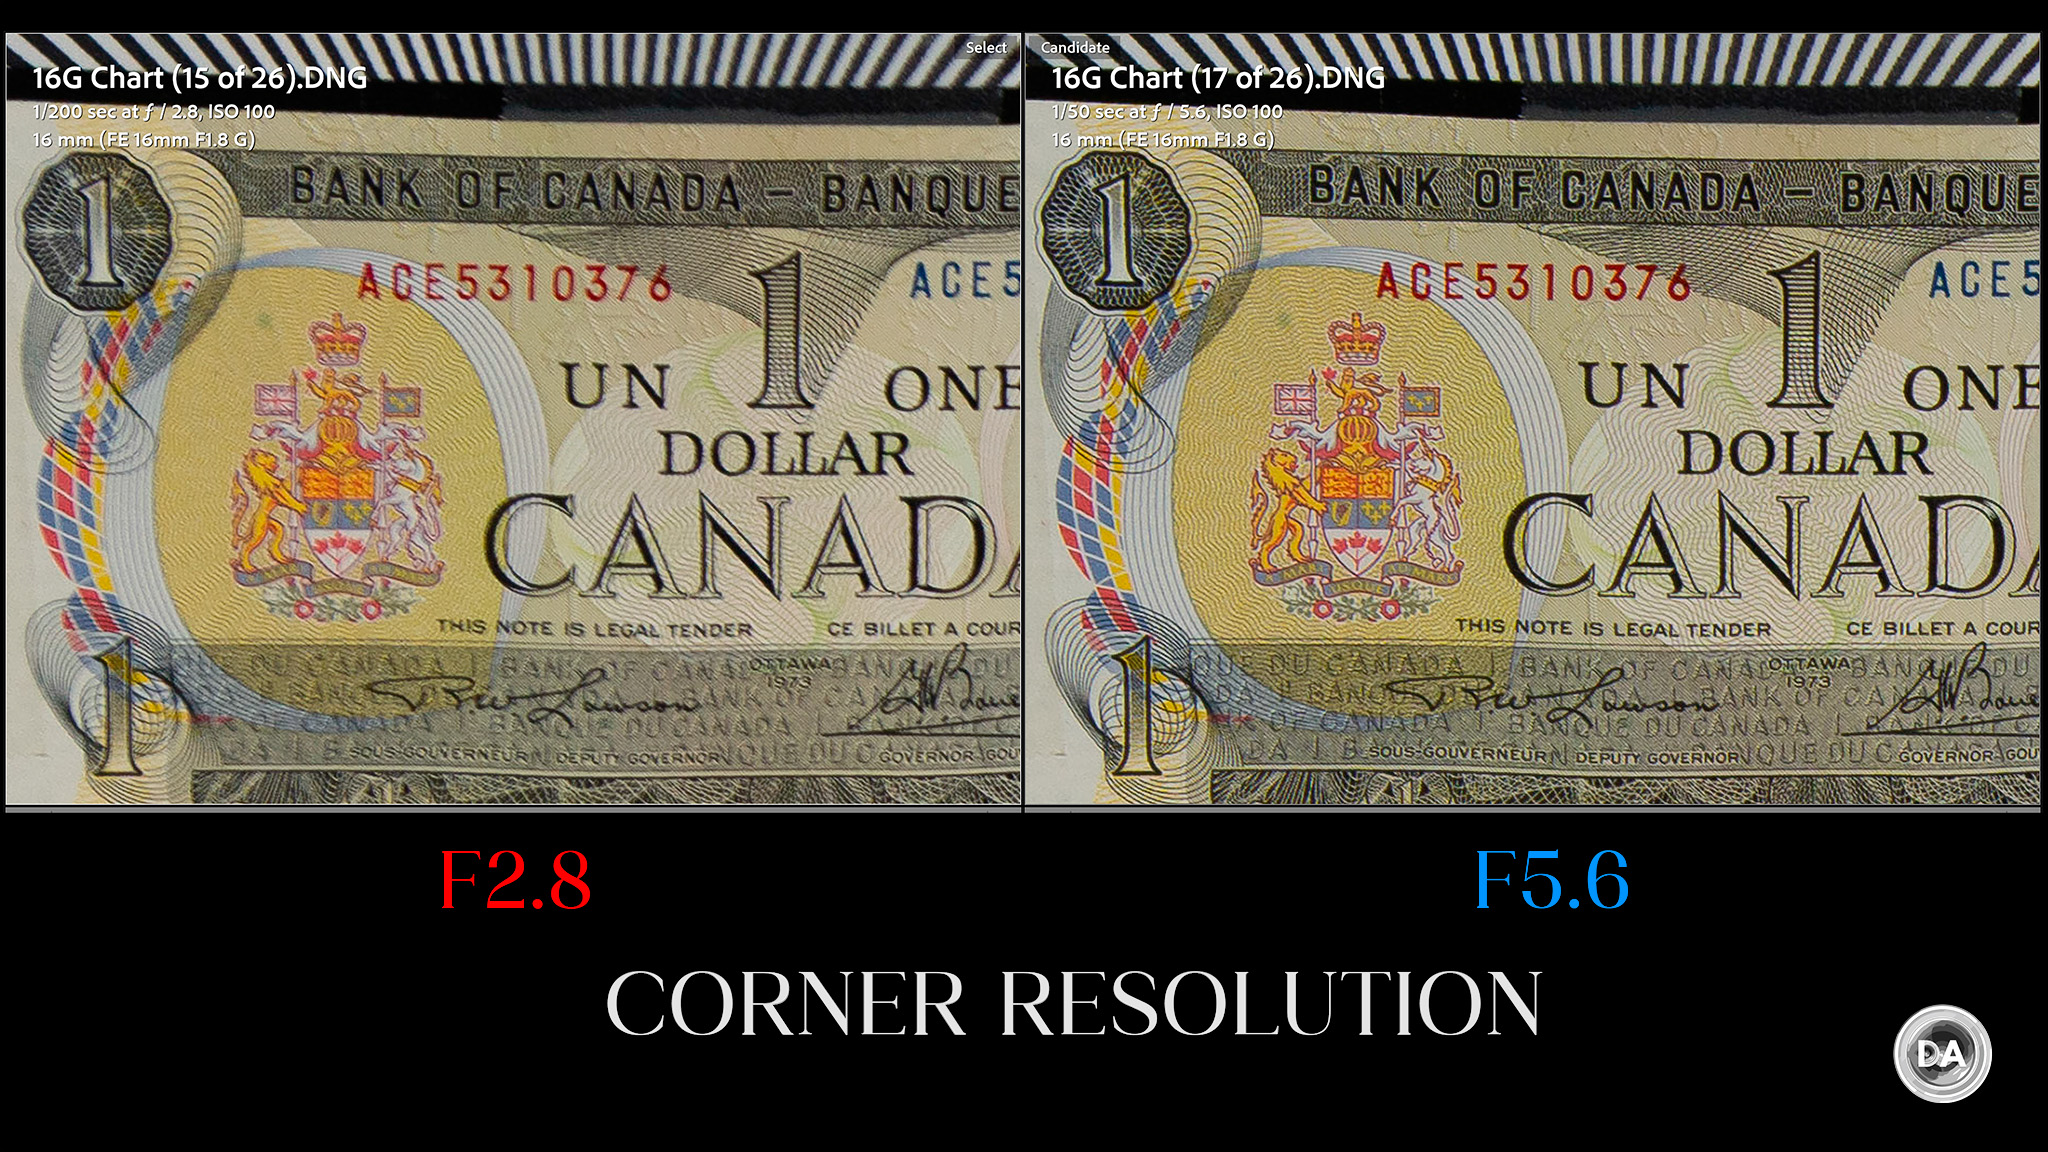
So how about resolution? You’ve probably already concluded that this is going to be an area of strength. Crops in this section will be from my test chart shown below, which I’ve tested on using my Sony a7RV and its 61MP of resolution. Crops are shown at roughly 200%.
And here are the F1.8 crops from the center, mid-frame, and lower right corner:
You can see a very nice degree of consistency, with an extremely sharp center and center performances, though we can see that the stretching in the extreme corners does detract a little from the extreme edge performance.
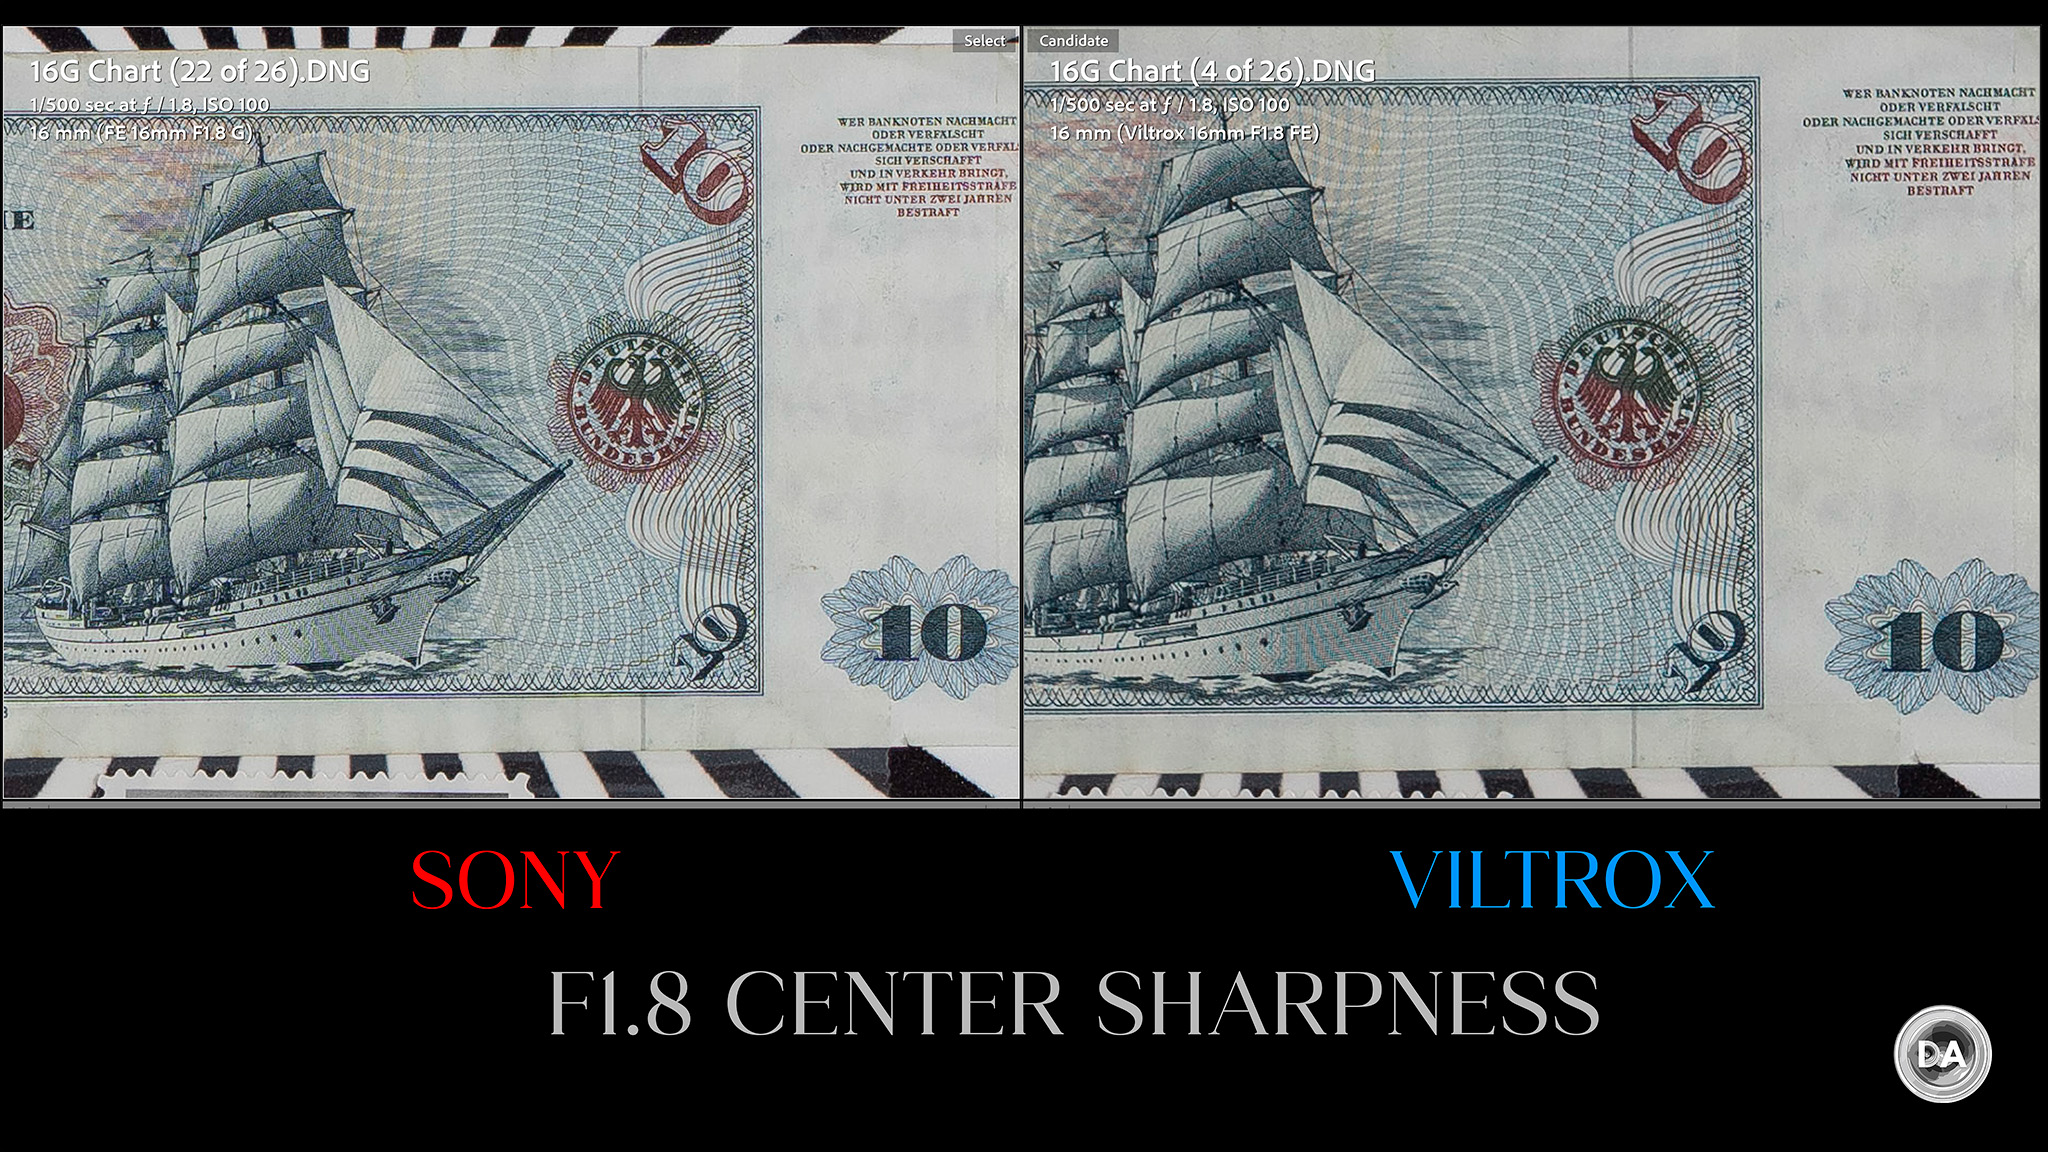
If we check in with the Viltrox, there are a few informative conclusions. First of all is the fact that the Sony is a bit sharper in the center of the frame (as the MTF suggests) and also that it delivers a slightly brighter image despite its compact size.
That advantage carries into the mid-frame, where the Sony is noticeably sharper and has superior contrast.
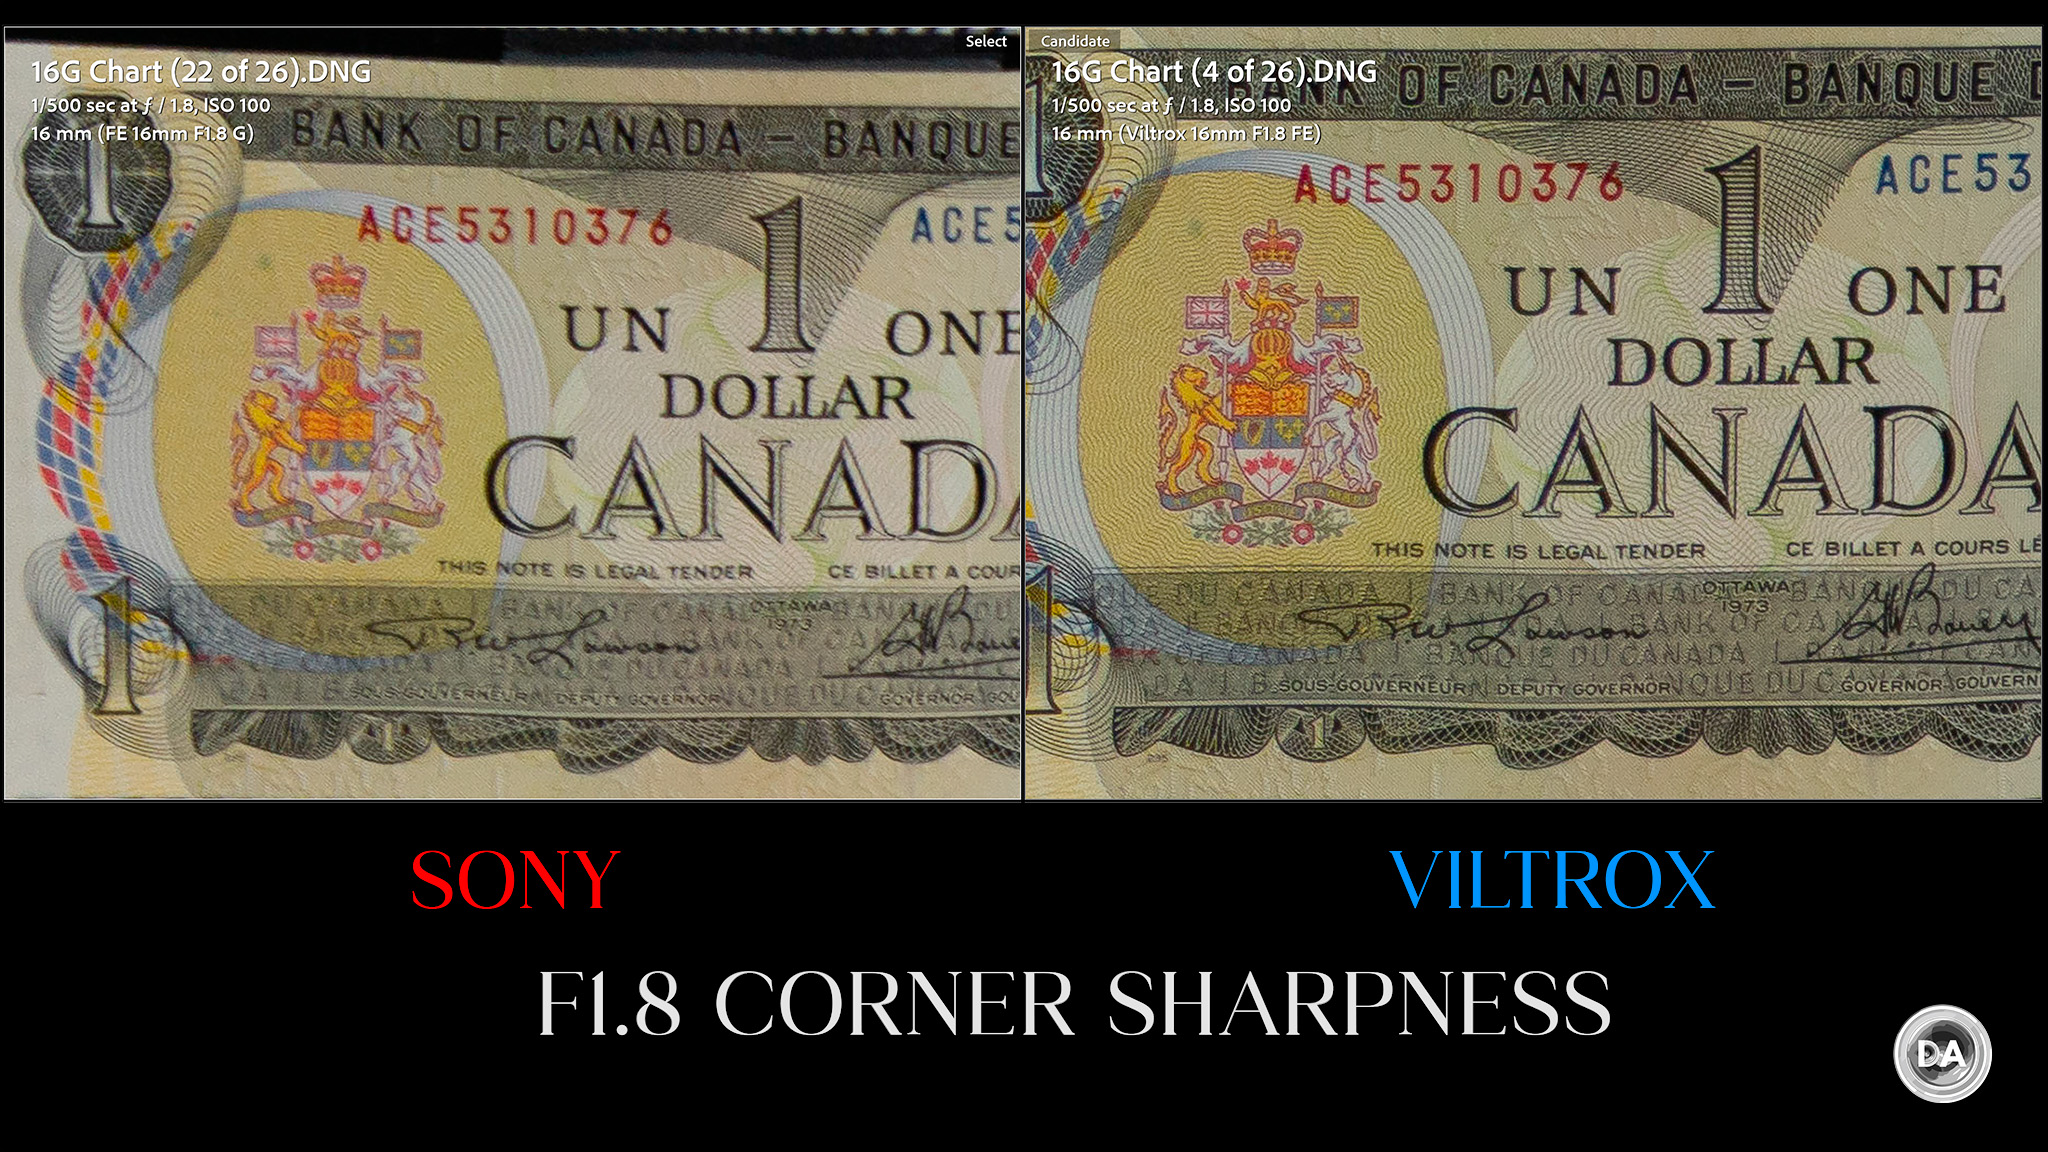
But the amount of corrections needed on the Sony do compromise its corner performance a bit. The Viltrox shows an advantage there with remarkably sharp corners for being F1.8:
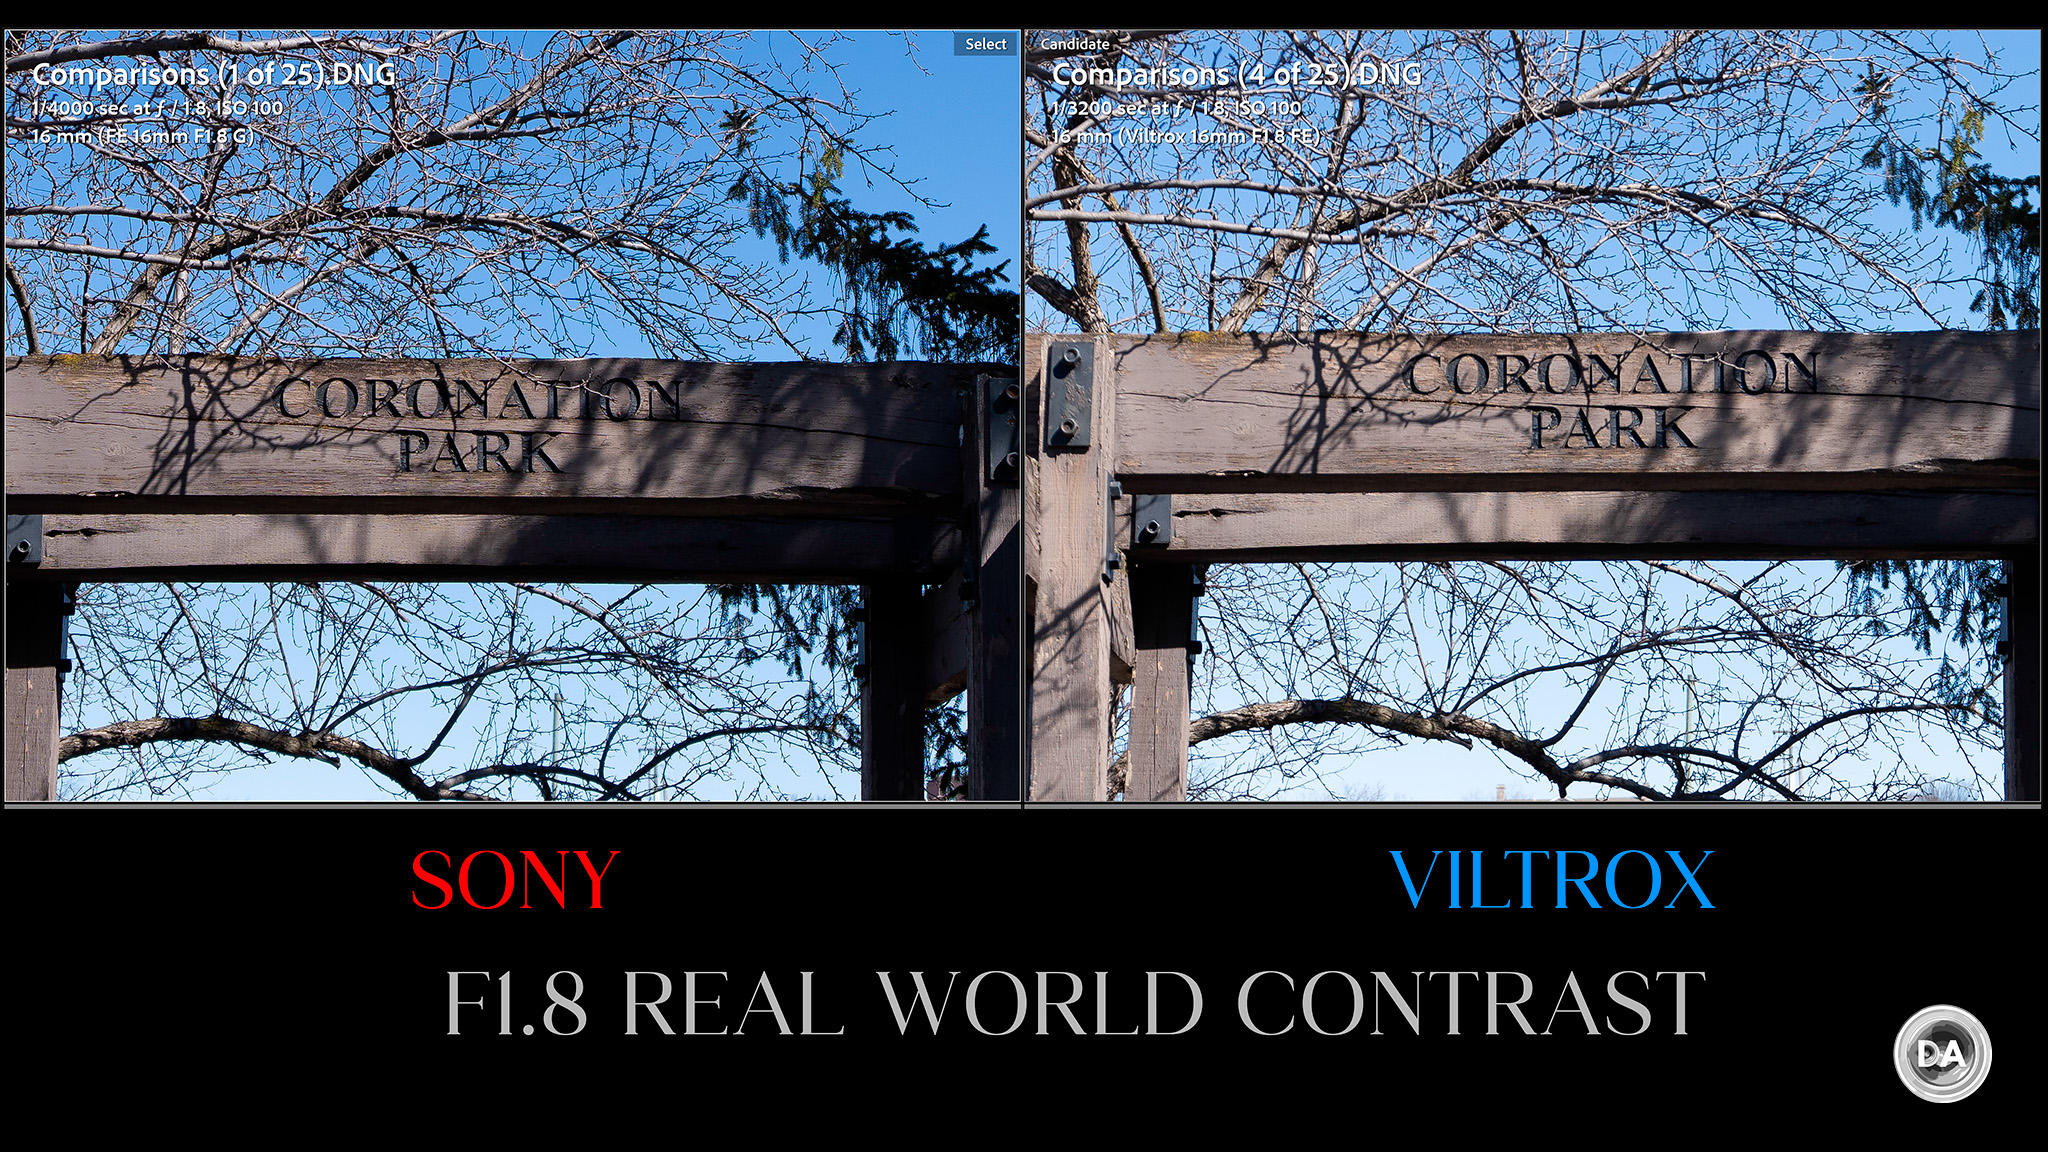
Real world images have fantastic “bite” to them and there’s a bit more real-world contrast for the Sony than what I see on the Viltrox.
Here’s a real world shot at F1.8 that shows both great center sharpness but still quite good sharpness at the edge of the image…even on a 61MP camera.
Stopping down to F2 bring a tiny bit more contrast, with a bit more available at F2.8. Corners are looking fairly crisp now.
The real jump in the corners comes in the F4-F8 zone, where they now look excellent. Here’s a look at how much better the upper left corner is at 200% at F5.6 (right) compared to F2.8 (left).
Real world images taken at these aperture settings will just look awesome.
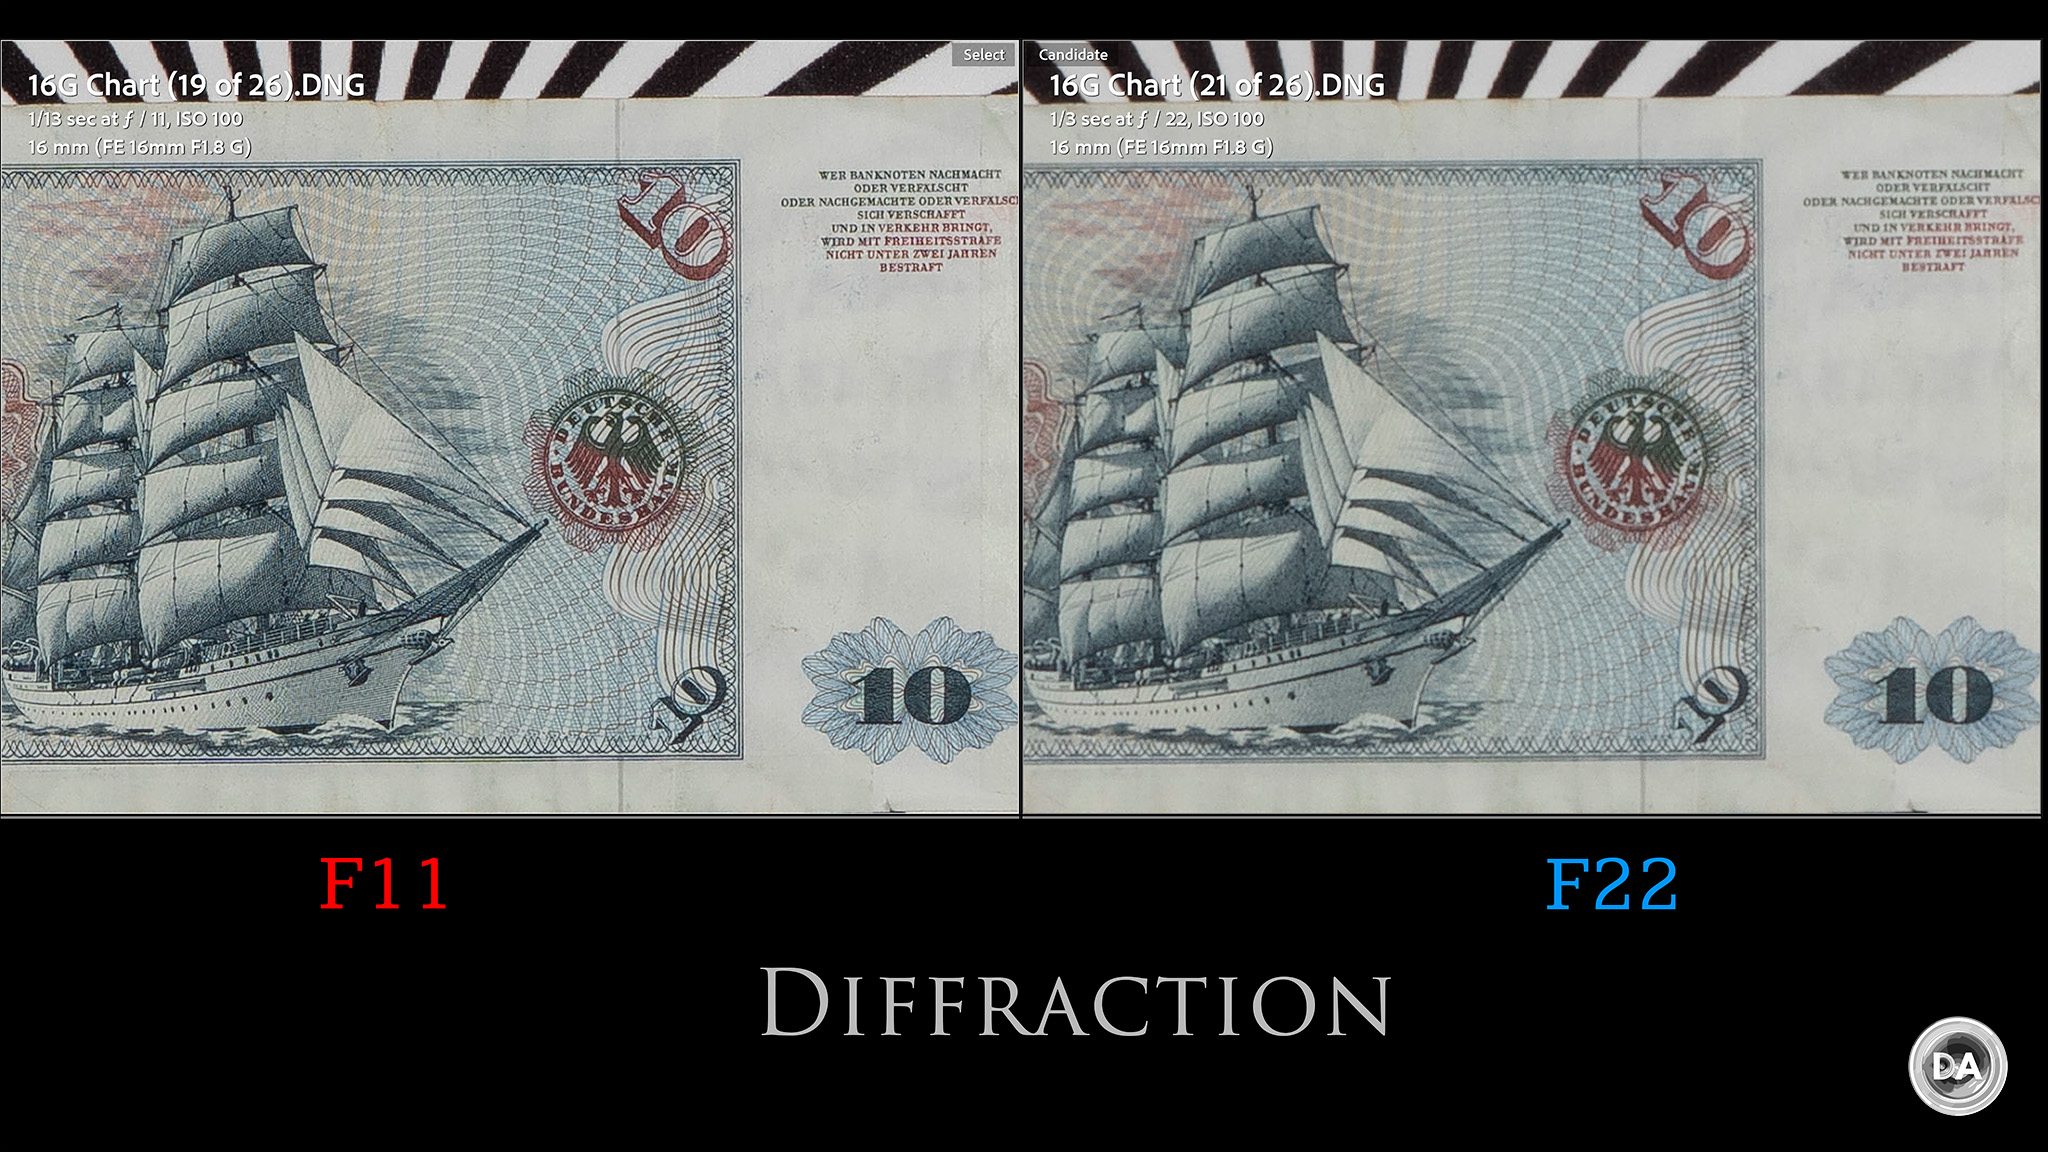
After F11 diffraction will start to soften the image, with F22 (minimum aperture) looking considerably softer than F11:
So yes, this is an extremely sharp wide angle lens.
We wouldn’t normally talk about bokeh with a 16mm lens, but the high magnification level of the 16mm F1.8 G means that you will be able to get backgrounds blurred out to some degree if you’re very close to your subject. Bokeh isn’t amazingly creamy or anything, but doesn’t look bad, either.
Here’s the bokeh in my barrel sauna if I put a bucket in the foreground.
Sony has great coatings, and they are extra important on a wide angle lens like this. The 16mm F1.8 G does a strong job of rejecting flare artifacts, delivering good contrast and minimal ghosting when pointed at the sun. I’ve raised the shadows in these images to make sure no ghosting artifacts are hiding there. First shot is F1.8, second F11, third F6.3.
The third image has the most of a glare pattern, and that seems to be at least somewhat related to the aperture, as I have the same composition wide open, and it has far less obvious ghosting.
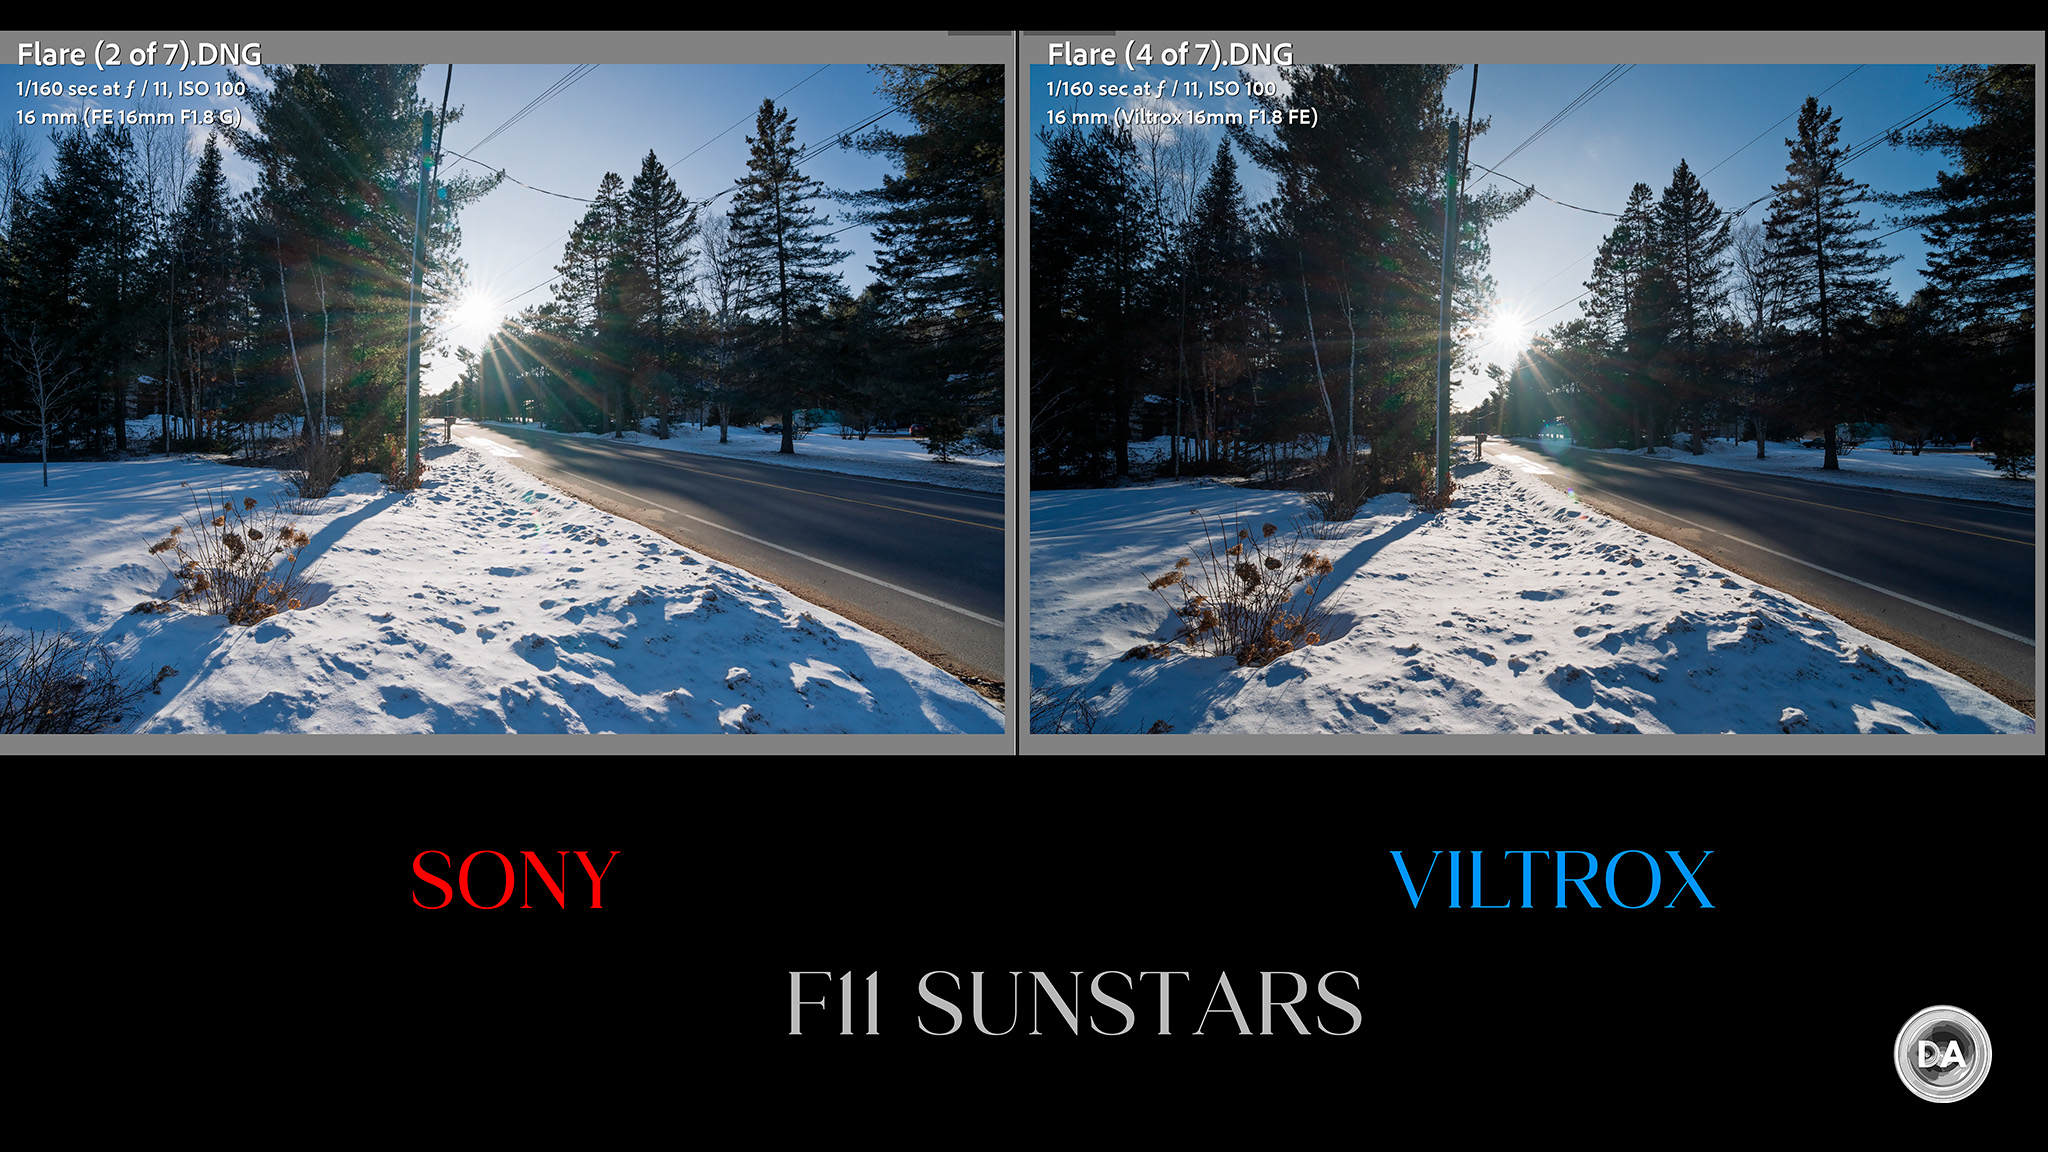
The Sony has slightly less flare artifacts than the Viltrox, and, while the sunstars are very similar, I do slightly favor those on the Sony because the blades keep a little more definition.
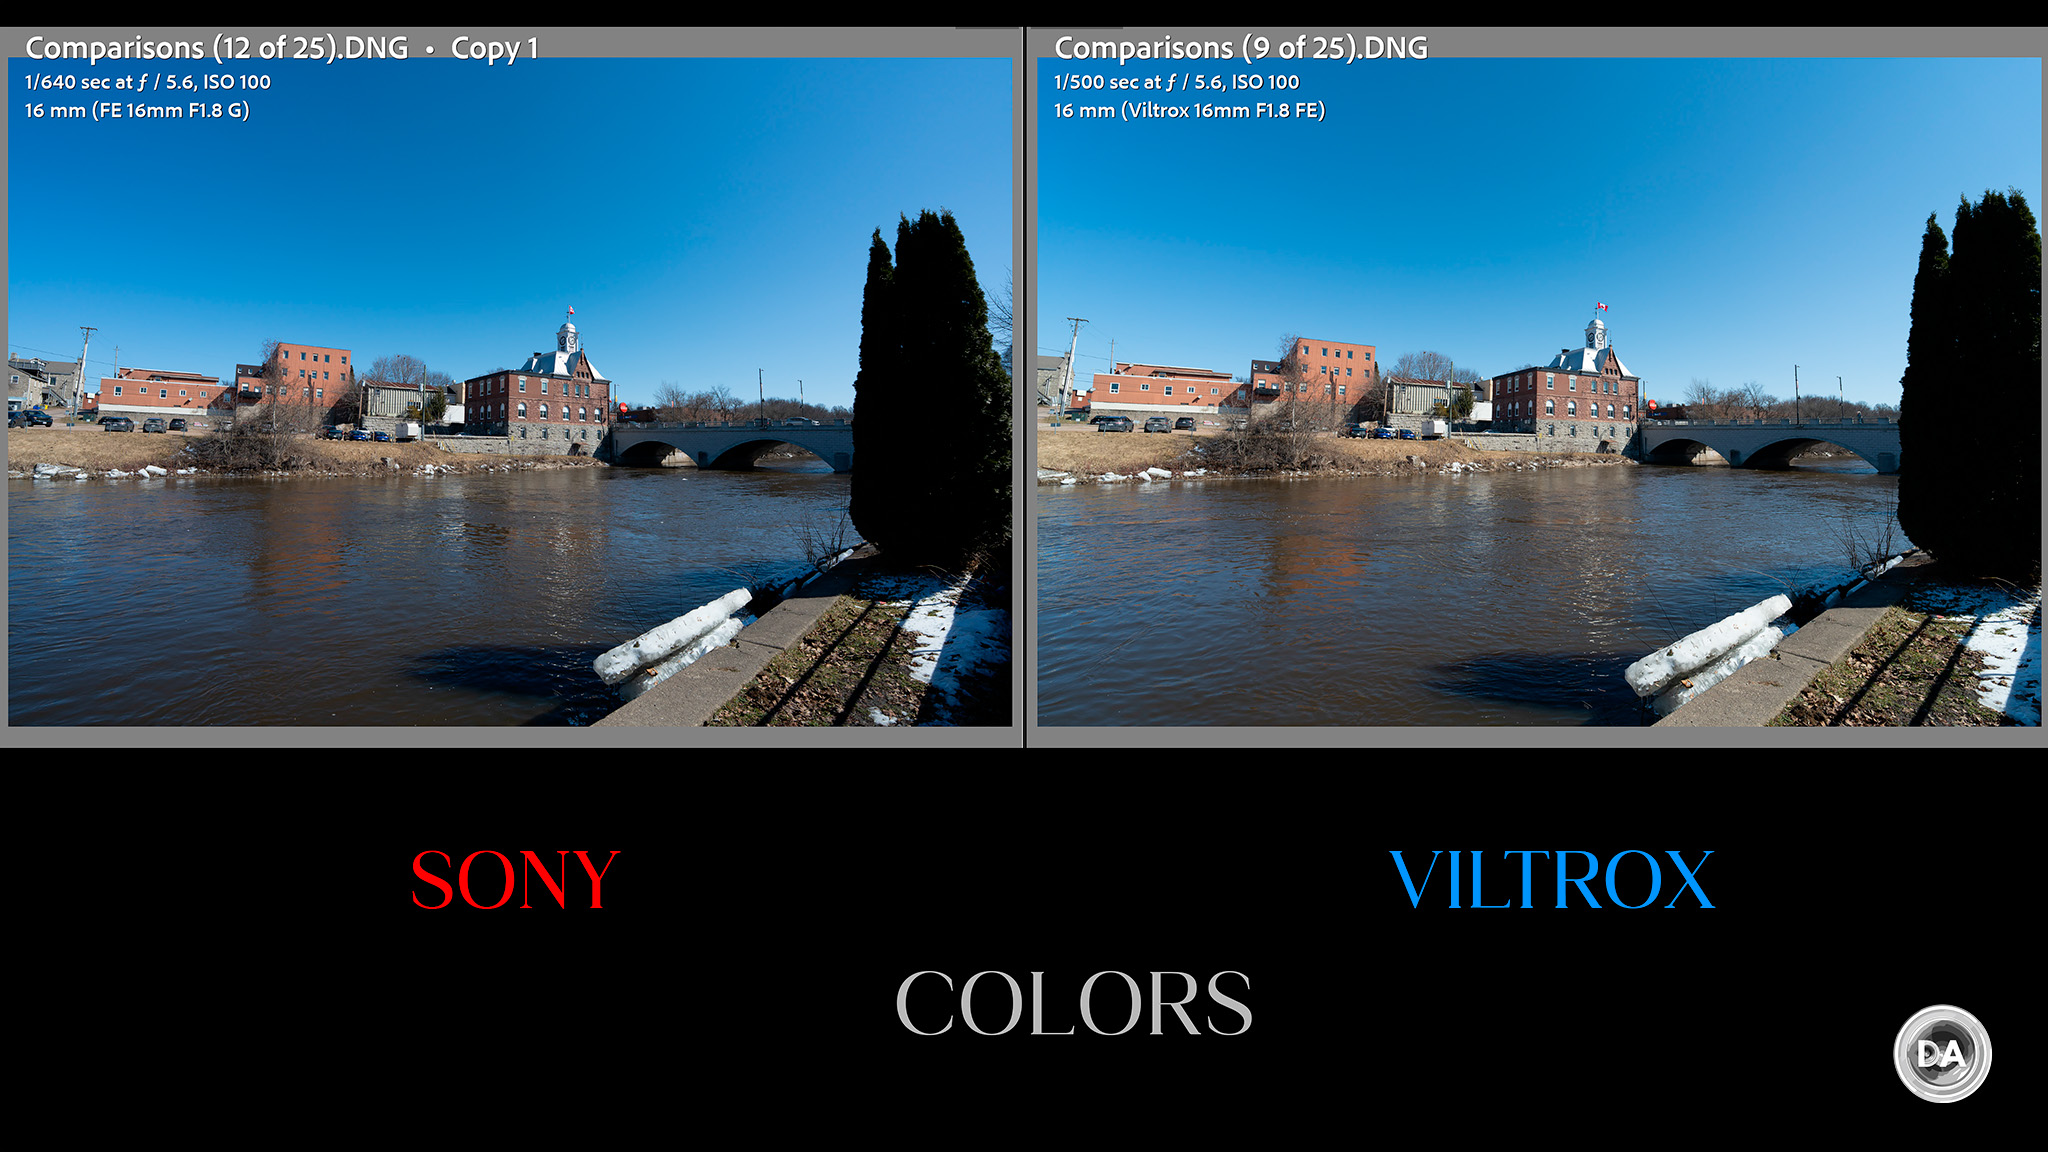
Colors seem to be slightly cool on the Sony lens than on the Viltrox. I gave some comparison images the same white balance, but even then there are slight nuances in colors. I’ll let you decide what you prefer.
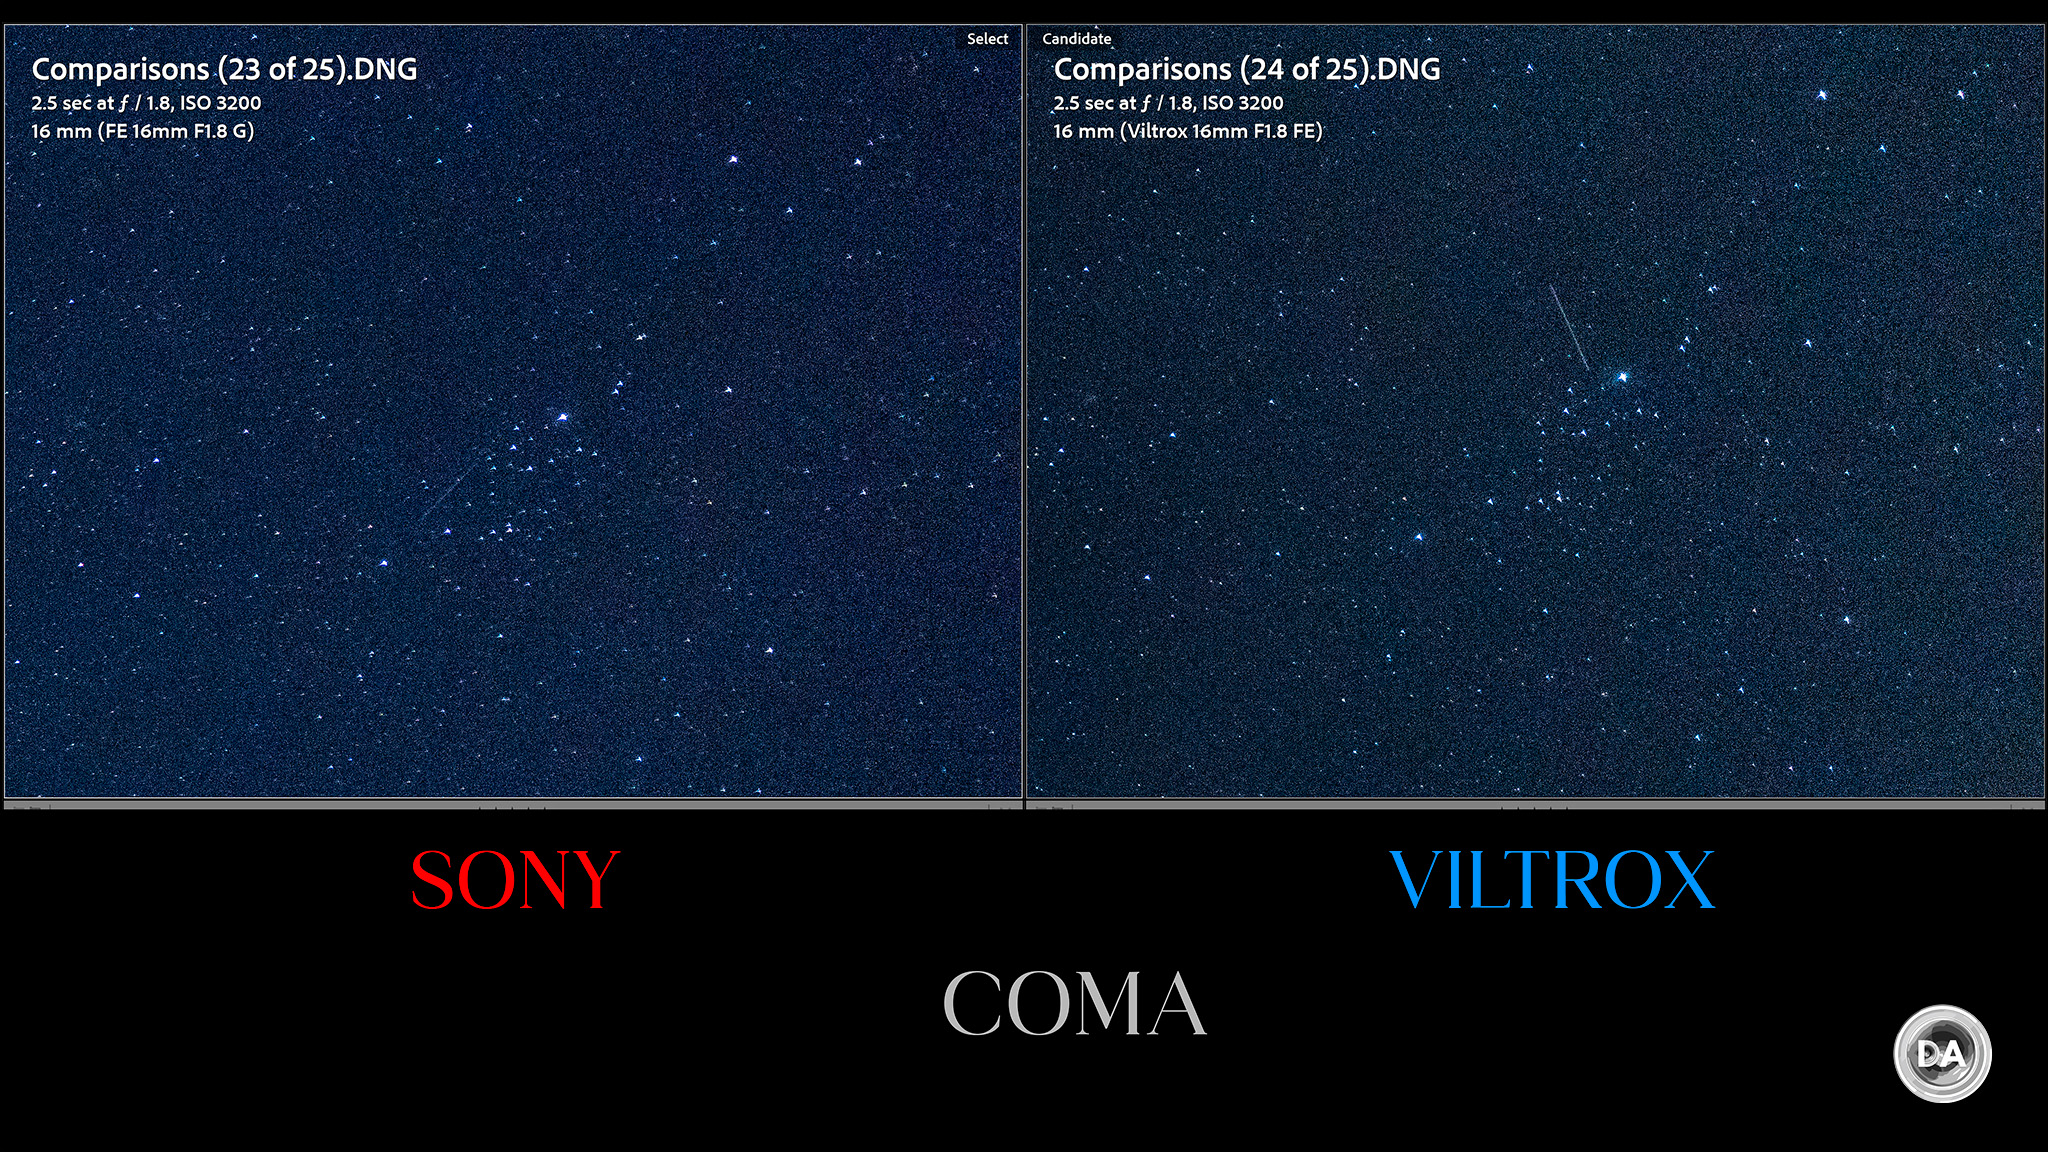
Finally, let’s take a look at coma. This could prove a very popular lens for shooting stars and the night sky. The low vignette is a big asset here, as it means that you won’t be getting a ton of extra noise in the edge where the vignette has to be corrected. This lens isn’t free from coma, though the results aren’t bad, either. The third crop shows the crucial corner performance, and you can see tha the stars have become more like flying angels. I’ve seen worse…and I’ve seen better.
The Viltrox shows very slightly less coma, but also more noise in the corners because of all the additional vignette that needs correcting. You’ll have to decide which you prefer.
All told, this is a good lens optically with just one major flaw. Check out the image gallery to see more photos from the lens.
Conclusion
I’m of the firm opinion than F1.8 lenses hit the sweet spot for wide angle lenses. F1.4 lenses are always “sexier”, but to me really fast maximum apertures are less necessary in a wide angle lens where one will ofter stop down anyway. A 16mm lens is pretty easy to handhold, so having an F1.4 aperture isn’t really ncessary for keeping the ISO down, either. Sigma’s (excellent) 20mm F1.4 DN weighs over twice as much and is 50% longer despite being fairly compact for an F1.4 wide angle. The Sony FE 16mm F1.8 G will make you wonder why carrying a larger lens is necessary, as it delivers great looking images and is generally a delight to carry and use.
I don’t love the trend of relying on software corrections to finish the job optically, and the amount of barrel distortion here is a bit disappointing. At the same time I’m a little more understanding when a lens is this compact. I recognize that there has to be some kind of tradeoffs for producing such a small lens, and I would rather have the need for software corrections of distortion than having a soft lens.
I’ve referenced the Viltrox AF 16mm F1.8 FE a lot during this review, as it is the most natural comparison for the Sony (and I happen to own it). But I’ll have to confess that this Sony is making me definitely consider selling my Viltrox and acquiring the Sony. It’s small size in particular is very compelling. $800 is not an inexpensive price, but that is $100 cheaper than what the similar FE 20mm F1.8 G sells for. I would probably choose the 16mm over the 20mm, myself, mostly for the simple reason that it is easy to crop in on today’s high resolution cameras, but you can’t always step back to put more in the frame. Kudos to Sony for managing to produce such a desirable little lens despite having a massive existing catalog. I guess there still is room for innovation!
Stay tuned at my YouTube channel, as I will soon have a direct head to head comparison video between the Viltrox and Sony which really highlights the comparitive strengths and weaknesses of both.
Keywords: Sony FE 16mm F1.8 G, Sony 16mm G, 16mm F1.8, Sony 16mm F1.8 Revew, 16mm, F1.8, G, Sony 16mm review, Viltrox AF 16mm F1.8, Full Frame, Review, Sony Alpha 1, Sony a7RV, Review, Hands On, Dustin Abbott, Real World, Comparison, Sharpness, Bokeh, Flare Resistance, Autofocus, Image Quality, Sample Images, Video, Photography, let the light in, weathersealing, #letthelightin, DA
DISCLAIMER: This article and description contains affiliate links, which means that if you click on one of the product links, I’ll receive a small commission. As an Amazon Associate I earn from qualifying purchases.
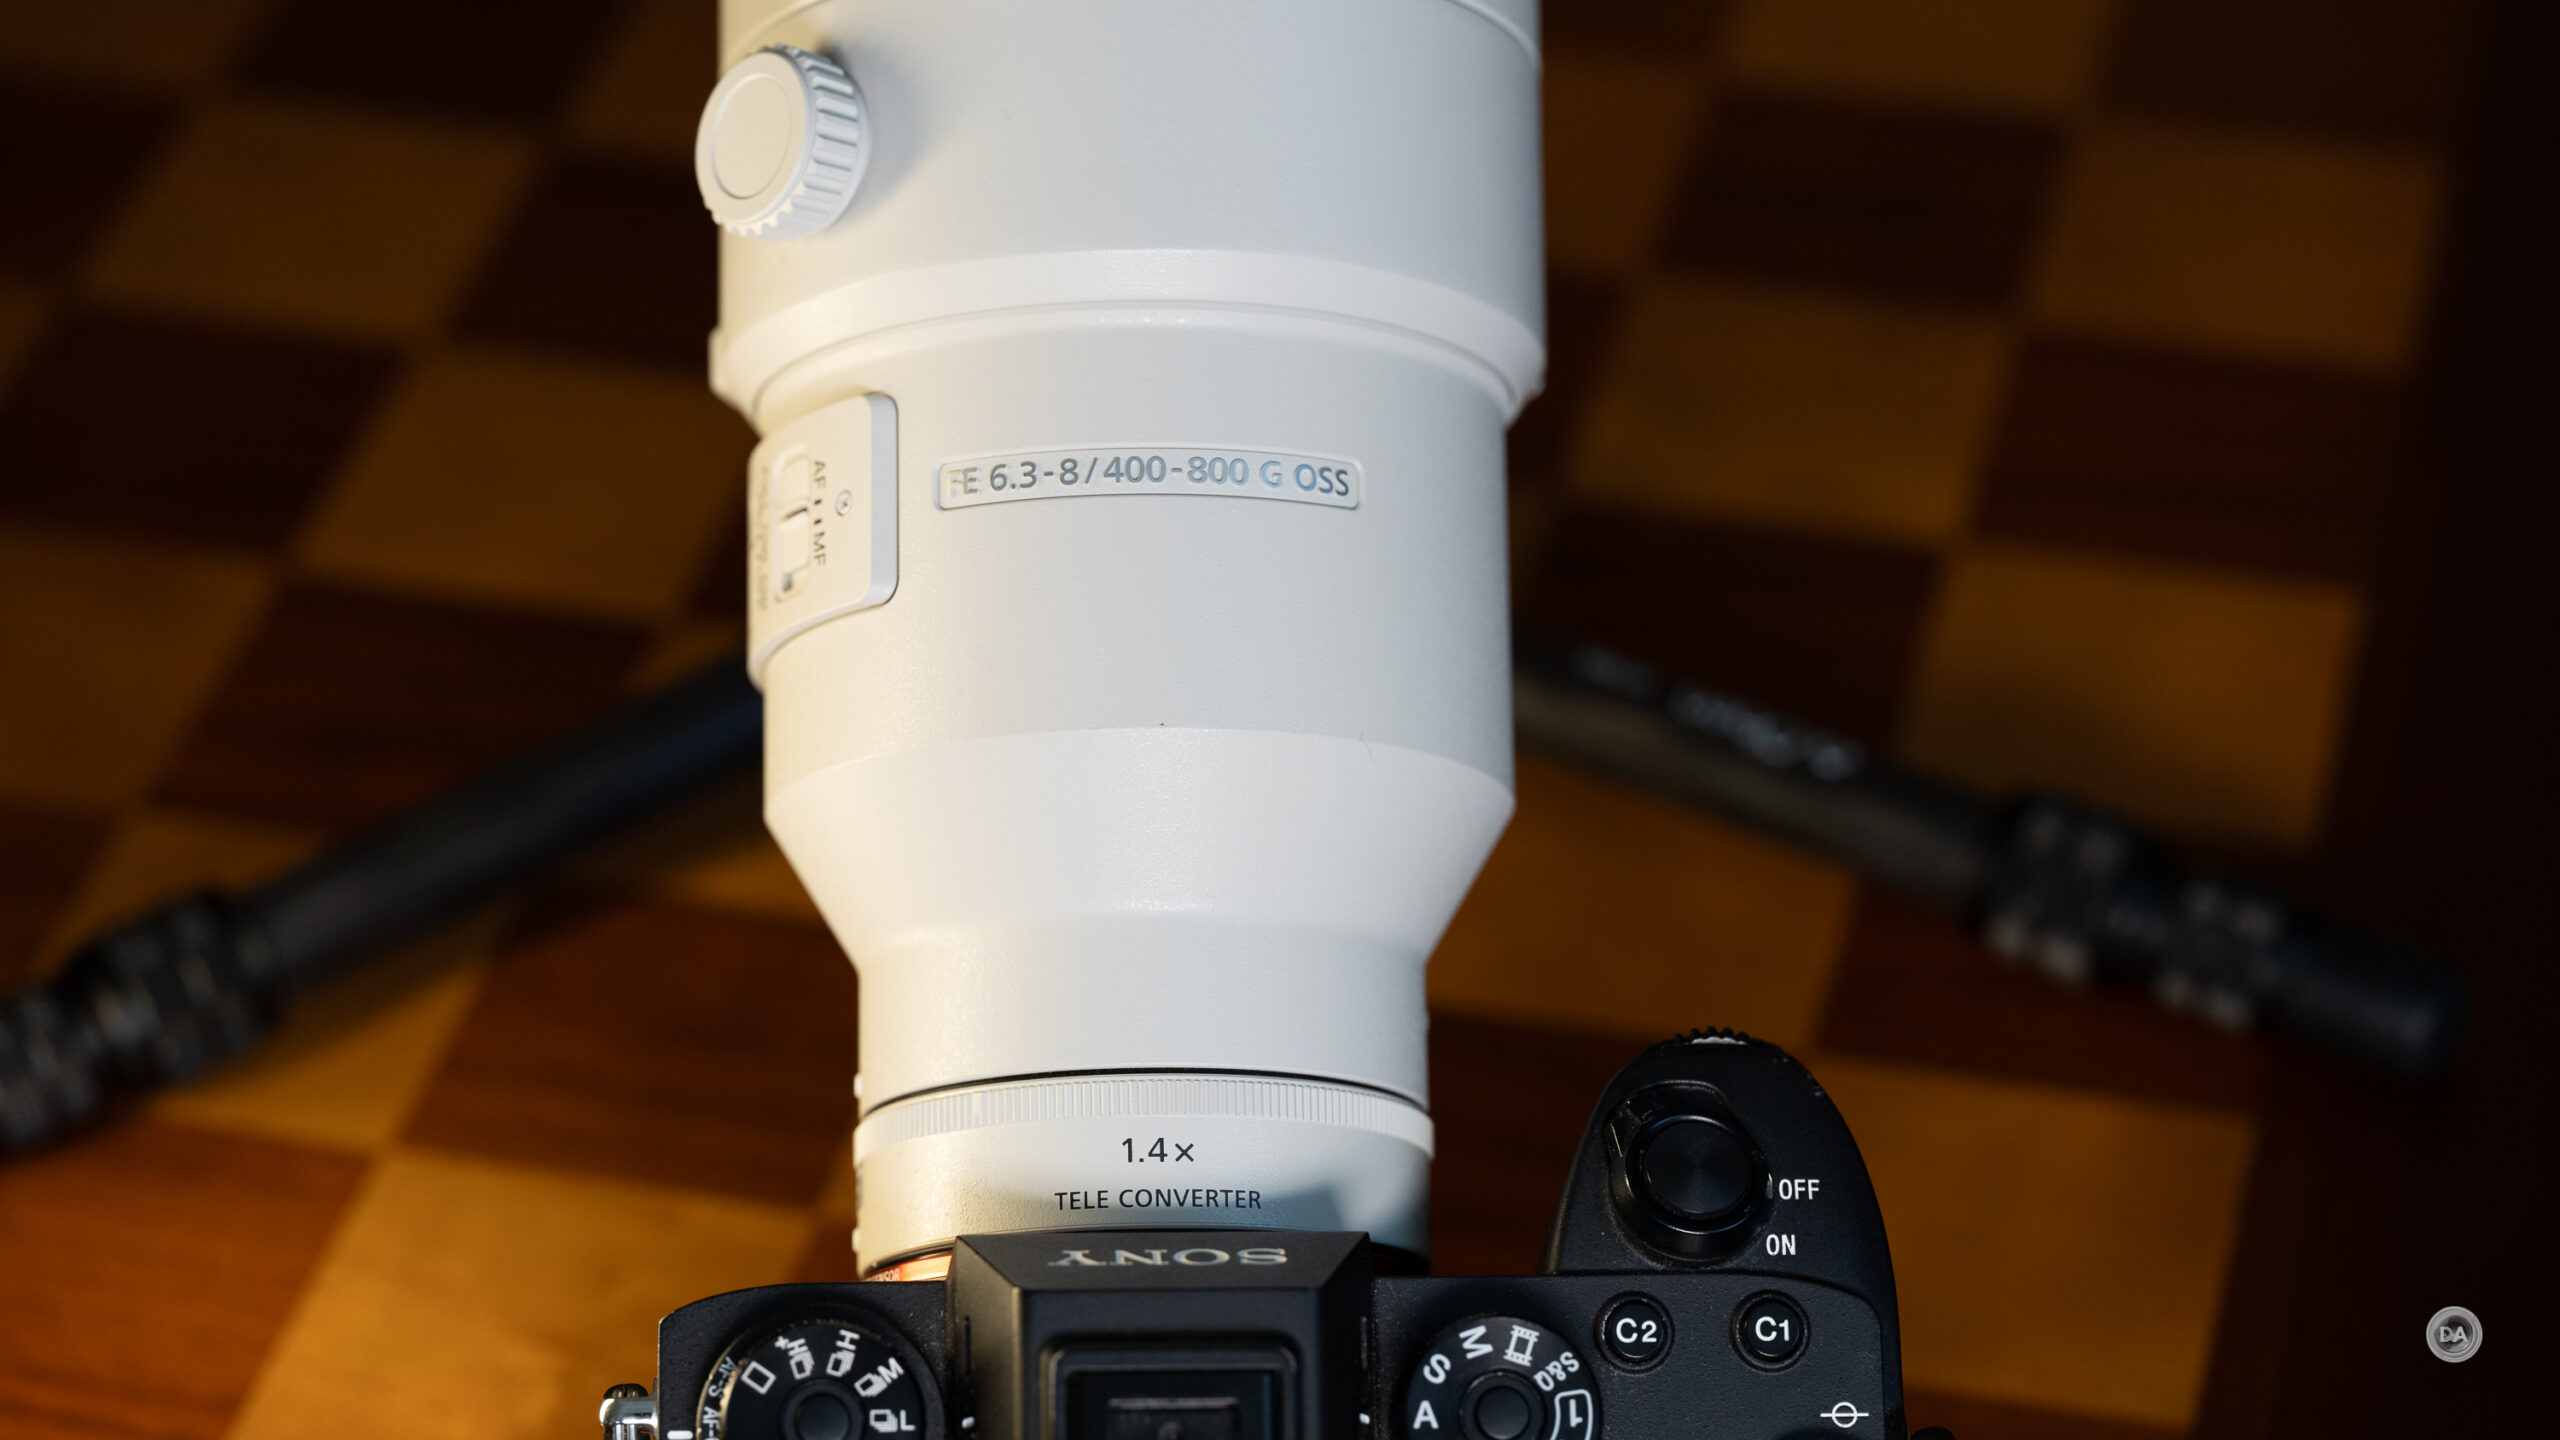
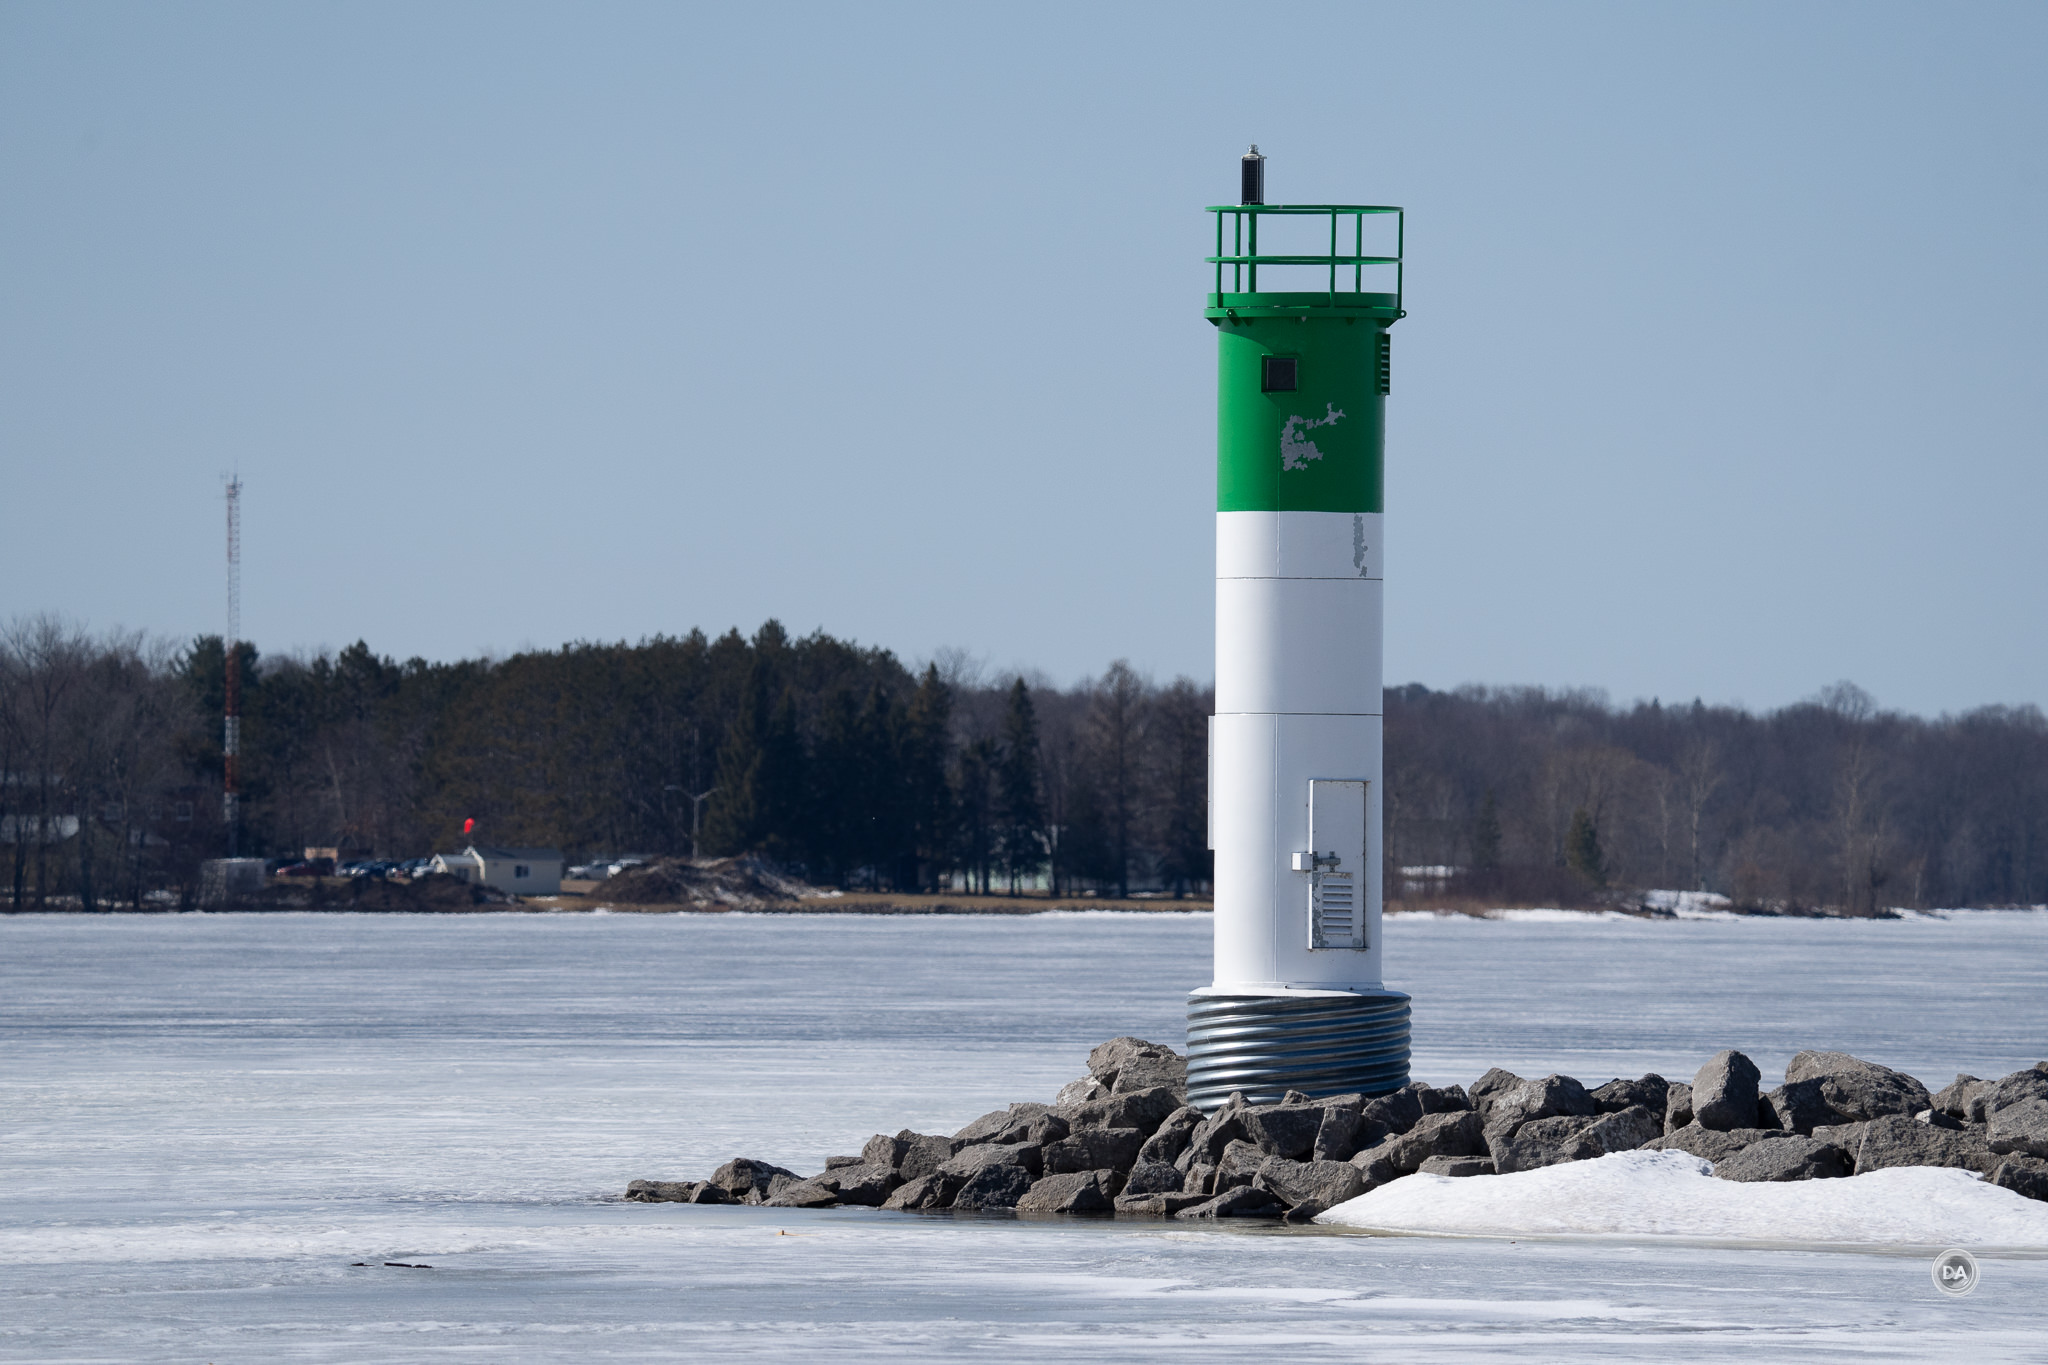
I have owned (and loved) the Sony FE 200-600mm F5-6.3 G OSS since reviewing it back in 2020. Sony took a different tack than most competing telephoto zooms by opting for an internally zooming lens, and, while that meant that the lens was larger than lenses like the Tamron 150-500mm or the Sigma 150-600mm, it also made for a lens that handled better in the field, allowing for near instant zooms, more consistent balance, and more consistency in handling. When your eye is in the viewfinder, it’s great to have everything stay in the same place for muscle memory. What’s more, that lens had great autofocus, great image quality, and was generally a lot of fun to use. Sony has now expanded on that formula with their newest lens – the Sony FE 400-800mm F6.3-8 G OSS – by shifting the zoom range 200mm further, and, in the process, creating a whole new class of lens. 600mm has been the previous limit for a lens like this, so getting up to 800mm opens up all kinds of new horizons…and the fact that it can be used with teleconverters allows for some pretty wild amounts of reach. Does the 400-800G limit up to the standard set by the 200-600G? We’ll explore that in both the video review and text reviews, or just enjoy the photos in the galleries below.
Thanks to Sony USA for sending me a review loaner of this lens. As always, this is a completely independent review. *The tests and most of the photos that I share as a part of my review cycle have been done with the Sony a7RV along with the Sony Alpha 1 that serve as my benchmark cameras for Sony lenses. You can visit the product page for the 400-800G here.
While lenses like this are not for everyone, those who are always looking for a little more reach are going to be delighted with the 400-800mm G.
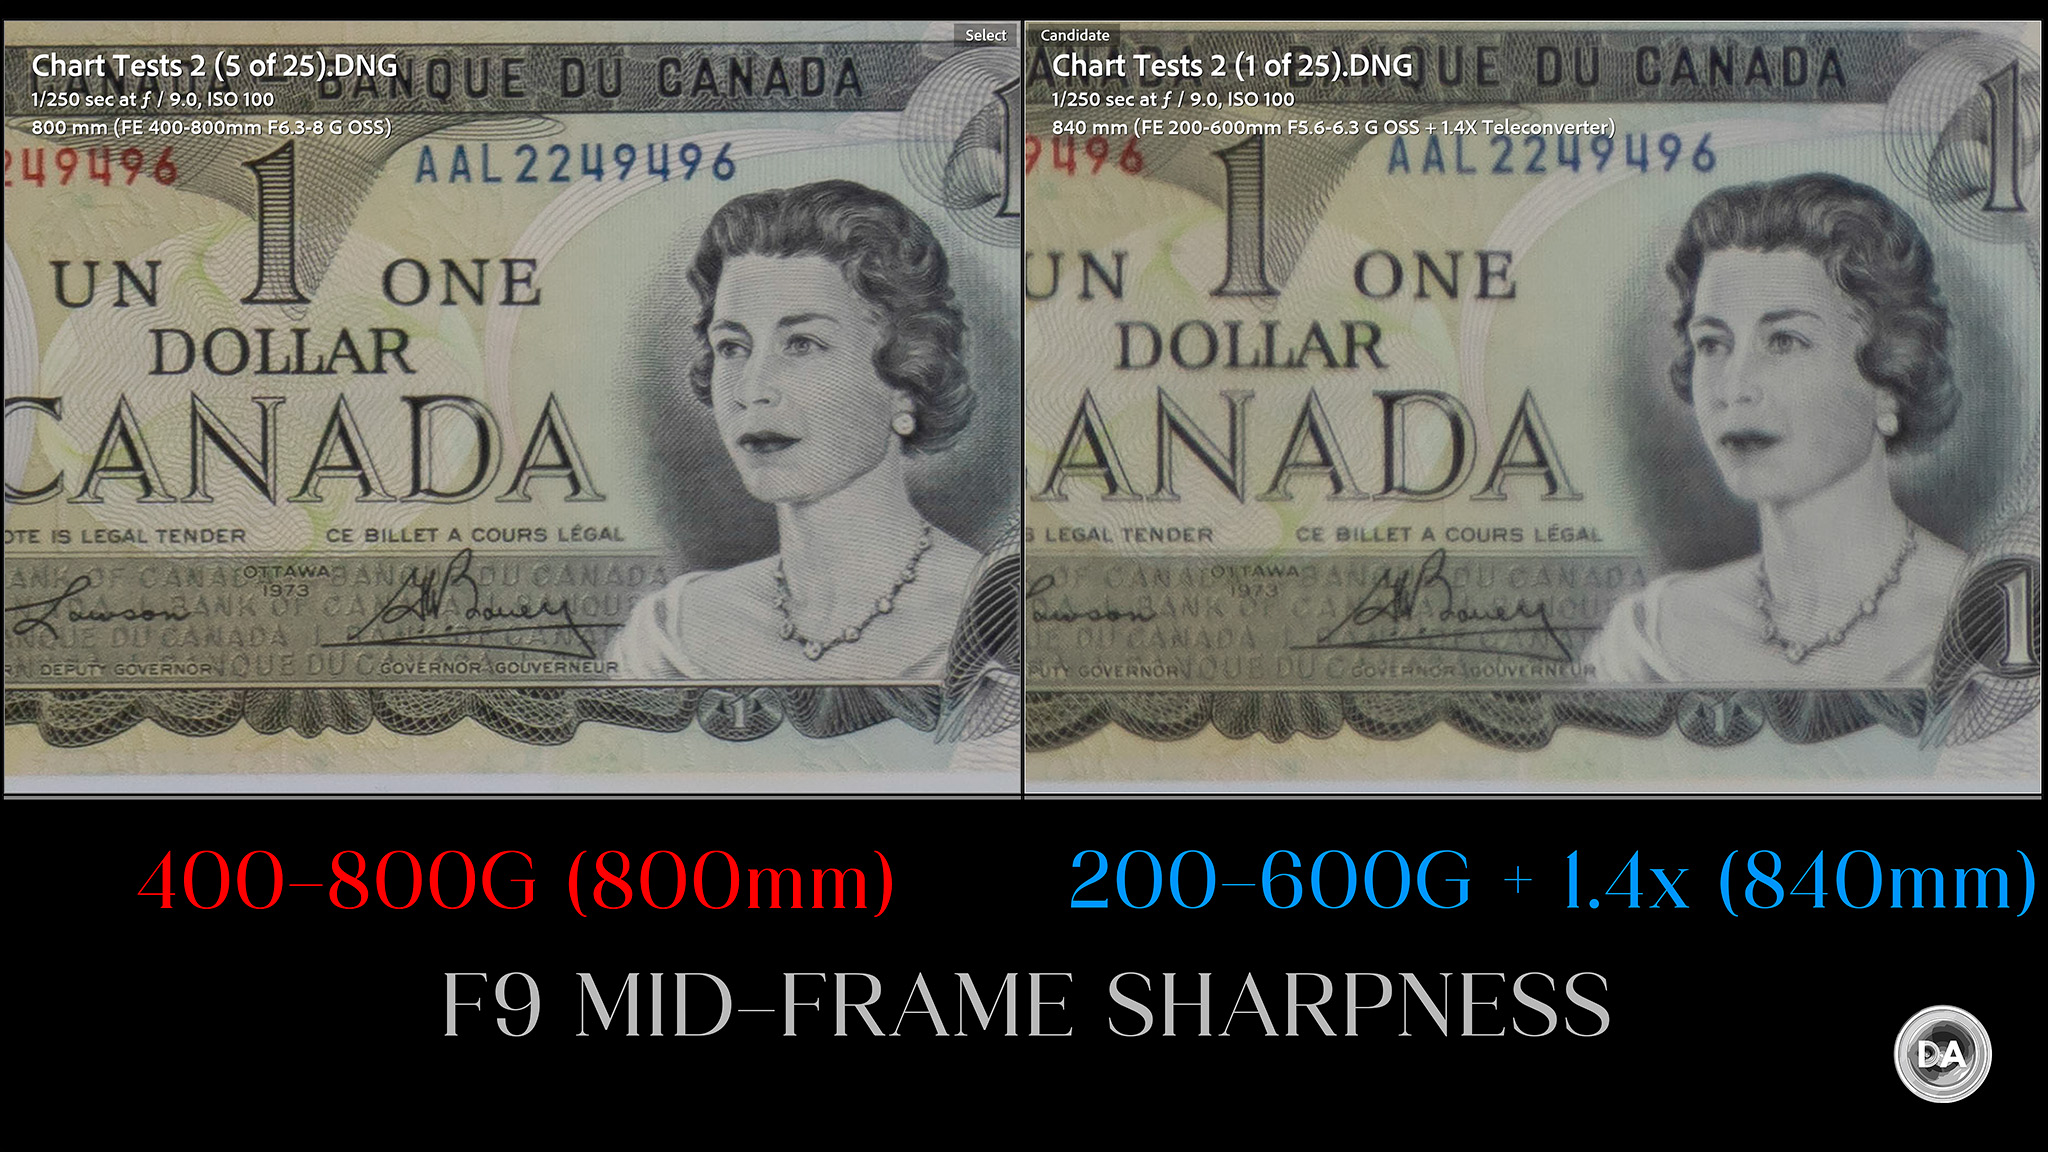
The 200-600G could reach up to 840mm if you used a 1.4x teleconverter, but your maximum aperture would be F9, so the 400-800G is actually the brighter option for shooting in and around 800mm. The 400-800’s range can be stretched out to 1120mm with a 1.4x, with a maximum aperture of F11. You can reach up to an unbelievable 1600mm with a 2x teleconverter, though I didn’t have one on hand to test with (I’m typically not a big fan of 2x teleconverters). Maximum aperture will be a rather dim F16, so you’ll need lots of light (and probably a slower moving subject) to make that work.
But we’ve never seen a zoom lens that reaches 800mm quite like this, and certainly not one that is quasi-affordable at roughly $2900 USD ($4100 CDN). Does that make this droolworthy lens worth pursuing? Take a look at the photos and see.
Keywords: Sony 400-800mm, Sony 400-800 G, 400-800, Sony FE 400-800mm F6.3-8 G OSS, 400-800mm, G, OSS, Sony 400-800 Review, Sony 400-800mm Review, 200-600, Sony FE 200-600, 200-600, 200-600mm, Sony FE 200-600G, 200-600G Review, Full Frame, Review, Sony Alpha 1, Sony a7RV, Review, Hands On, Dustin Abbott, Real World, Comparison, Sharpness, Bokeh, Flare Resistance, Autofocus, Image Quality, Sample Images, Video, Photography, let the light in, weathersealing, #letthelightin, DA
DISCLAIMER: This article and description contains affiliate links, which means that if you click on one of the product links, I’ll receive a small commission. As an Amazon Associate I earn from qualifying purchases.
I have owned (and loved) the Sony FE 200-600mm F5-6.3 G OSS since reviewing it back in 2020. Sony took a different tack than most competing telephoto zooms by opting for an internally zooming lens, and, while that meant that the lens was larger than lenses like the Tamron 150-500mm or the Sigma 150-600mm, it also made for a lens that handled better in the field, allowing for near instant zooms, more consistent balance, and more consistency in handling. When your eye is in the viewfinder, it’s great to have everything stay in the same place for muscle memory. What’s more, that lens had great autofocus, great image quality, and was generally a lot of fun to use. Sony has now expanded on that formula with their newest lens – the Sony FE 400-800mm F6.3-8 G OSS – by shifting the zoom range 200mm further, and, in the process, creating a whole new class of lens. 600mm has been the previous limit for a lens like this, so getting up to 800mm opens up all kinds of new horizons…and the fact that it can be used with teleconverters allows for some pretty wild amounts of reach. Does the 400-800G limit up to the standard set by the 200-600G? We’ll explore that in both the video review and text review here.
Thanks to Sony USA for sending me a review loaner of this lens. As always, this is a completely independent review. *The tests and most of the photos that I share as a part of my review cycle have been done with the Sony a7RV along with the Sony Alpha 1 that serve as my benchmark cameras for Sony lenses. You can visit the product page for the 400-800G here.
It’s a curious quirk of mathematics, but while both the 200-600G and 400-800G cover an identical number of potential focal lengths, the former is a 3x zoom ratio and the latter just a 2x zoom ratio. Moving deeper into telephoto territory also dictacted a shift in maximum aperture (otherwise the lens would have been prohibitively large and expensive). Whereas the maximum aperture of the 200-600G varied between F5 and F6.3, the new 400-800G shifts to F6.3 on the wide end as the maximum aperture and F8 on the telephoto end. More specifically:
400-482mm = F6.3
483-594mm = F7.1
595-800mm = F8
Because Sony only shows one-third stop aperture changes, there are only 3 different maximum apertures in the zoom range. So yes, the new lens is less bright at 483-600mm than the 200-600G (F6.3), but only by one third stop. That being said, the maximum aperture for more than 50% of the zoom range is F8, which isn’t particularly bright. This will be a lens best used in good lighting conditions, which means either outdoors or under very good stadium lights.
The 200-600G could reach up to 840mm if you used a 1.4x teleconverter, but your maximum aperture would be F9, so the 400-800G is actually the brighter option for shooting in and around 800mm. The 400-800’s range can be stretched out to 1120mm with a 1.4x, with a maximum aperture of F11. Here’s a shot with that combo.
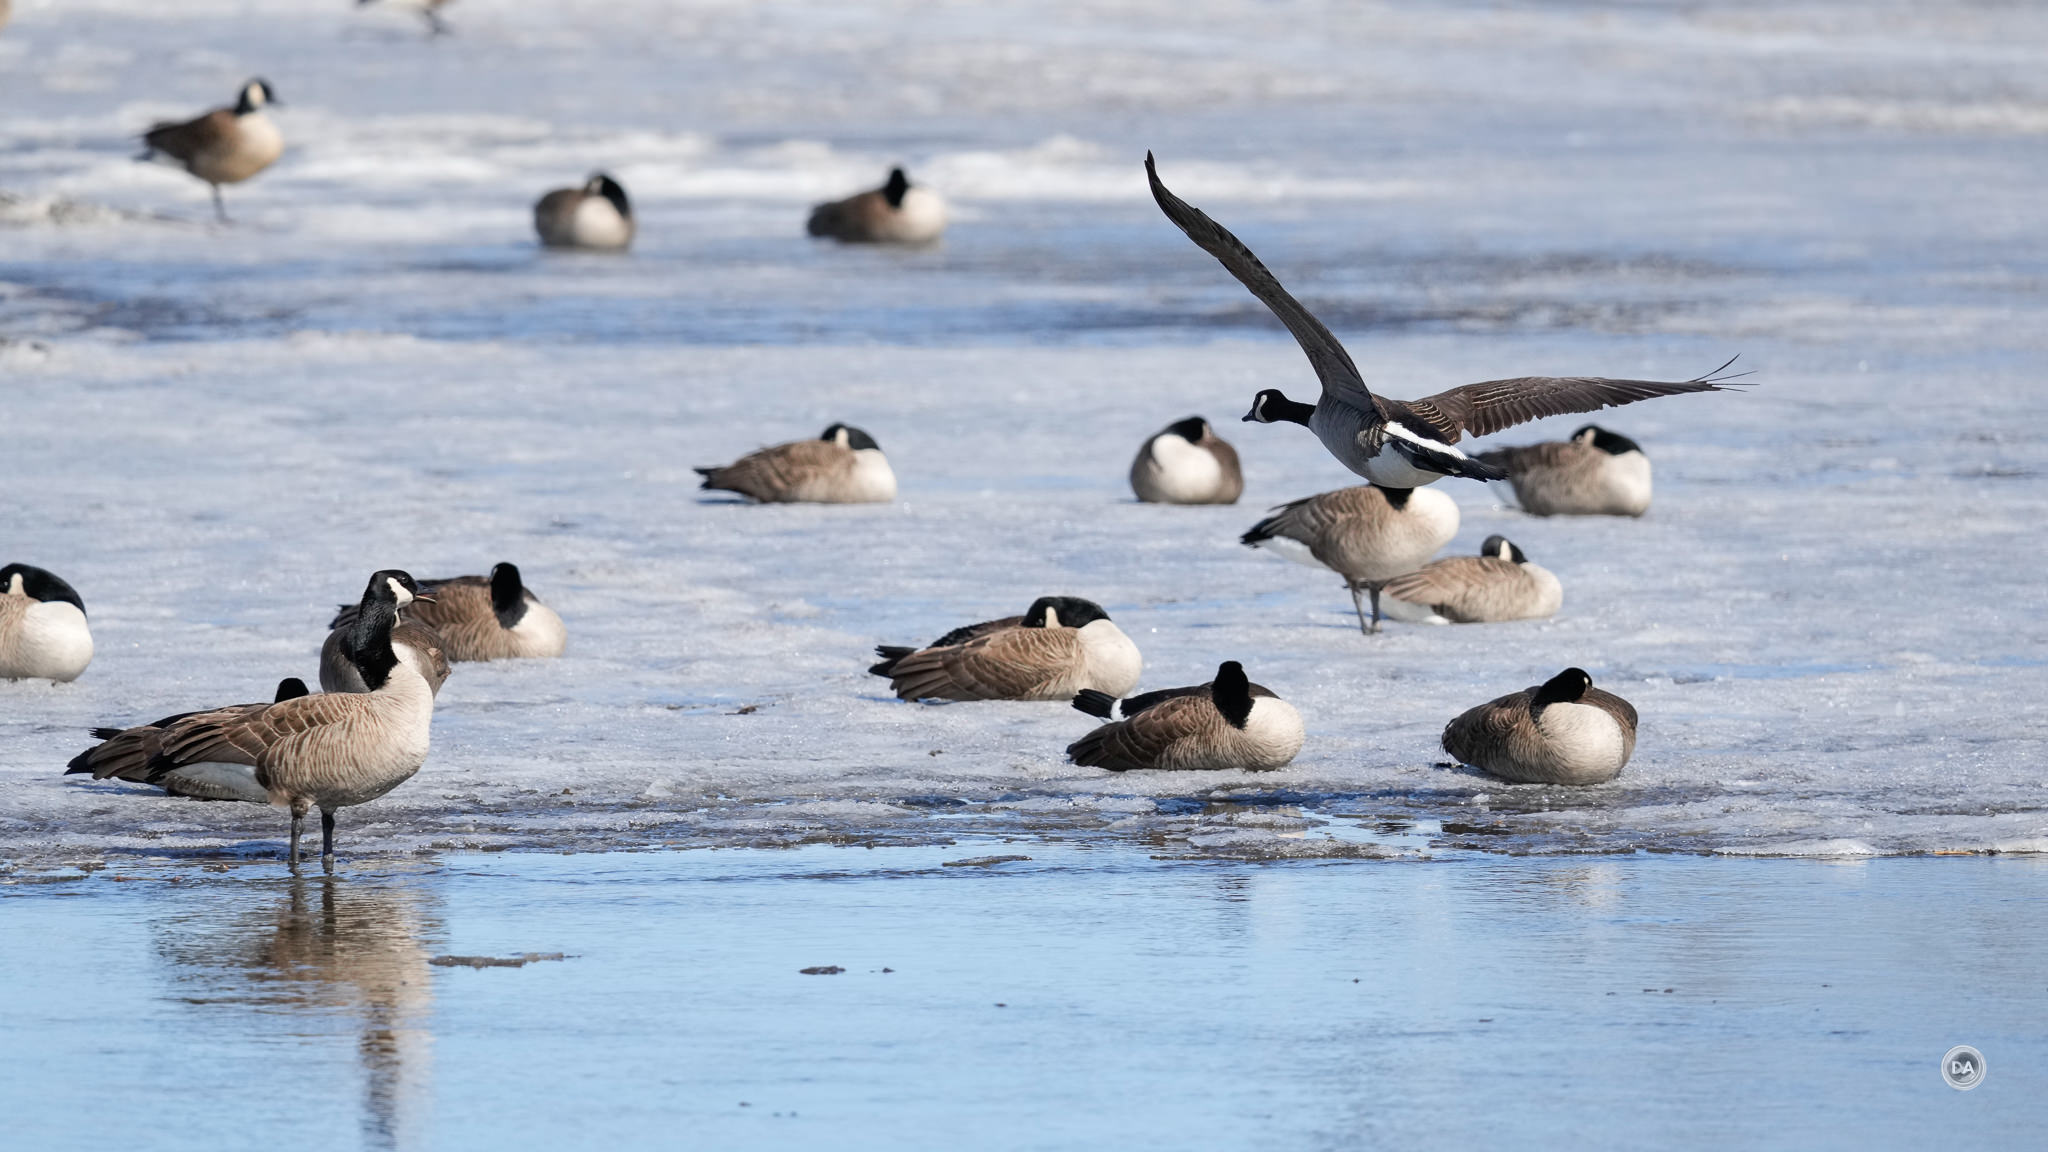
That gives you can idea of just how far away these geese were!
You can reach up to an unbelievable 1600mm with a 2x teleconverter, though I didn’t have one on hand to test with (I’m typically not a big fan of 2x teleconverters). Maximum aperture will be a rather dim F16, so you’ll need lots of light (and probably a slower moving subject) to make that work.
But we’ve never seen a zoom lens that reaches 800mm quite like this, and certainly not one that is quasi-affordable at roughly $2900 USD ($4100 CDN). Does that make this droolworthy lens worth pursuing? Let’s take a closer look…
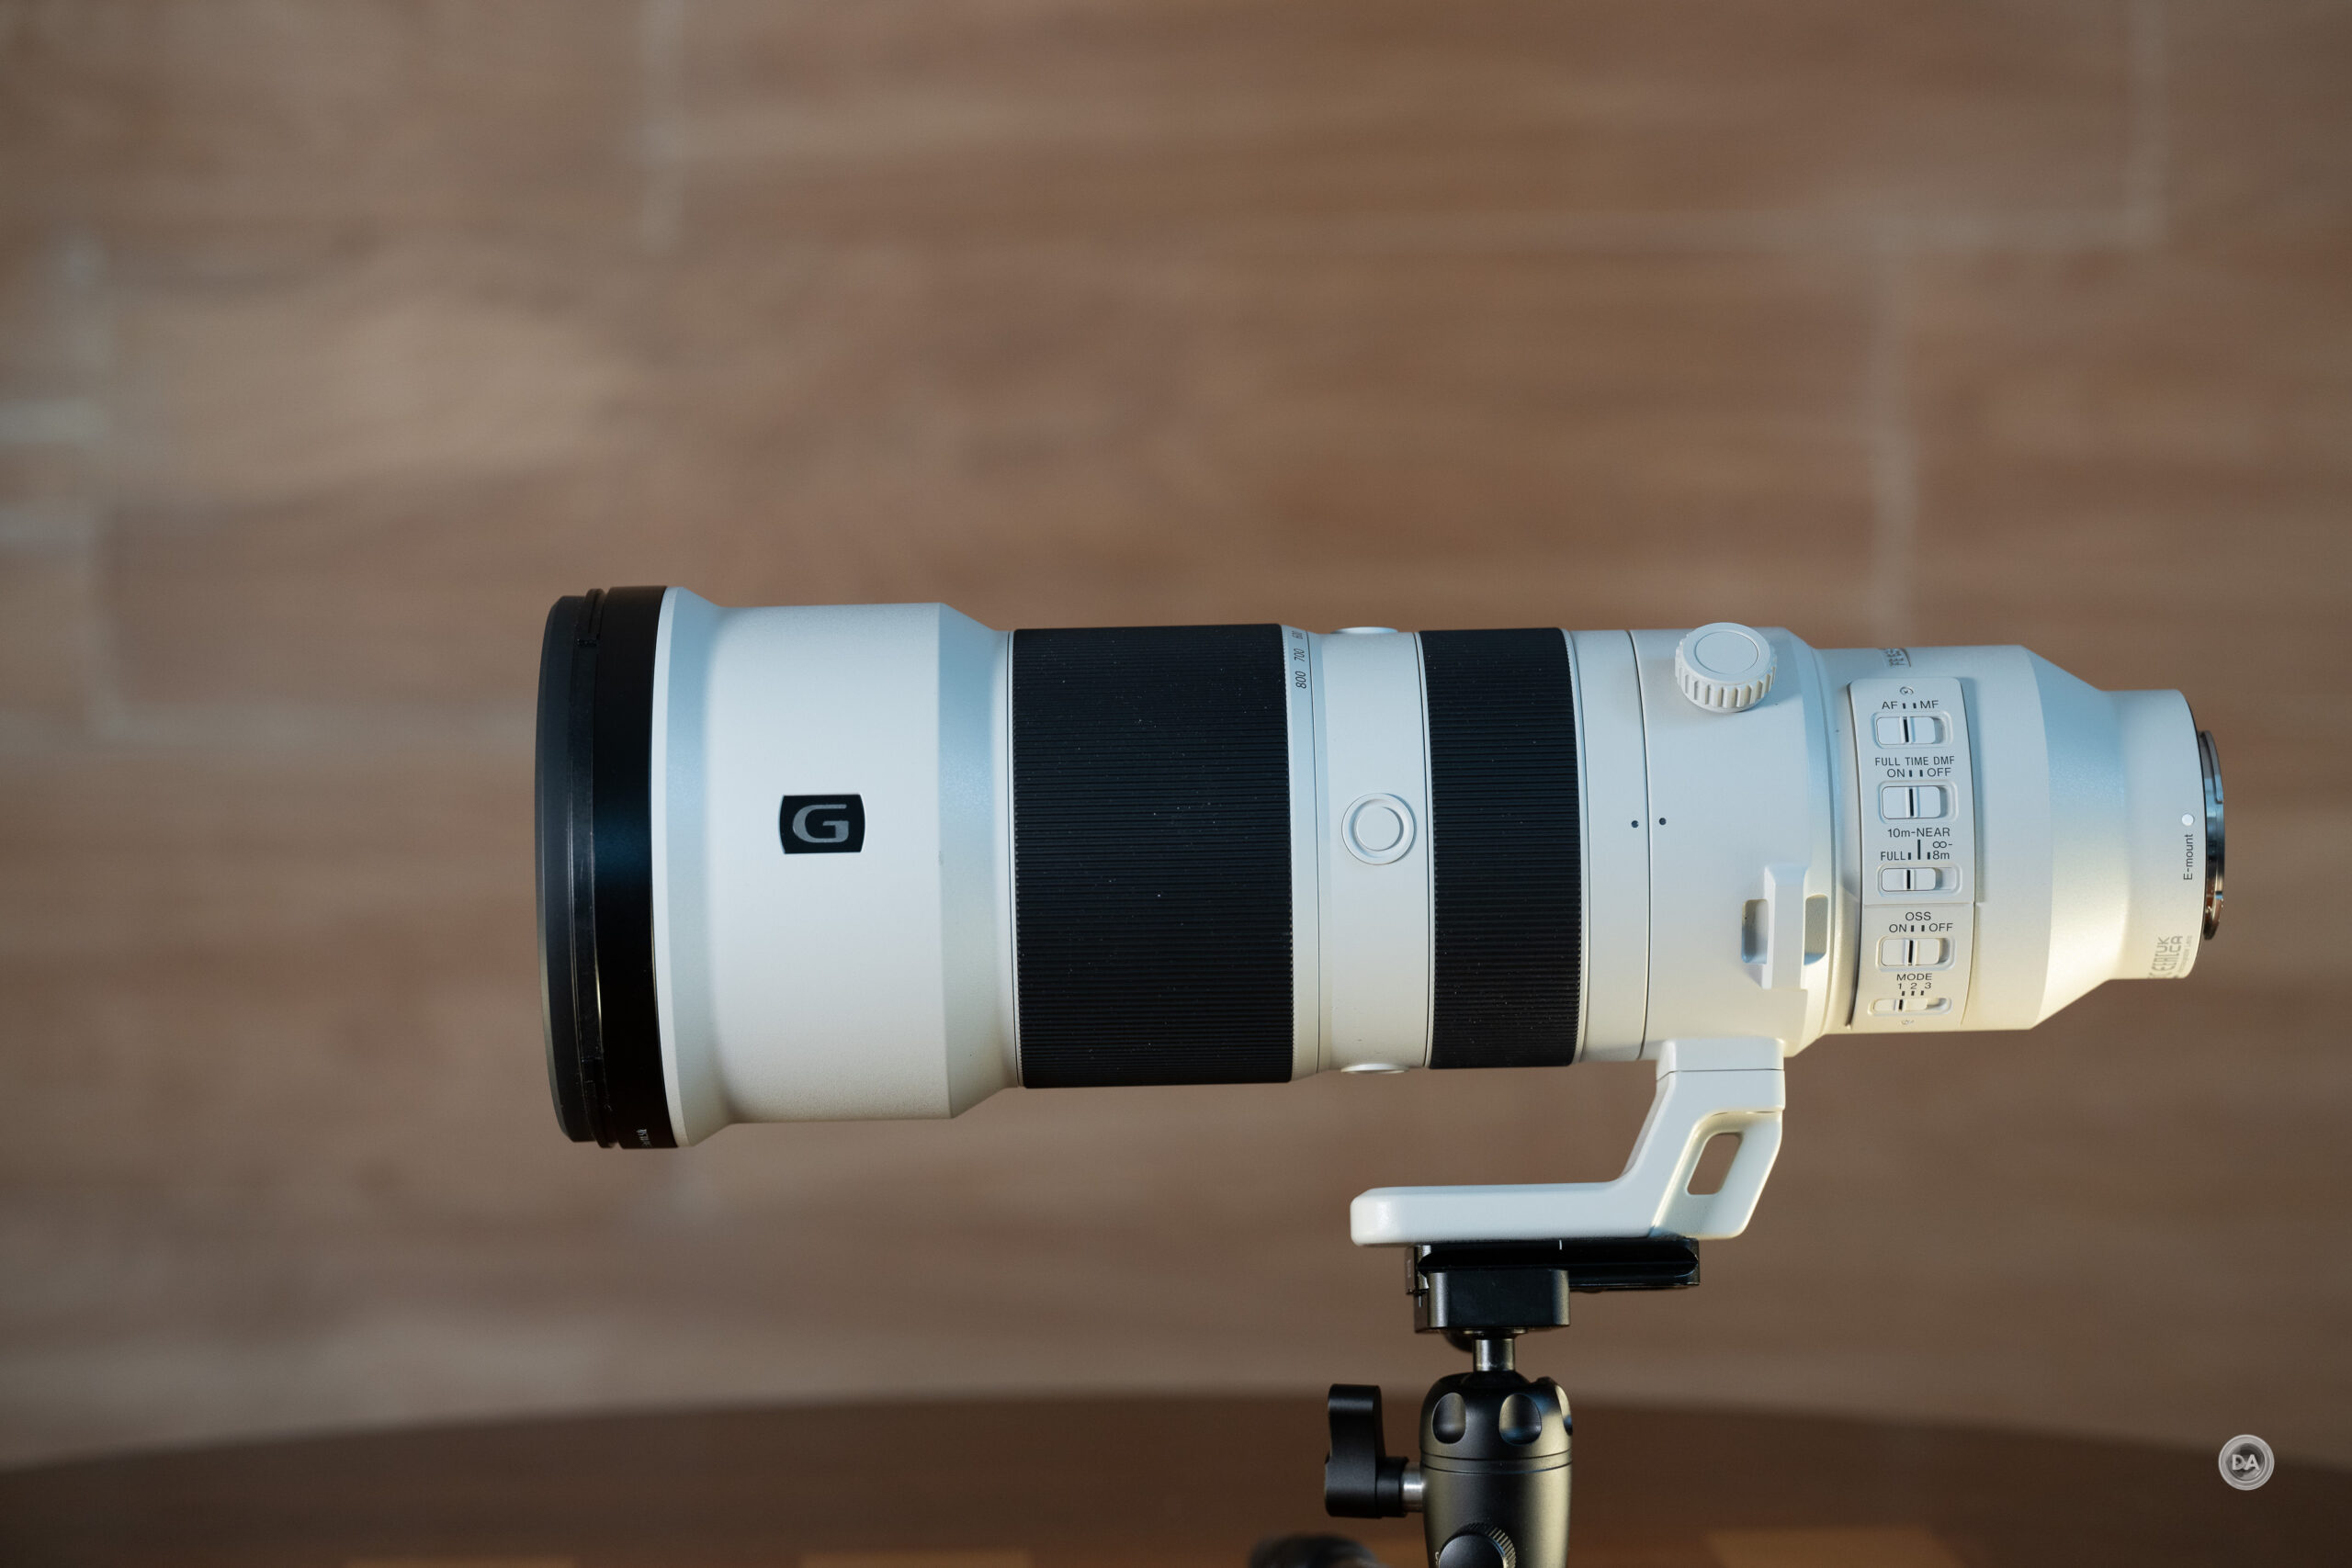
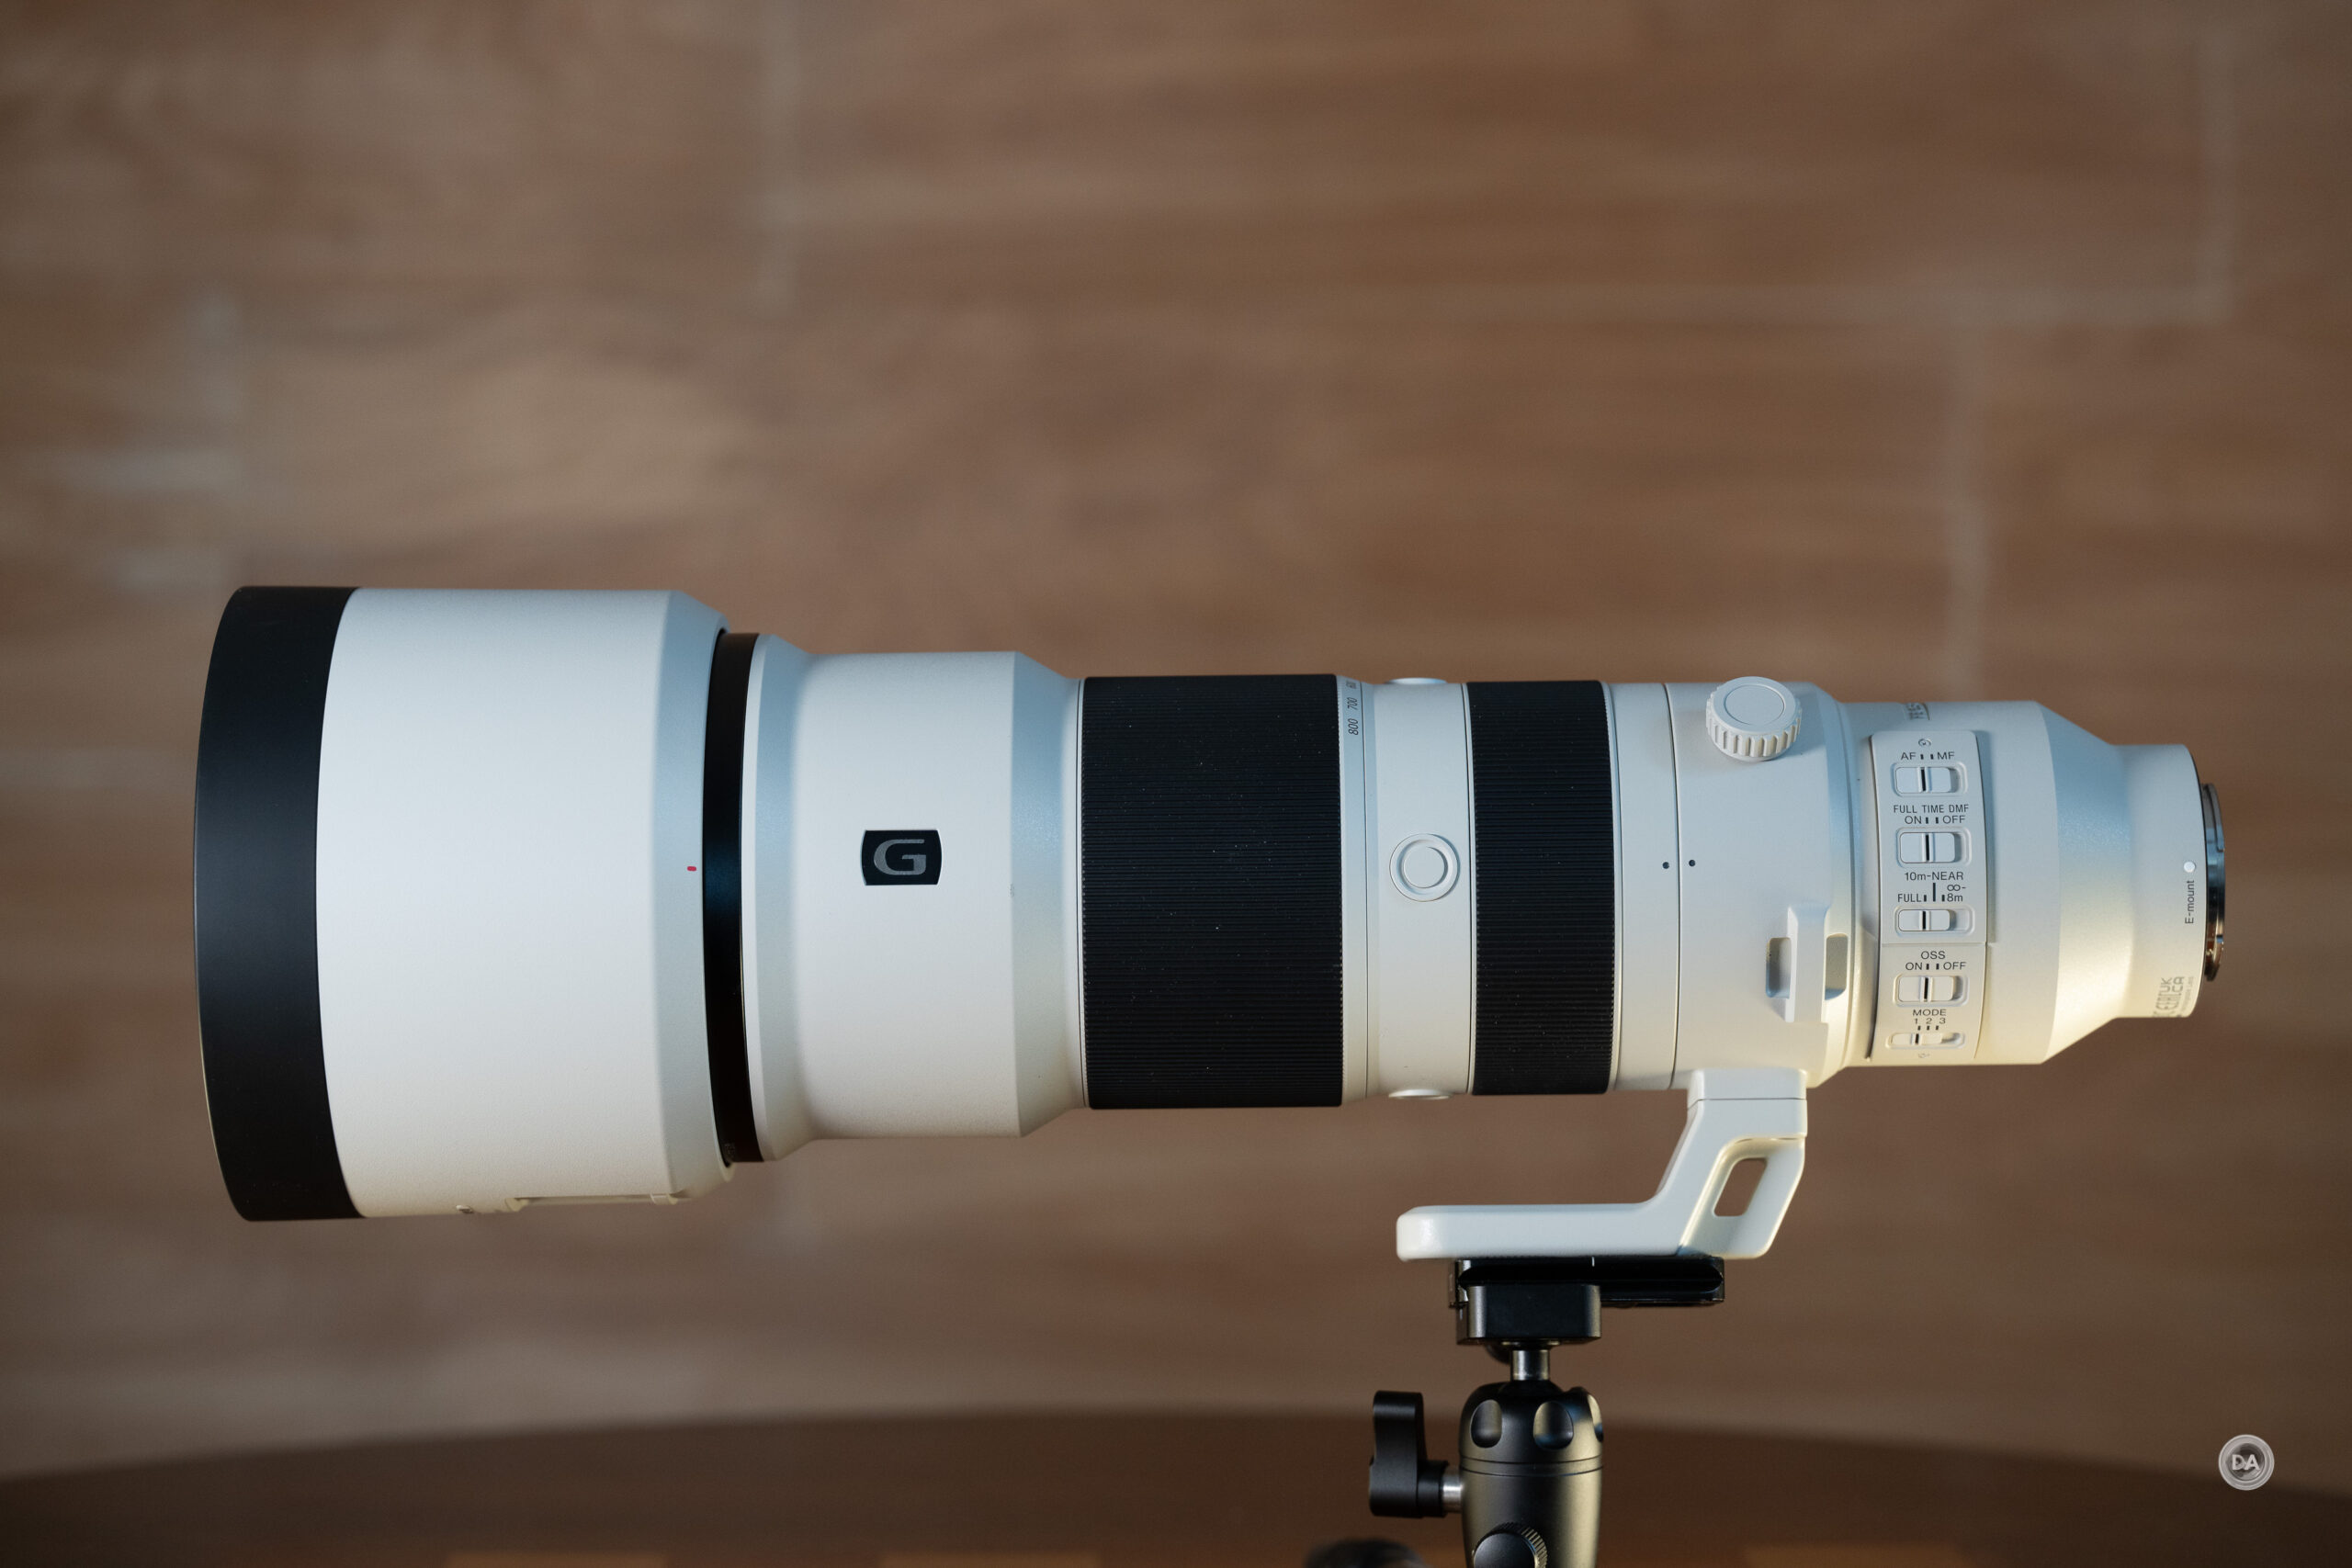
Build and Handling
It’s moments like these when I’m not quite sure where the line between Gold (G) and Gold Master (GM) lies. This looks and feels like a premium product, with a high grade of build quality, a deep suite of features, and thorough weather sealing. I’ve been impressed by just how GM these two G telephotos lenses look and feel.
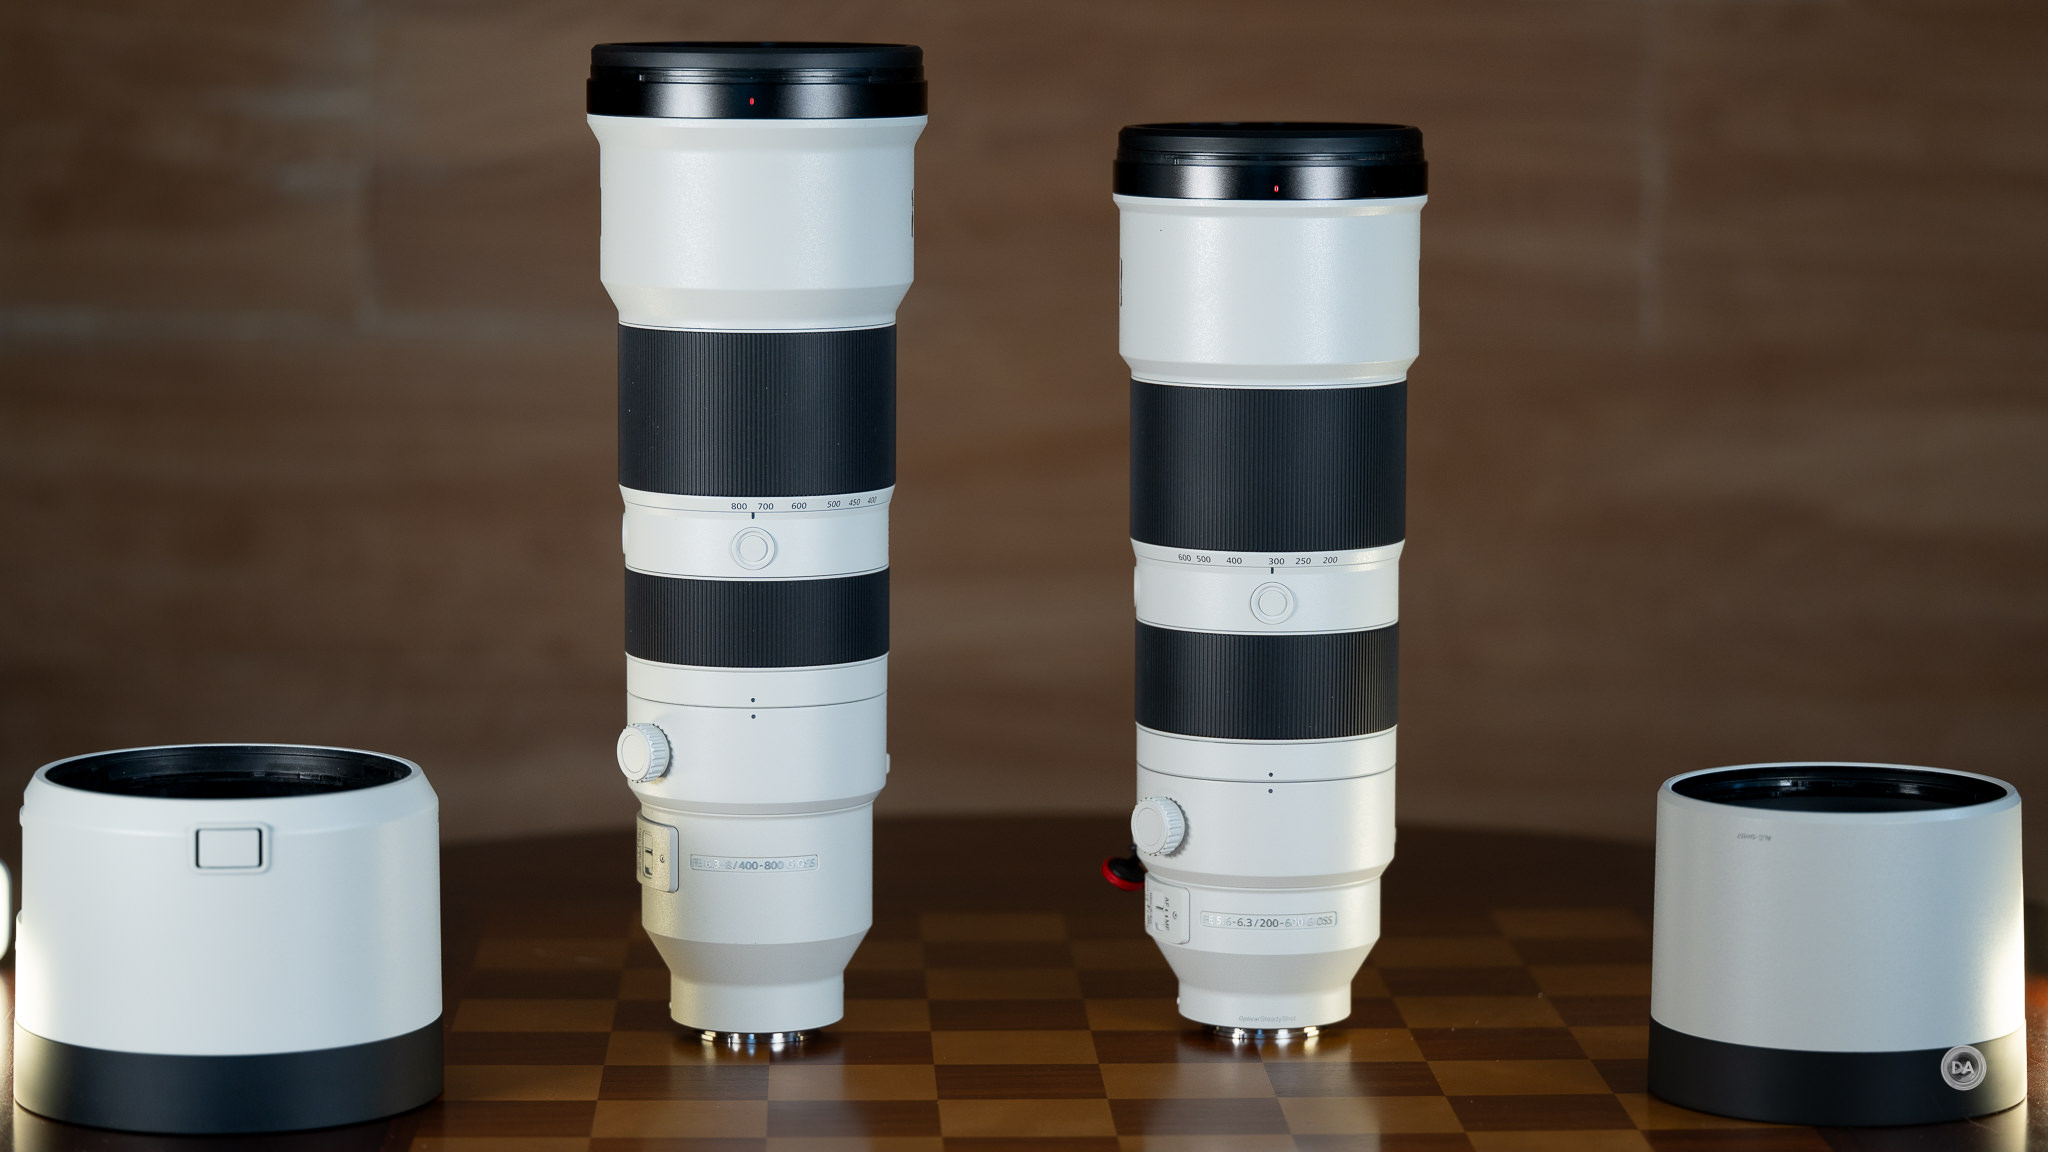
As you can see, the two lenses have a very similar design, though the 400-800G just scales everything up. The size difference isn’t even as significant as this photo suggests, as the hood is actually the thing that has grown the most. If I remove the hood, you can see that the 400-800G is about an inch longer than the 200-600G.
To be more precision, the dimensions are 11.98 (D) x 34.6 cm (L), or 4.72″ in diameter and 13.6″ in length for the new lens, while the older 200-600G measures 11.15 x 31.8 cm or 4.39 x 12.52″. That’s nearly 17% bigger in overall volume, which is not too bad for a lens that reaches all the way to 800mm. The weight is 2.47kg, or 5.45lb, which is hefty but not outside the realm of being handholdable. The 200-600G weighs in at 2.11kg and the Sigma 150-600mm Sport weighs 2.1kg. Probably only the dedicated are up for using any of these lenses handheld for any length of time, though that’s almost exclusively the way that I used the lens.
On a practical note, I did find the balance point when on a tripod to be better with the 200-600G vs the 400-800G. It took more work when trying to align my test chart with the 400-800G as it was more likely to drop forward after framing.
The front filter size has increased from 95mm to 105mm, so if you’ve invested in 95mm filters on the 200-600G or a similar lens, you may need to rebuy.
The lens hood is deeper, so Sony has added a door to the hood to allow for easier rotation on a filter like a circular polarizer.
The lens hood is large, but also fairly lightweight. It has both a locking button (large and nicely executed) along with a rubberized front surface that makes for a logical place to place the lens or lens/camera combination…as in the first photo in this section.
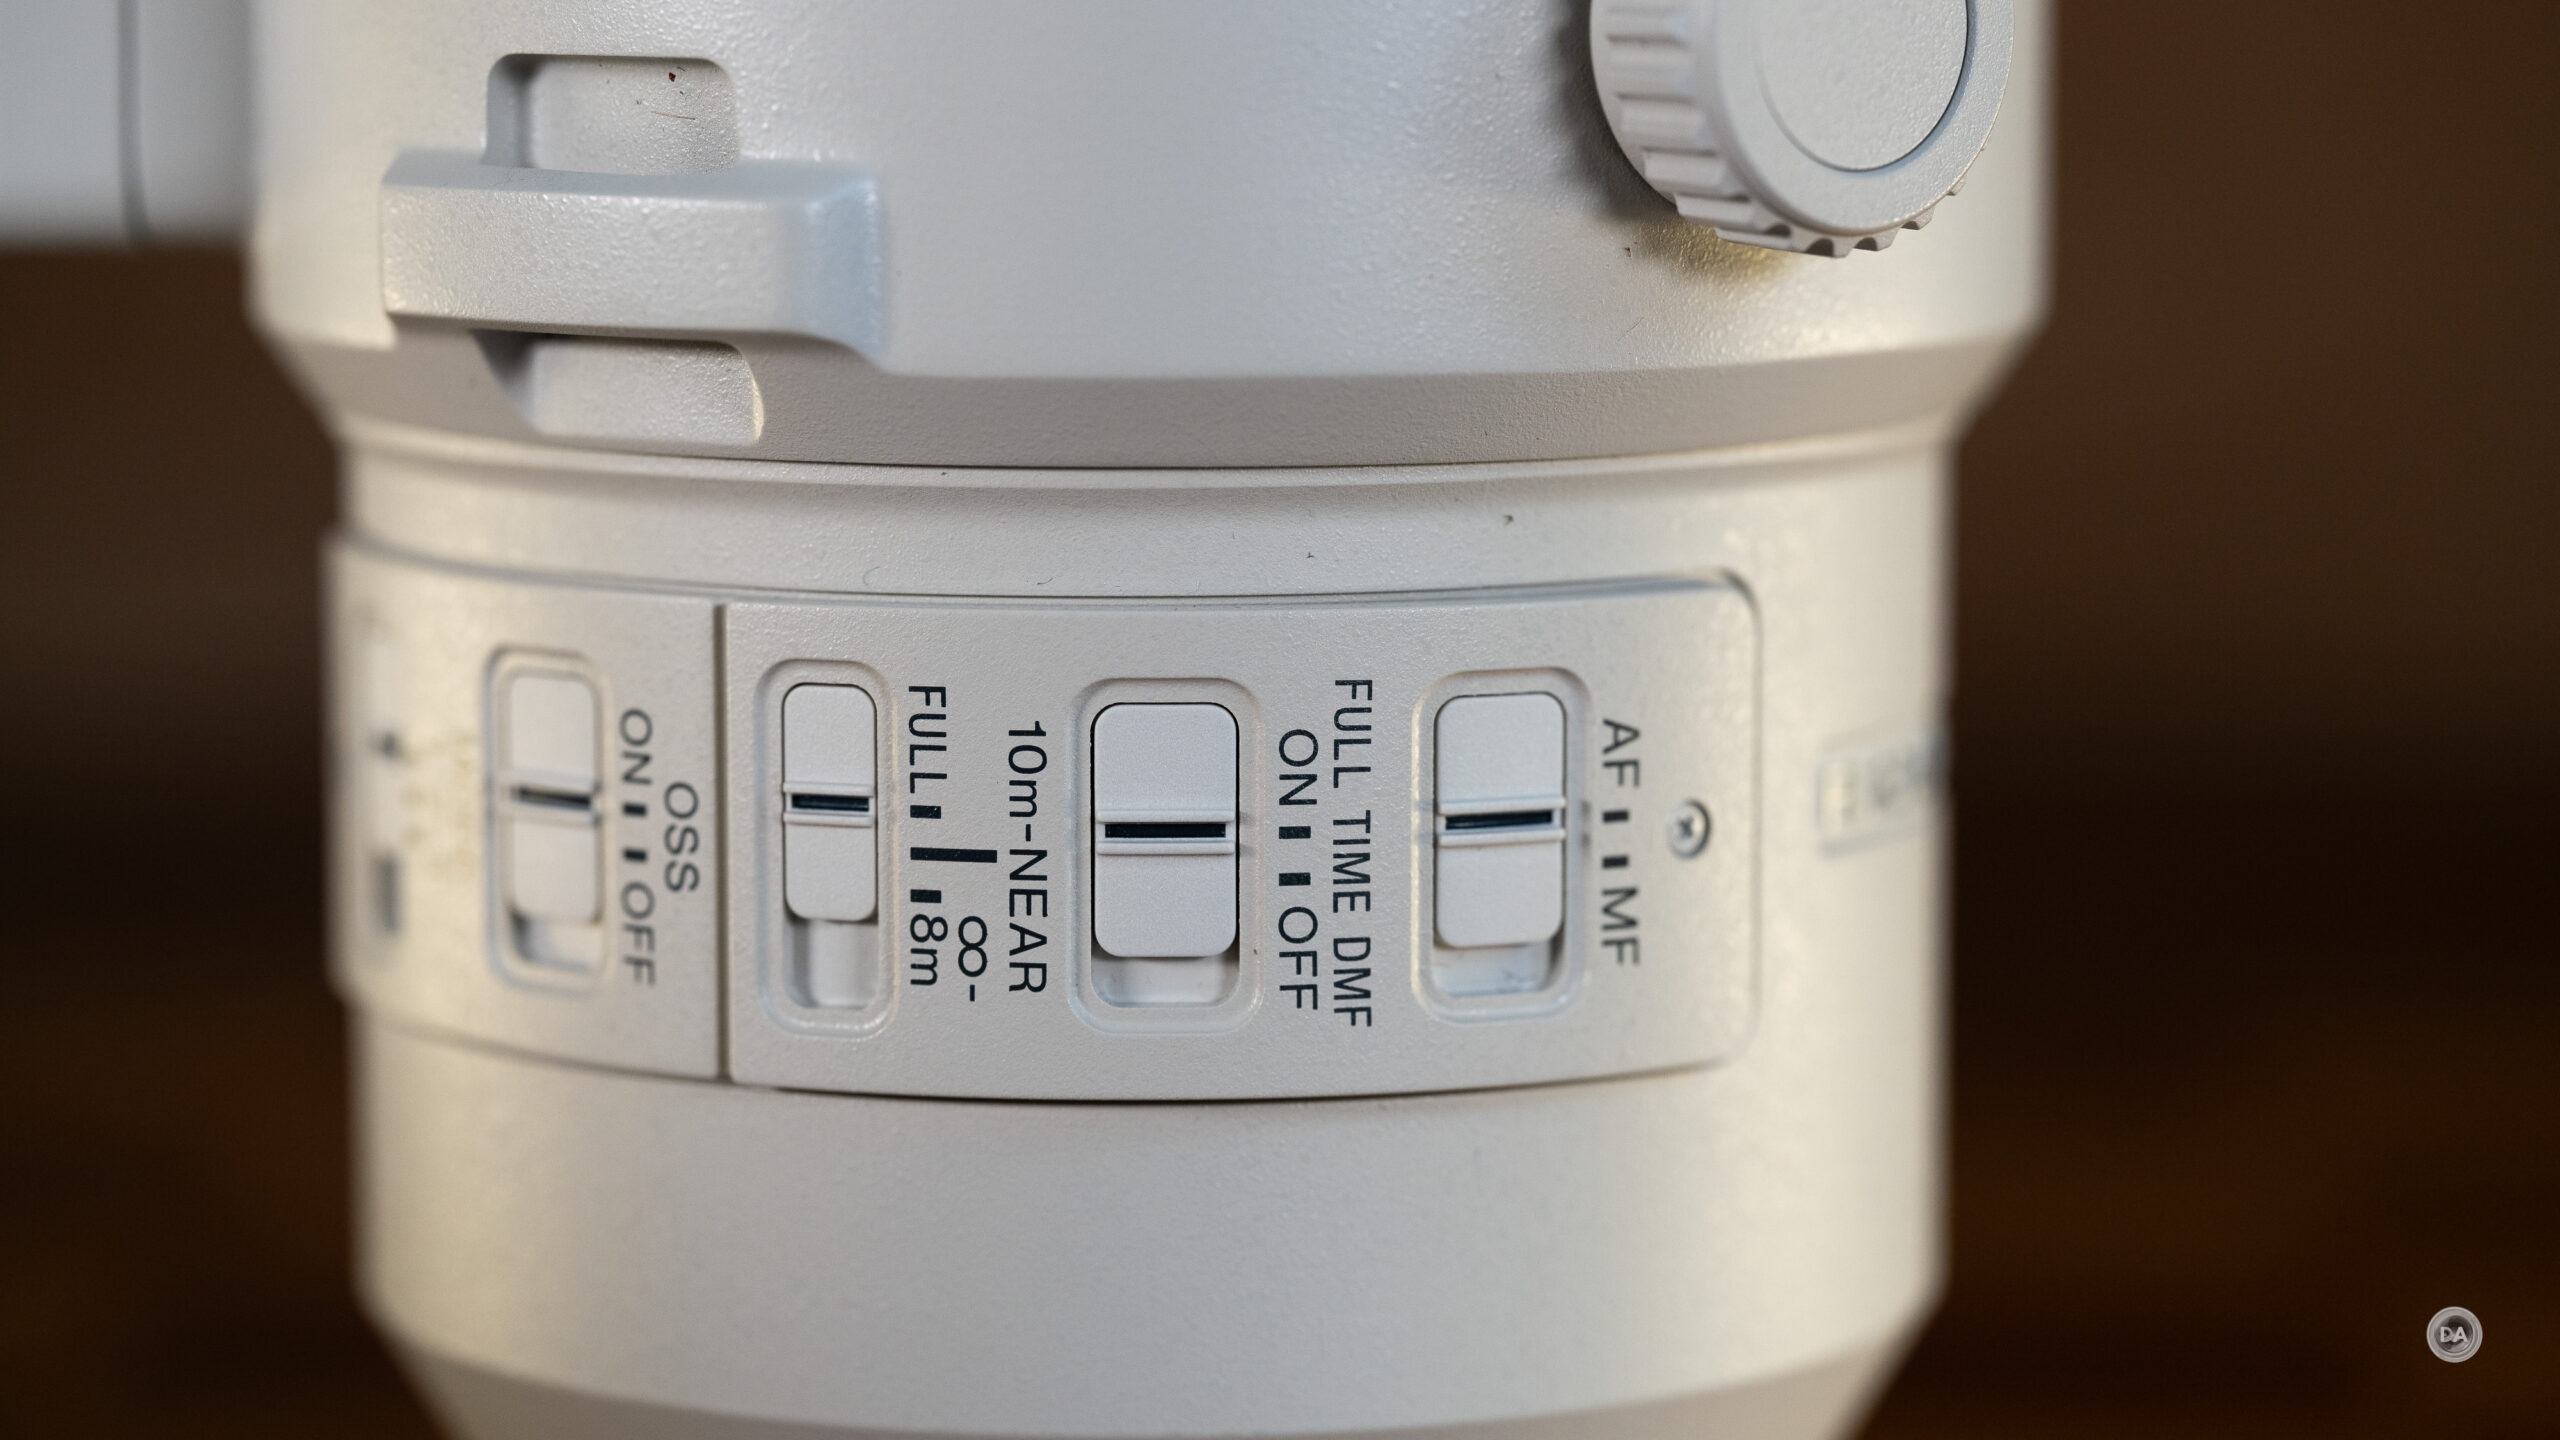
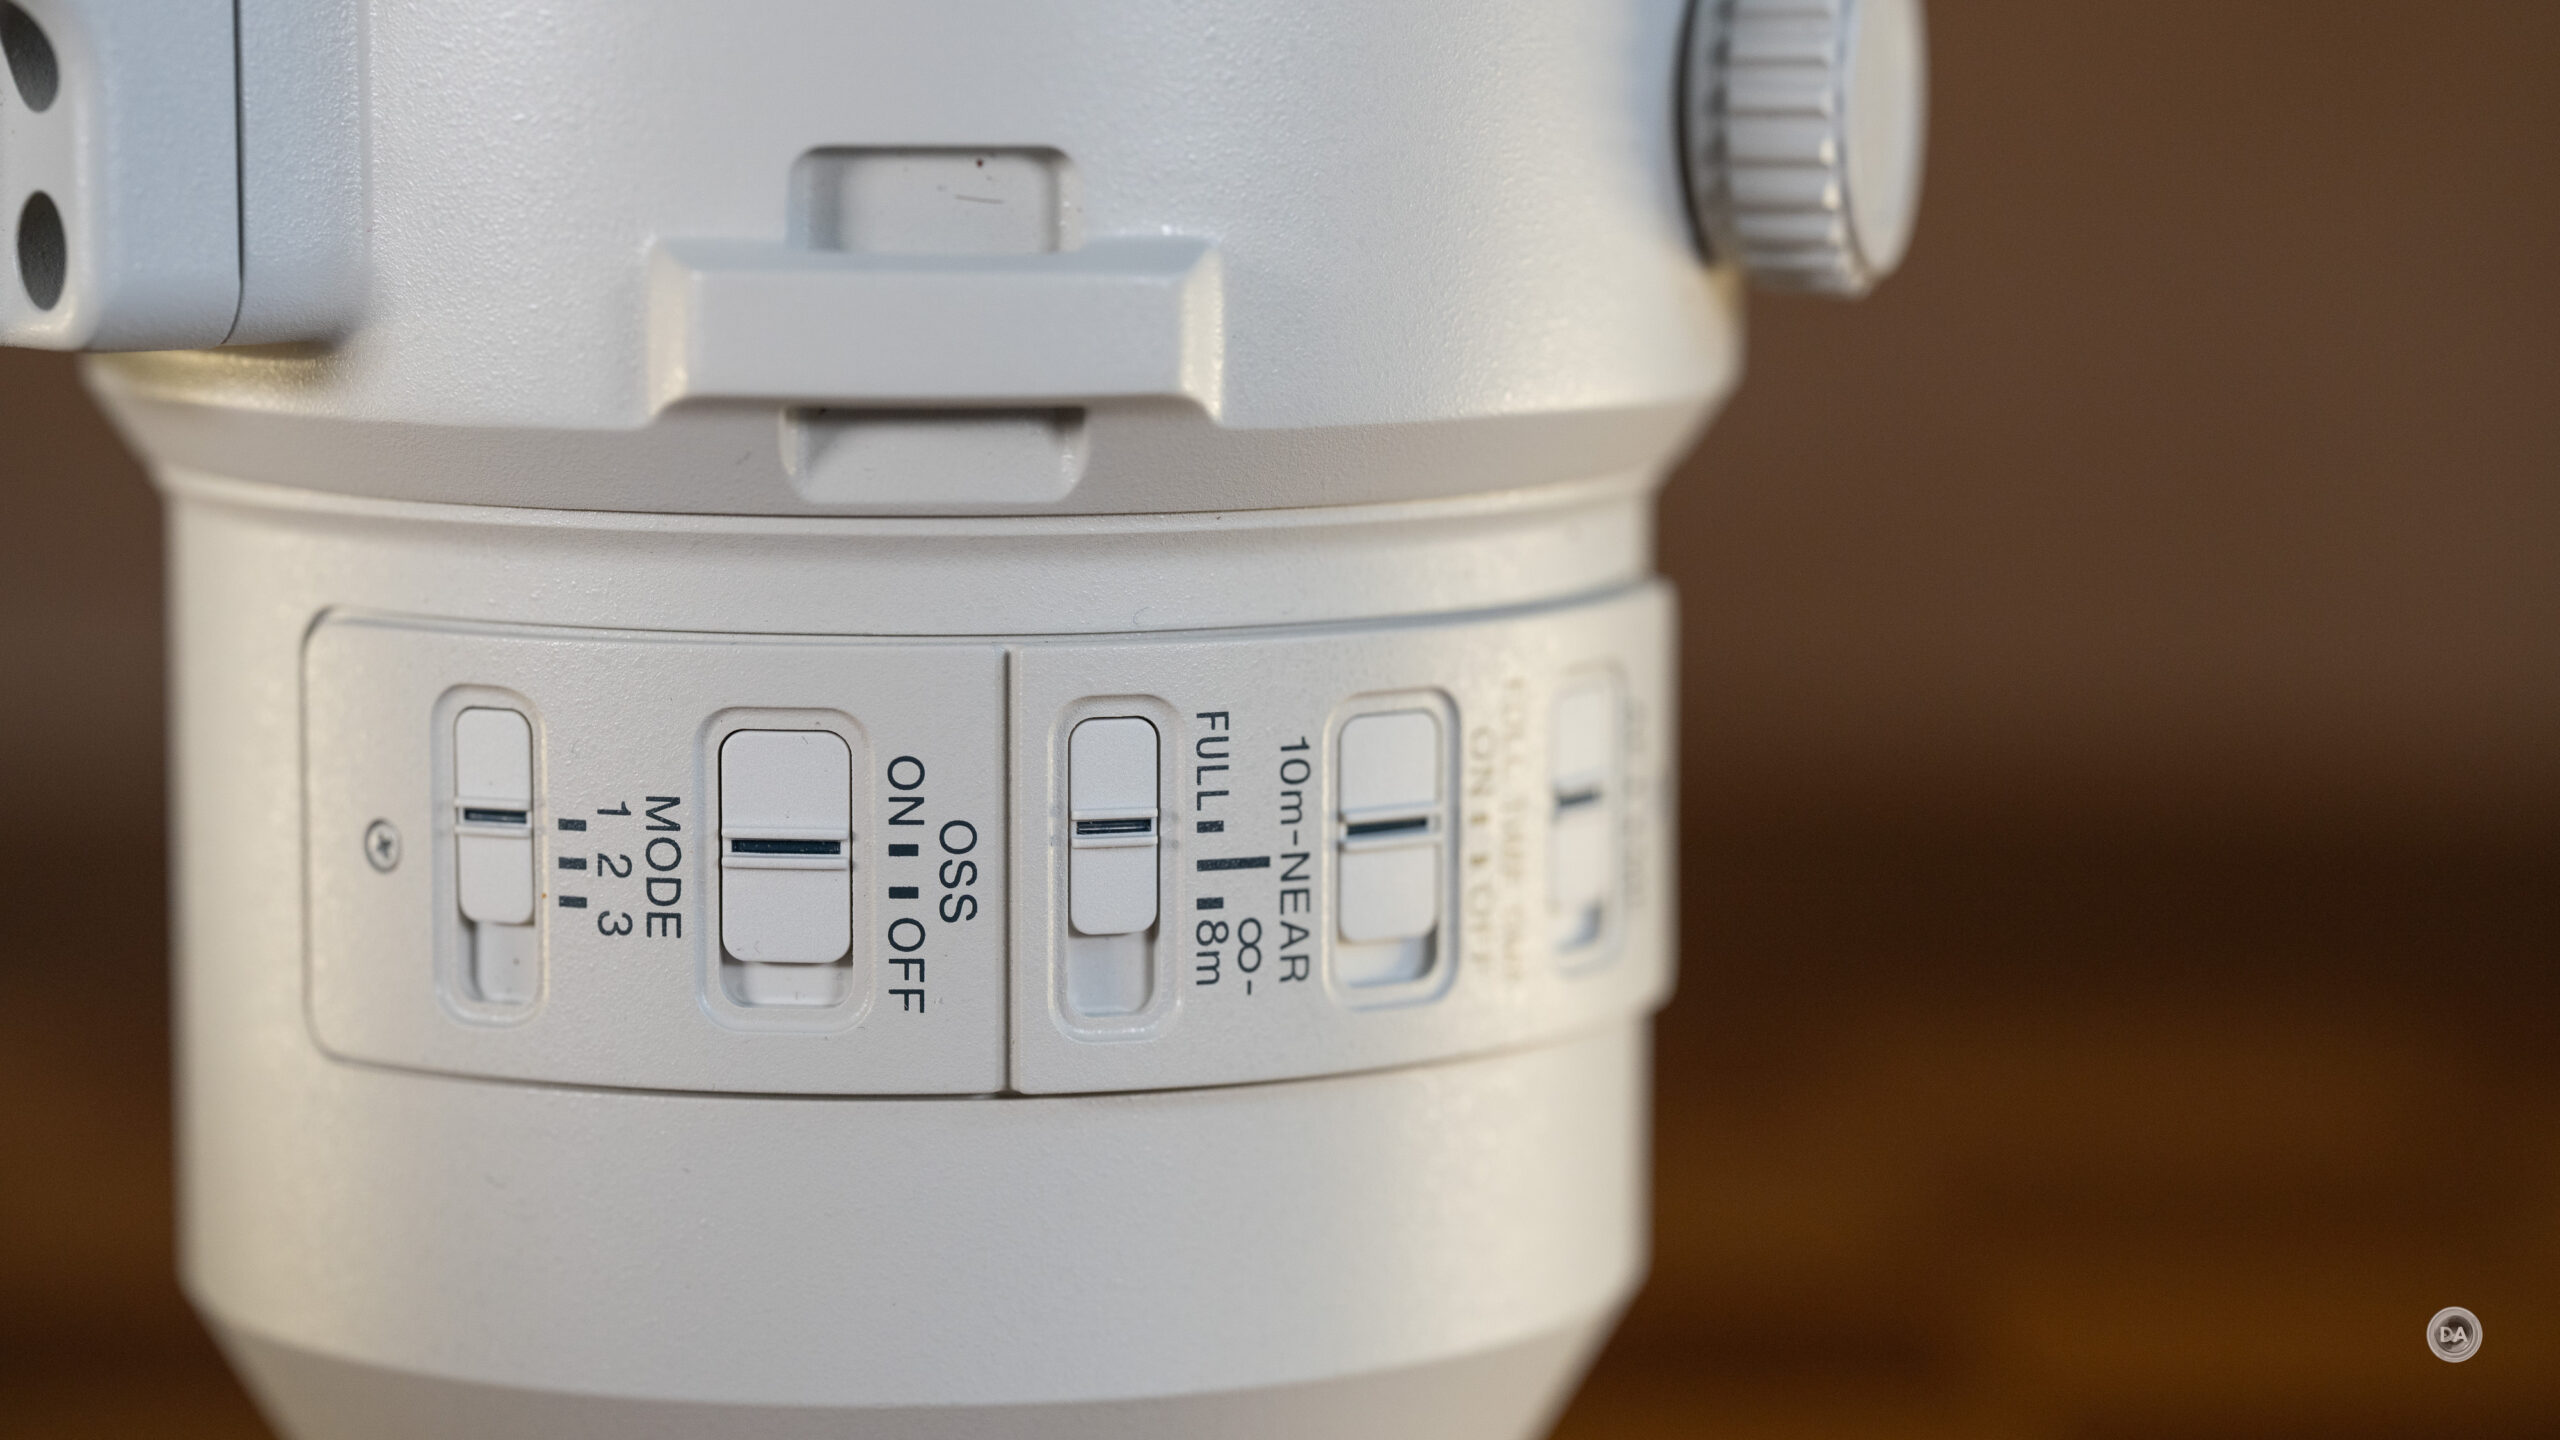
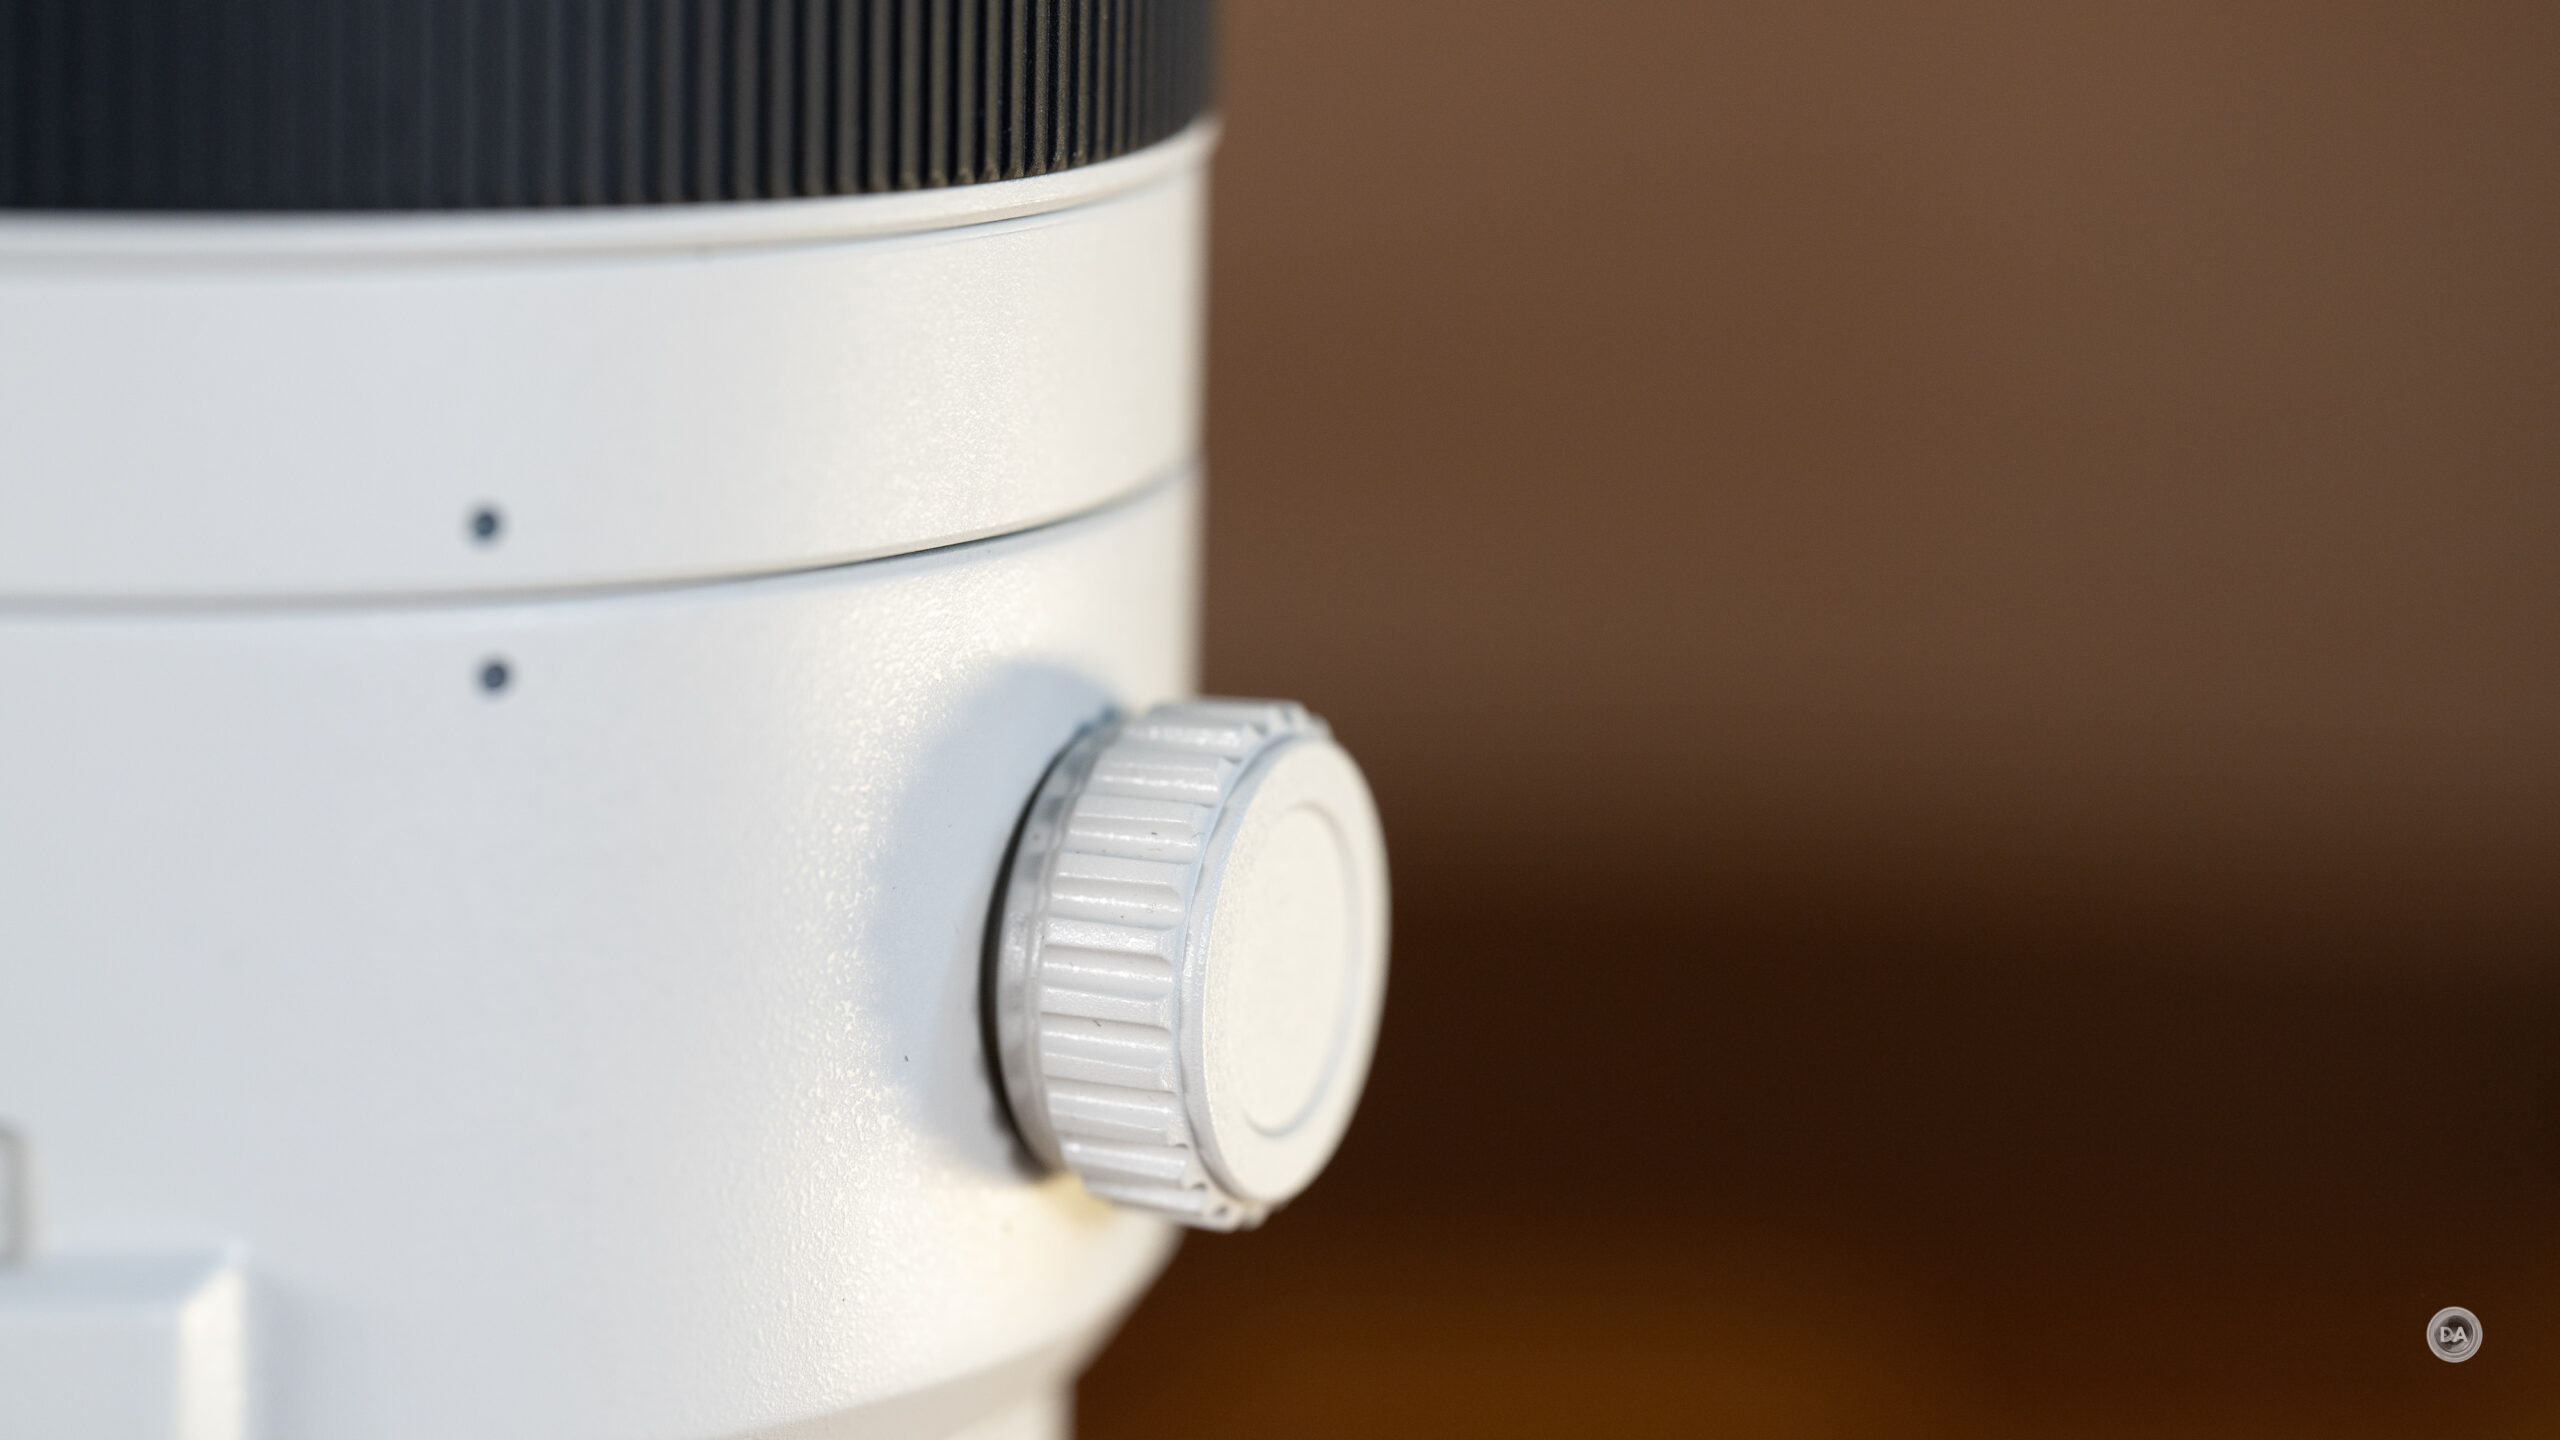
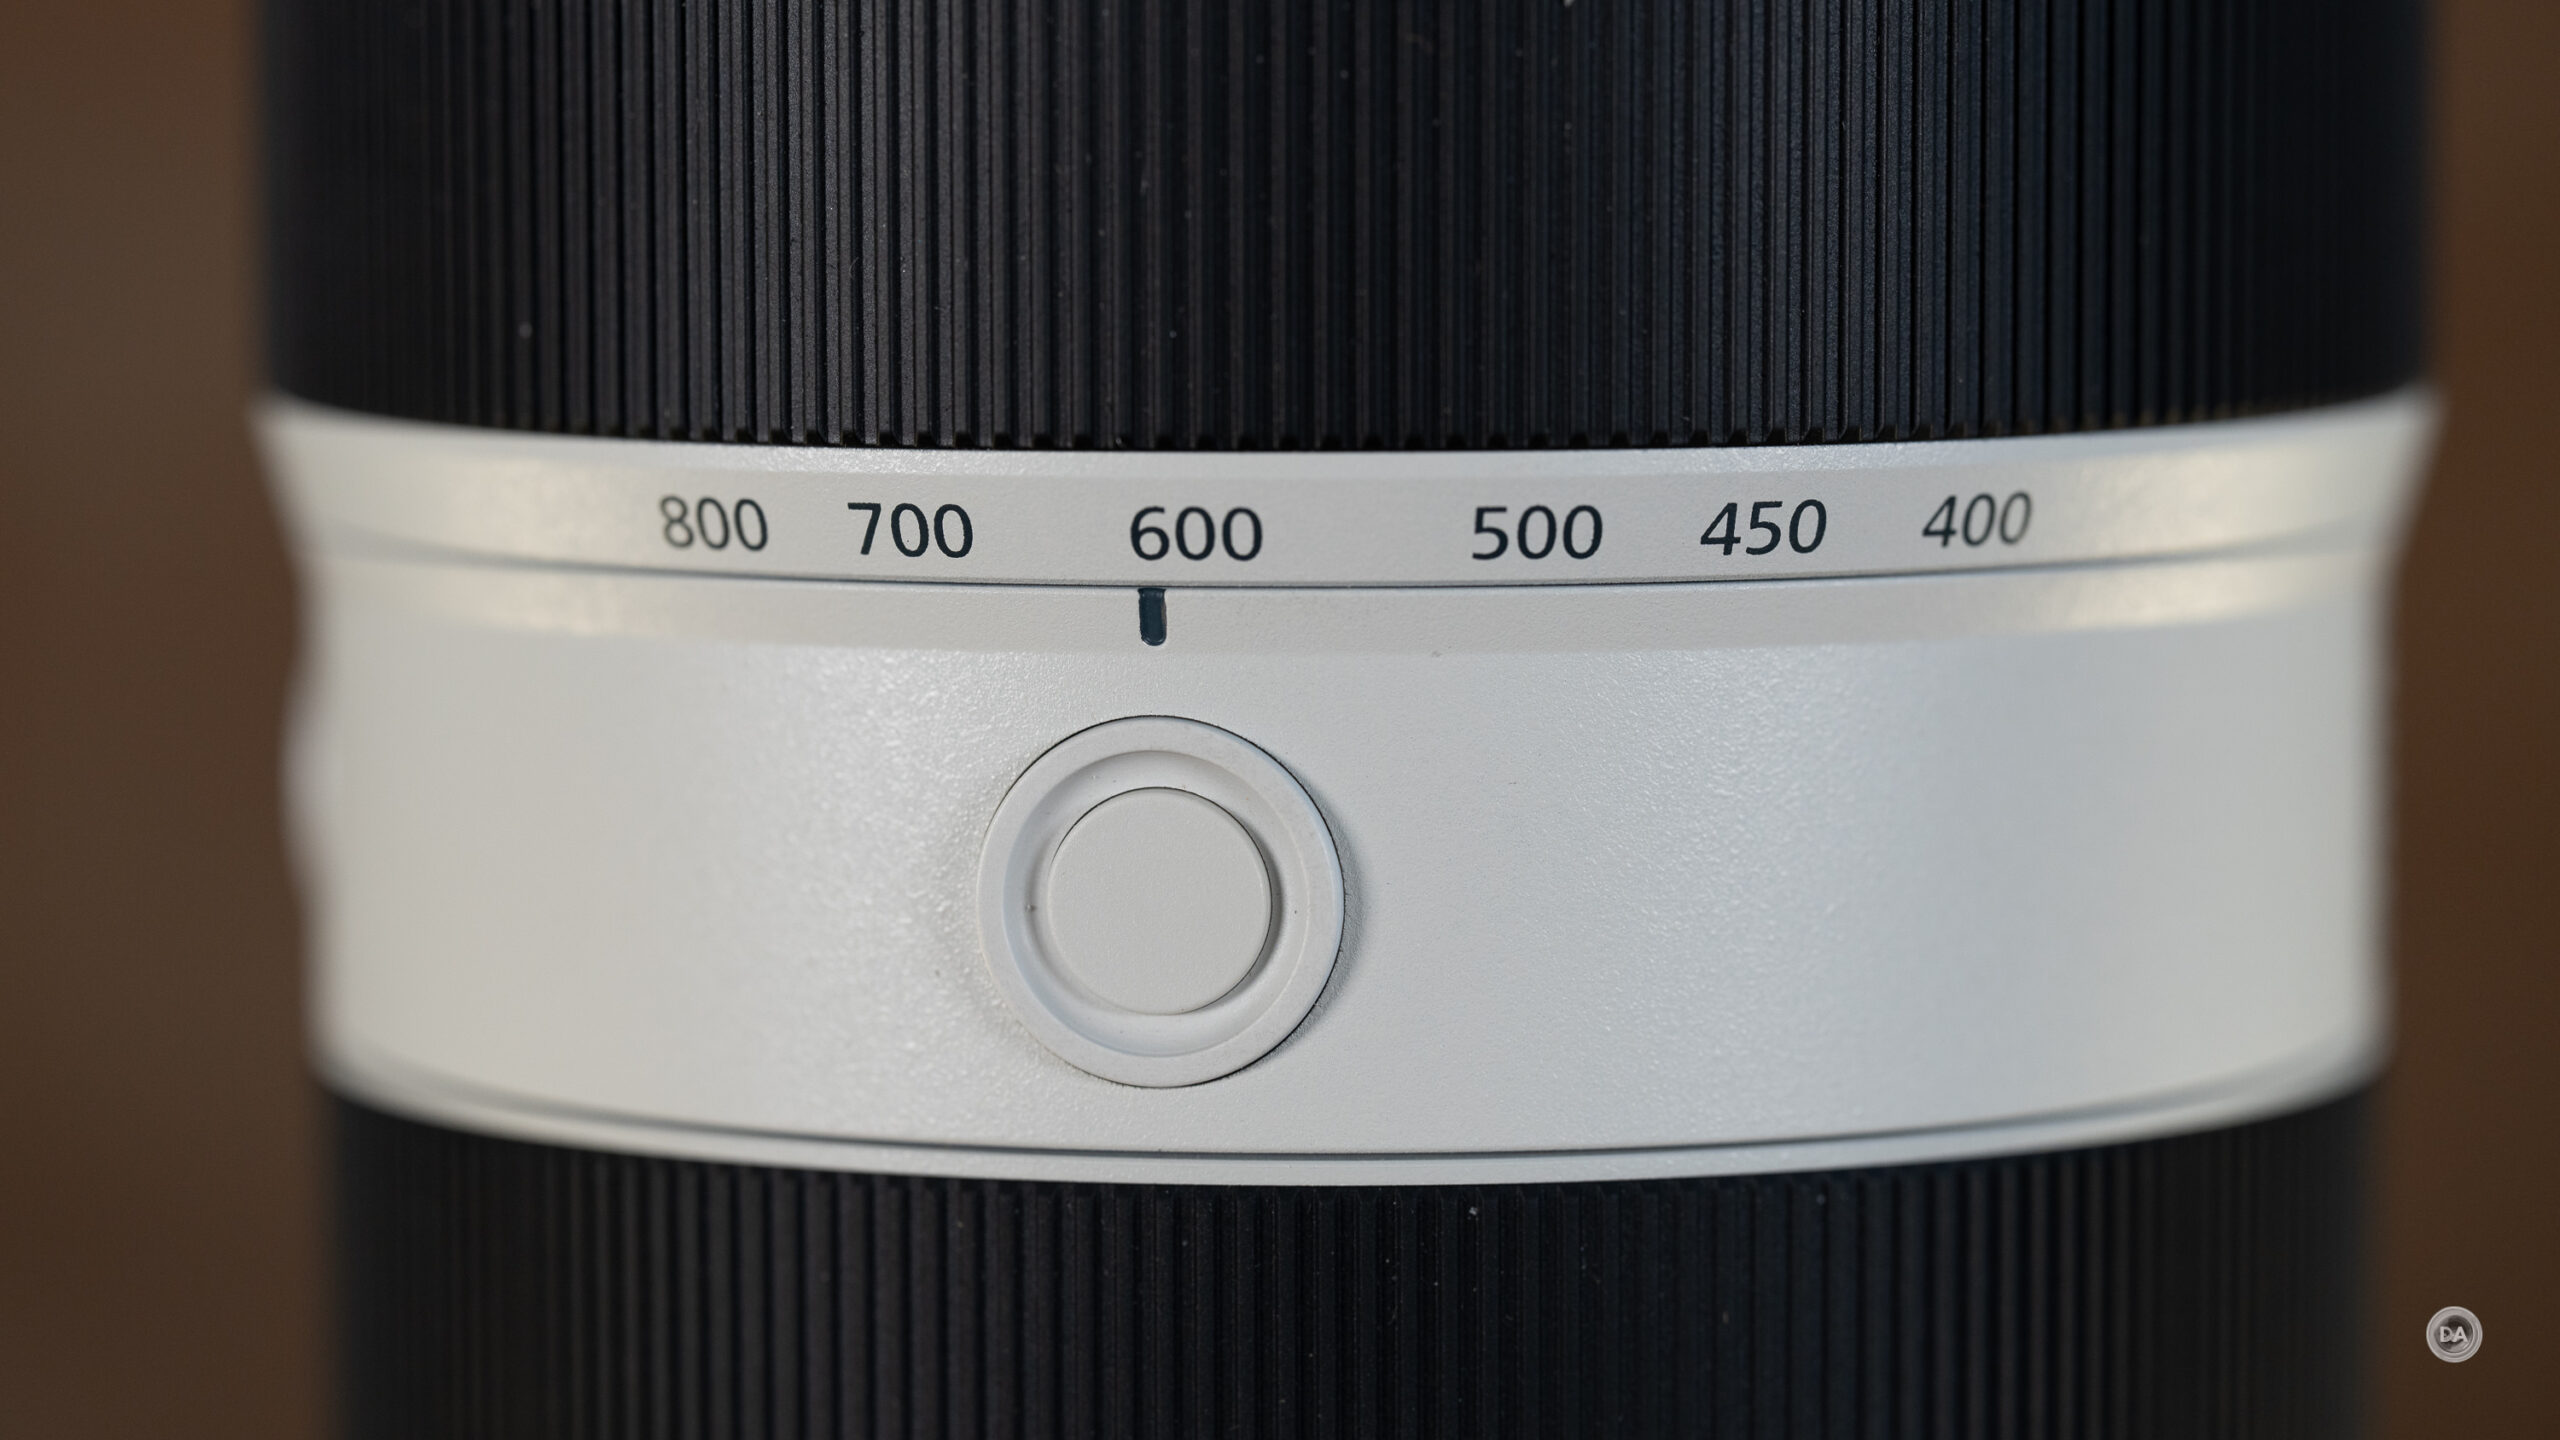
There is a section before the tripod collar that has a bank (two banks?) of switches. They occupy the same plane but there is a line of division between them. The top section contains the AF | MF selector, a switch allowing for full time DMF (manual override regardless of what focus mode you’re in), and a three position focus limiter that allows for the full range of focus, from minimum focus to 10 meters, and then from 8 meters to infinity.
On the note of minimum focus, the lens can focus as closely as 1.7 meters (5.6 feet) at 400mm and then only as close as 3.5 meters (11.5 feet) at 800mm. Maximum magnification is 0.23x and is gotten on the 400mm end of the zoom range.
The second bank of switches is dedicated to the OSS, or Optical Steady Shot. The first switch is a simple ON | OFF, and this will override any camera setting for in camera stabilization if so equipped. The systems will work somewhat in harmony, but it is either both or neither. The truth of the matter is that in camera stabilization is rarely very effective at long focal lengths like this, however.
The second switch here is for three different modes for the OSS. The first is the standard mode, while mode 2 is for panning, and mode 3 emphasizes viewfinder stabilization to help with framing.
You can see a radical difference in trying to handhold the shot at these kinds of focal lengths when the stabilization is turned off. I could not find a rating for the stabilization in terms of stops, but the stabilization seems reasonably effective.
I tried a battery of handholding at 800mm, first at 1/8th second (ISO 800), then at 1/30th second (ISO 1600), and finally at 1/60th second (ISO 3200). I didn’t have any success in getting stable results until 1/60th second. That’s about 4 stops of assistance (see the final shot for a nice stable result).
The tripod collar/foot section comes next, and it follows the same formula as the one found on the 200-600G. The foot itself is removable, but the collar is fixed. You can rotate it by releasing the tension via a knob found on that section. The foot itself is has a standard 1/4″ and 3/8th” holes for attaching quick release style plates, but the foot is not natively Arca-compatible.
I never quite understand the lack of Arca grooves, as both Sigma and Tamron seem perfectly capable of making Arca-compatible tripod feet.
There are attachment points on either side of the tripod collar for attaching a carrying strap (included). The lens also comes with a large, padded case for storage. *My loaner is from Sony, and didn’t come with retail packaging, so I can’t picture these items.
There are two rings on the lens, the first (slimmer) being the manual focus ring. This ring has a rubberized grip and moves nicely. There’s a decent amount of damping, and the ring works well either for manual focus or DMF override. The most useful application is when photographing something like birds when focus grabs a branch in the foreground instead.
In between the manual focus and zoom rings there are three function buttons. These are at 3 of the cardinal positions around the lens, with a Sony logo at the fourth position. These are redundant buttons, meaning that each one will perform the same function (which is assigned in the camera menu). They are repeated at a variety of positions to be sure that one is close to hand whether shooting in horizontal or vertical modes.
The zoom ring is the real standout. The internal zoom design means that you can near instantly swing from one end of the zoom range to the other. I love the precision, not having to worry about zoom creep, and that the balance of the lens remains the same. This is where the additional size of the lens for storage really pays off.
Up front we have a fluorine coating on the front element along with the aforementioned 105mm filter threads.
This is the final touch on the thorough weather sealing, which starts with a gasket at the lens mount and then is backed up by a number of seals throughout the lens. I count at least 21 seals in total.
This is a professional grade lens with high quality build. The body seems to be a mix of metal alloys along with some engineered plastics. The lens feels tough and durable, and I can attest that my own copy of the 200-600G (now five years old), has definitely been that.
As noted, the 400-800G is fully compatible with Sony’s 1.4x and 2.0x teleconverters. In most situations I would recommend sticking with the 1.4x and avoiding the 2.0x. There are too many compromises introduced by 2.0x teleconverters in most situations, and the challenge of focusing with F16 as a maximum aperture could prove vexing. Third party lenses on Sony are purposely excluded from teleconverter compatibility, and, while I disagree with this policy, it is this case one potential asset for this lens over another.
This is a big, heavy lens (as you probably already knew), but the tradeoff is a very well constructed lens that is actually very nice to use in the field…if you can manage the weight.
Autofocus for Stills
*Before entering the formal test sections for autofocus and optics, I do want to add a general caveat that the extreme nature of a lens like this means that all of my typical test processes go out the window. I don’t have enough room indoors to perform them, so everything has to get reinvented outside…where I have less control over certain variables.
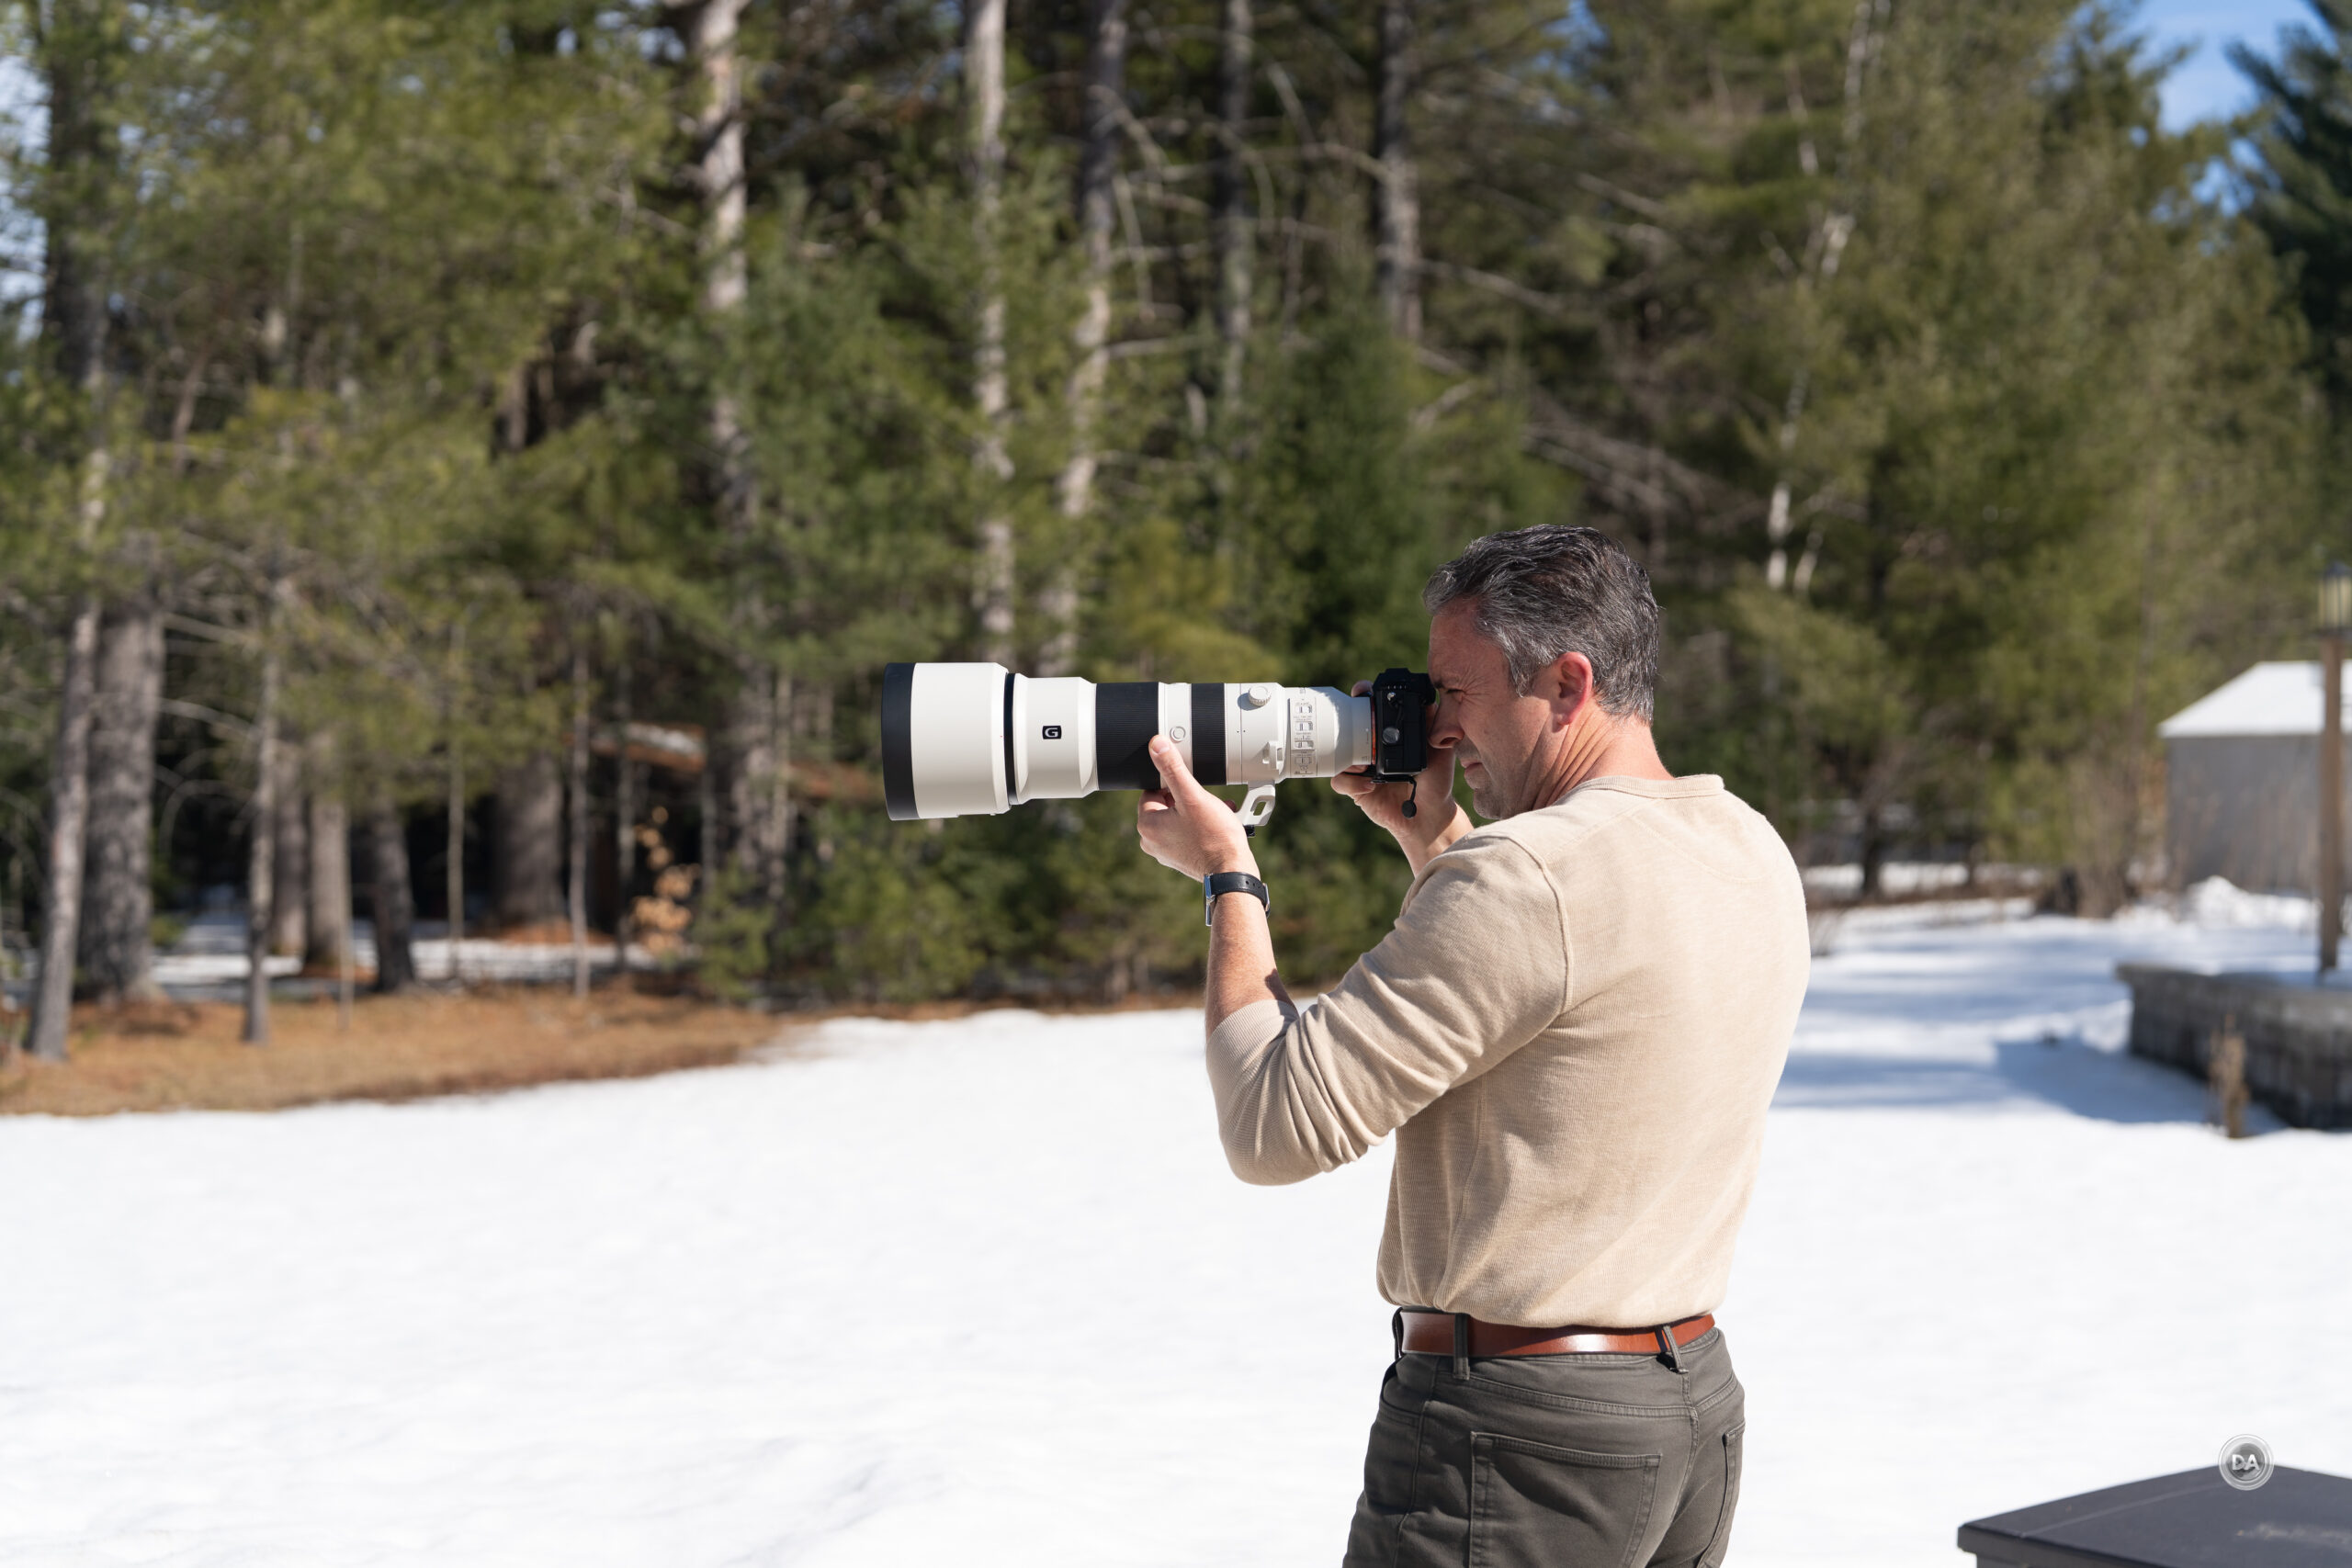
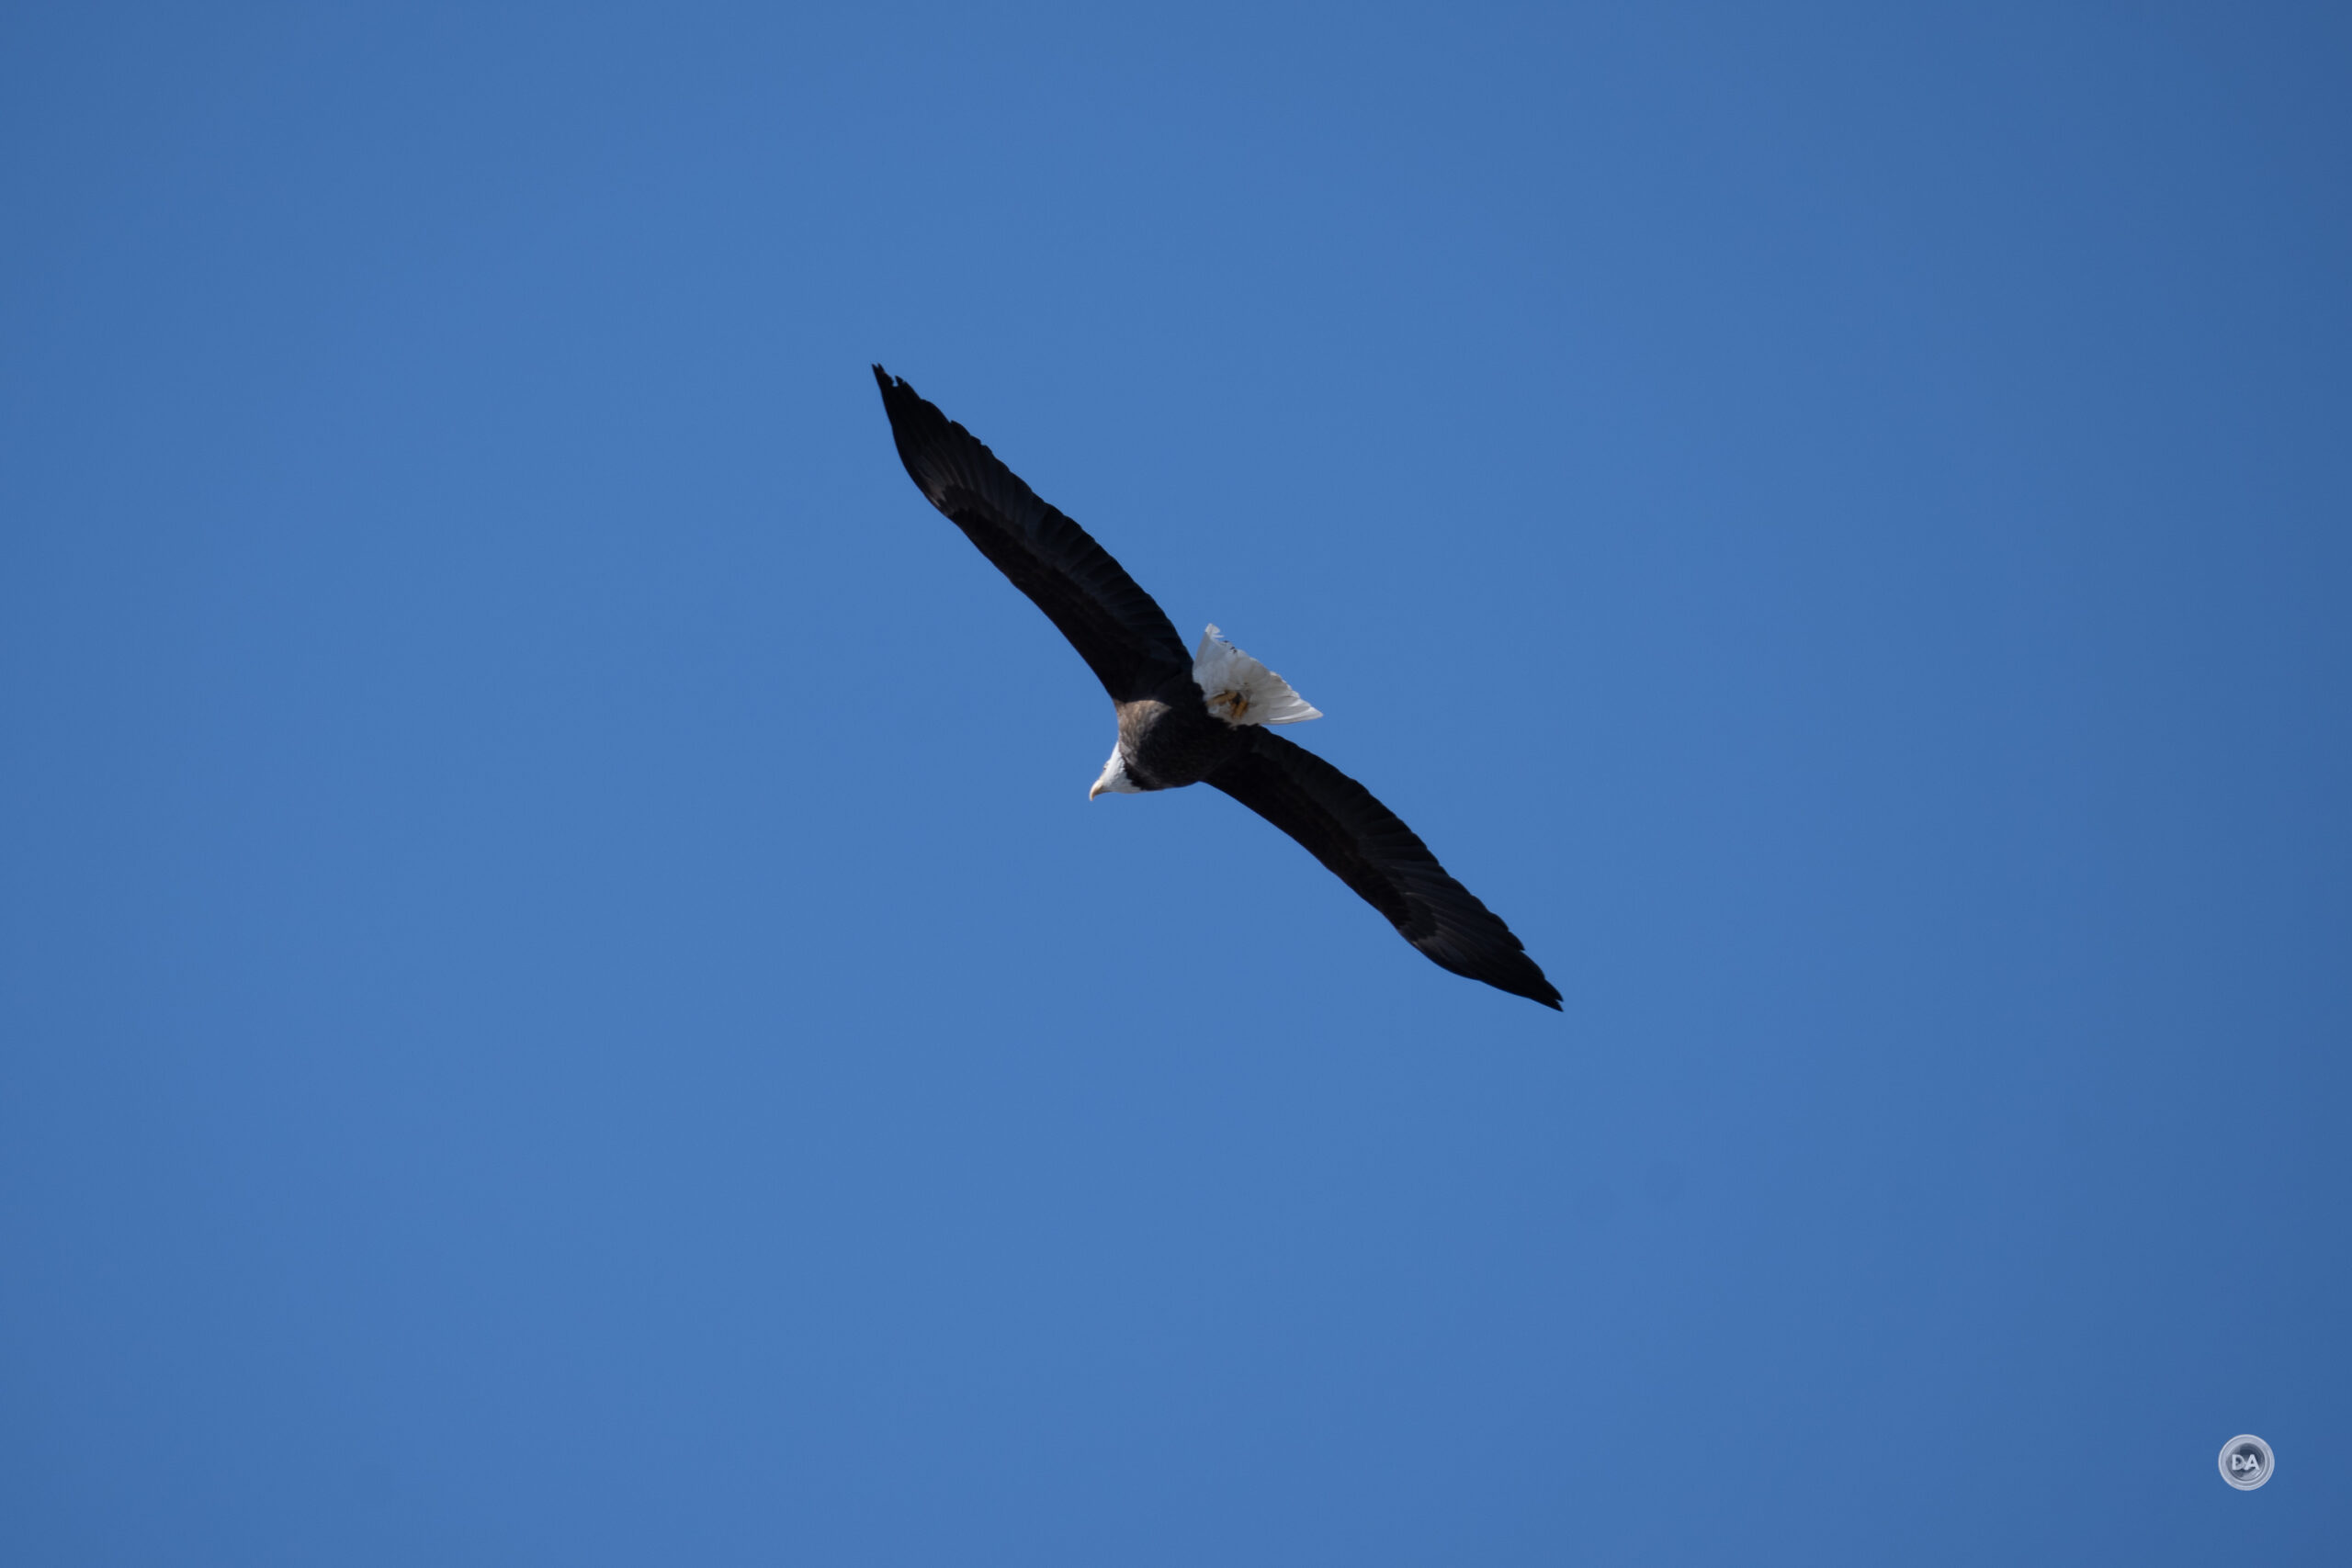
Pairing a Sony telephoto lens with a Sony sports camera is generally a delight. Combine a lens like the 400-800G with one of the a9 or a1 bodies and it will feel like enabling a cheat code. Tracking is just so good! Sony has employed dual linear motors to drive focus here, and that helps give the lens the speed it needs. I tested focus on an Alpha 1 body, but Sony adds this for those shooting with the lower resolution but ultra fast a9III: “Tracking easily keeps up with the 120 fps maximum burst speed of the α9 III, and continues uninterrupted even while zooming so important moments are not lost.“
In my formal tests, I found that focus speed was faster at the 400mm than at the 800mm end, with the former being basically instant and the latter having just a slight pause as intertia builds.
There’s plenty of speed for tracking everything from sports to birds in flight…with one caveat we’ll soon address.
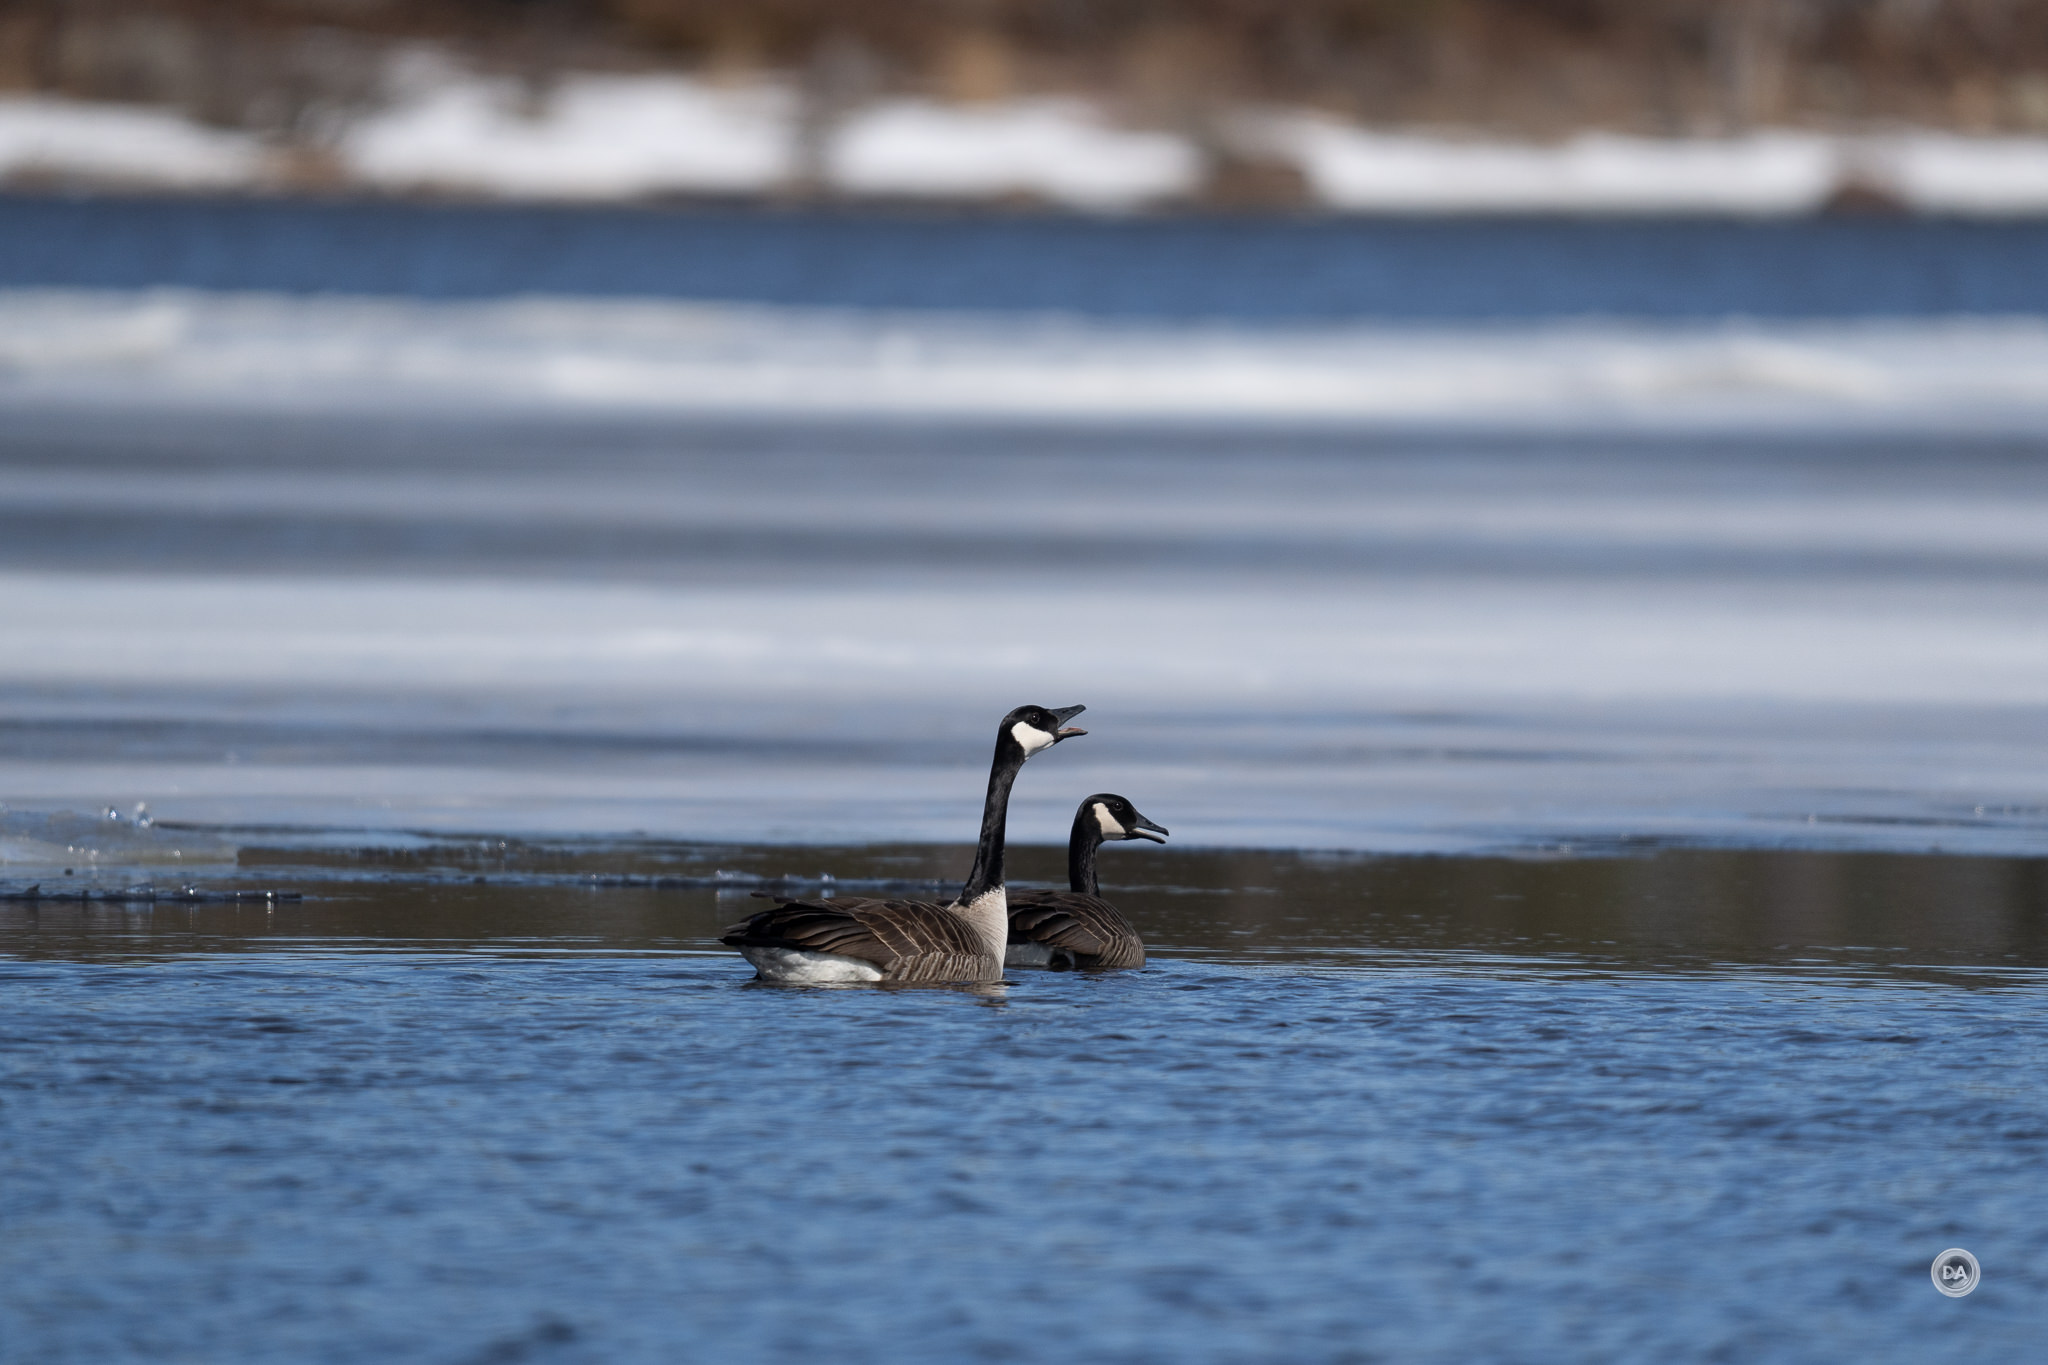
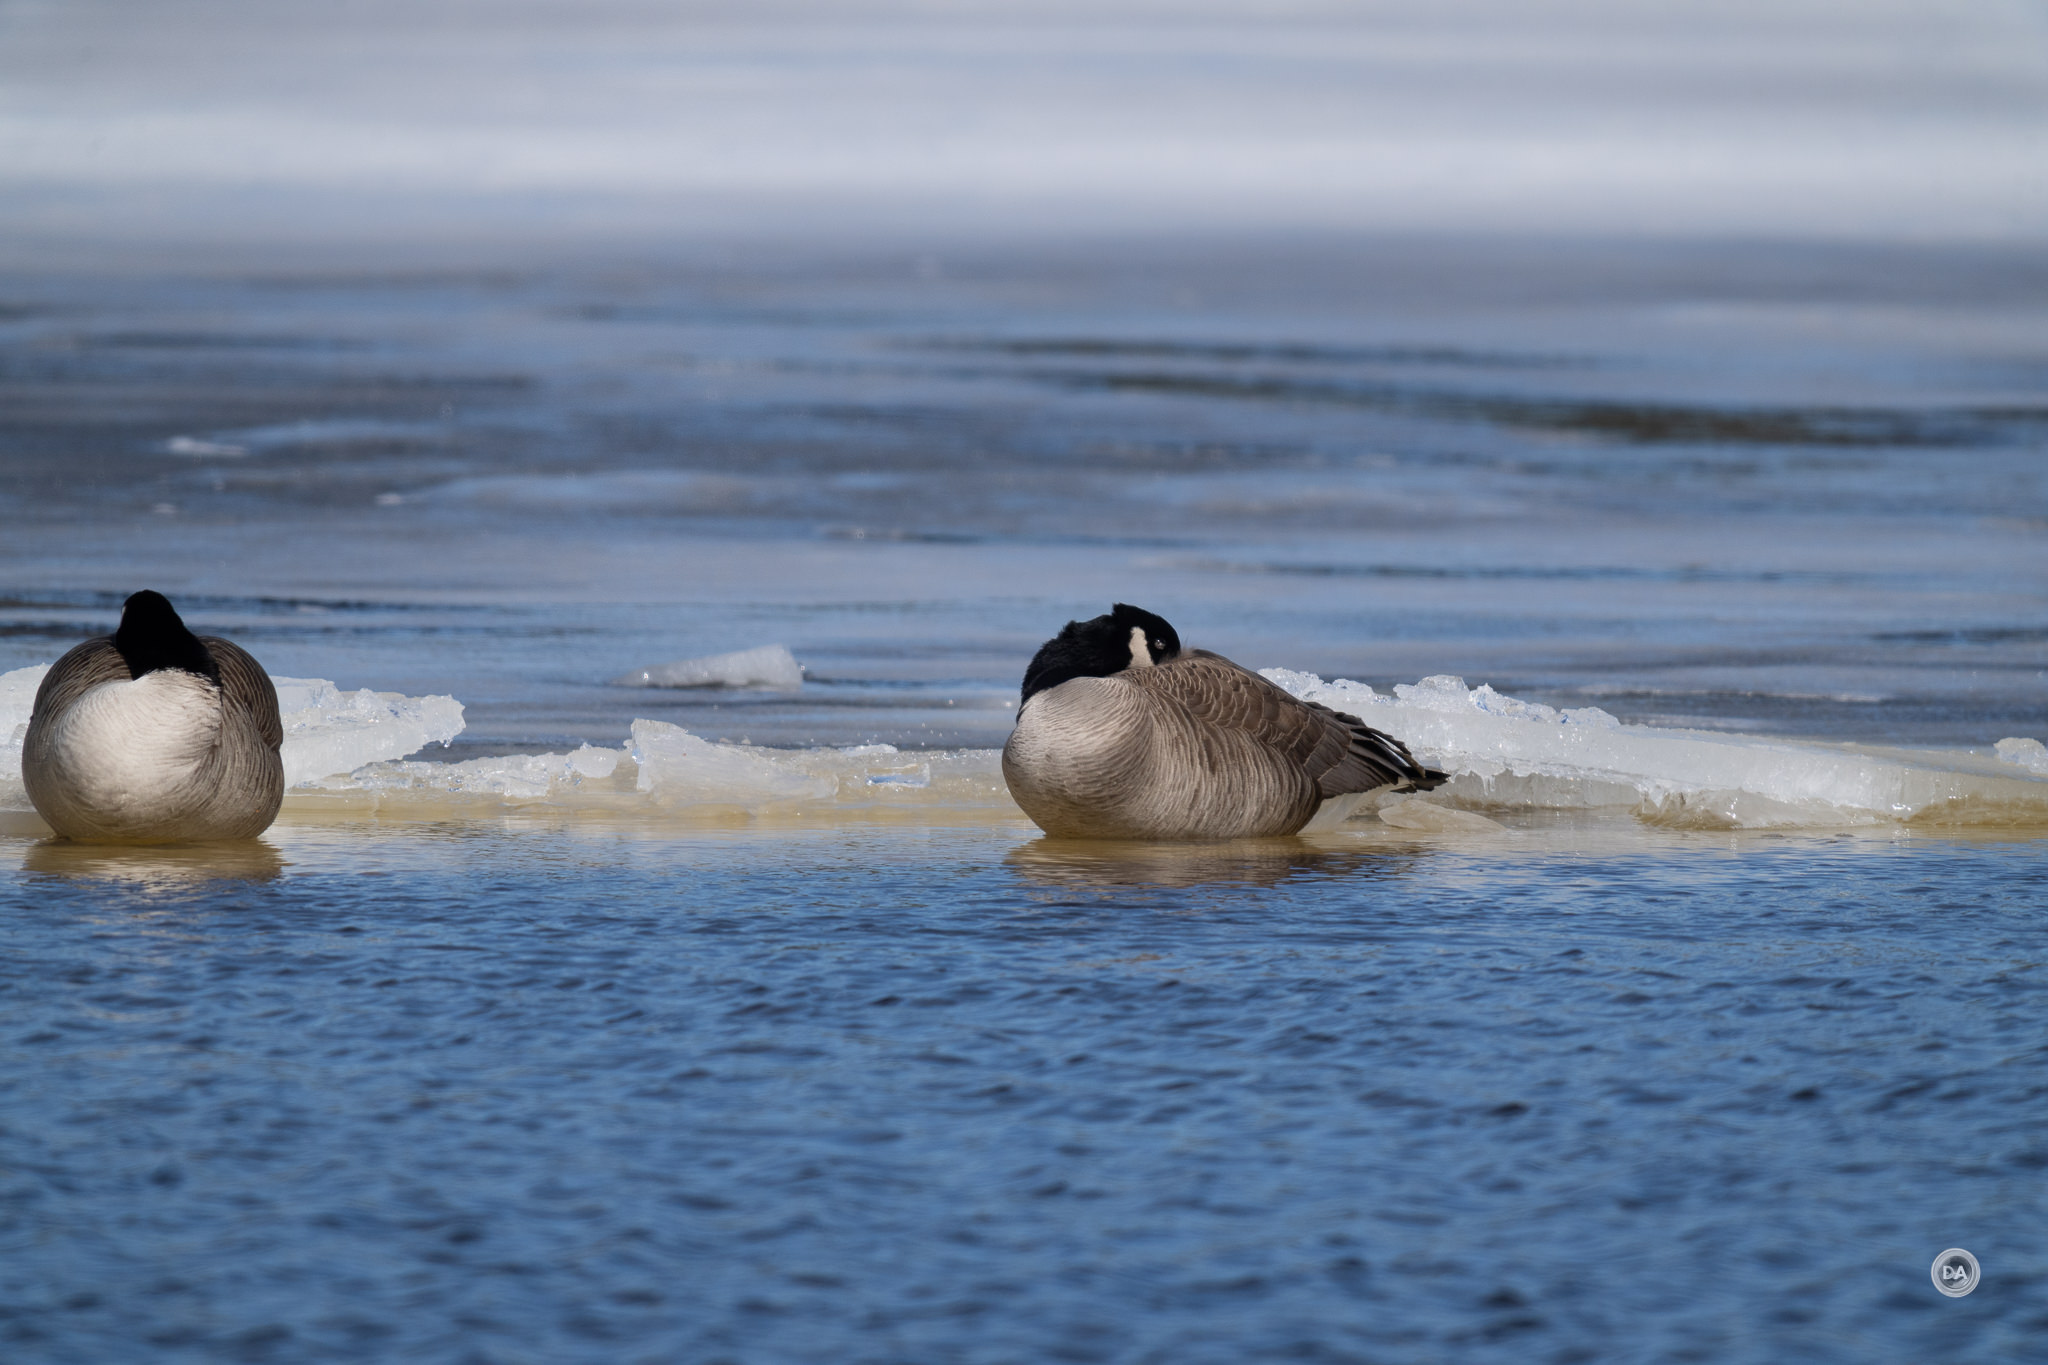
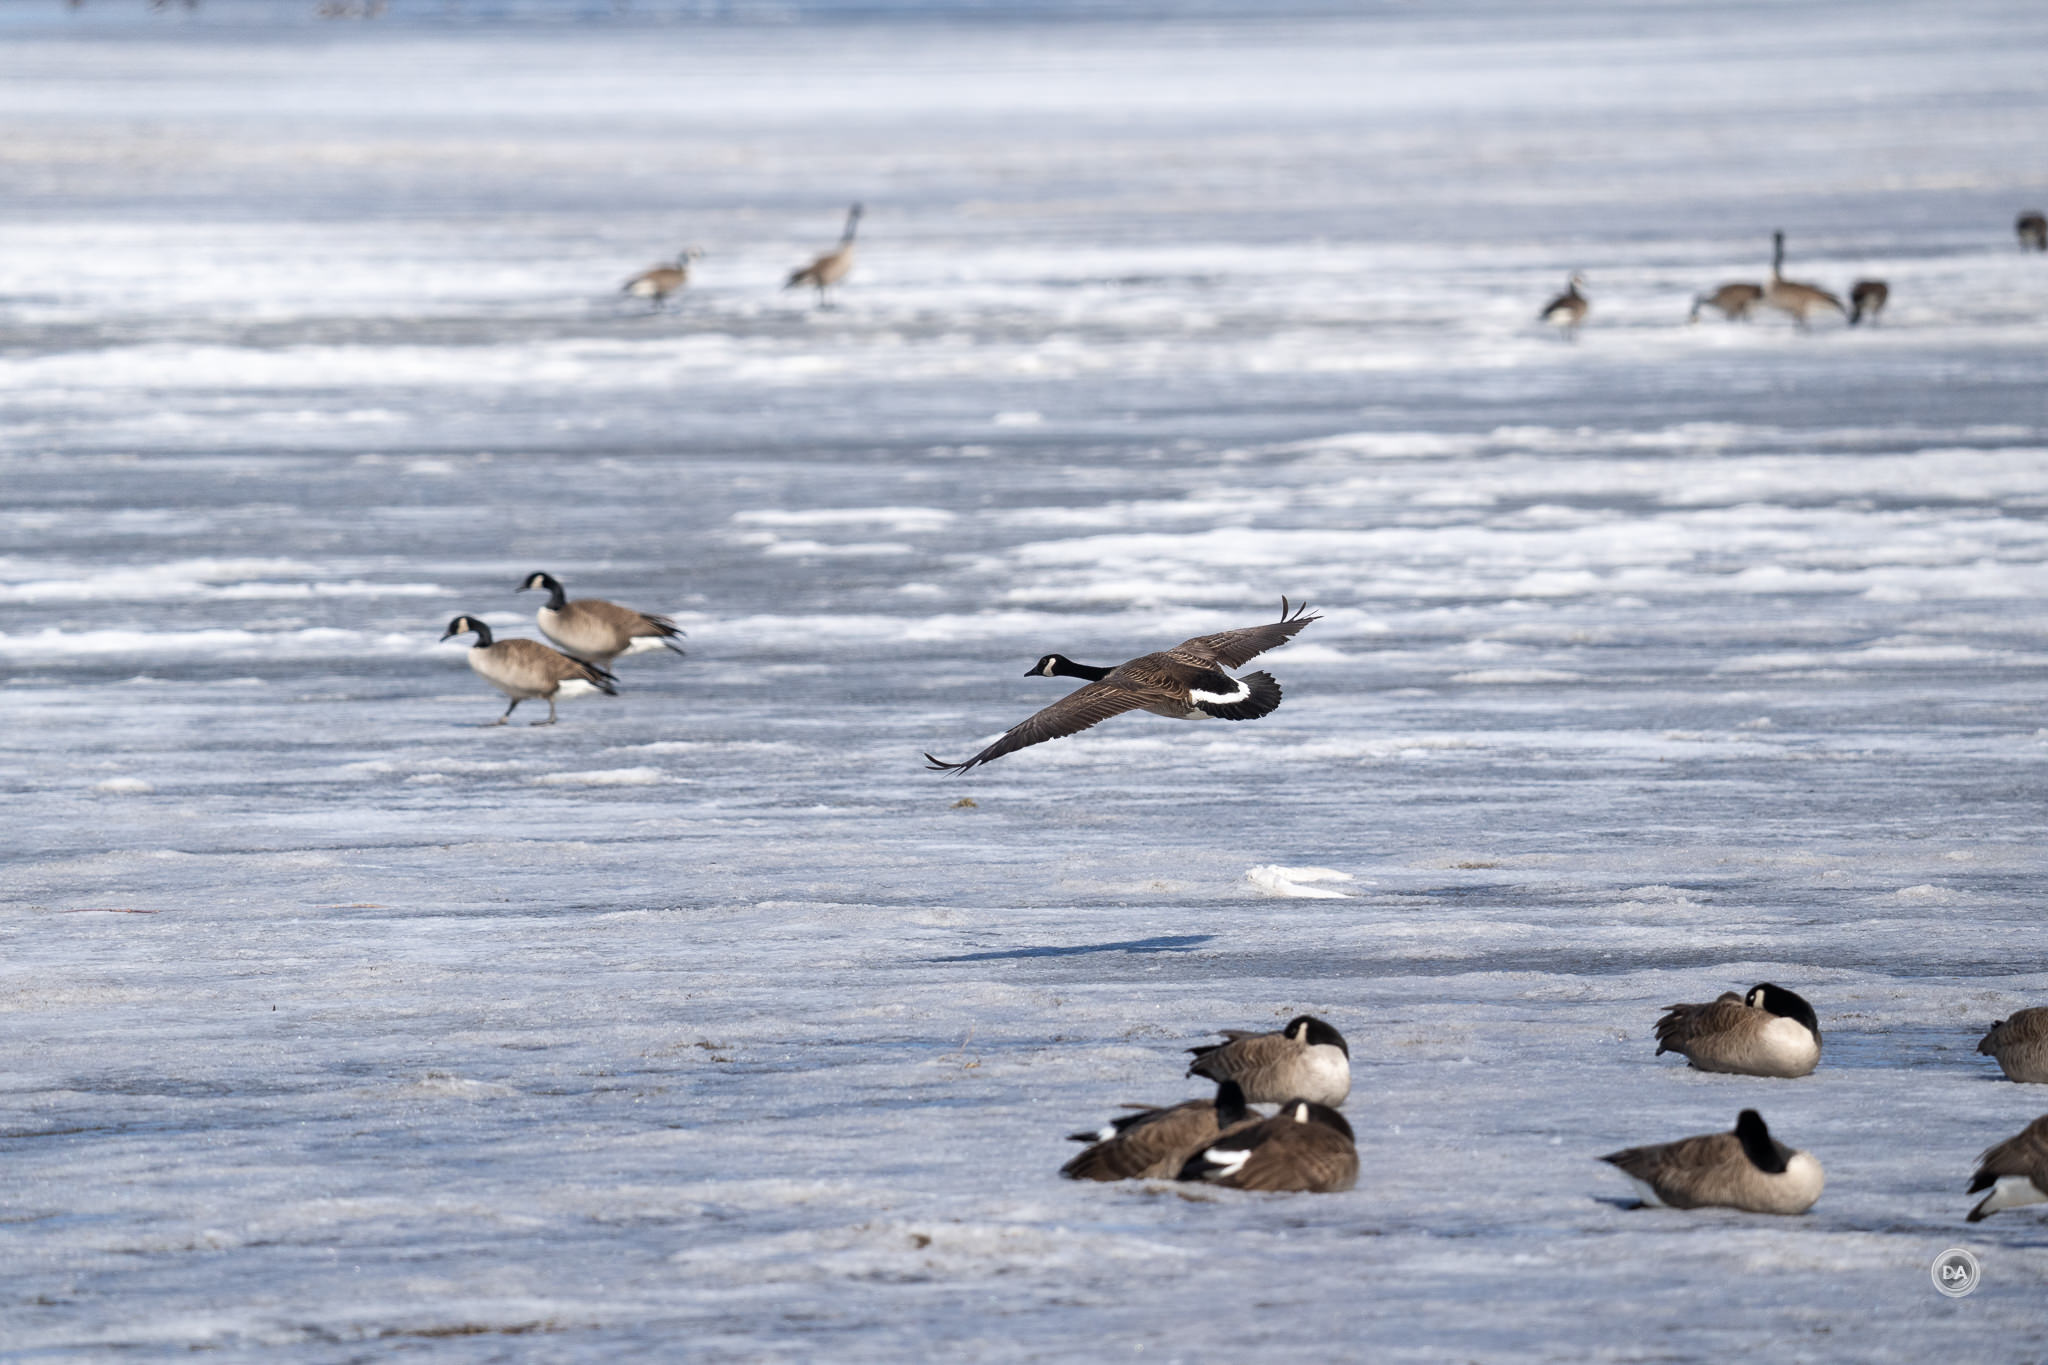
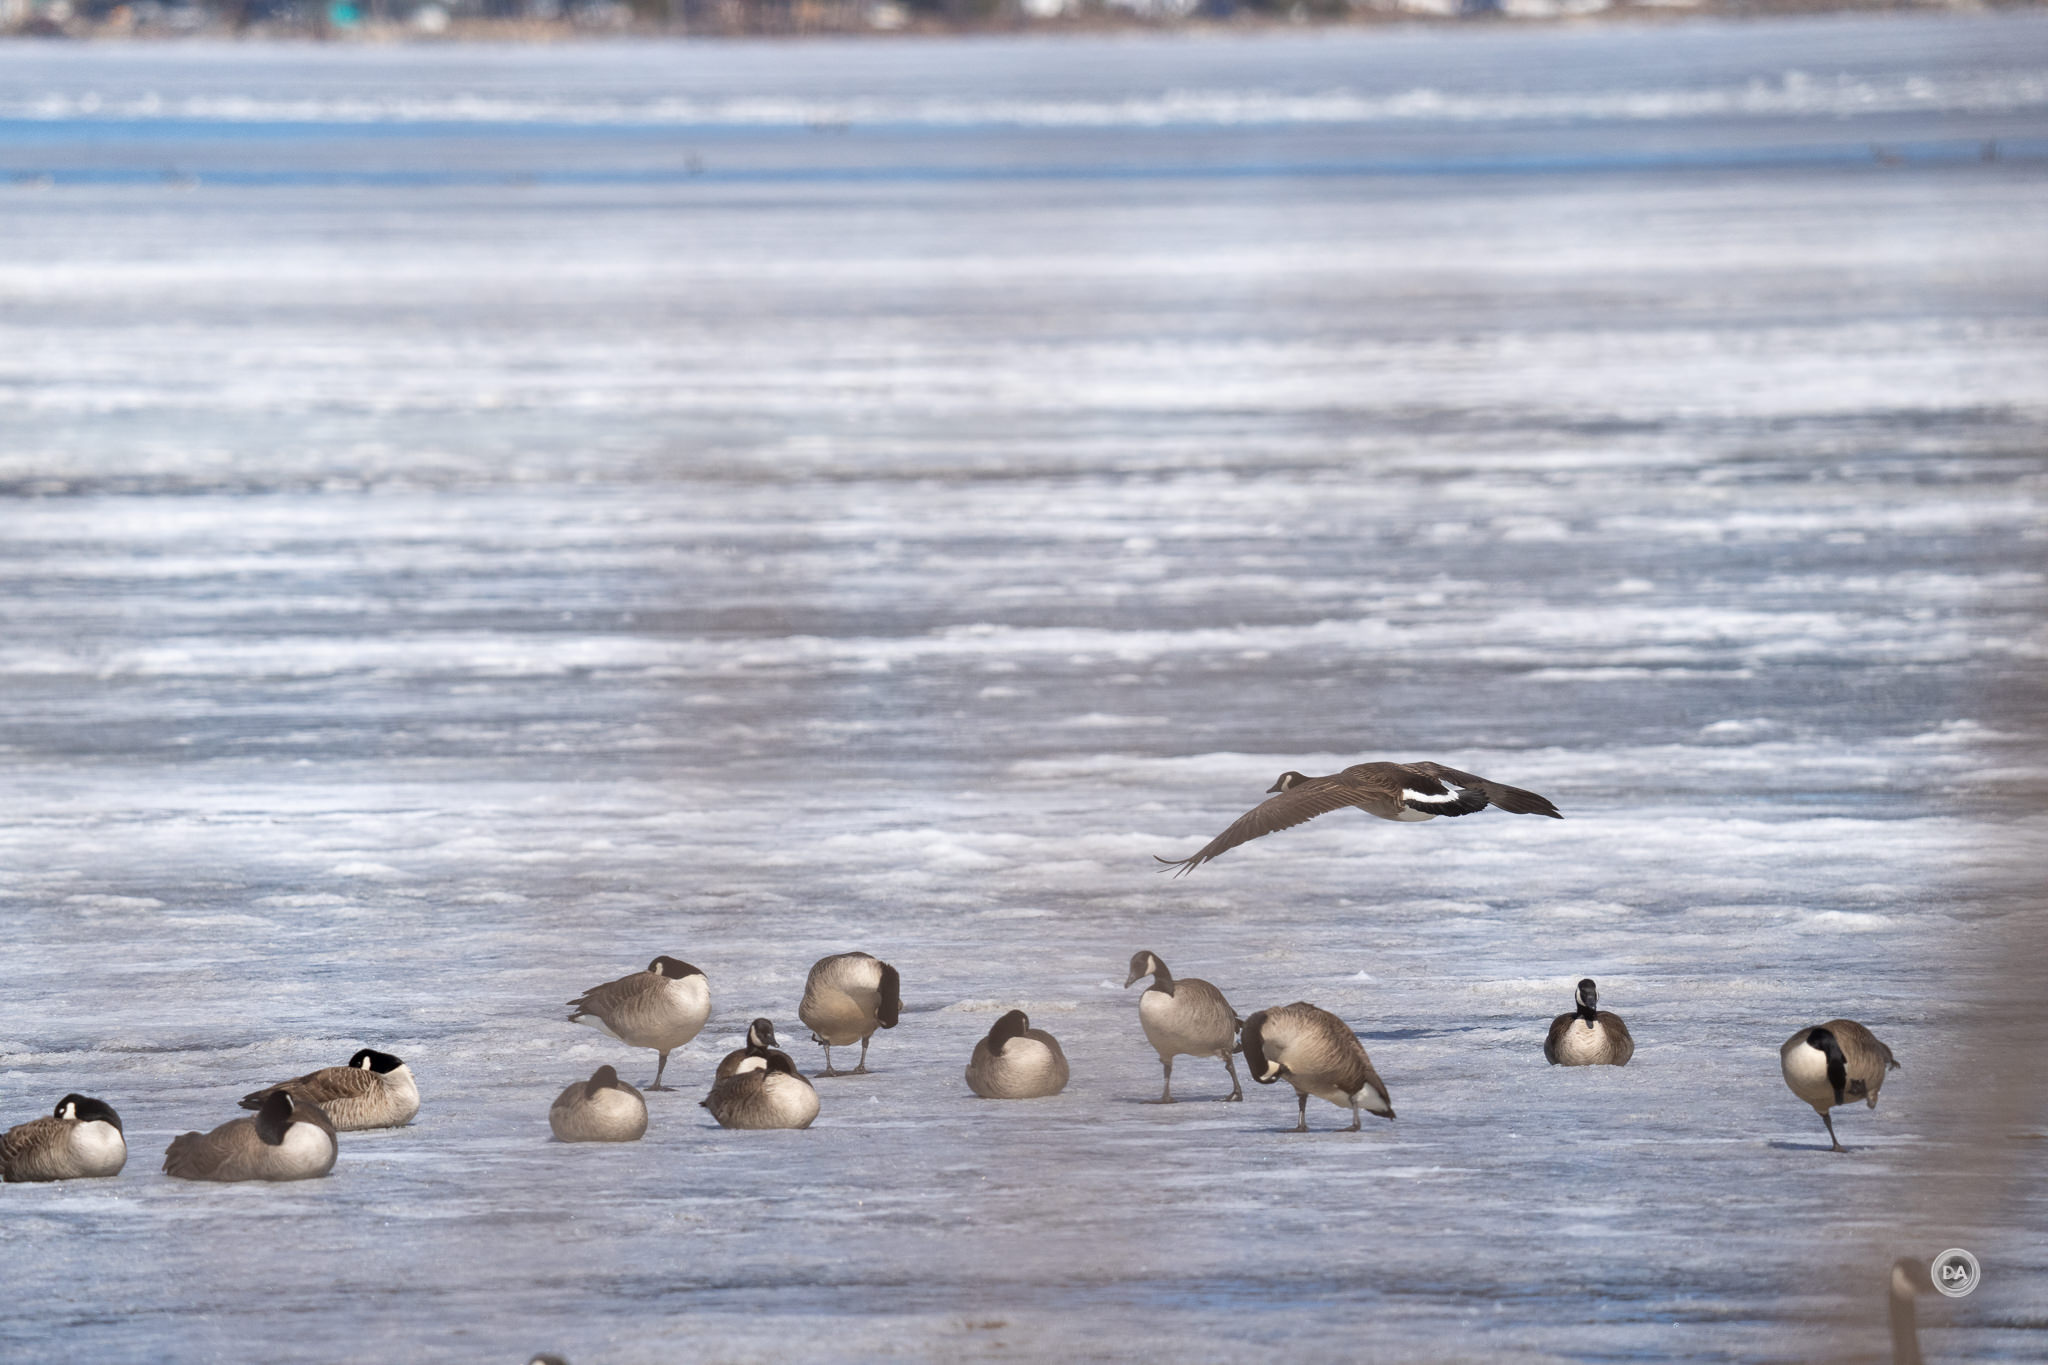
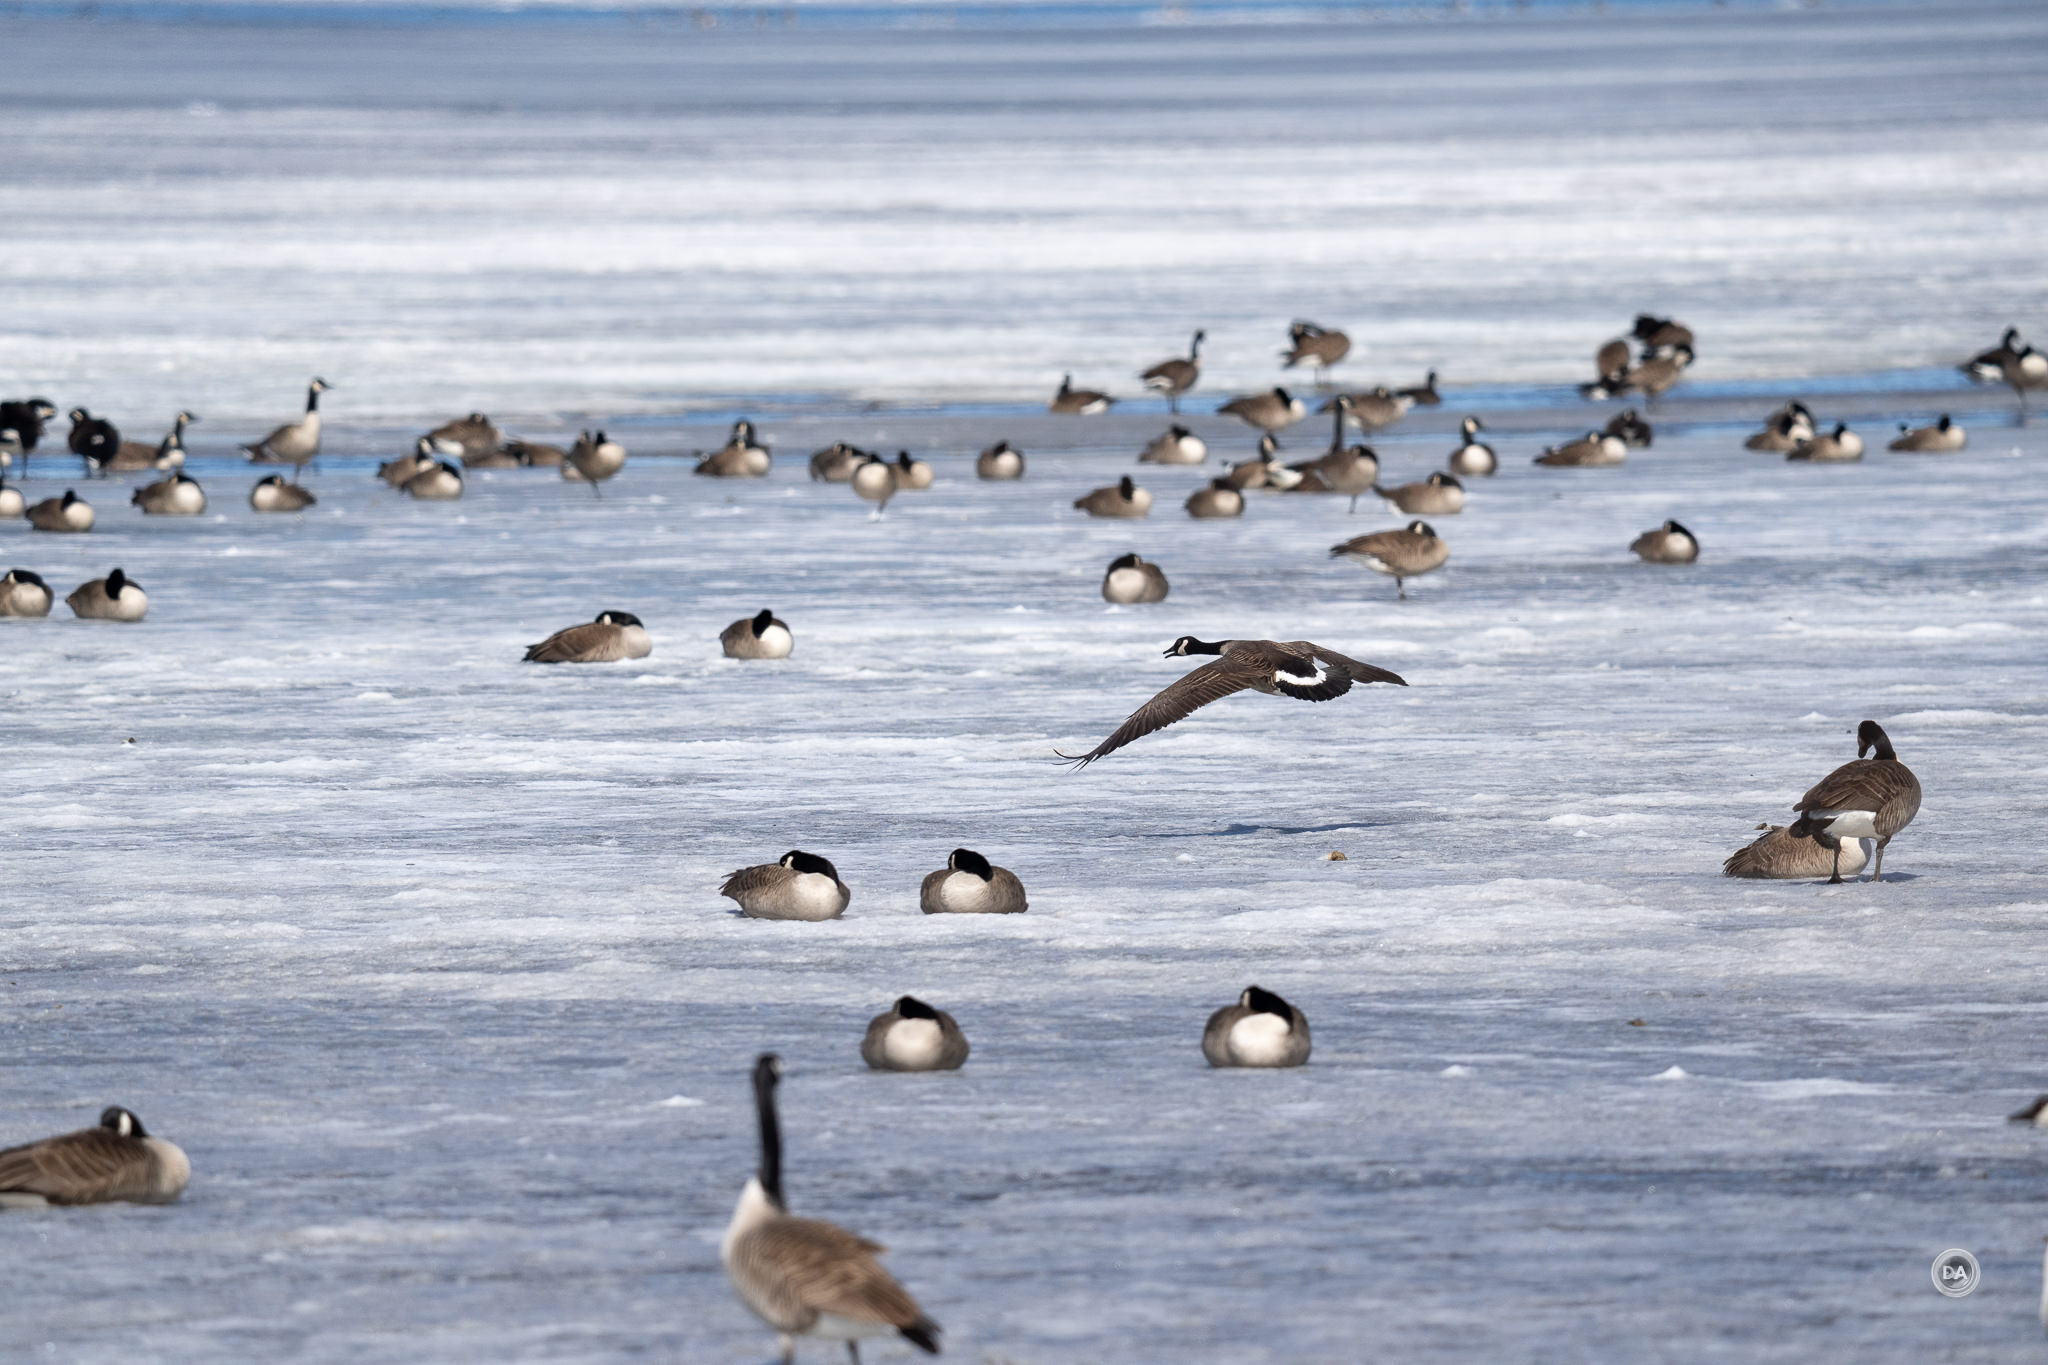
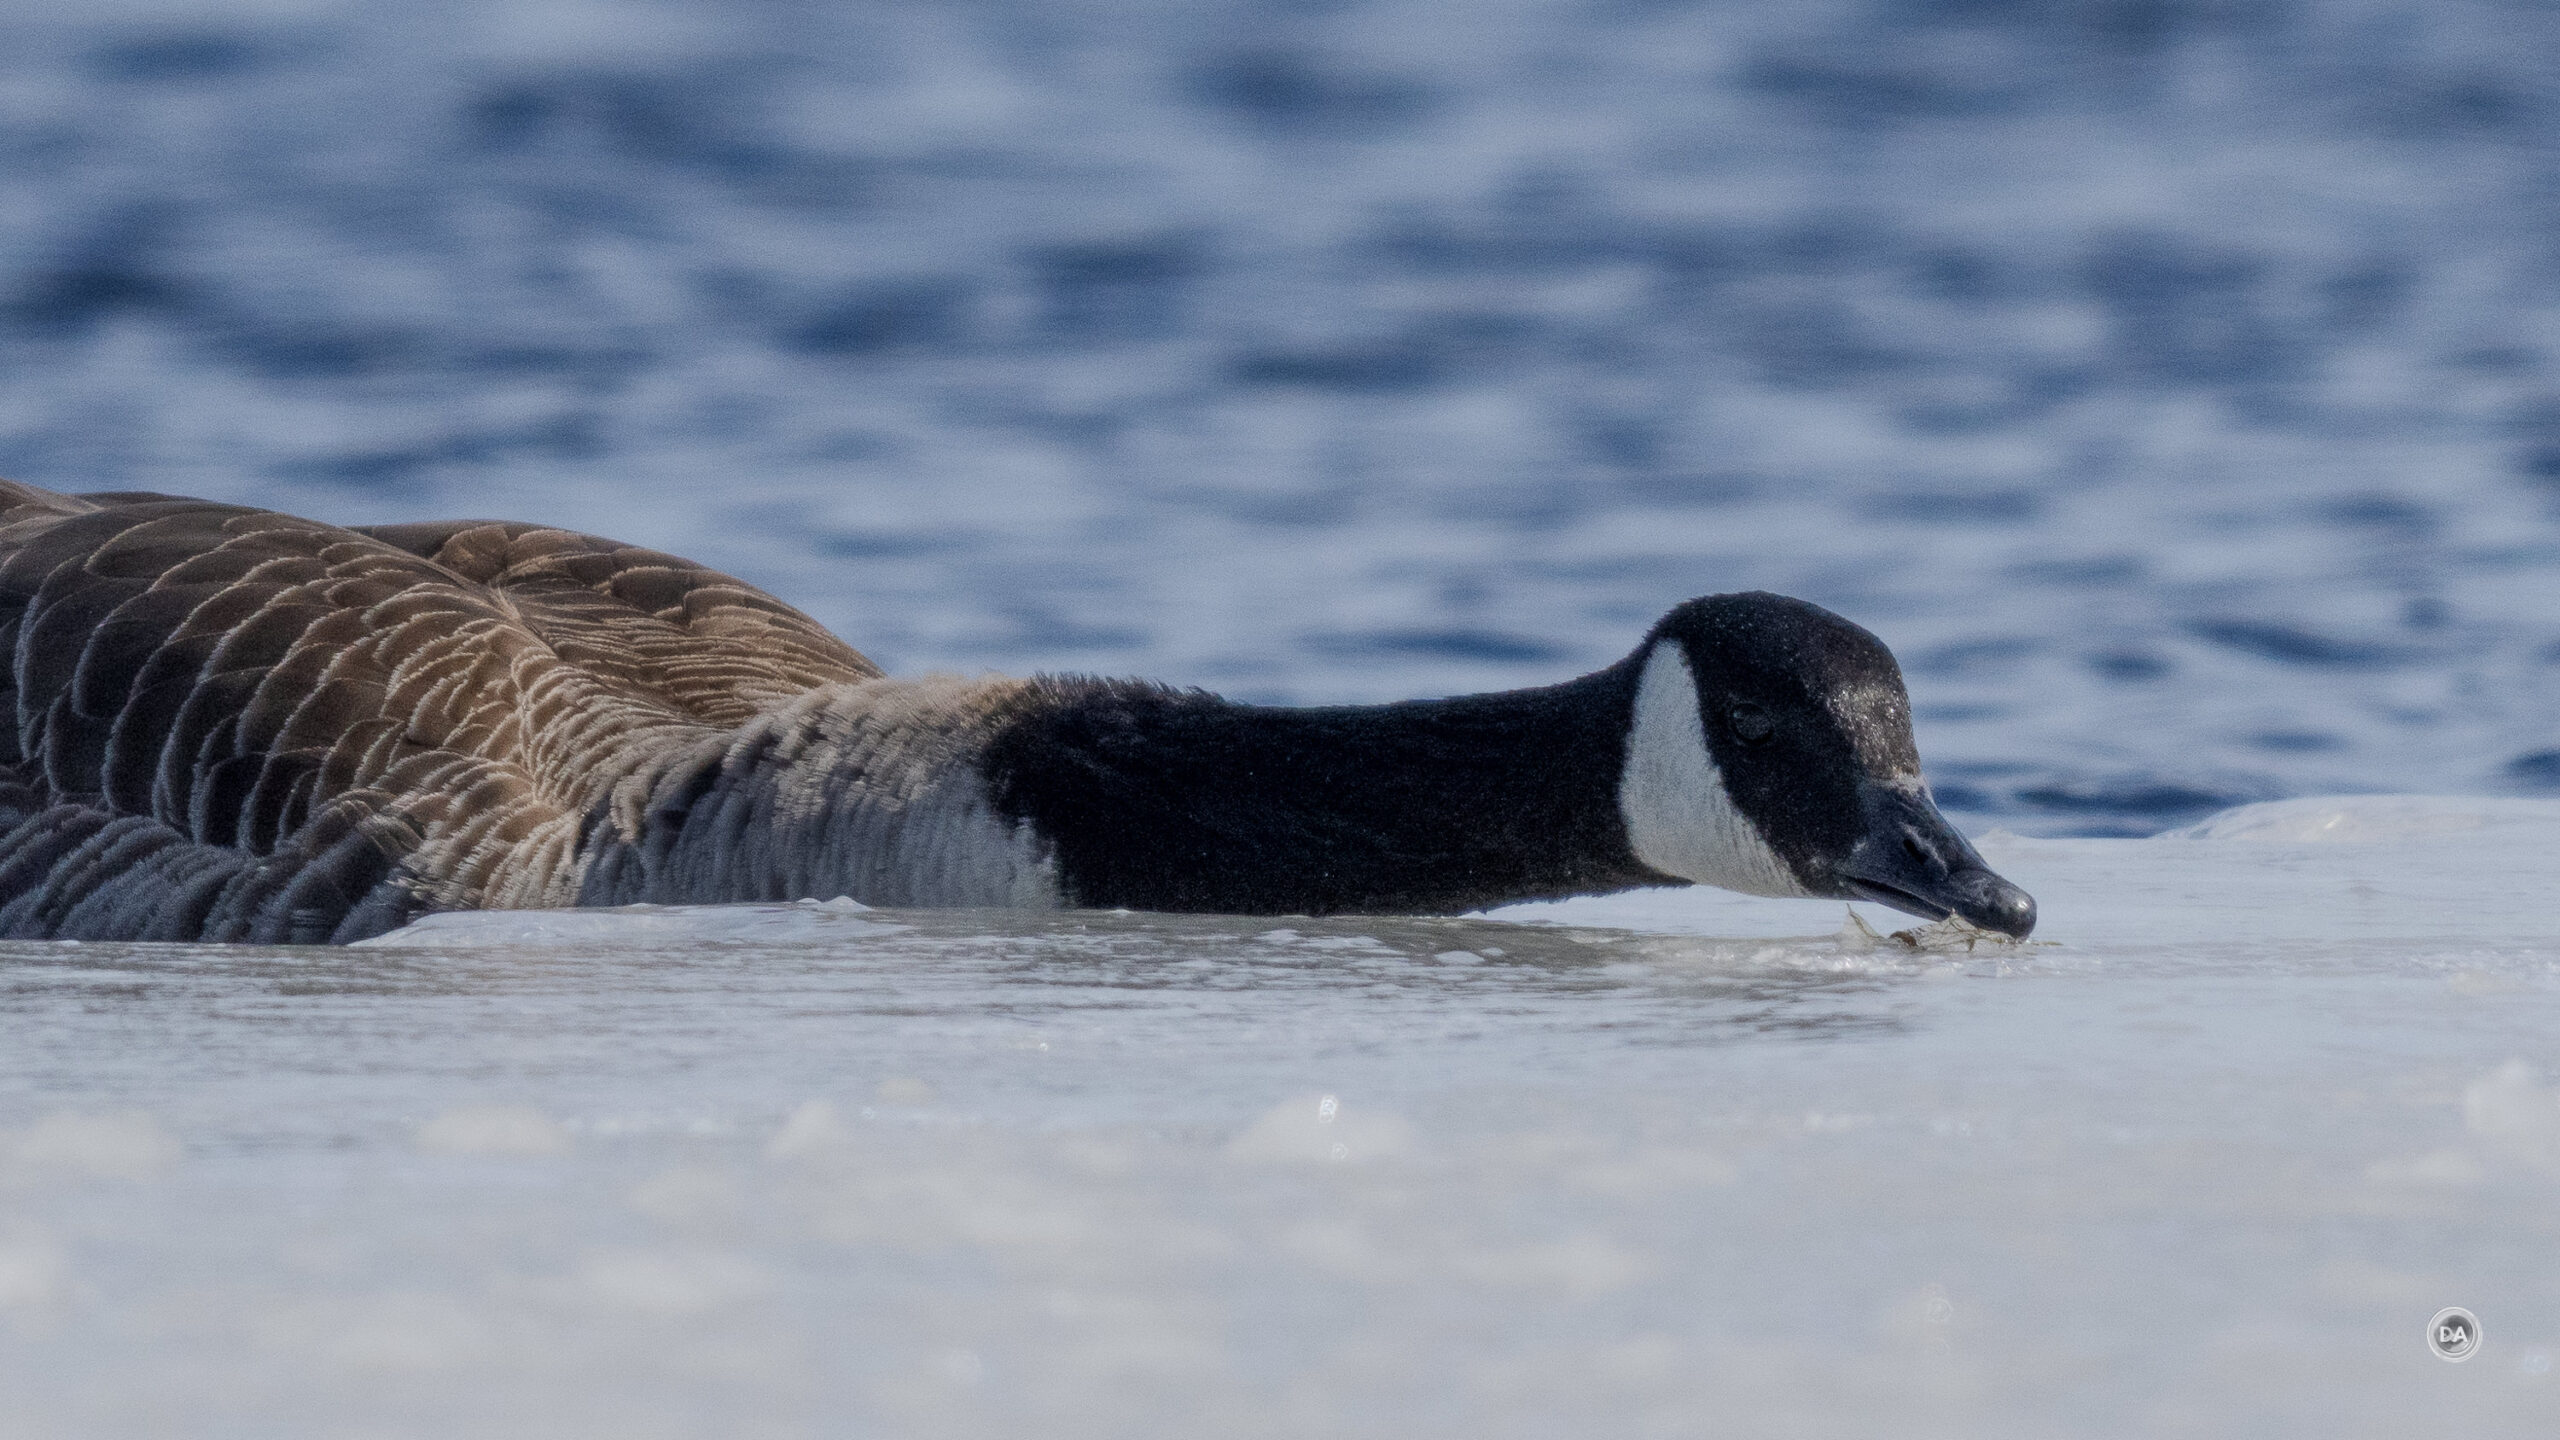
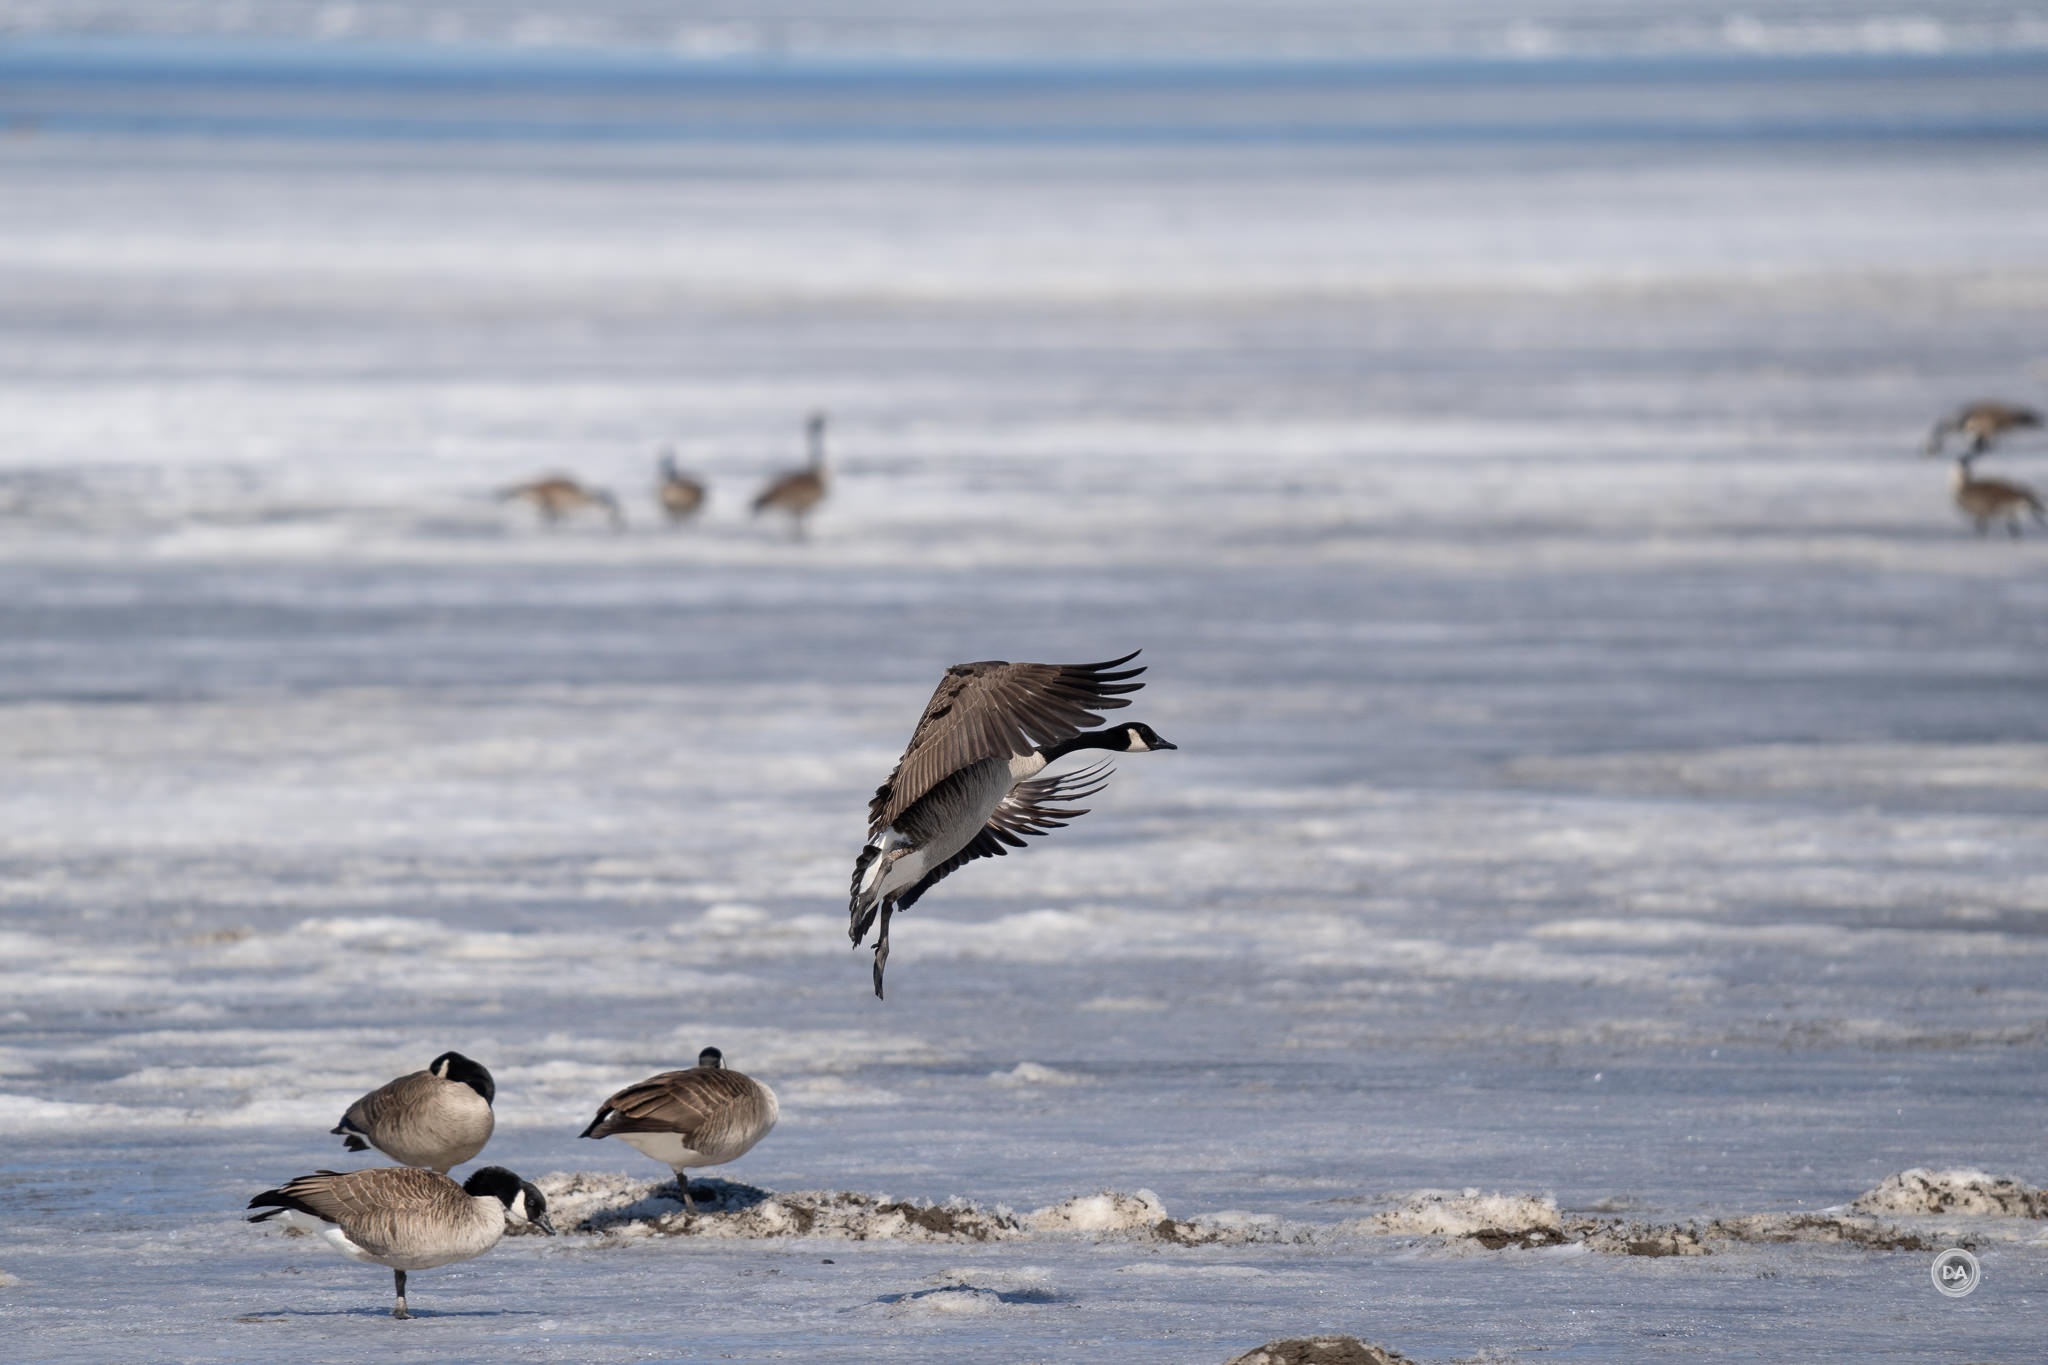
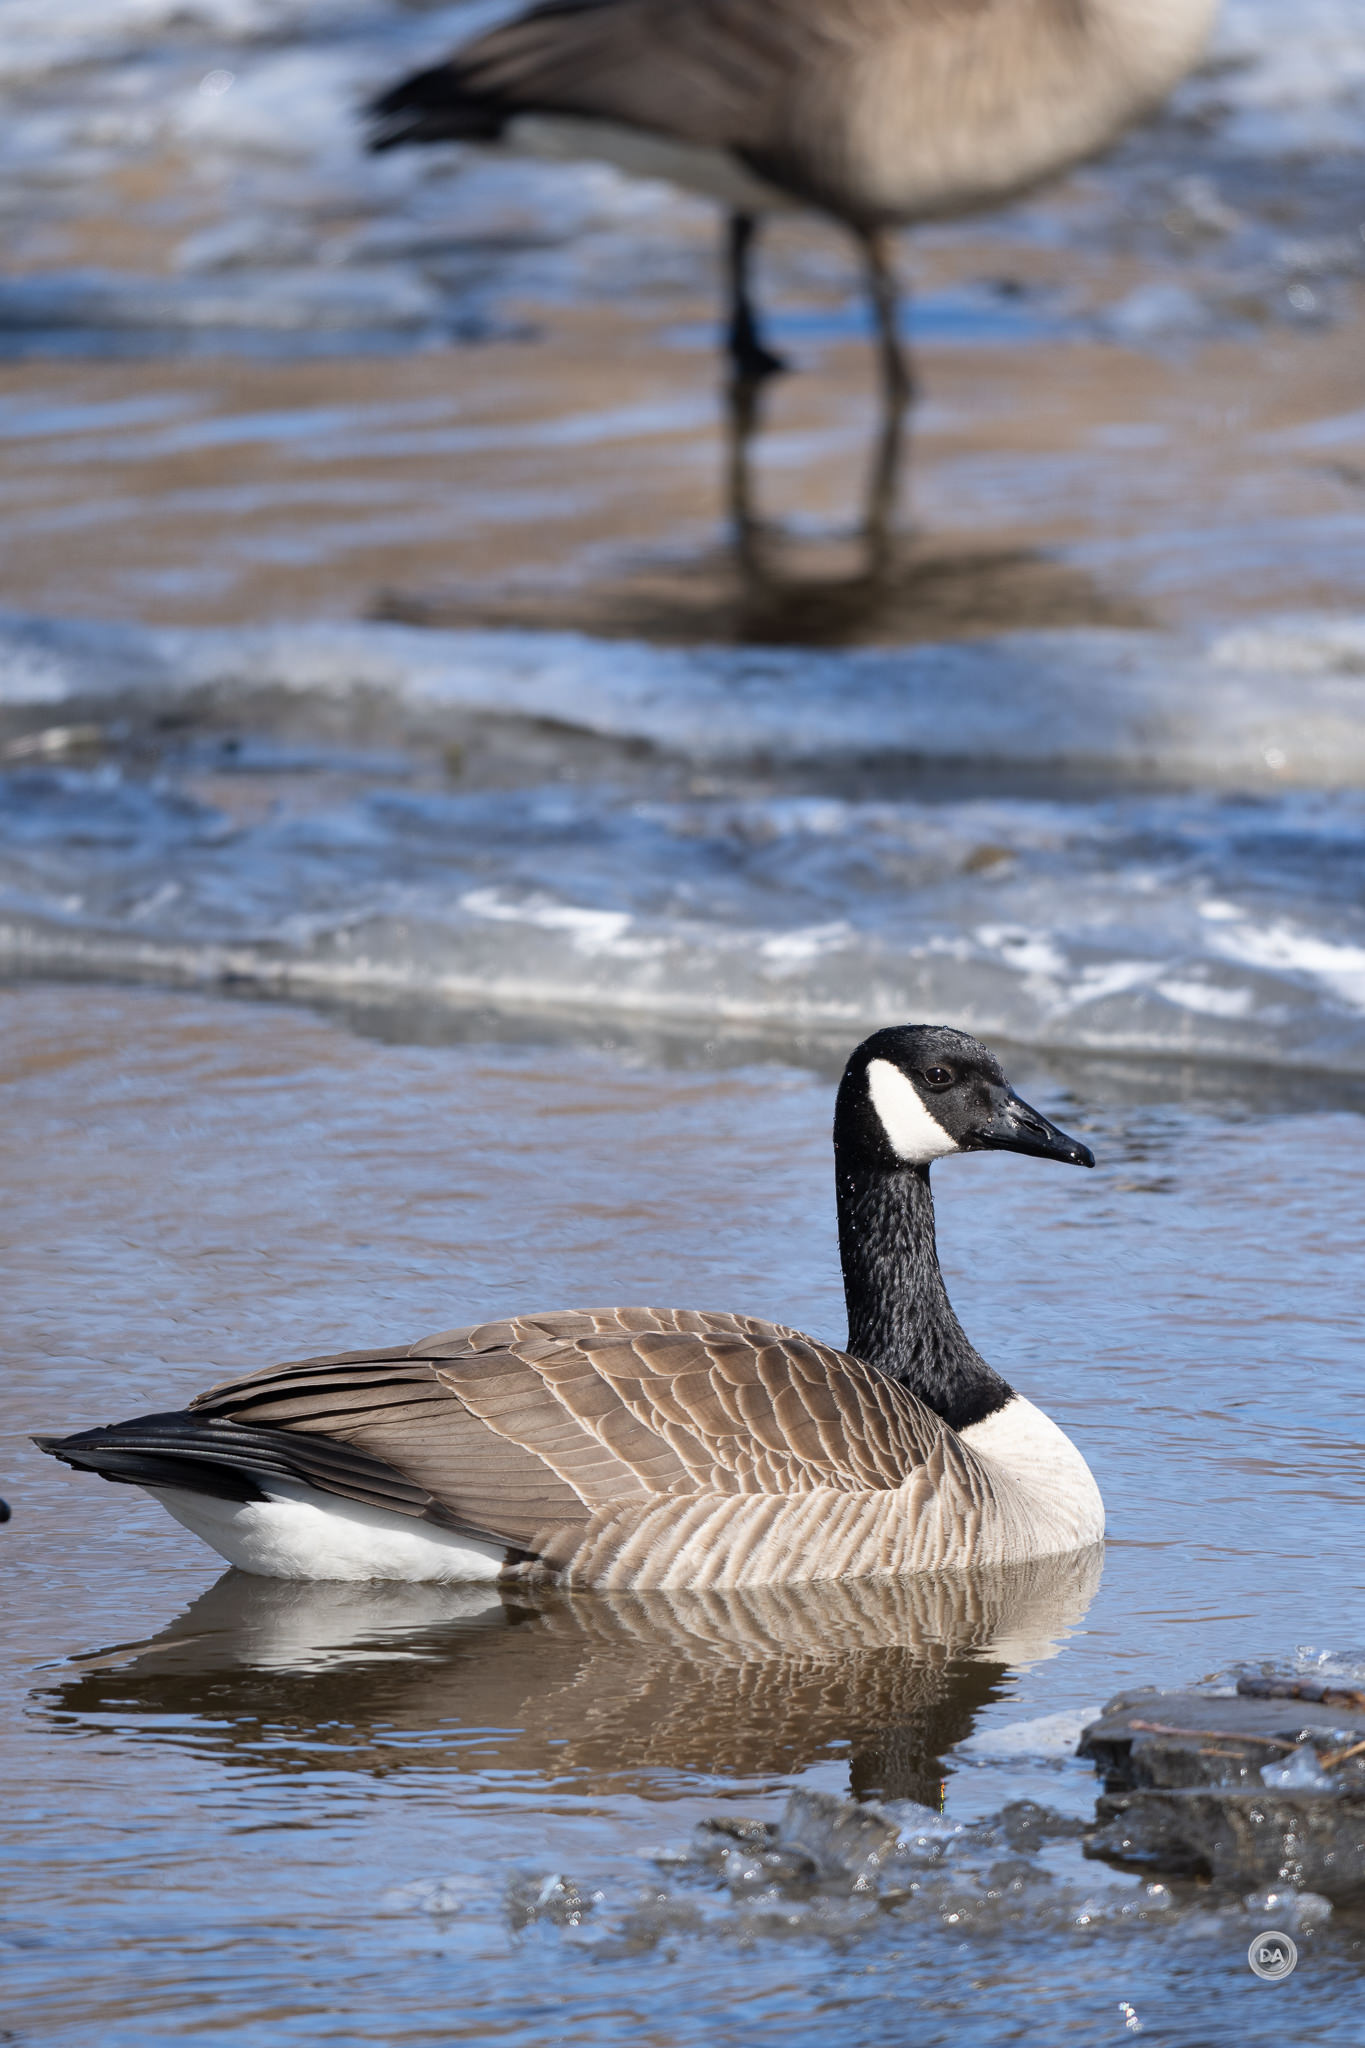
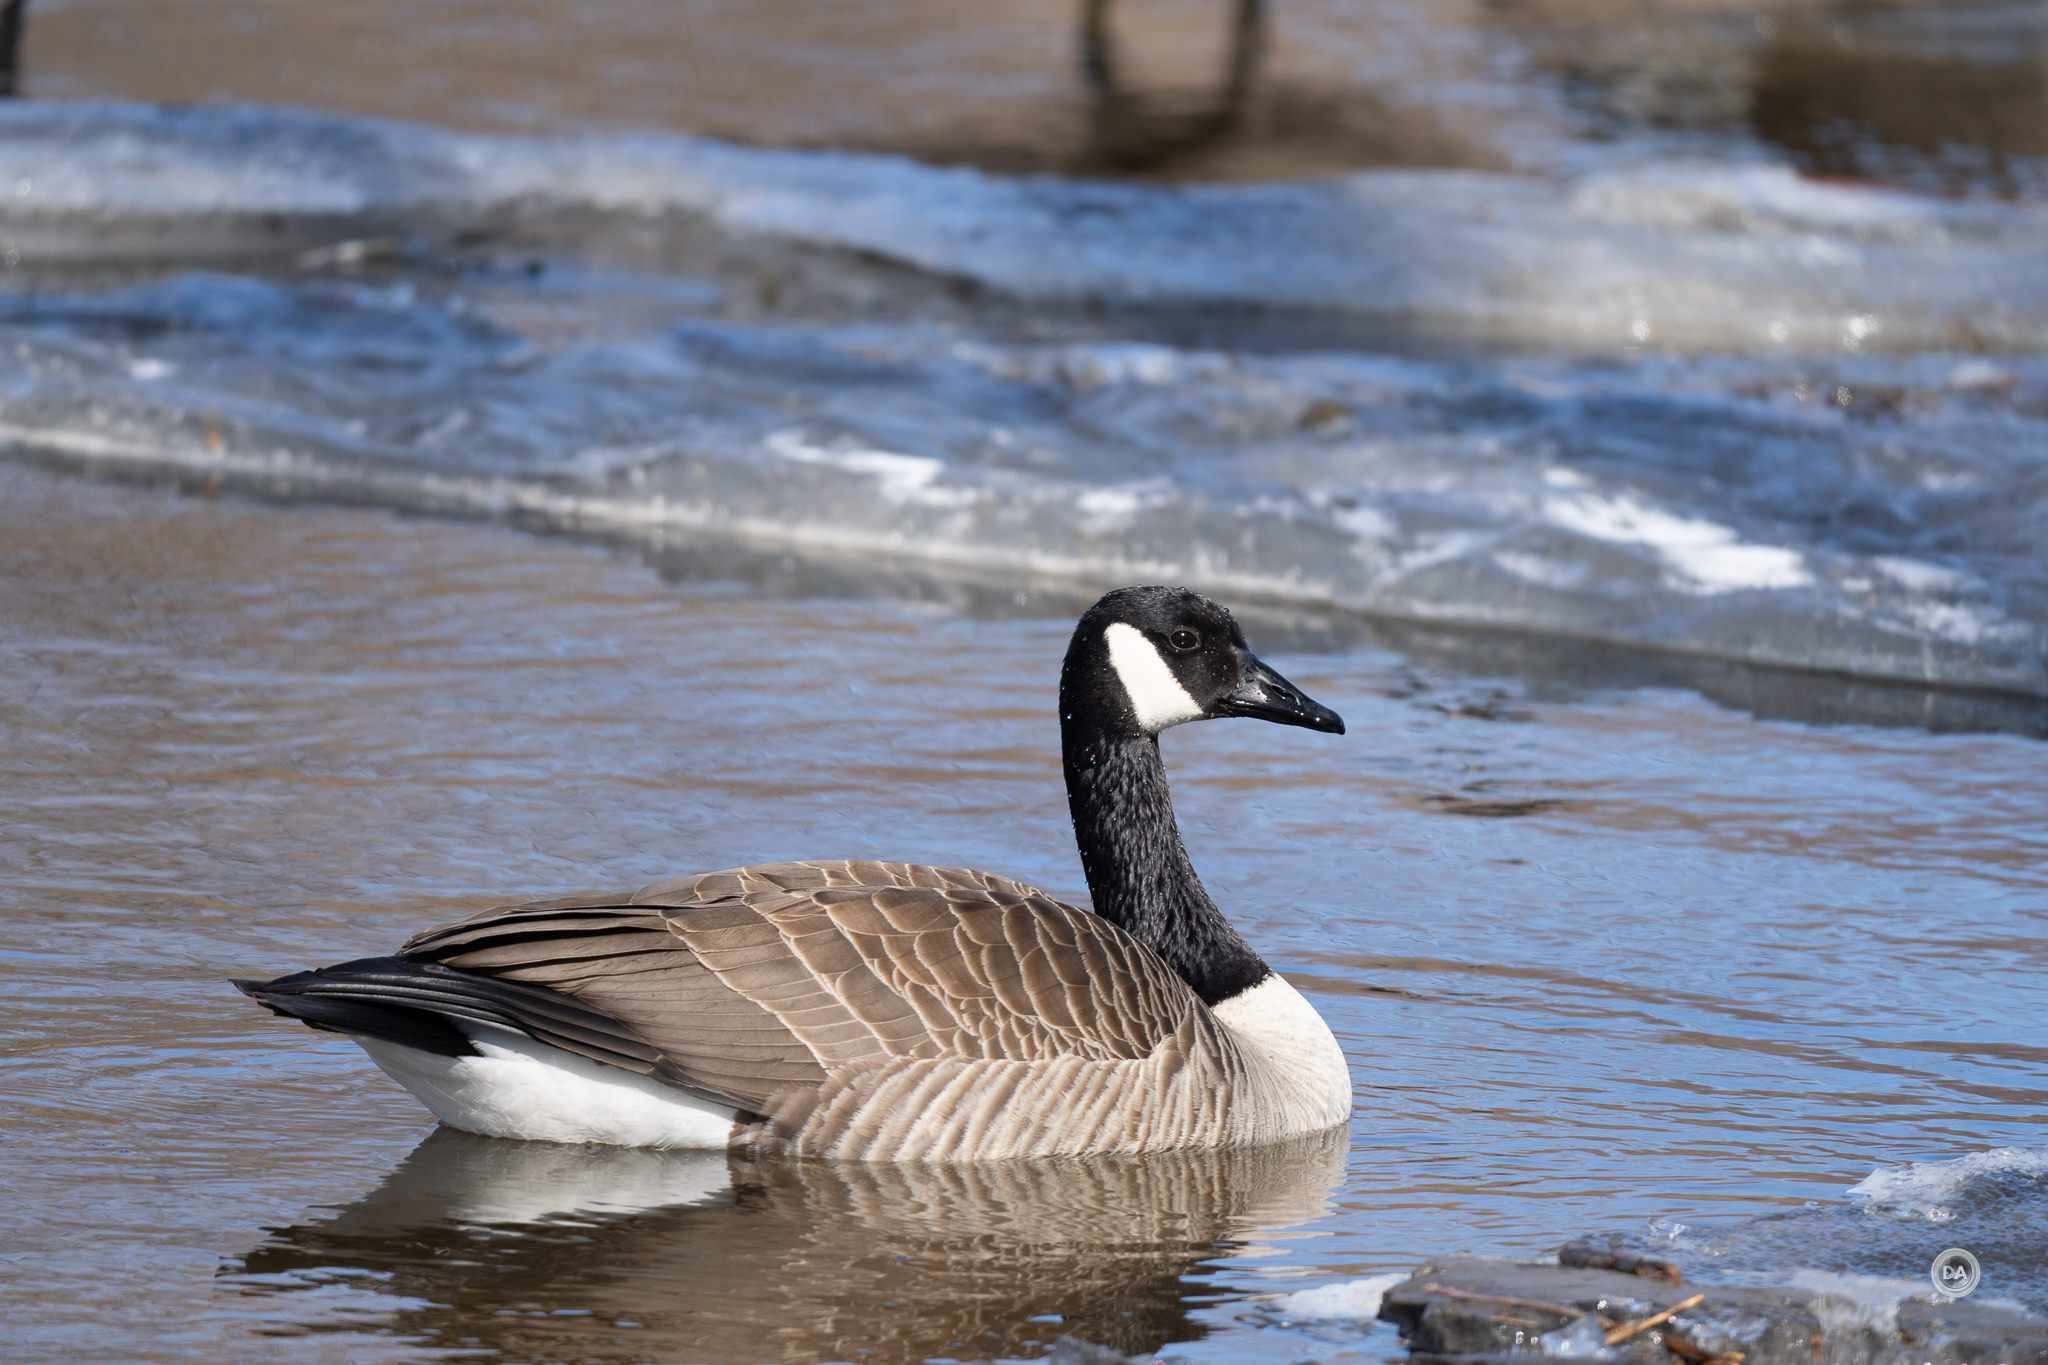
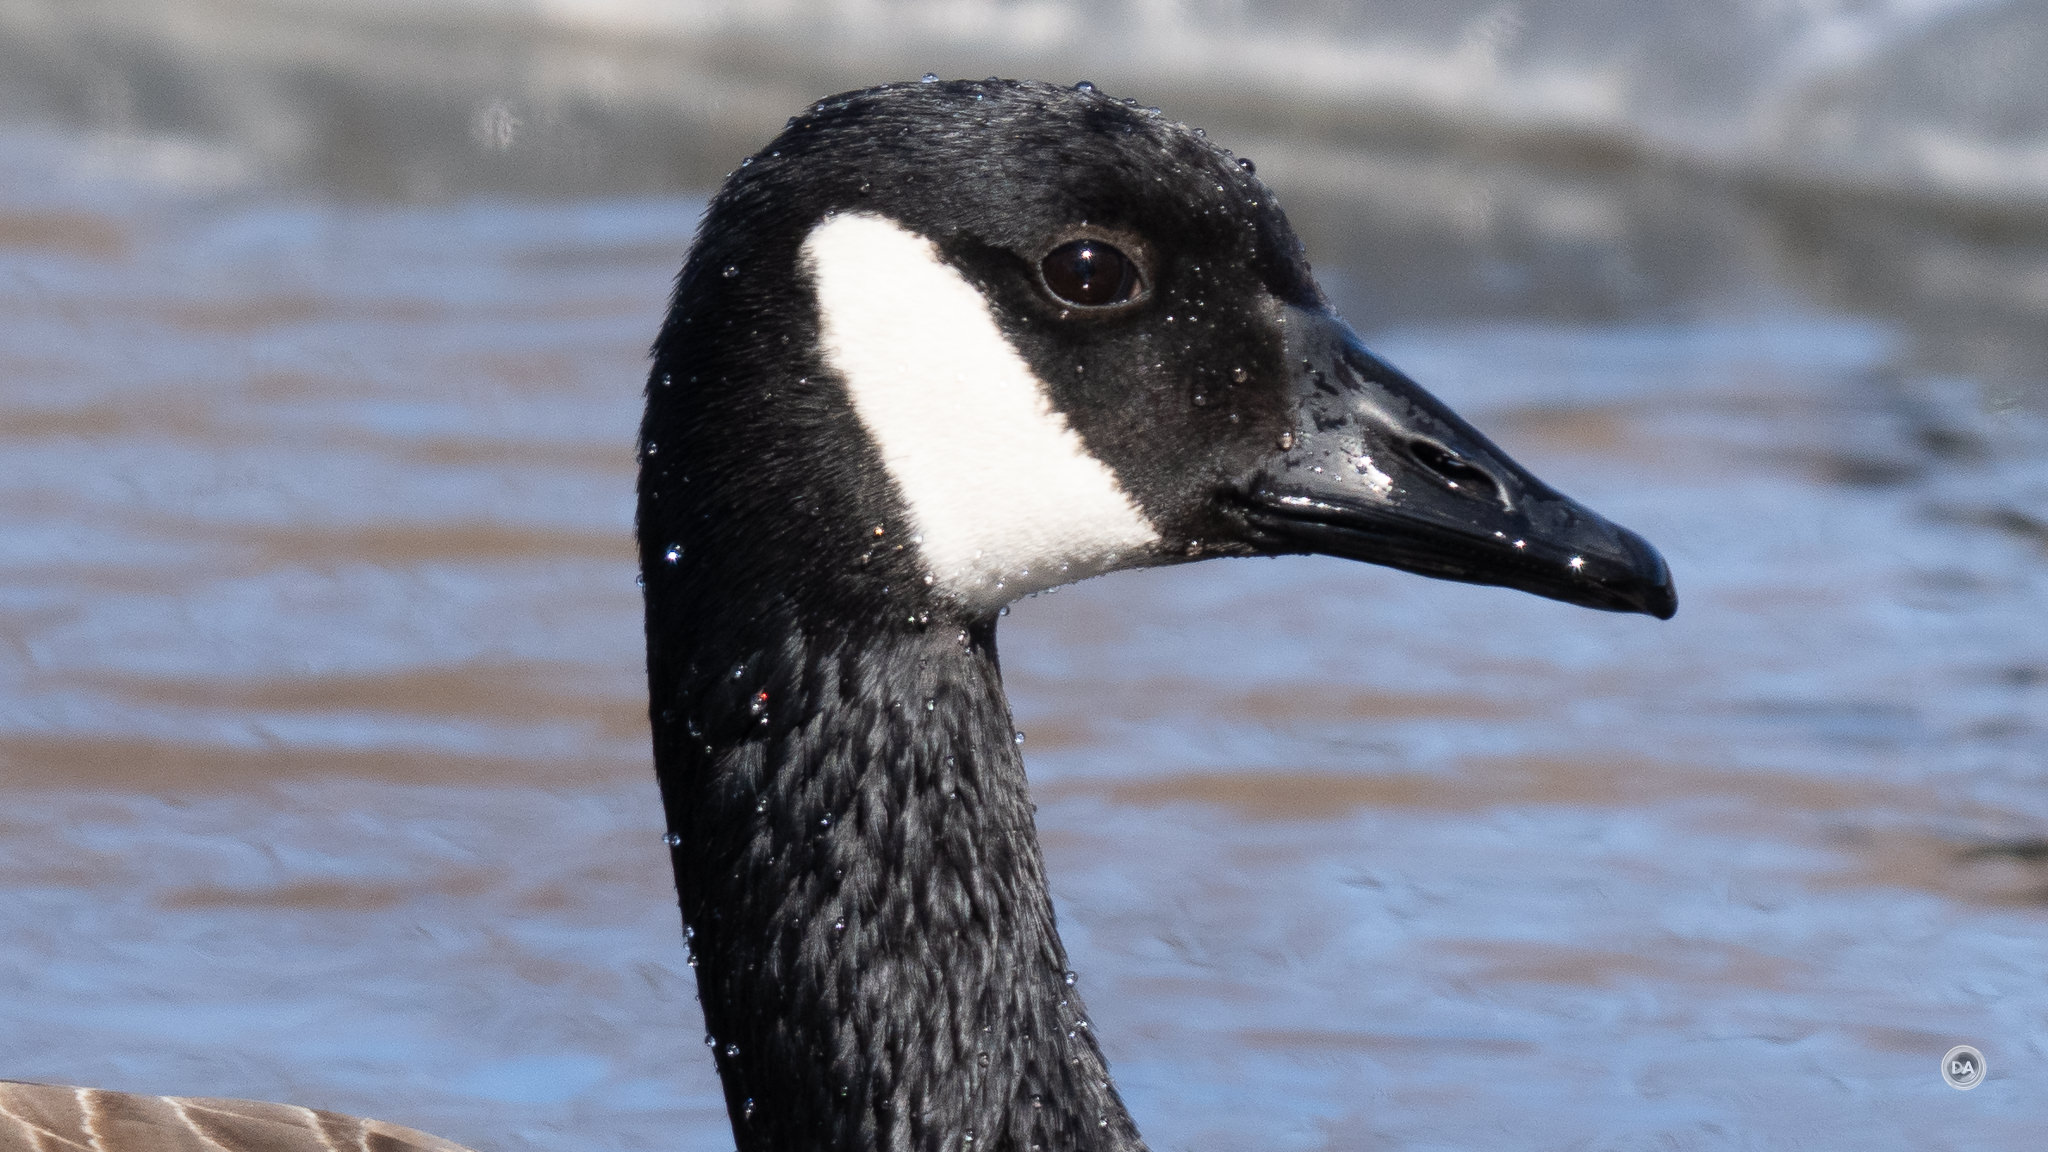
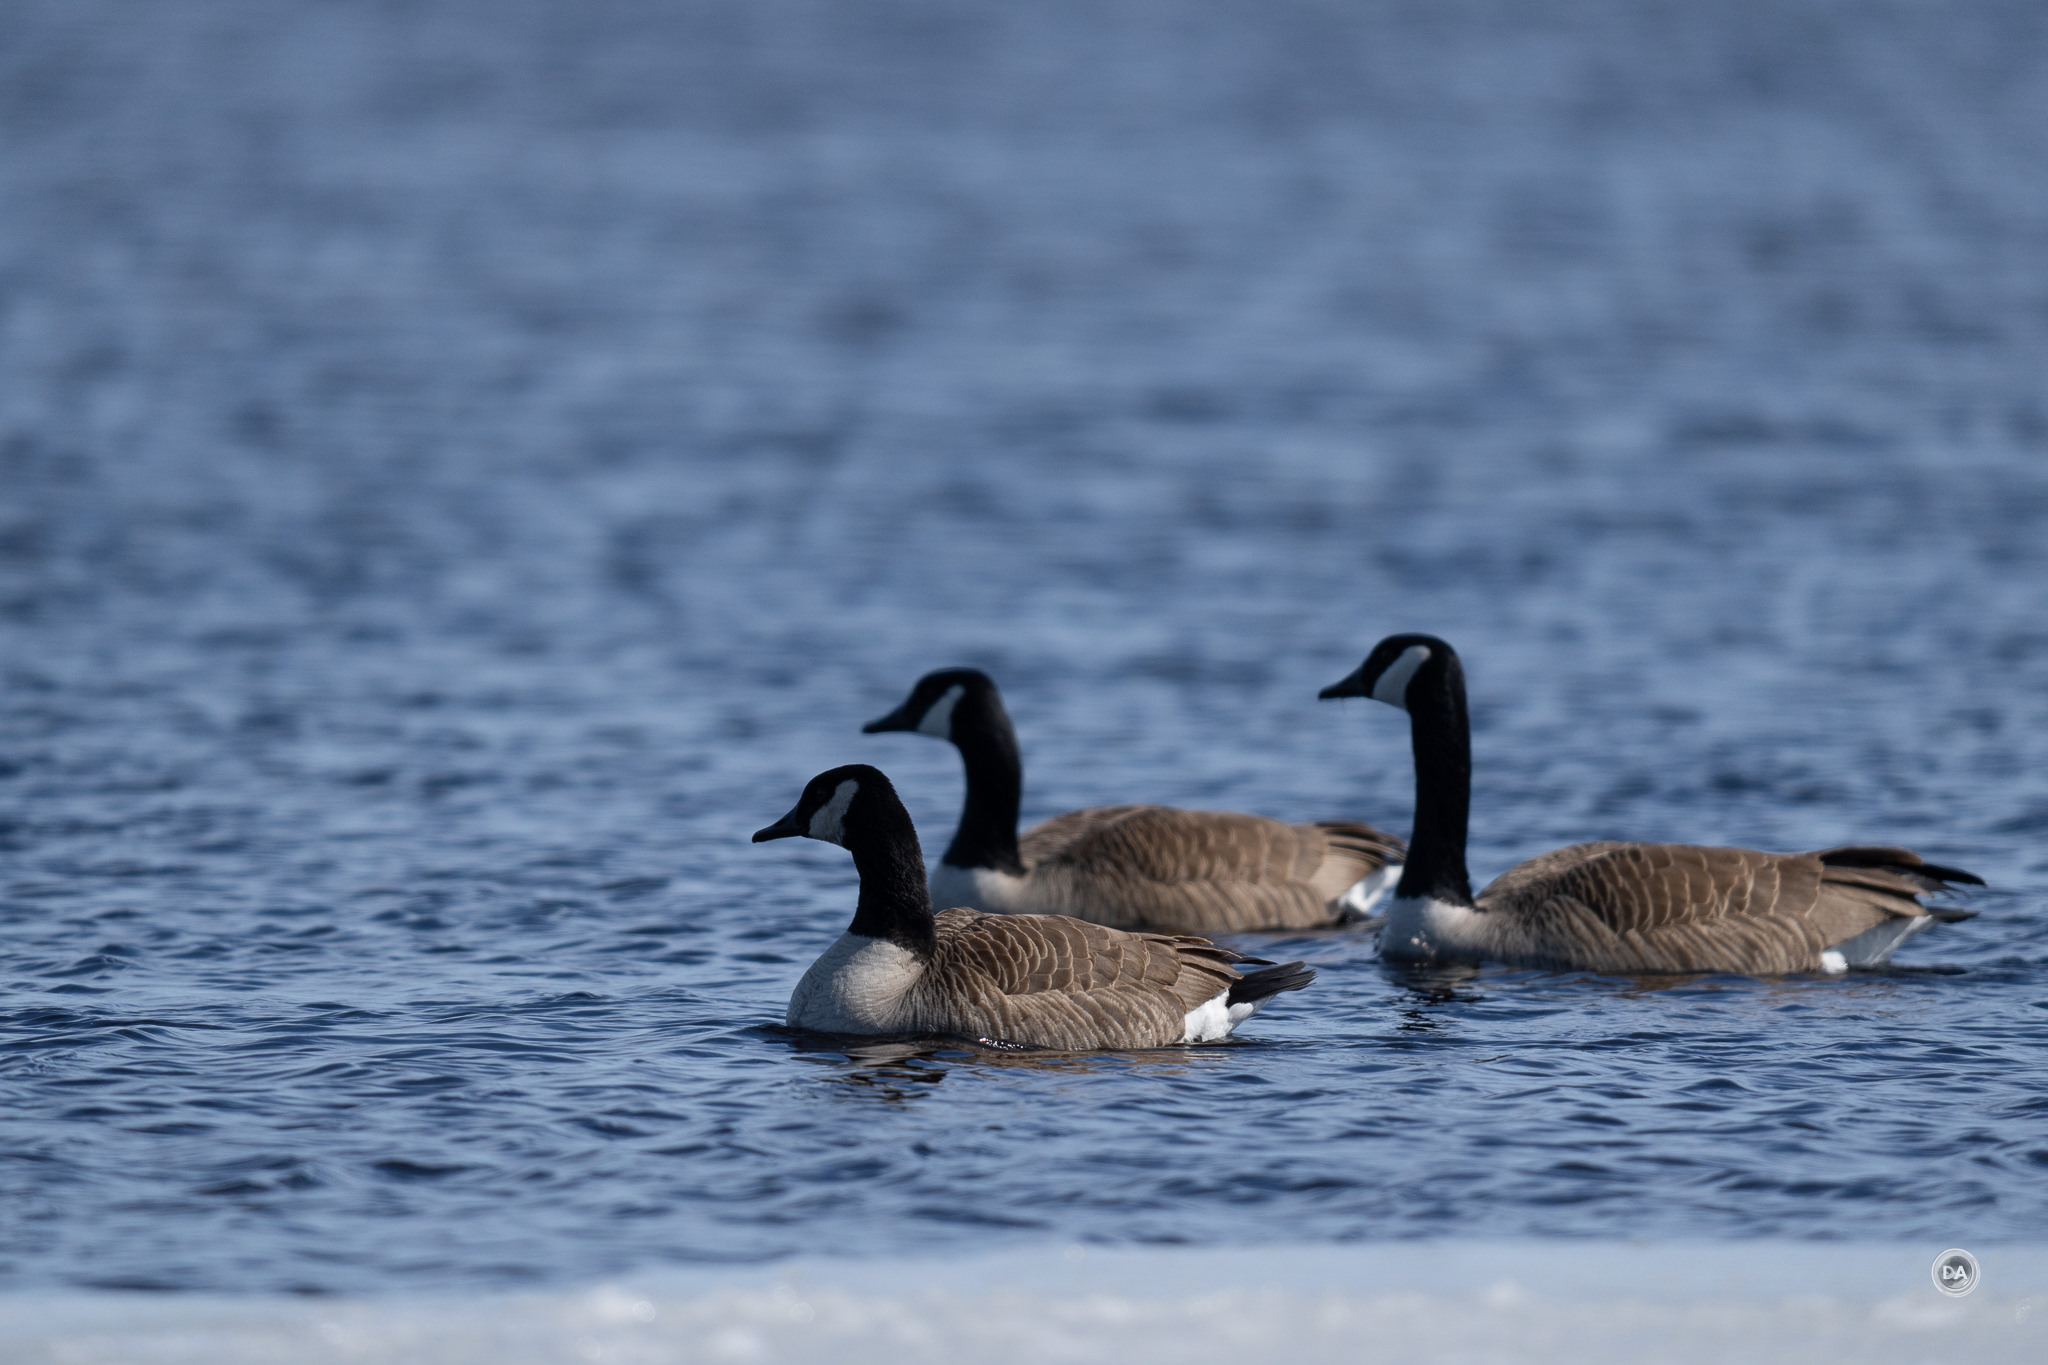
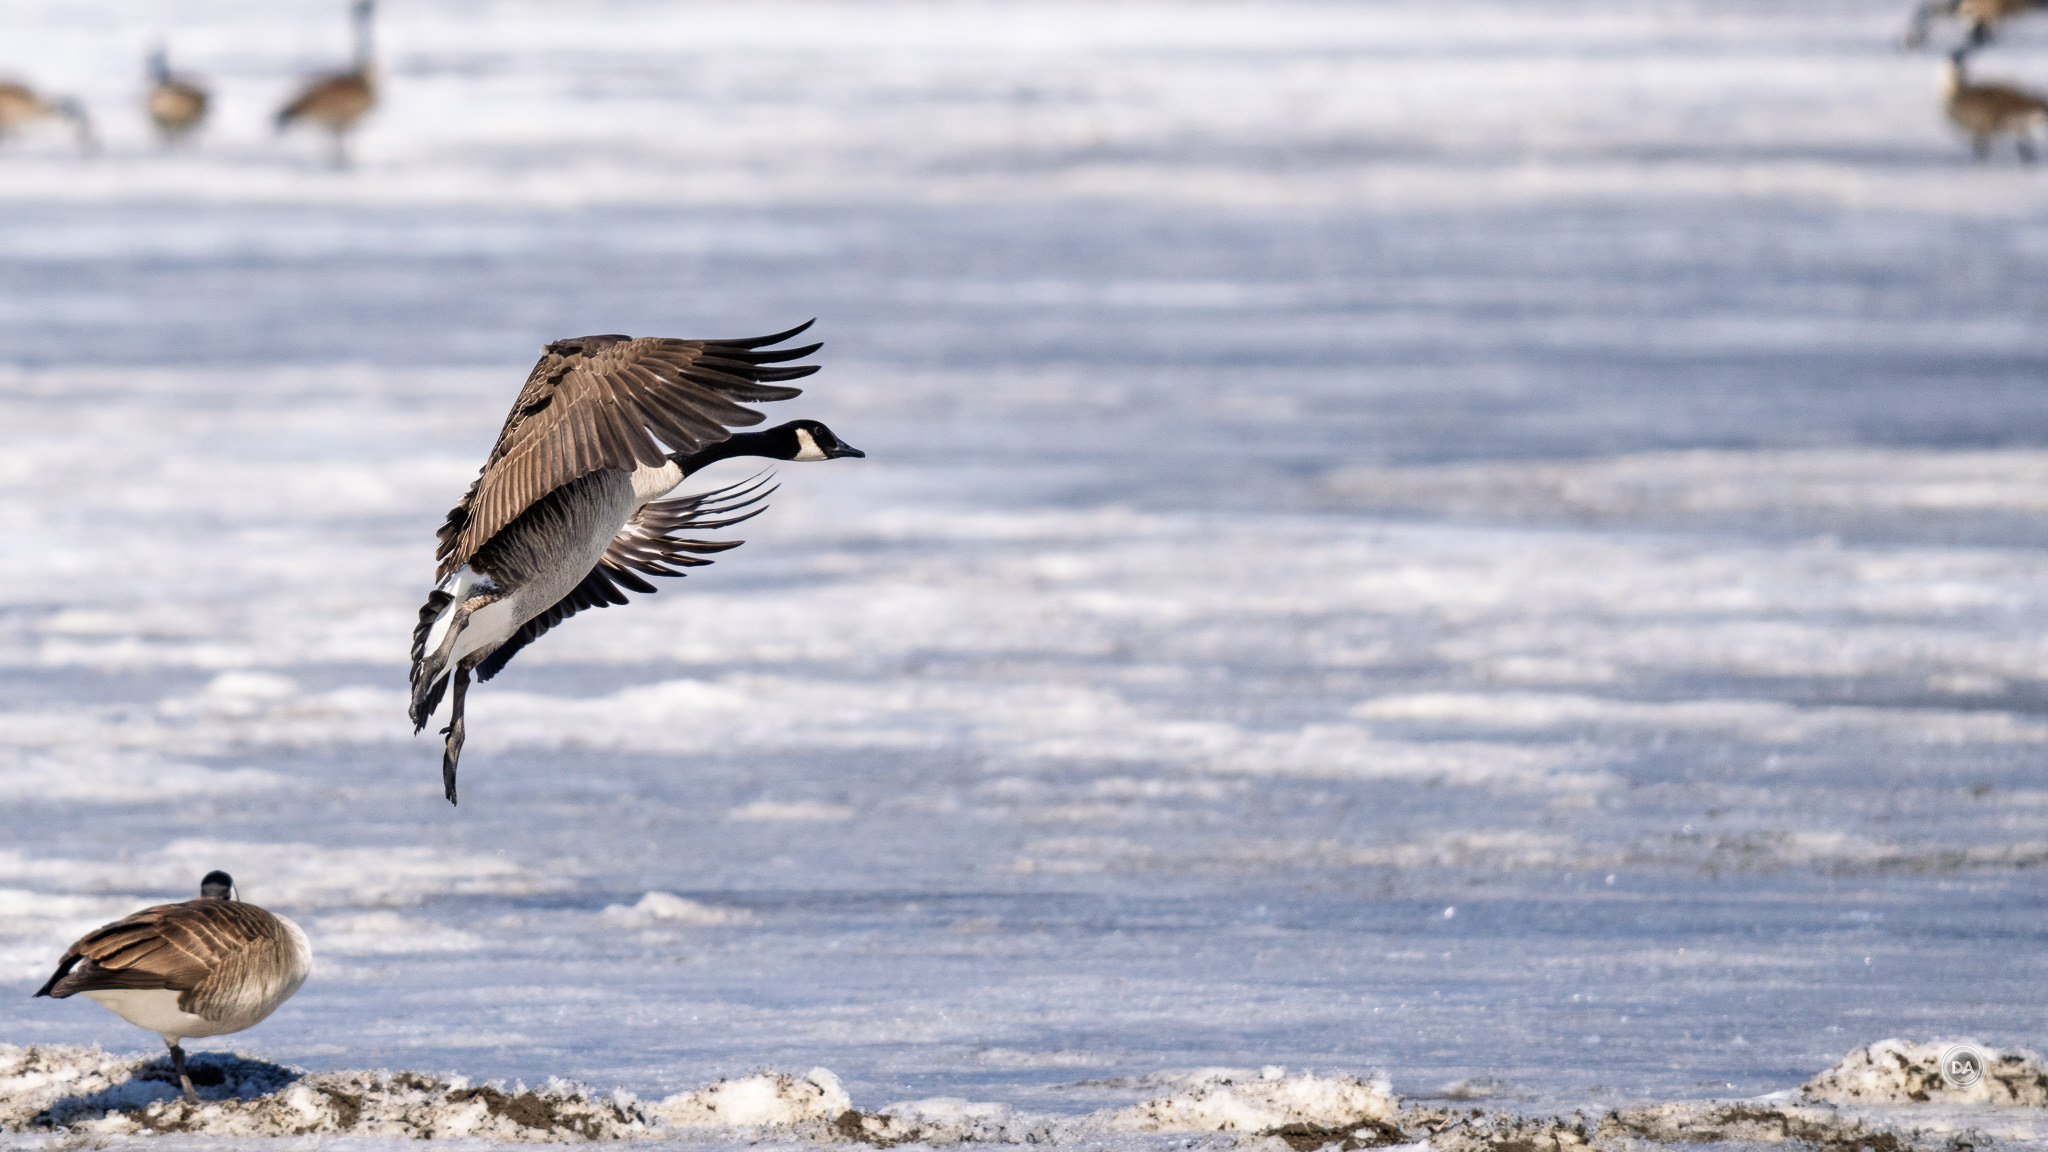
I shot a burst of 138 shots tracking a Canada Goose soaring low over an ice floe where many other geese were gathered. Despite having many subjects (and occasionally having foreground bushes partially blocking my view) tracking was csonsistently excellent, keeping the goose in perfect focus all throughout the burst.
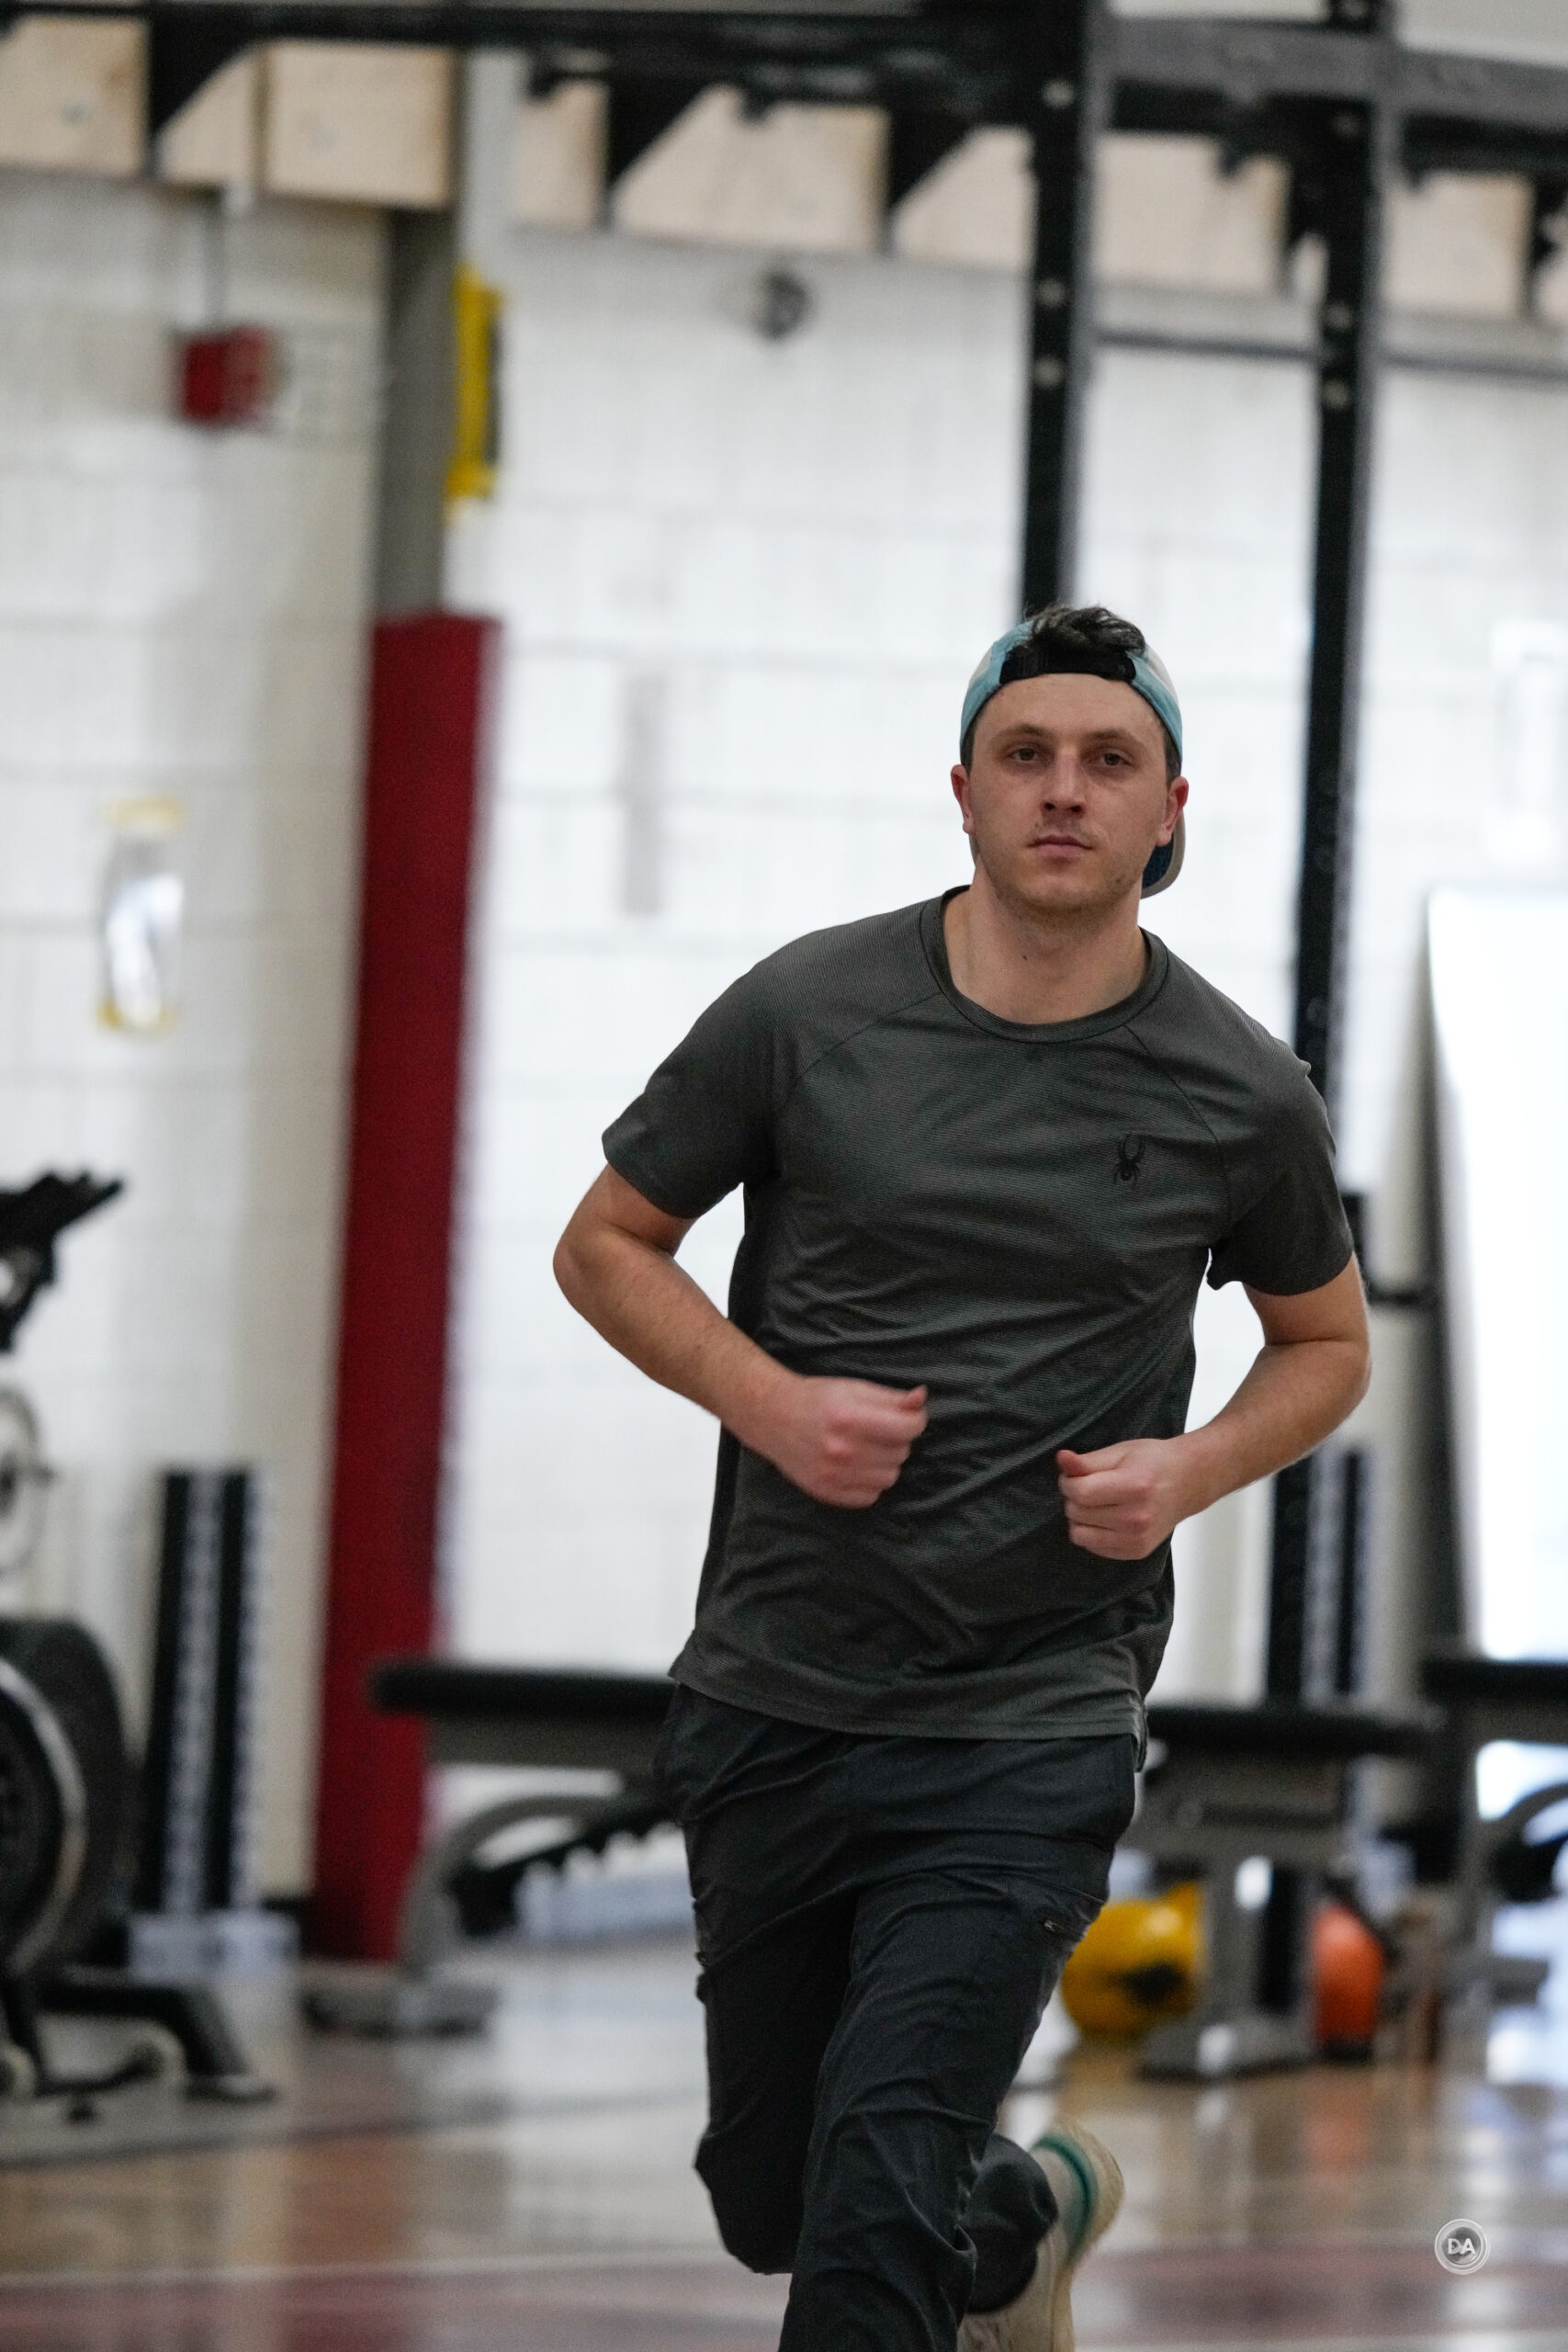
There is a challenge, however, and that’s you are going to need good light if your subject is moving. I tested tracking of a running subject in a fairly well lit field house, and tried to bias everything as much in the lens’ favor as possible. I shot near 400mm to keep maximum aperture at the brighter F6.3, jacked the ISO up to 6400, and even so I was getting shutter speeds no faster than 1/200th of a second and sometimes slower. That just wasn’t fast enough to reliably stop the action, so while focus and tracking were good, most of the shots are impacted by some motion blur. There’s a specific point int he sequence where the runner has landed from one stride and hasn’t taken off on the next, and those tended to be the most stable shots.
This is why 500mm and 600mm F4 lenses cost so much and are so big – getting sufficient light gathering in a long telephoto is a real challenge.
Focus remained good throughout the sequence, however, moving forward in a nice linear fashion so that I continued to get accurate focus even when the runner was relatively near the camera.
I saw enough to assure me of two things: Sony really knows how to do autofocus and this is definitely an outdoor lens!
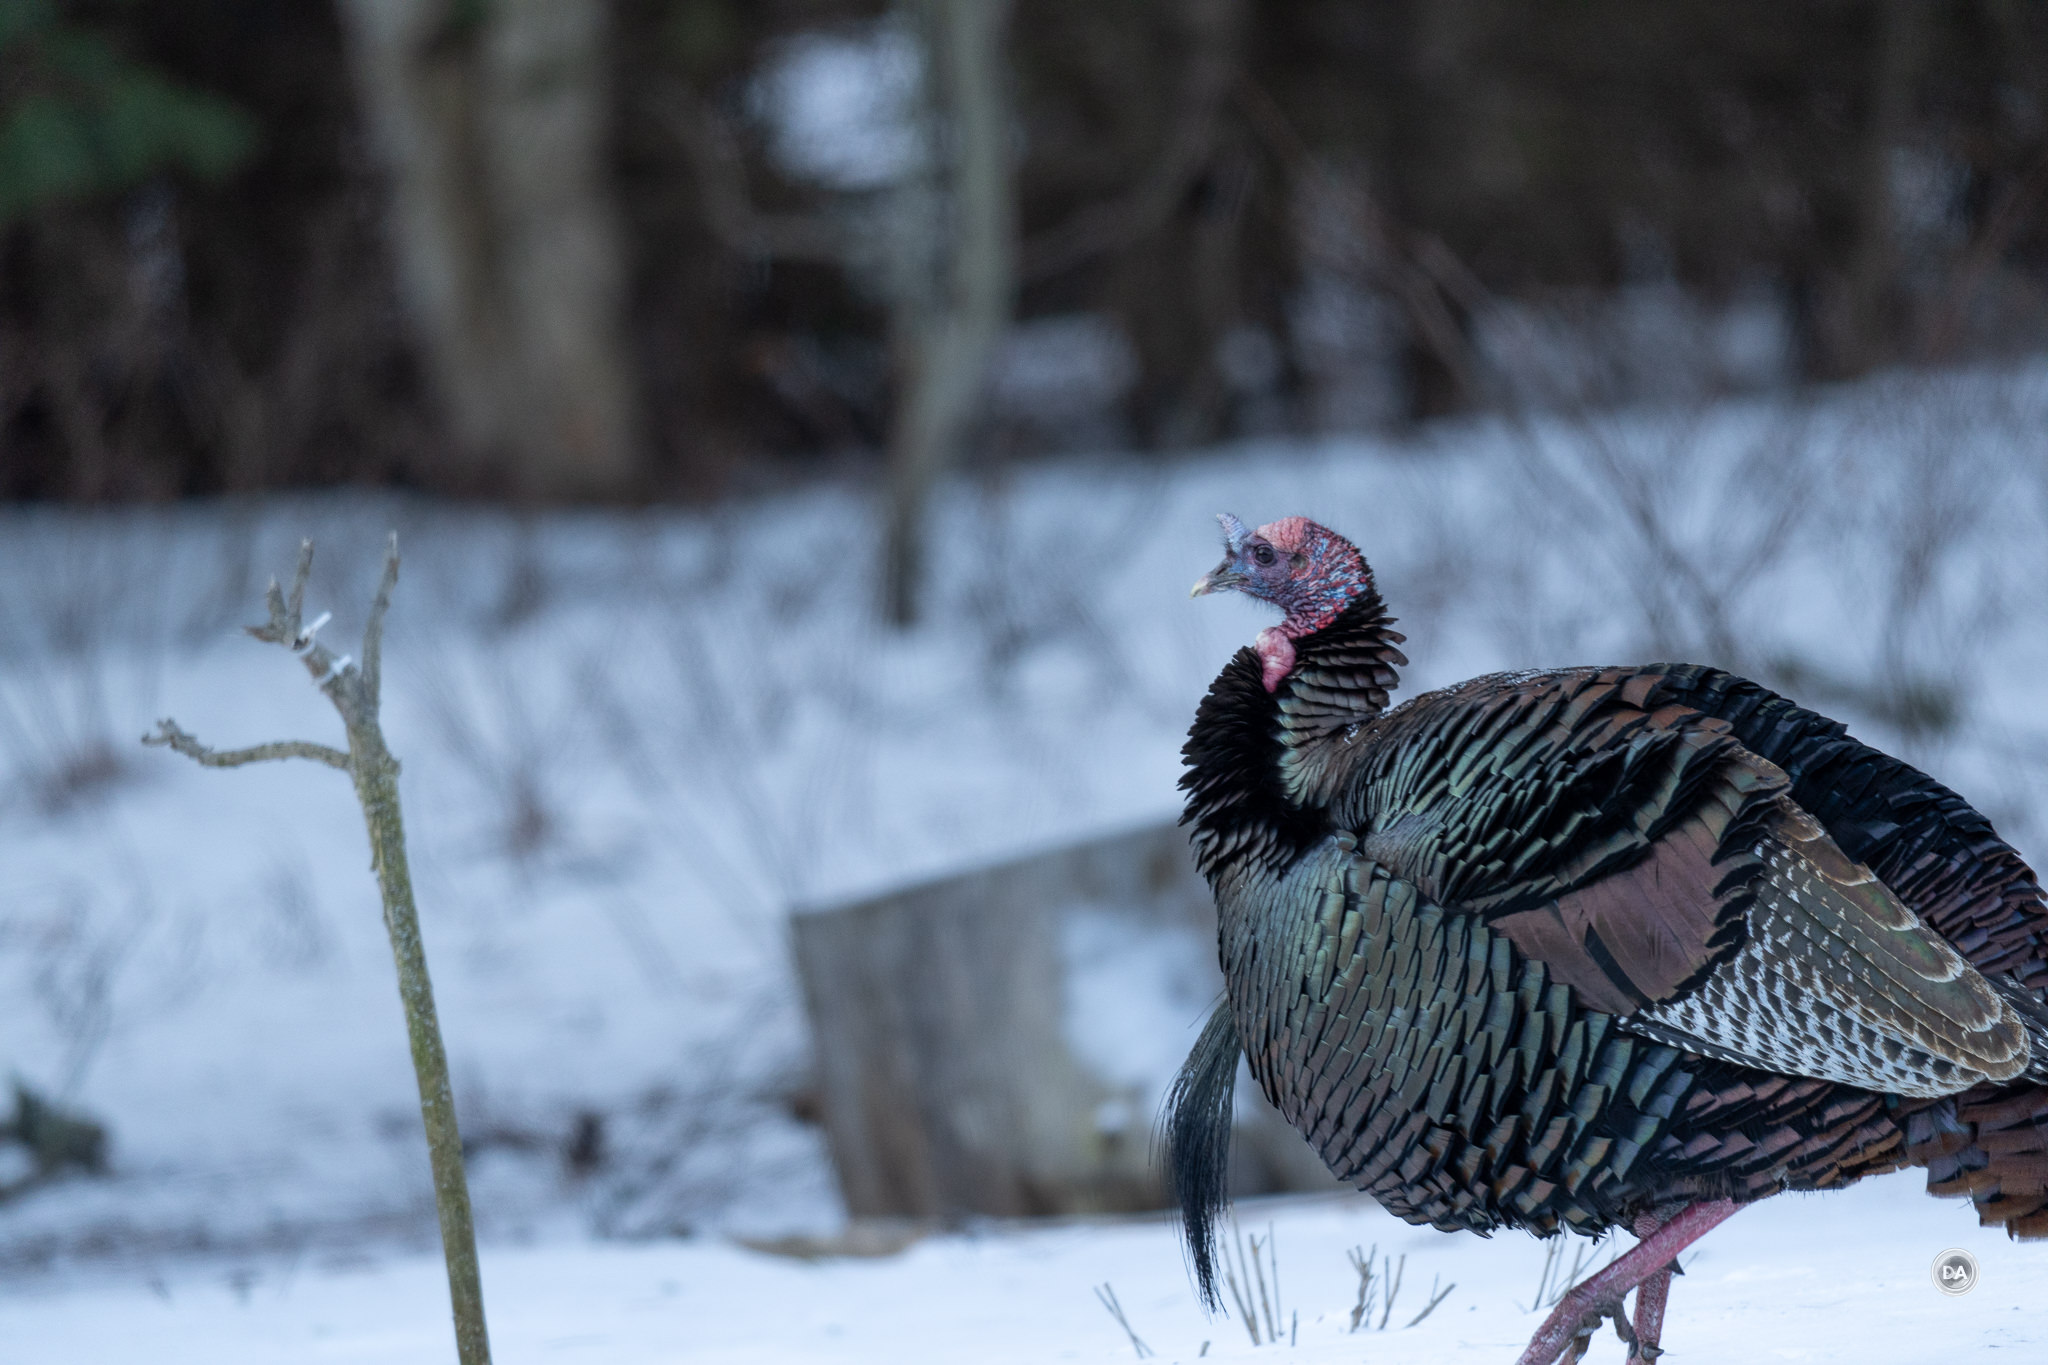
I always hate when long telephotos get released during Canadian winters (which it seems like they invariably are), as it makes find subjects extremely difficult. In this case, because the river is only open in a certain channel and there is a lot of unstable ice near the edge, I couldn’t really get close to any waterfowl subjects on this particular day. That meant a lot of 800mm shooting, and you can see that even with that extreme magnification I wasn’t all that close to my subject. Because I had only one angle, it also meant that the sun was on the wrong side of these geese, leaving the side of their heads facing me in shadow. A black eye on a black background in shadow is hardly a high contrast subject, so I was very impressed to find that eye detection worked pretty consistently, and I was able to get accurately focused results.
In better light (and at a different location where I could get closer) I had no problem getting the shutter speed I needed to perfectly stop action.
Slow subjects are no problem, obviously, and this shot of Ferrari (658mm, F8) shows perfect focus.
Bottom line is that the limiting principle won’t be autofocus…but it could possibly be the amount of available light.
Autofocus for Video
Sony has worked hard at making their lenses (and cameras) to be equally good whether doing photo or video work. I did my formal tests at the 400mm end, as the working distance at 800mm just requires far more room than I have easy access to. I found a nice level of damping, with no visible steps and smooth transitions from one subject to another.
At 400mm, focus breathing is extremely well controlled, even with Sony’s “Focus Breathing Compensation” turned off. You can see from the third stills capture below that the size of the distant subject stays mostly the same regardless of being in or out of focus.
My hand test went fine, though it was very odd to be doing it at a distance of about 40 feet rather than 6. The amount of compression at 400mm makes it feel like there is very little distance between my hand and my face, but I could see that focus was transitioning smoothly back and forth.
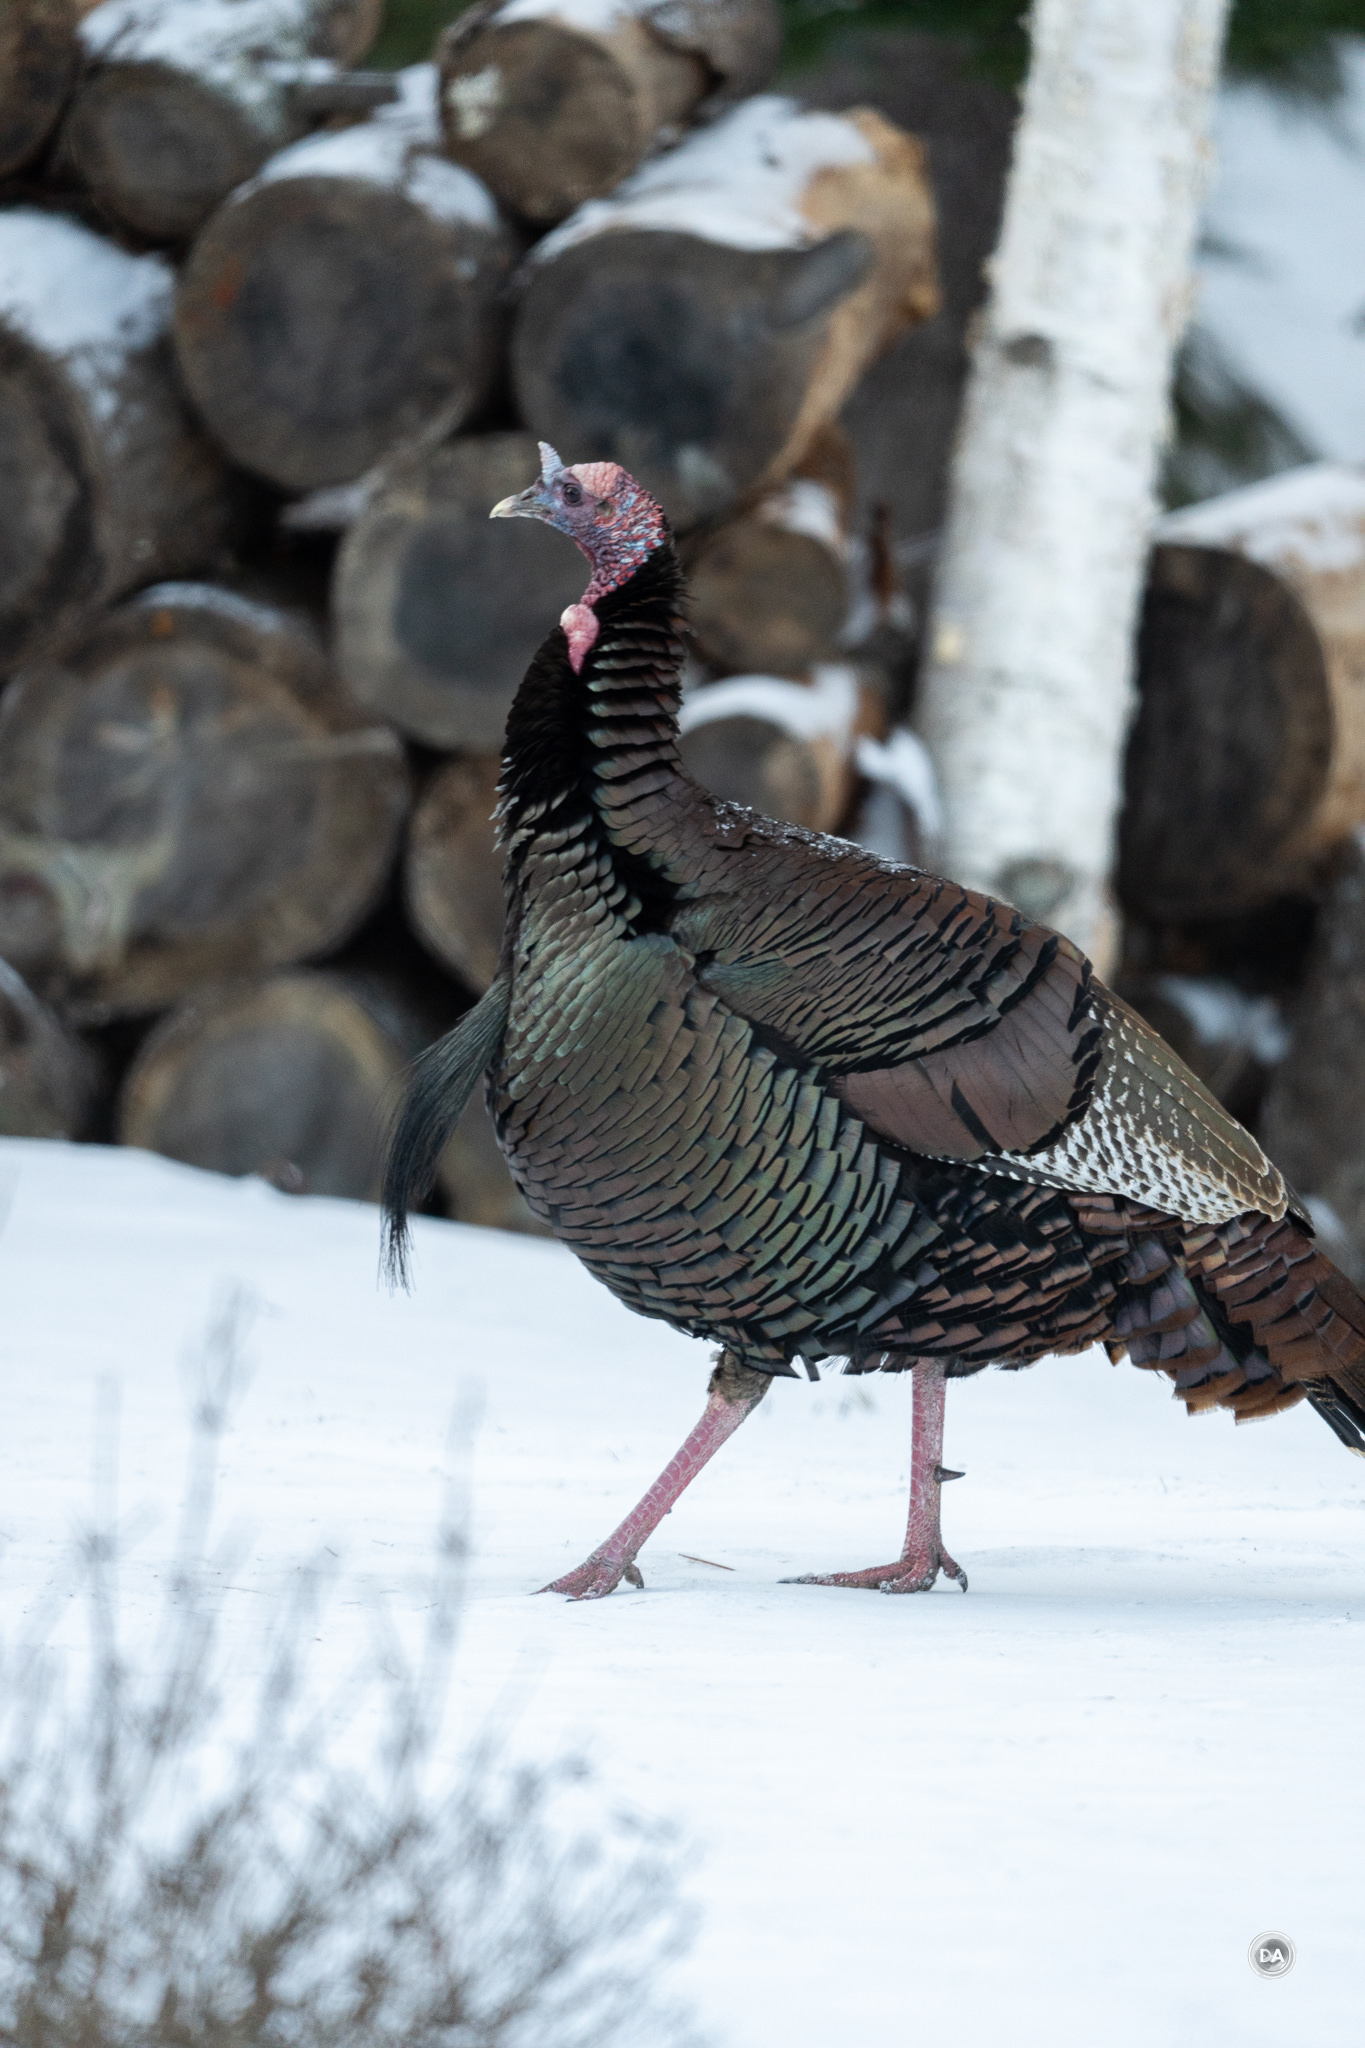
I tracked some turkeys walking around my backyard, and focus mostly kept steady on them as they moved in an agitated fashion (they knew I was there). There was one occasion where focus did shift to a foreground bush momentarily, but it mostly stayed where I wanted.
Overall I would say that focus works well in video as well. The extreme nature of the focal range does provide some challenges, but it isn’t because of the autofocus.
Image Quality Breakdown
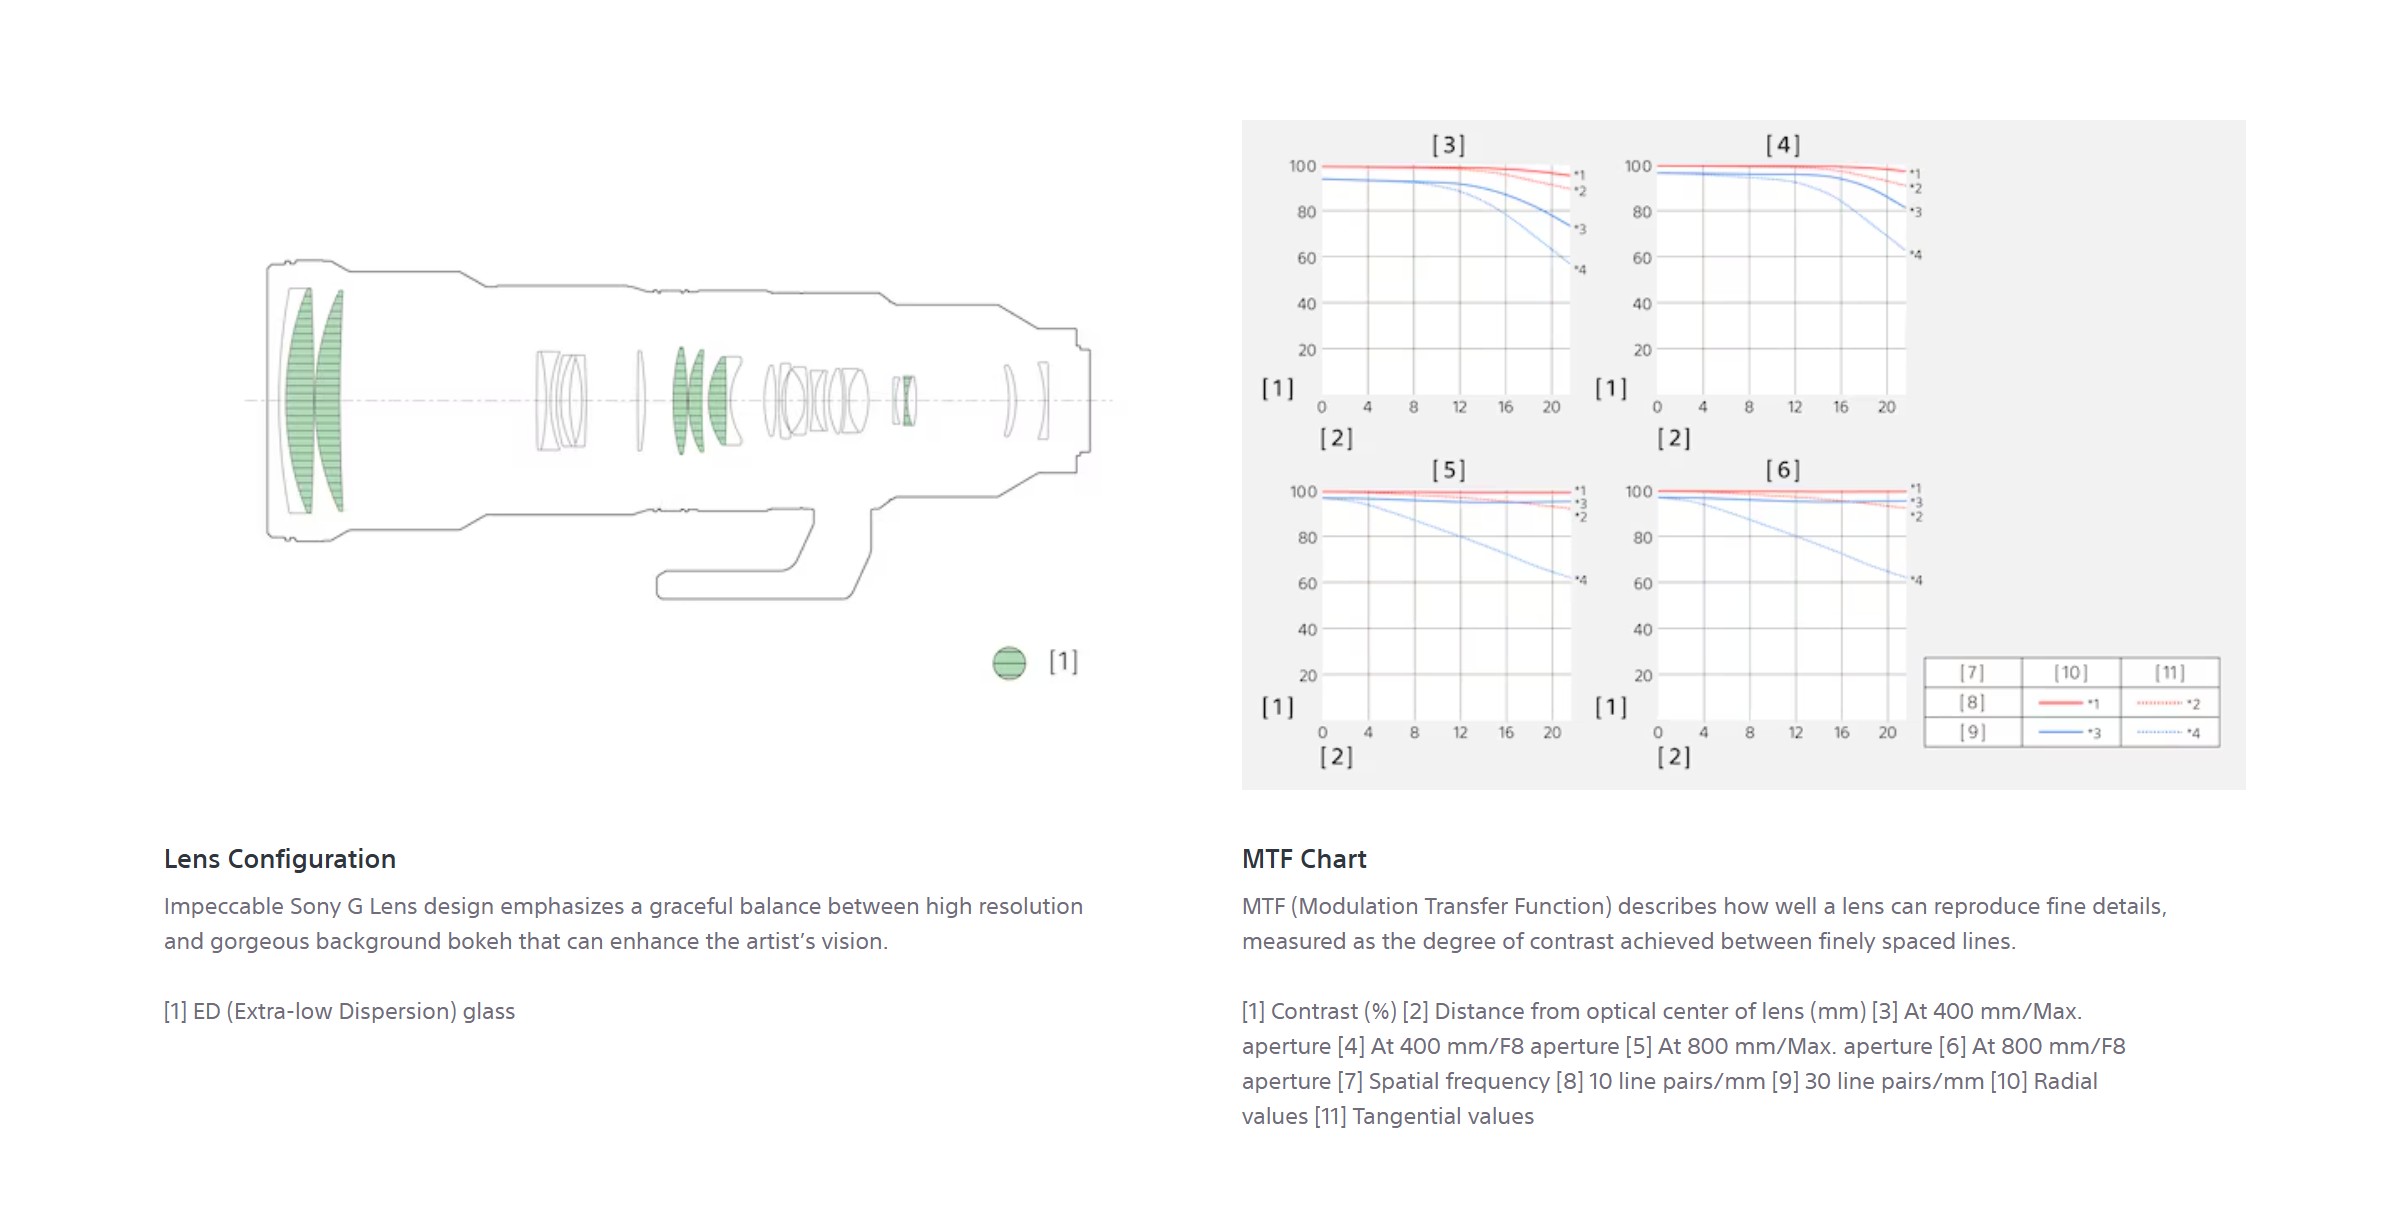
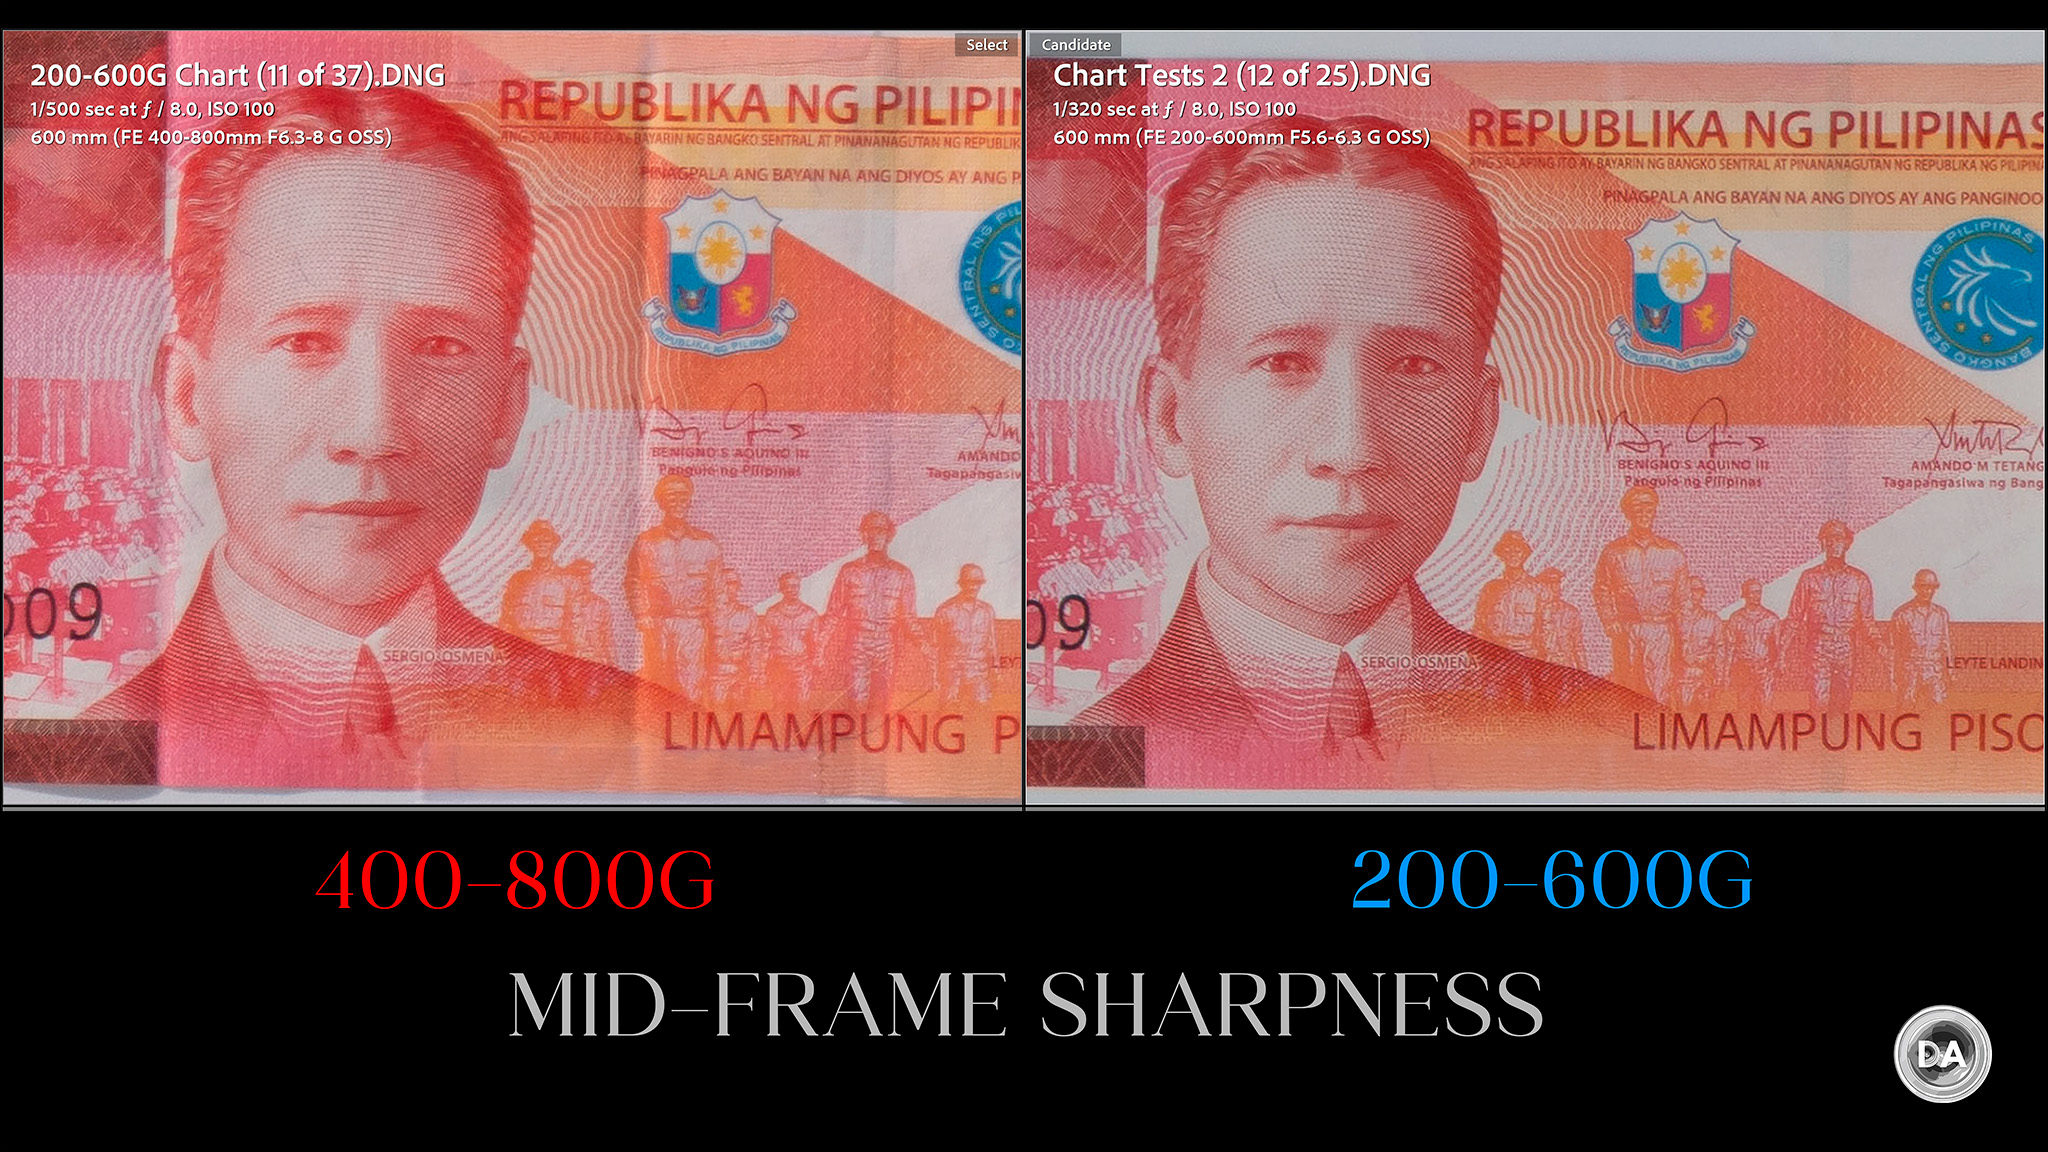
As you would expect, the complexity of the optical design has grown from the 200-600G. Whereas that lens had an optical design of 24 elements in 17 groups, the the Sony FE 400-800mm F6.3-8 G OSS is one of the most complex optical designs I’ve seen, with 27 elements in 19 groups. That matches the Sigma 60-600mm F4.5-6.3 DN Sport lens, another extremely complex lens (some 50mm primes have as little as 5 or 6 elements!). The 400-800G’s optical design includes 6 ED (Extra-low dispersion) elements. The MTF chart included below gave me a little chuckle, as Sony tends to show both wide open and then F8 results. That fine for the first row, which includes first the 400mm results at F6.3 and then at F8. The bottom row, however, shows the 800mm performance, and since the maximum aperture is F8, it actually shows the same results twice.
Those results are pretty impressive, though, showing an extremely sharp center (over 90%) at 400mm and nearer to 100% at 800mm. The midframe is also impressive at both focal lengths, with some fade in the corners (arguably far less important in a lens like this). That fade is pretty consisent on both the “radial and tangential” axis at 400mm, though at 800mm the corner drop is almost entirely on the tangential plane.
The key advantage to a telephoto zoom lens is that it gives you a lot more control over framing. Often shooting with a prime lens is frustrating either because you are too close or too far. A zoom lens doesn’t solve all of those problems, but it means that you have both this extreme:
And then this extreme as framing alternatives:
800mm was too tight of framing for the shot below, so I was able to back off to 740mm to get the composition I wanted, something I wouldn’t be able to do with a prime.
A zoom lens is extremely useful, particularly if you have a fixed location to work from.
So how about the optical details?
I saw a minimal amount of longitudinal type chromatic aberrations in some real world shots, mostly showing up as some blue-green fringing in high areas of contrast, like this:
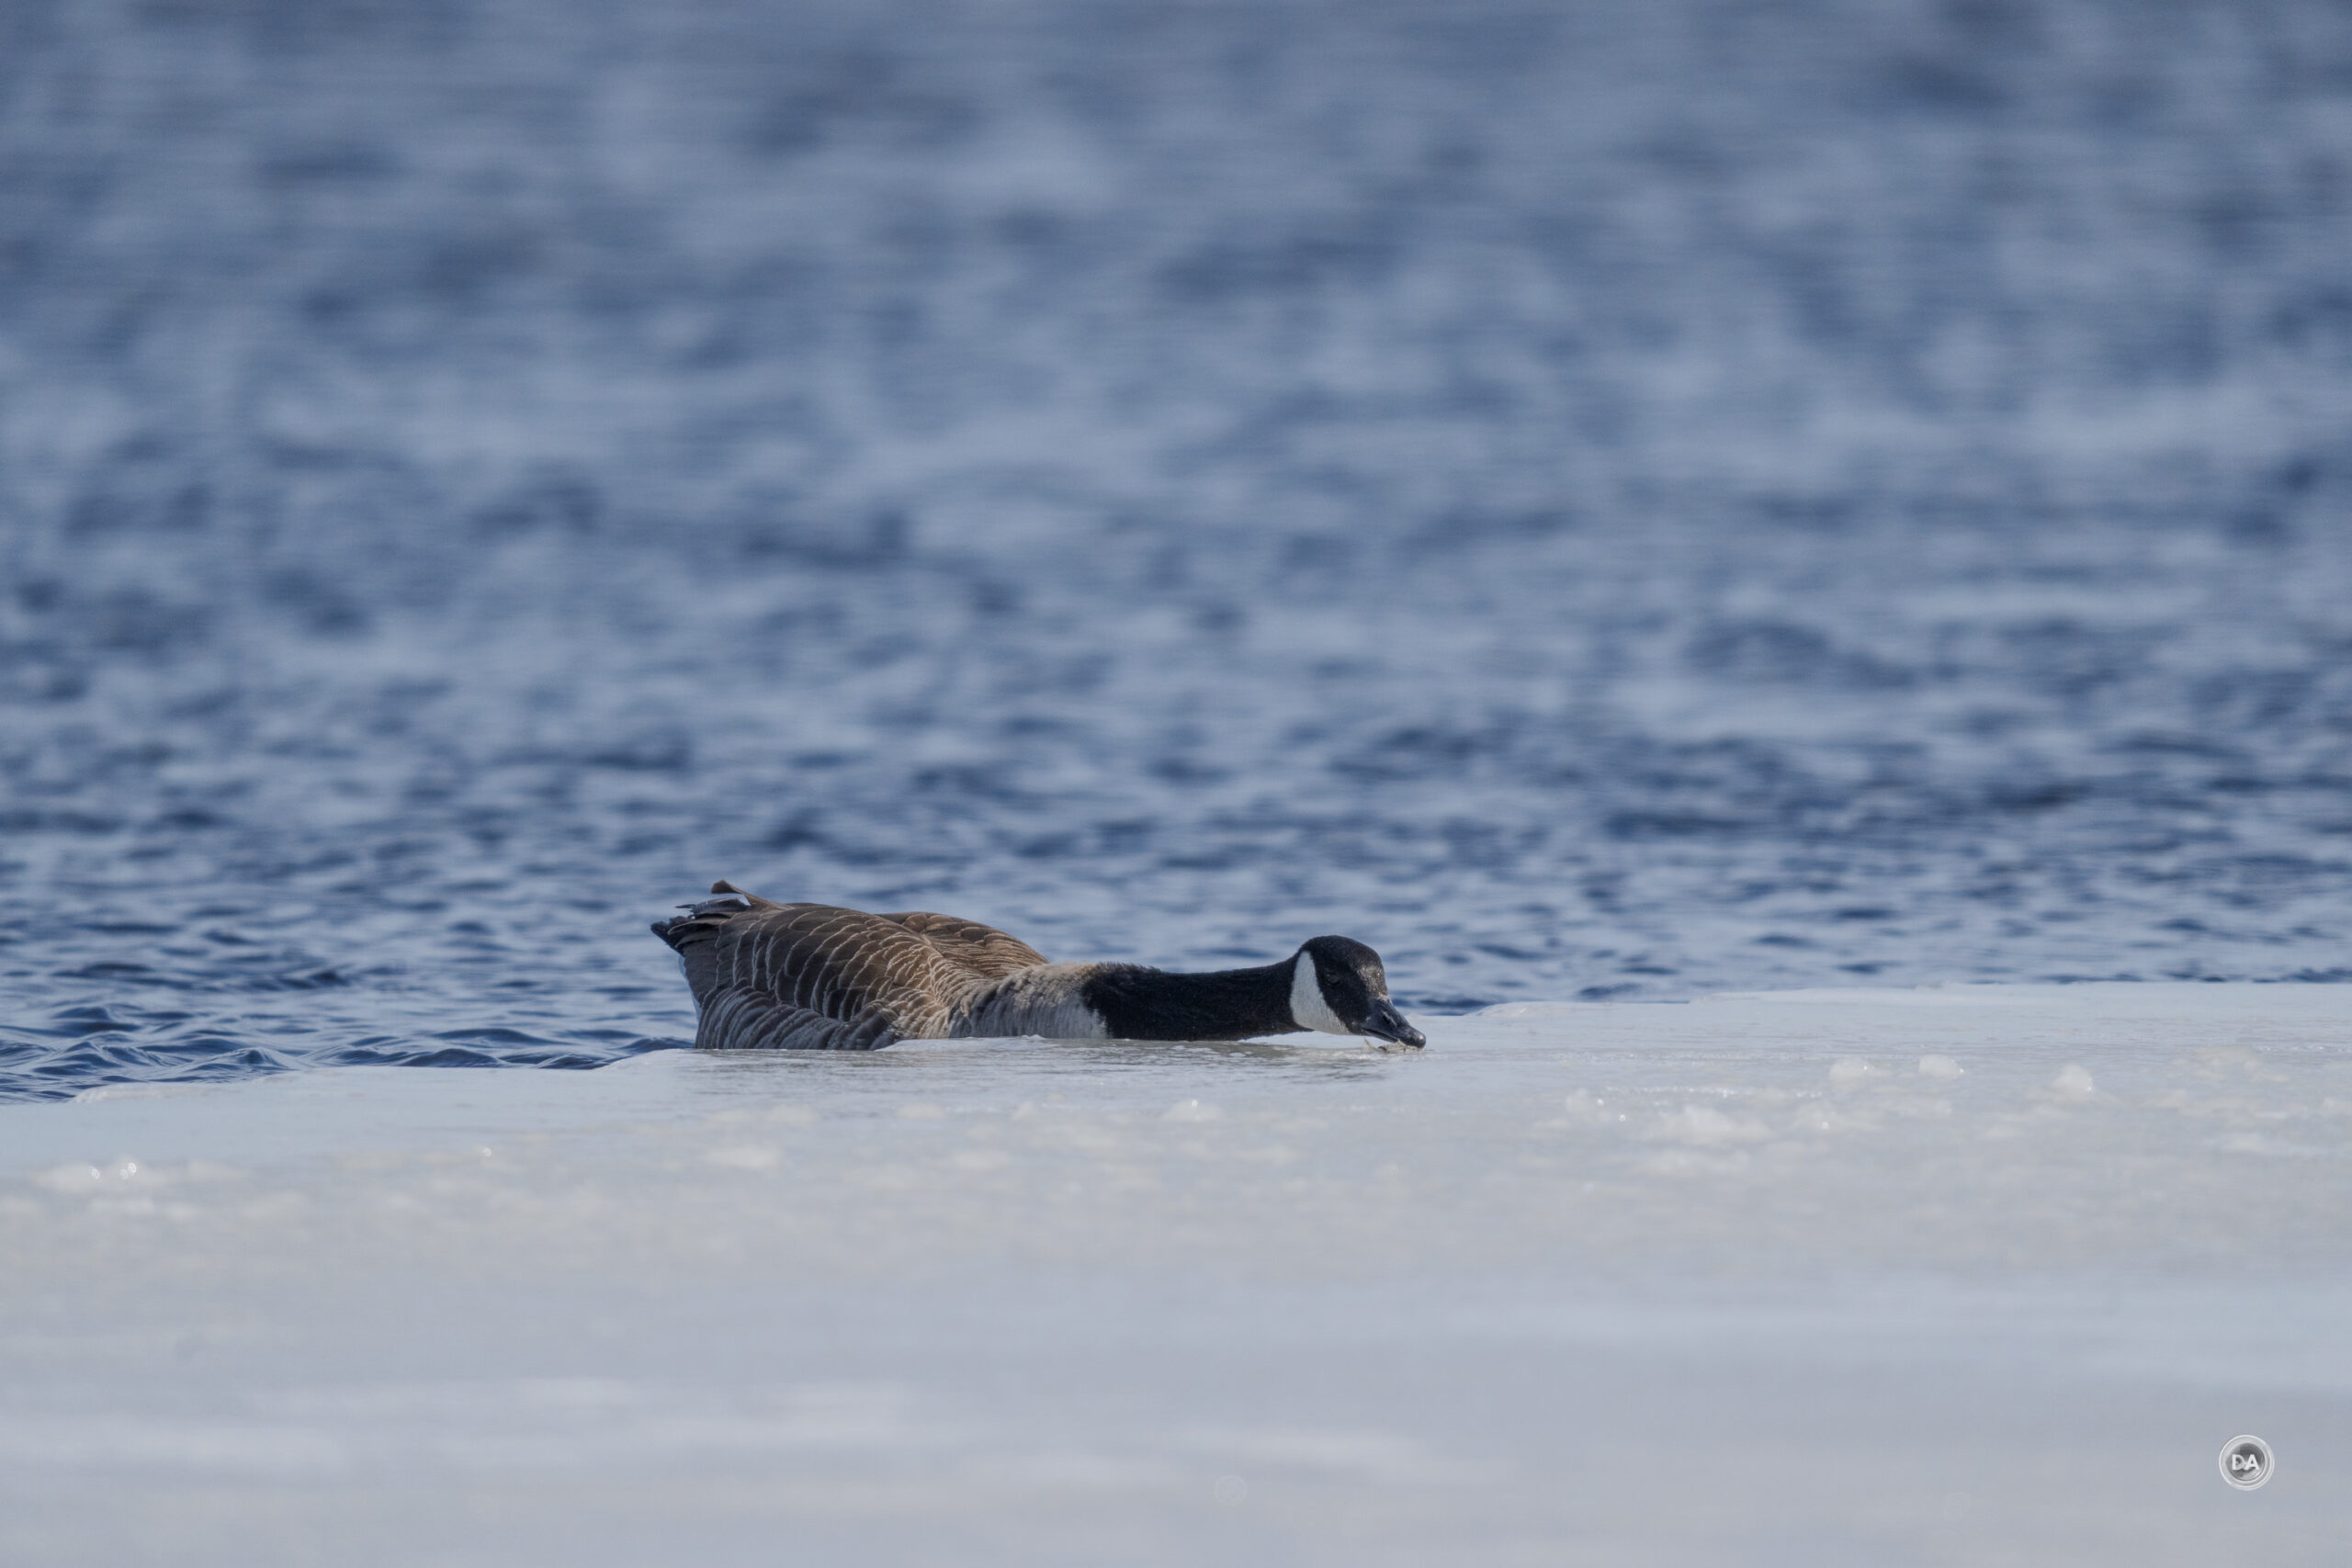
I didn’t see much of it in my shots of geese with shiny ice around them, however, leaving me to believe it won’t be any problem in real world shots.
I didn’t really see any lateral style chromatic aberrations near the edges of the frame either on my chart or in real world results.
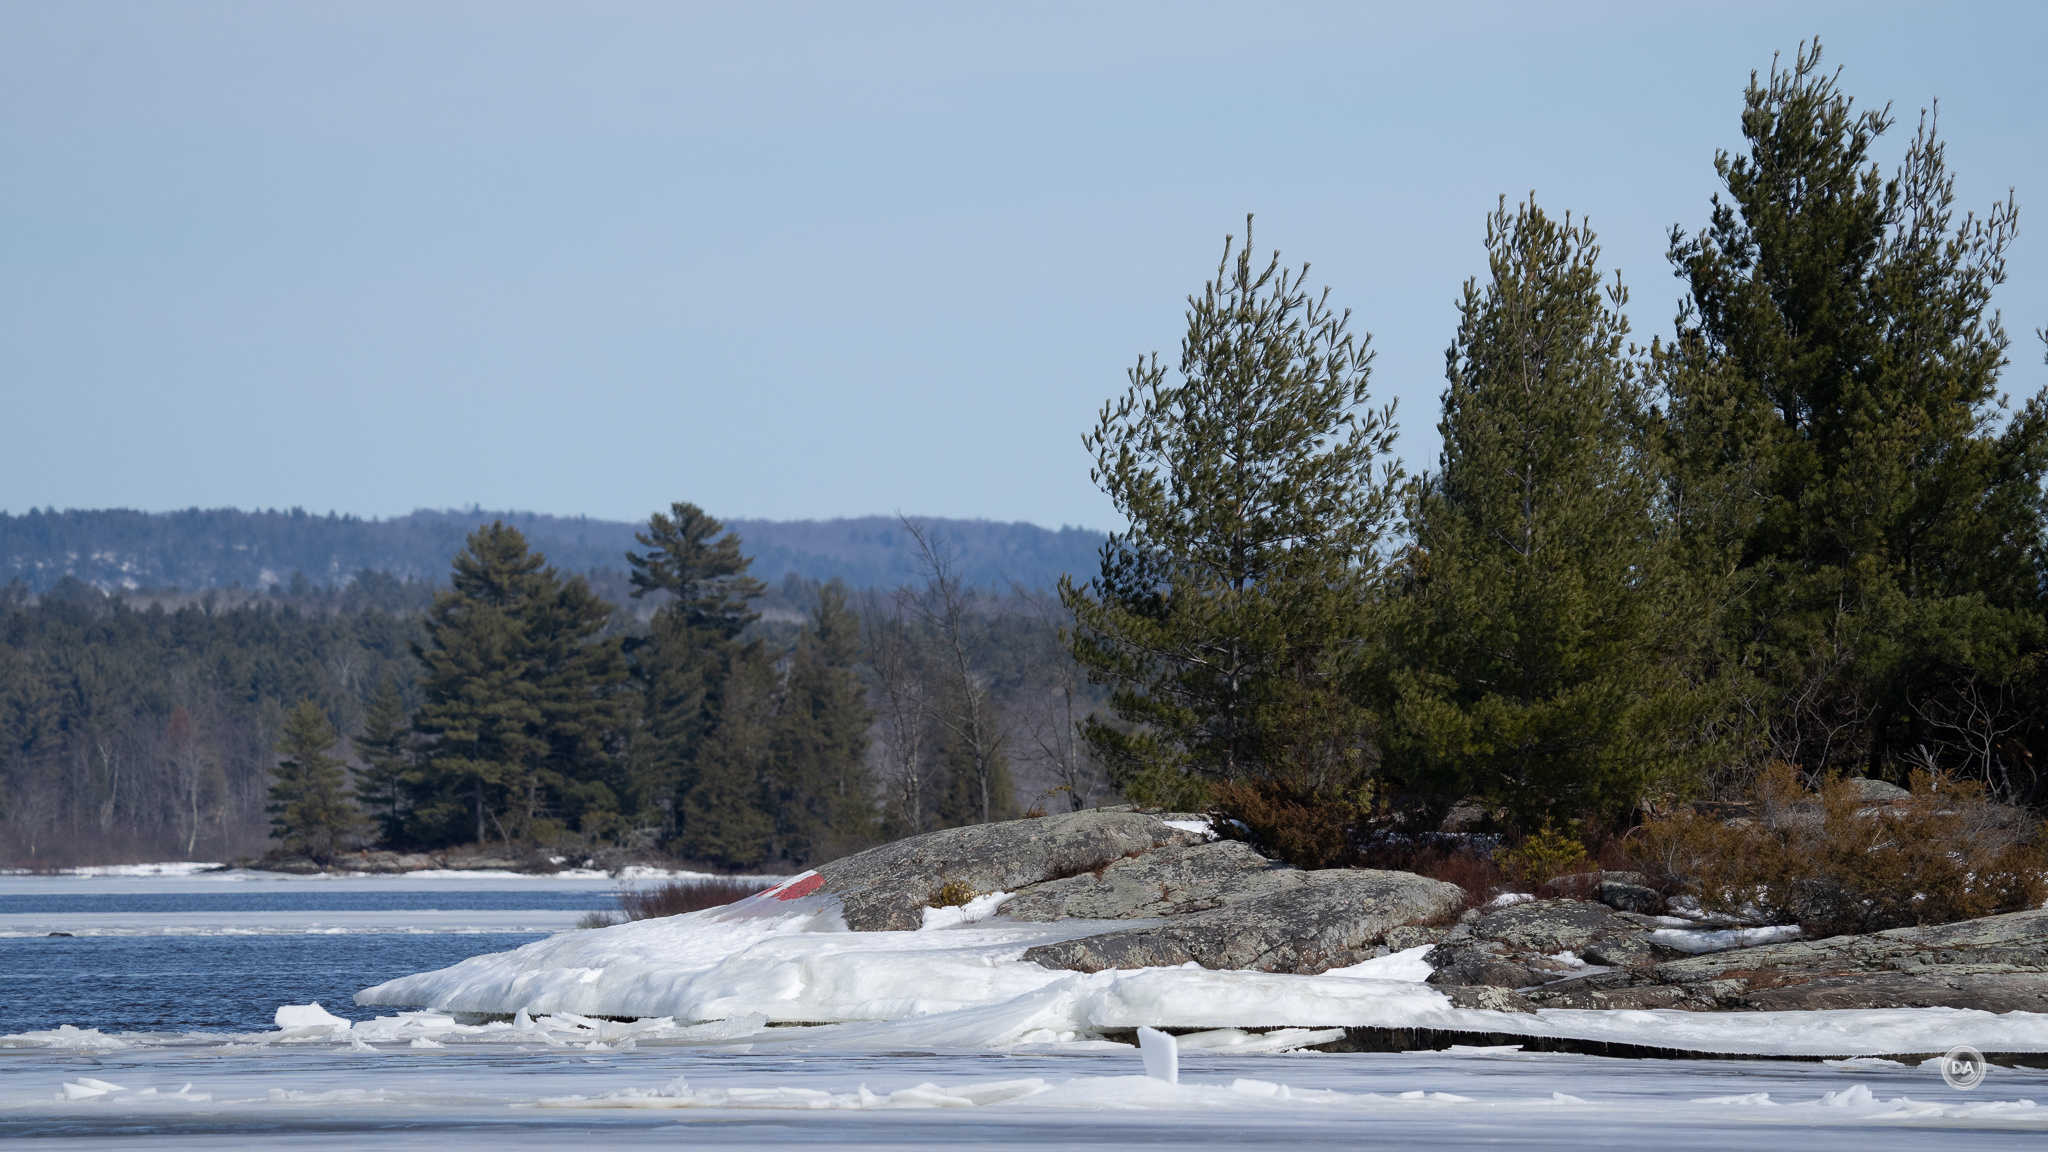
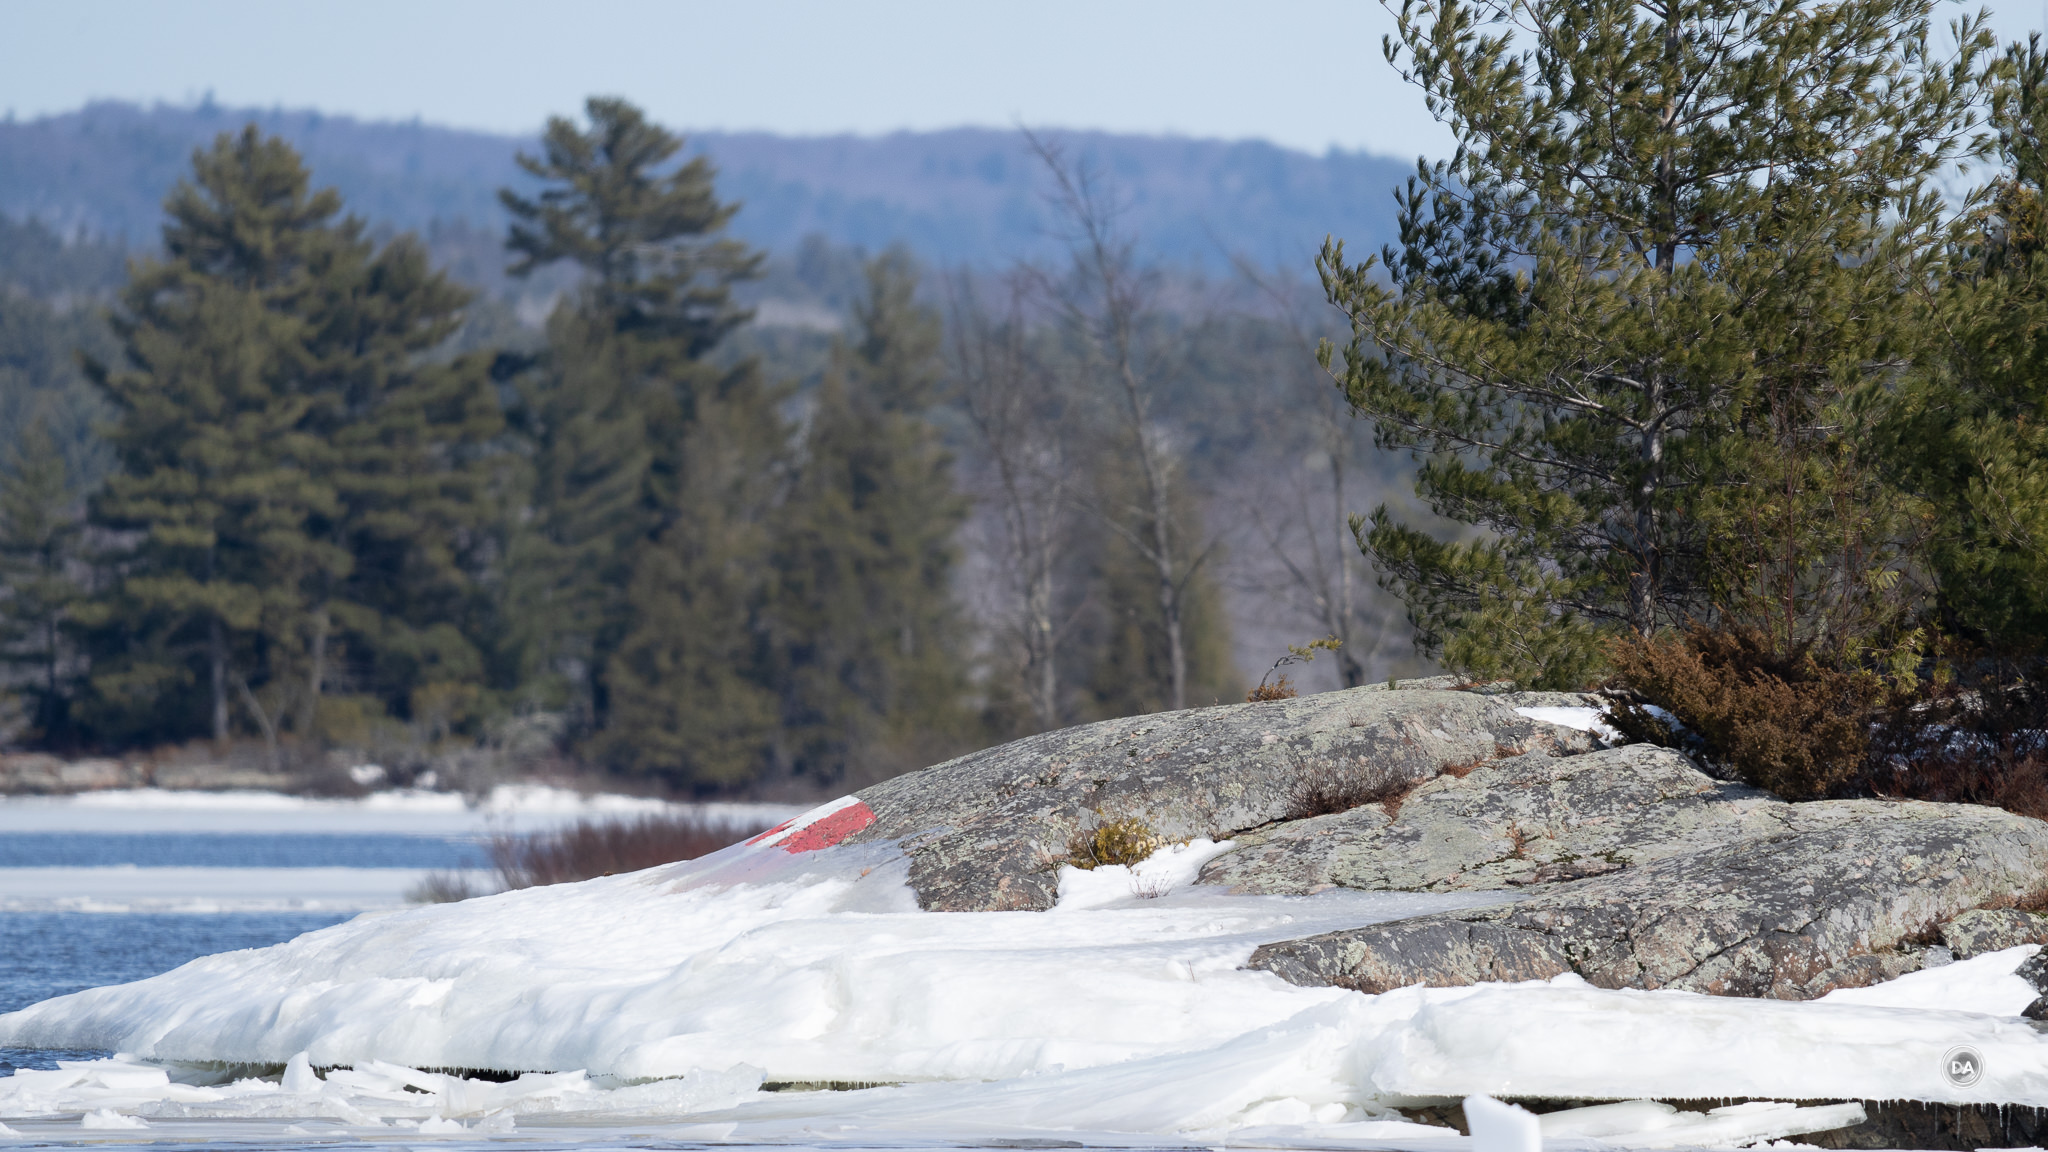
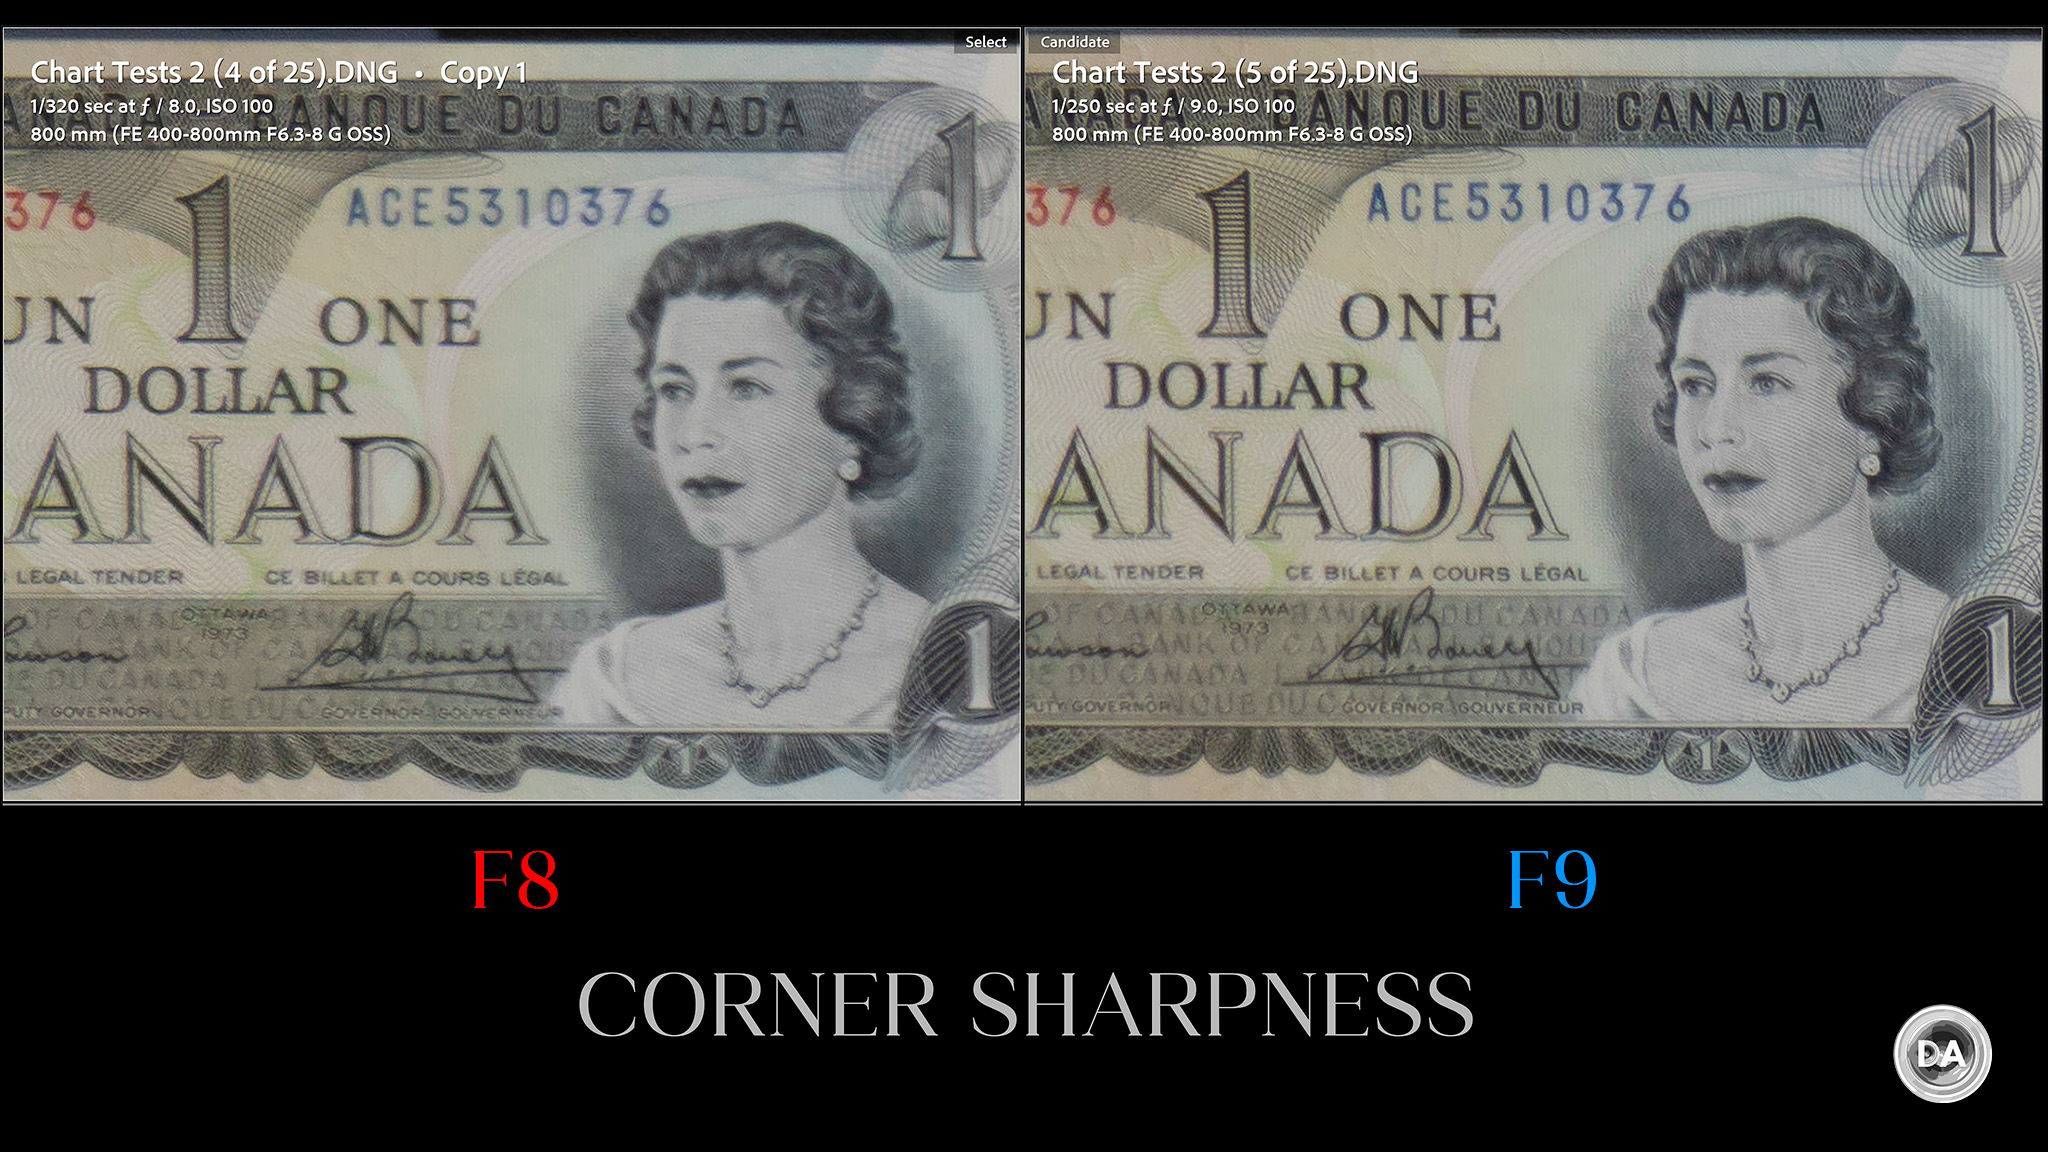
I only set up one test chart outside (and ended up regretting that a bit, as it got a little dirty), so I’m going to pull my findings on vignette and distortion from my main chart. Here’s how far I had to be away to test 800mm:
No, I don’t have that kind of room in my basement! And yes, we still have snow (March 21st). I actually cleared some of the snow to make sure that I had enough space to test the full range of the lens.
Distortion is consistently of the pincushion variety, with some ebb and flow throughout the zoom range. Here’s a look at 400mm before and after correction.
The pincushion isn’t bad at 400mm, requiring just a -4 to correct, and you can see that it corrected in a linear fashion leaving straight lines on the frame around my chart. Vignette is also pretty minimal, with no more than a stop of peripheral shading (I used a +30 to correct).
In the middle of the range, the distortion increases a bit (-6), but the vignette remains extremely low.
At 800mm the distortion needs only a -3 to correction, and vignette remains pretty neglible. Nothing that is going to cause anyone any problems; I never saw anything more than about a stop of vignette, which frankly you just won’t notice in real world shots. This shot of a turkey was taken at 681mm, F8, and there has been no correction. Note how bright the snowy bottom corner is.
That big front element is letting in plenty of light to the corners of the image circle.
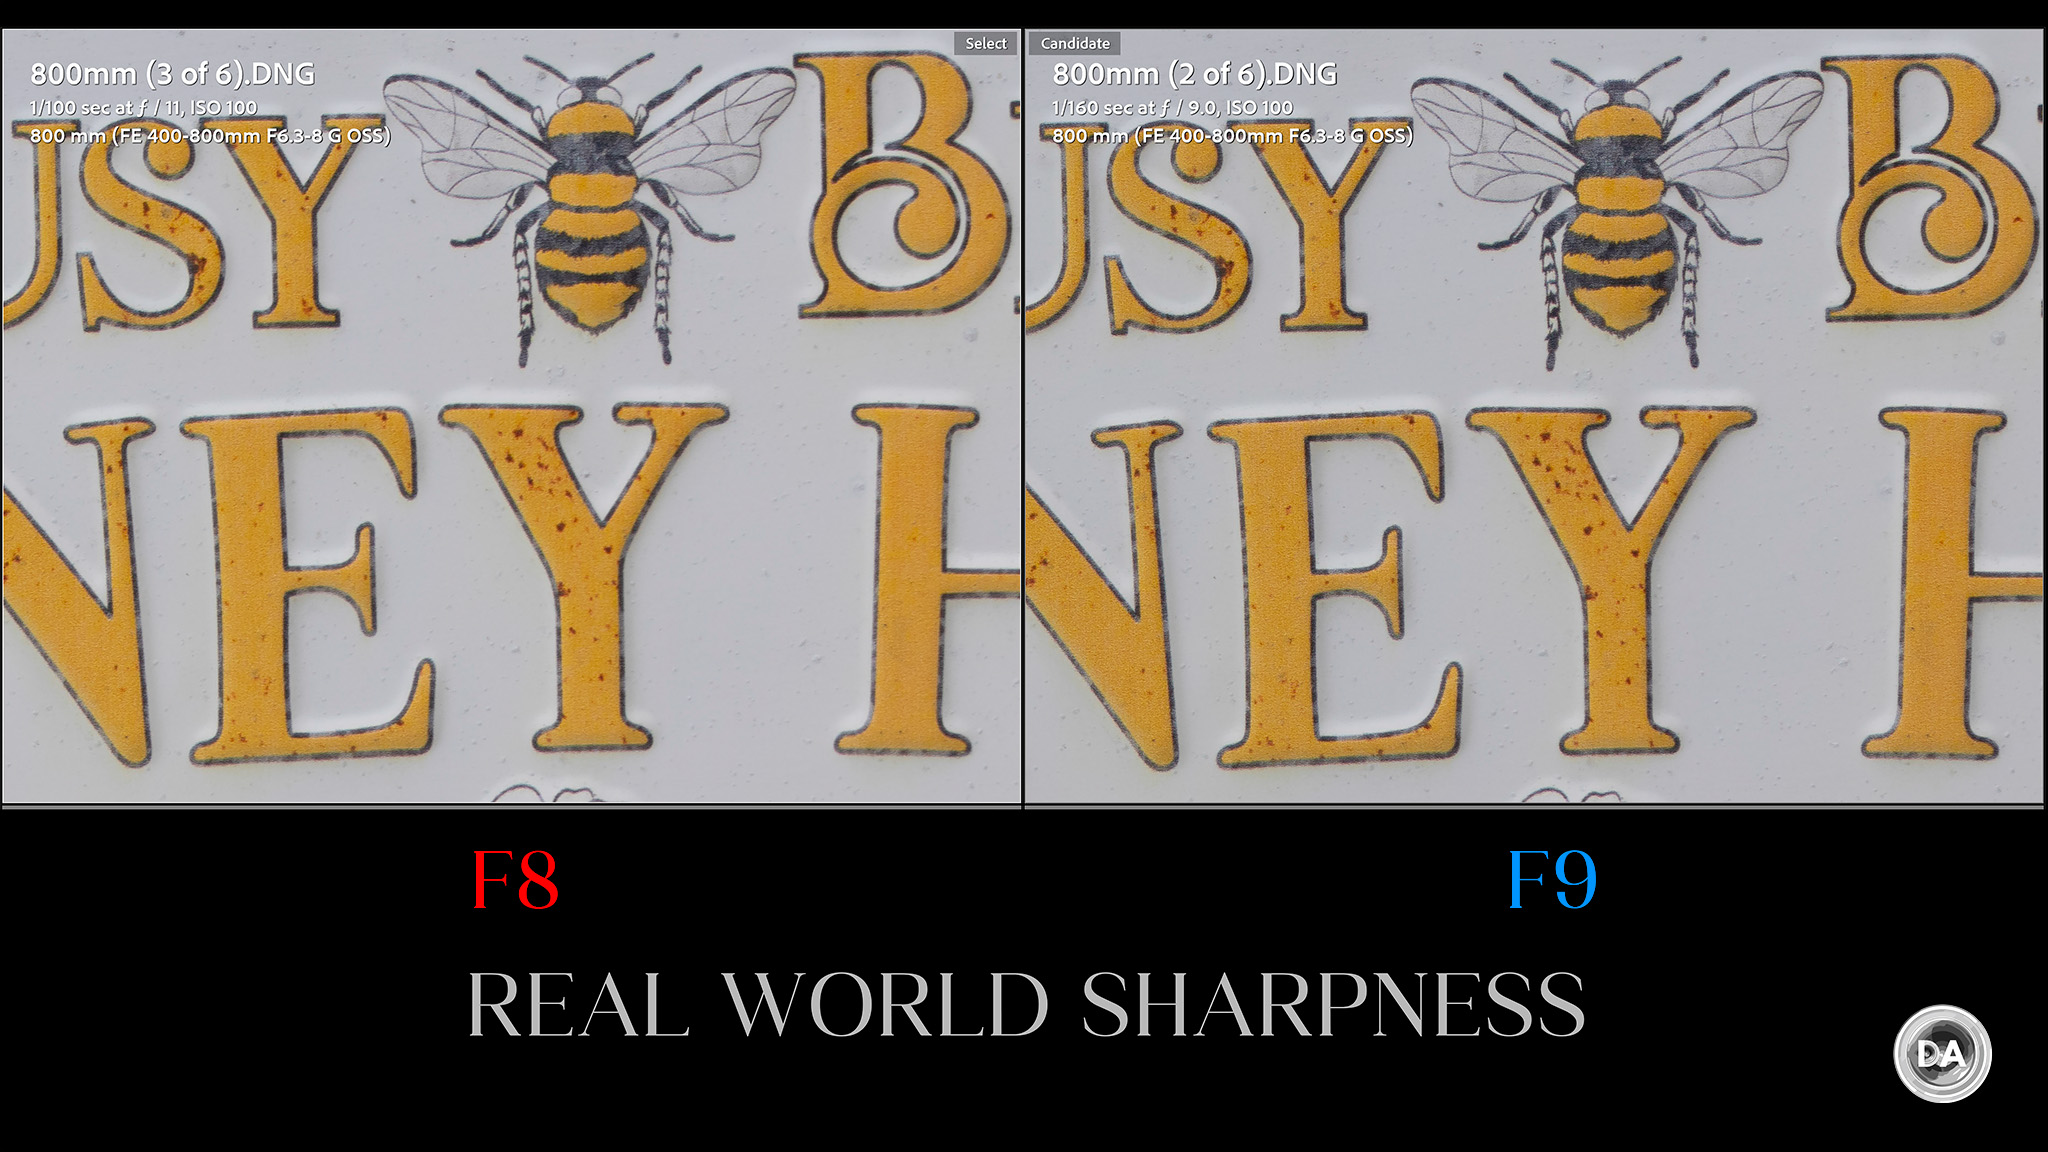
So how about sharpness and contrast? I did these tests on my Sony a7RV and its 61MP sensor. Crops are shown at roughly 200% magnification (as always) to highlight strengths and weaknesses. If you aren’t experienced with long telephoto lenses, know that sharpness results are much more dependent on environmental conditions. You are often shooting at much great distances, and there are many more variables like thermal pockets that cause heat shimmers and other optical disturbances. Shooting with long lenses requires skill and developing a sense of what works and what doesn’t…often some trial and error. I shot my test chart results multiple times to broaden the sample size for this reason. I used my most stable tripod and also moved from a 2 second timer to a 10 second timer to reduce vibrations. I’ve mixed and matched here to show the best results I found.
You’ve already seen the test chart earlier, so I’ll go right to the deep crops. This is 400mm, F6.3, with crops from the center, mid-frame, and bottom right corner.
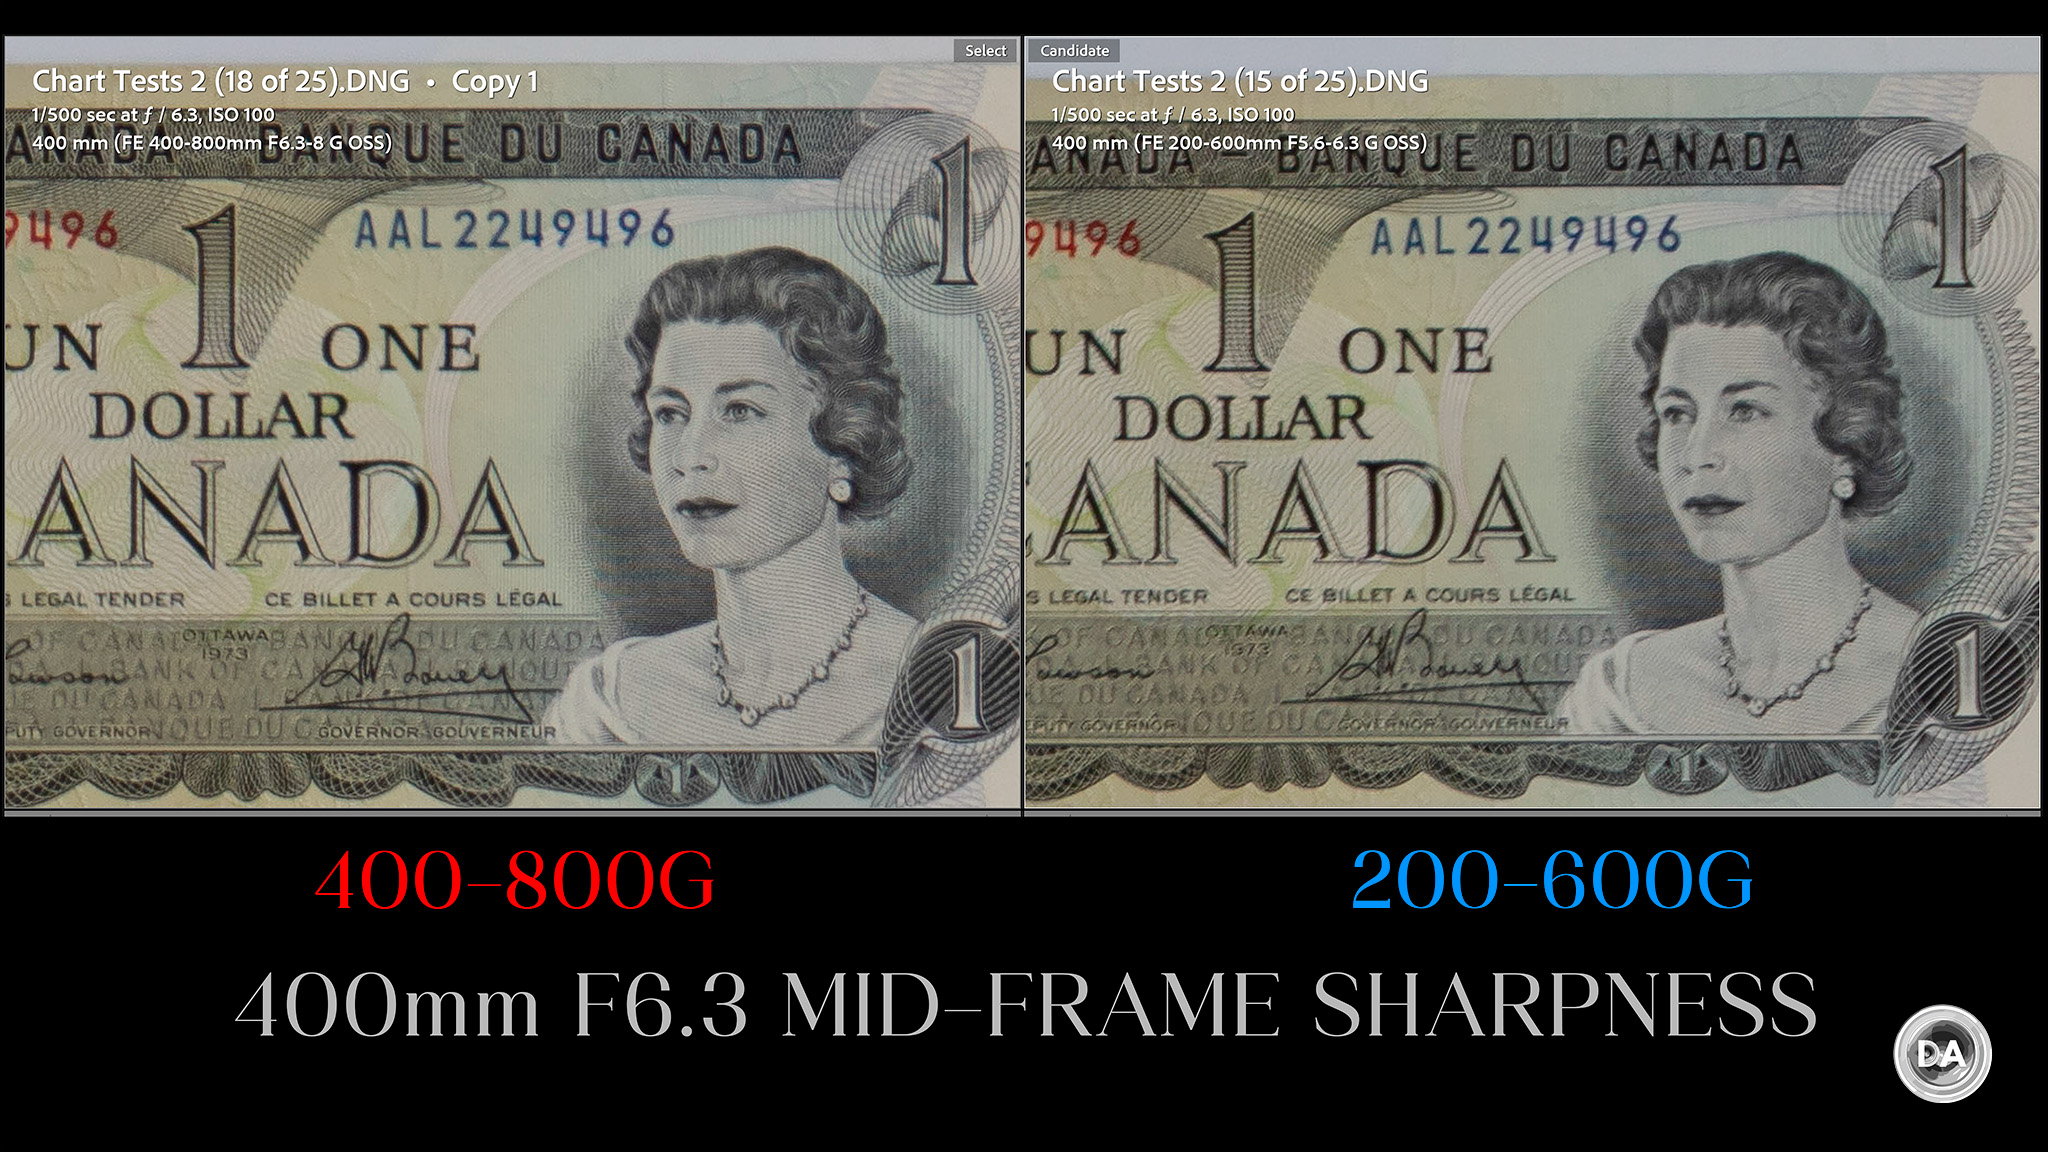
Detail is good, though contrast isn’t exceptional. To put this in perspective, however, here’s a comparison to the 200-600G, taken within a few minutes of each other (so similar lighting conditions).
What I found is that the 400-800G was very slightly better – a tiny bit more sharpness and contrast – all across the frame. I was pleasantly surprised by that, as I’ve always considered the 200-600G to be one of the best lenses I’ve tested in this class.
The MTF suggests a mild improvement when stopped down to F8, and I’m sure that in a lab under perfectly controlled conditions that’s true, but I didn’t really see much of a difference in any of my tests. here’s a real world example and crop at 100% that shows good detail and mostly good contrast at F8.
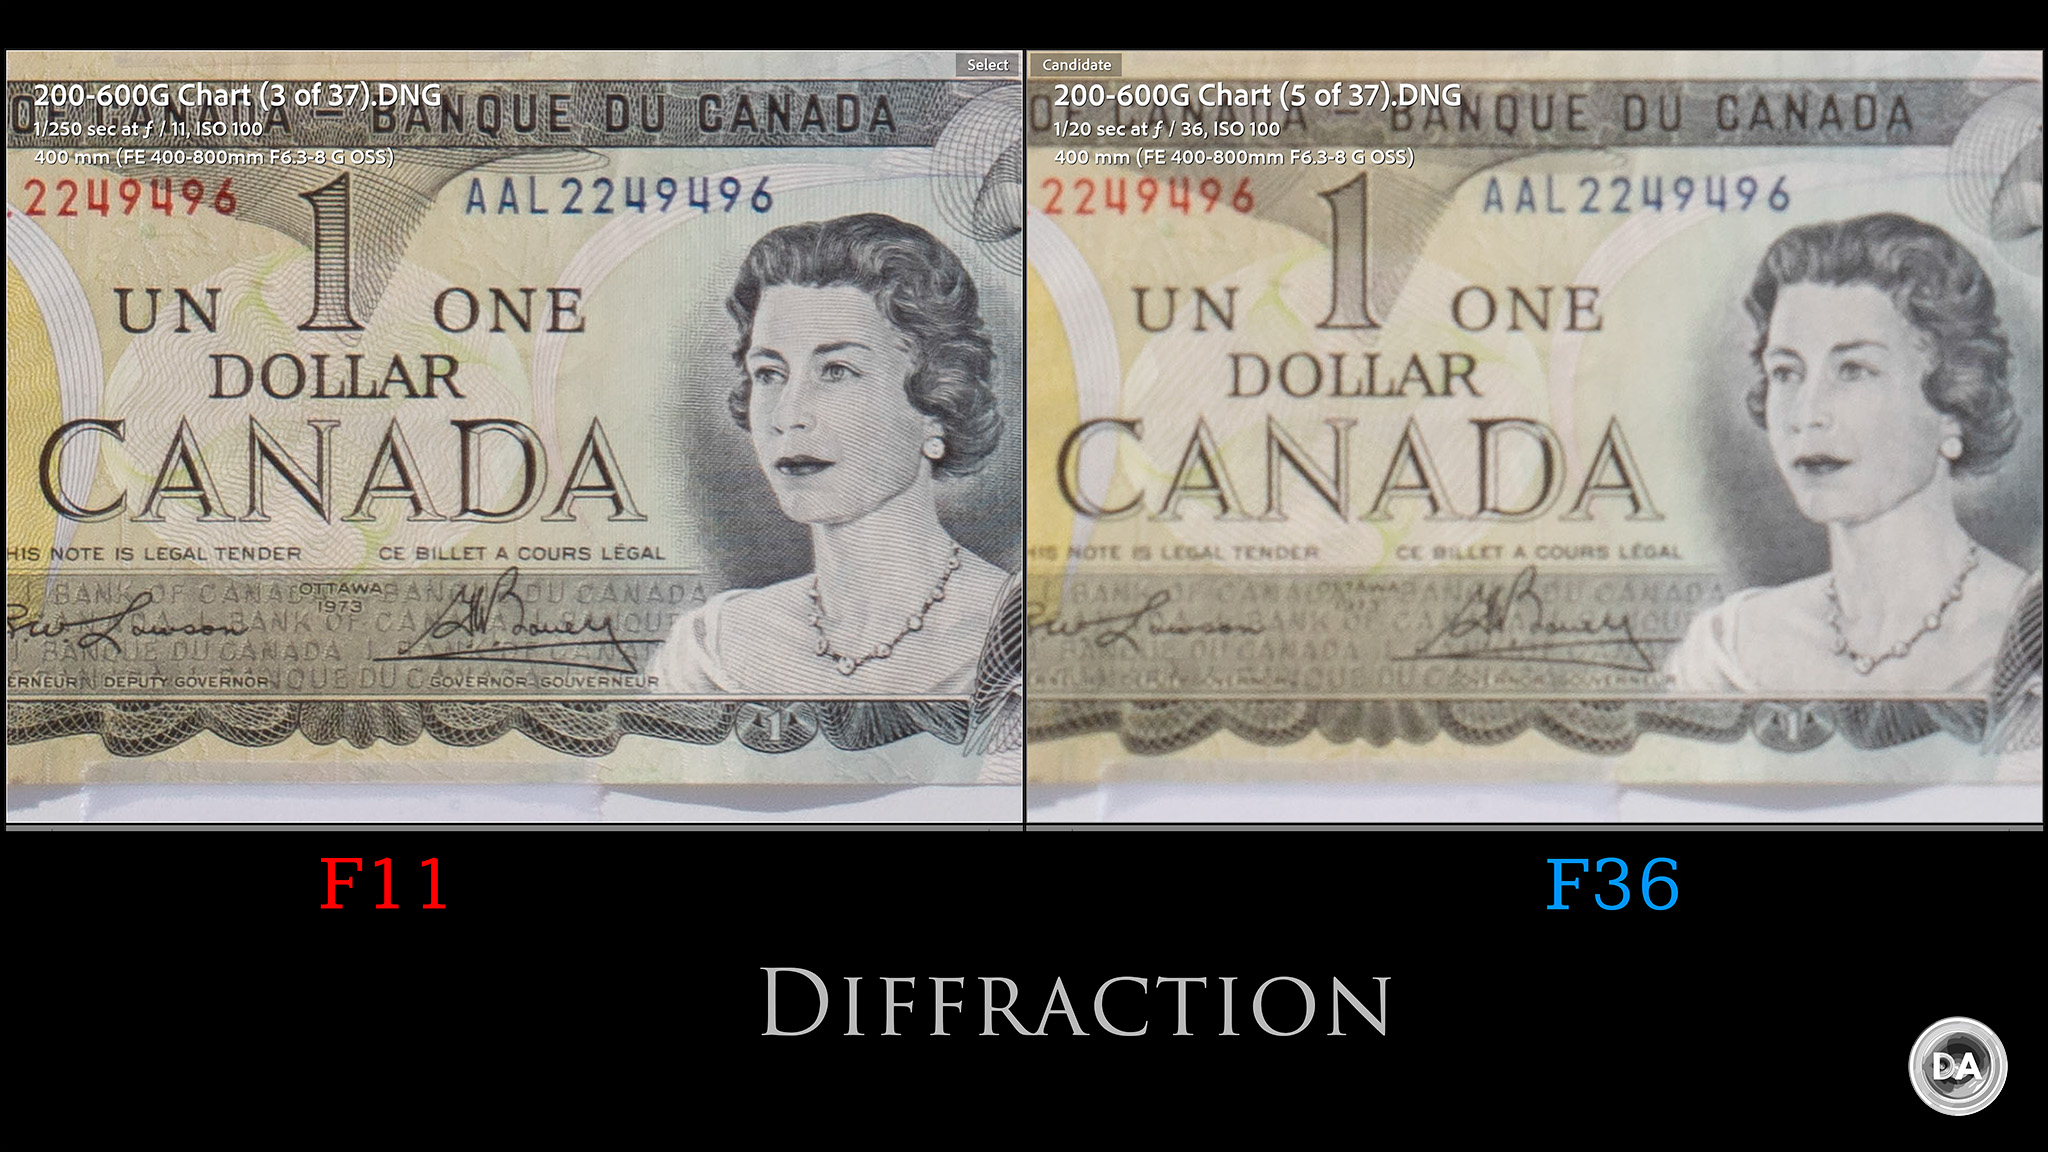
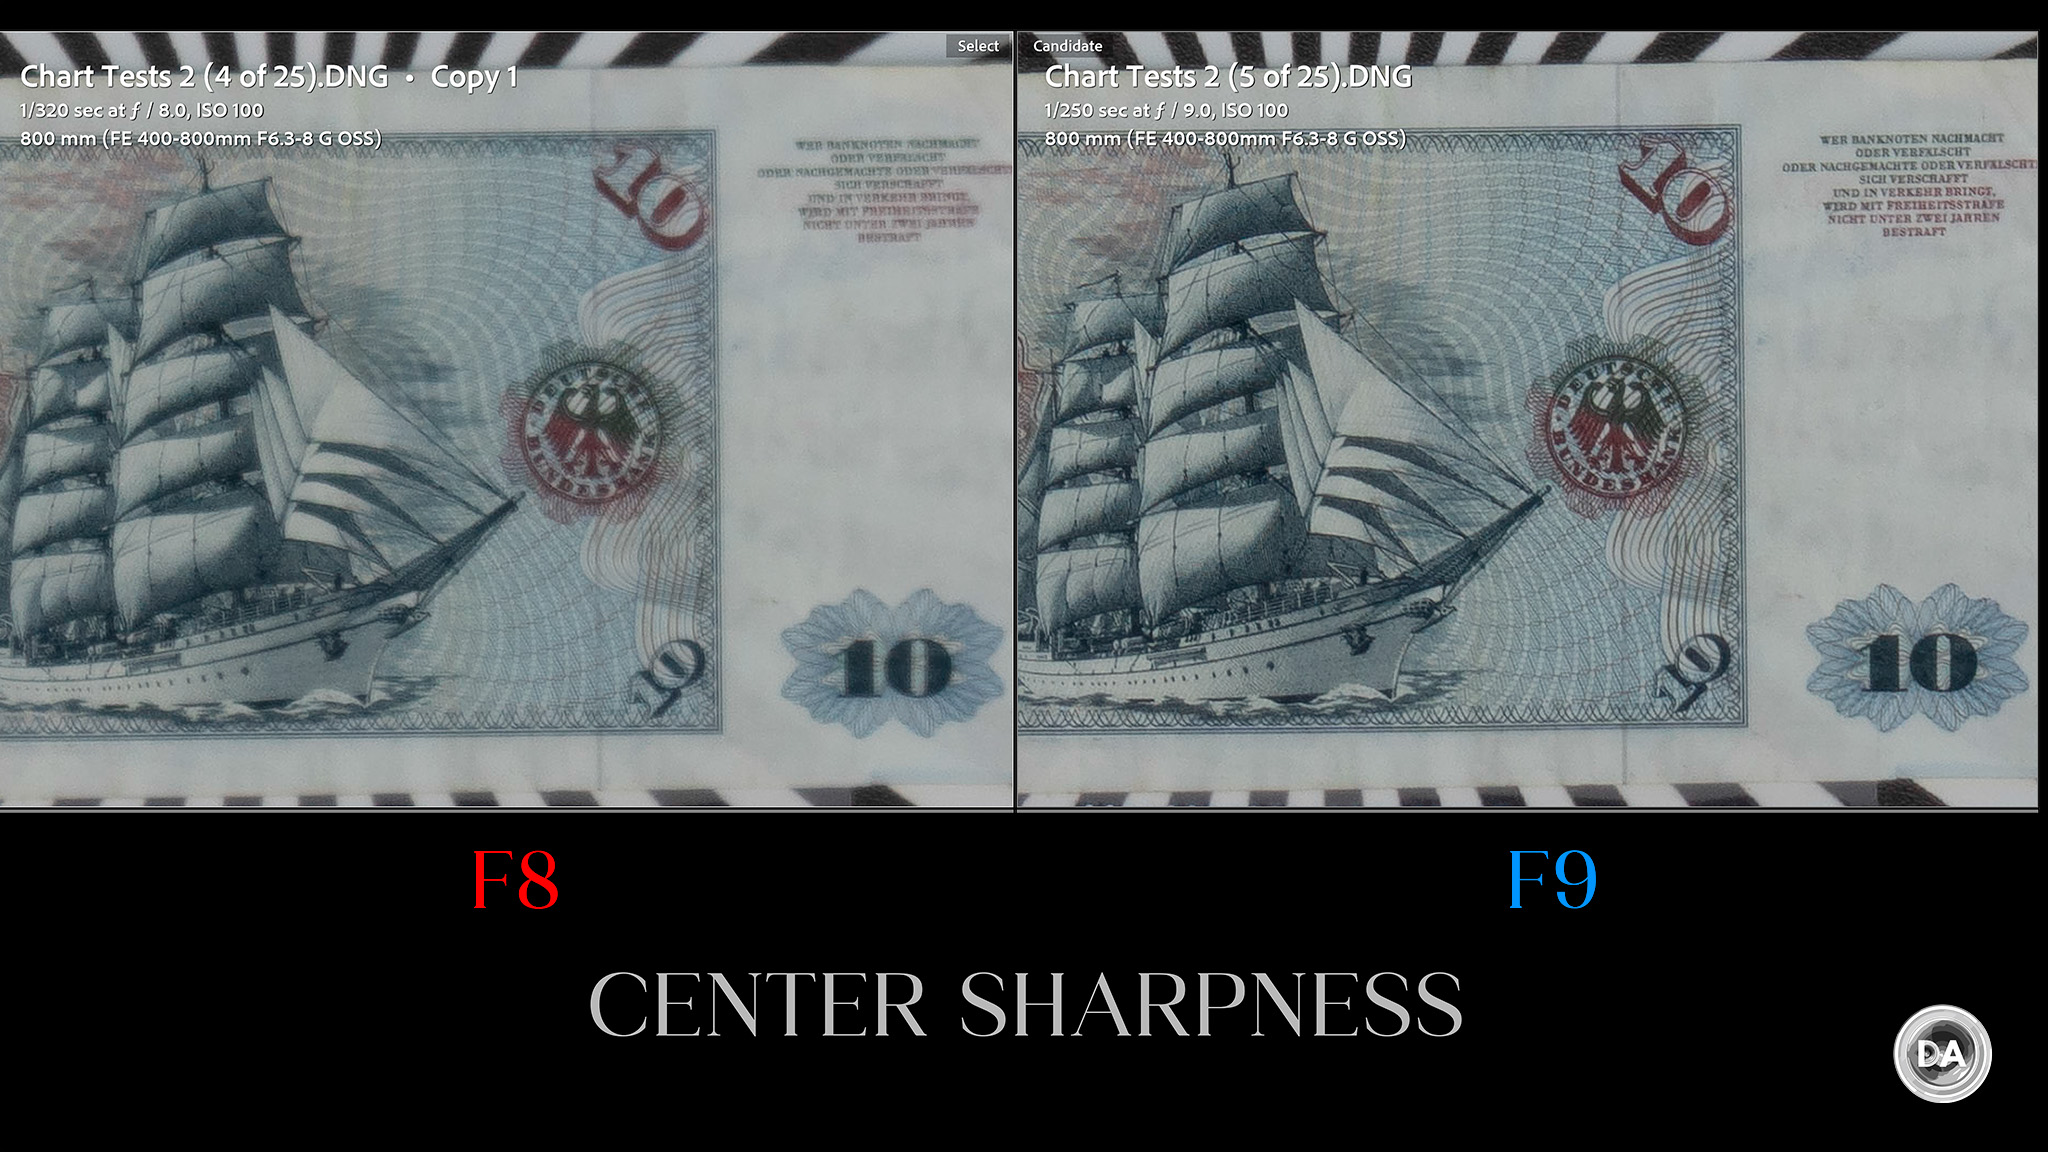
This is a variable aperture lens, and that affects not only the maximum aperture; it also affects the minimum aperture. This varies from F36 on the wide end to F45 on the telephoto end. I would shoot through F11 and try to avoid anything smaller than that as diffraction will definitely play havoc with resolution and contrast.
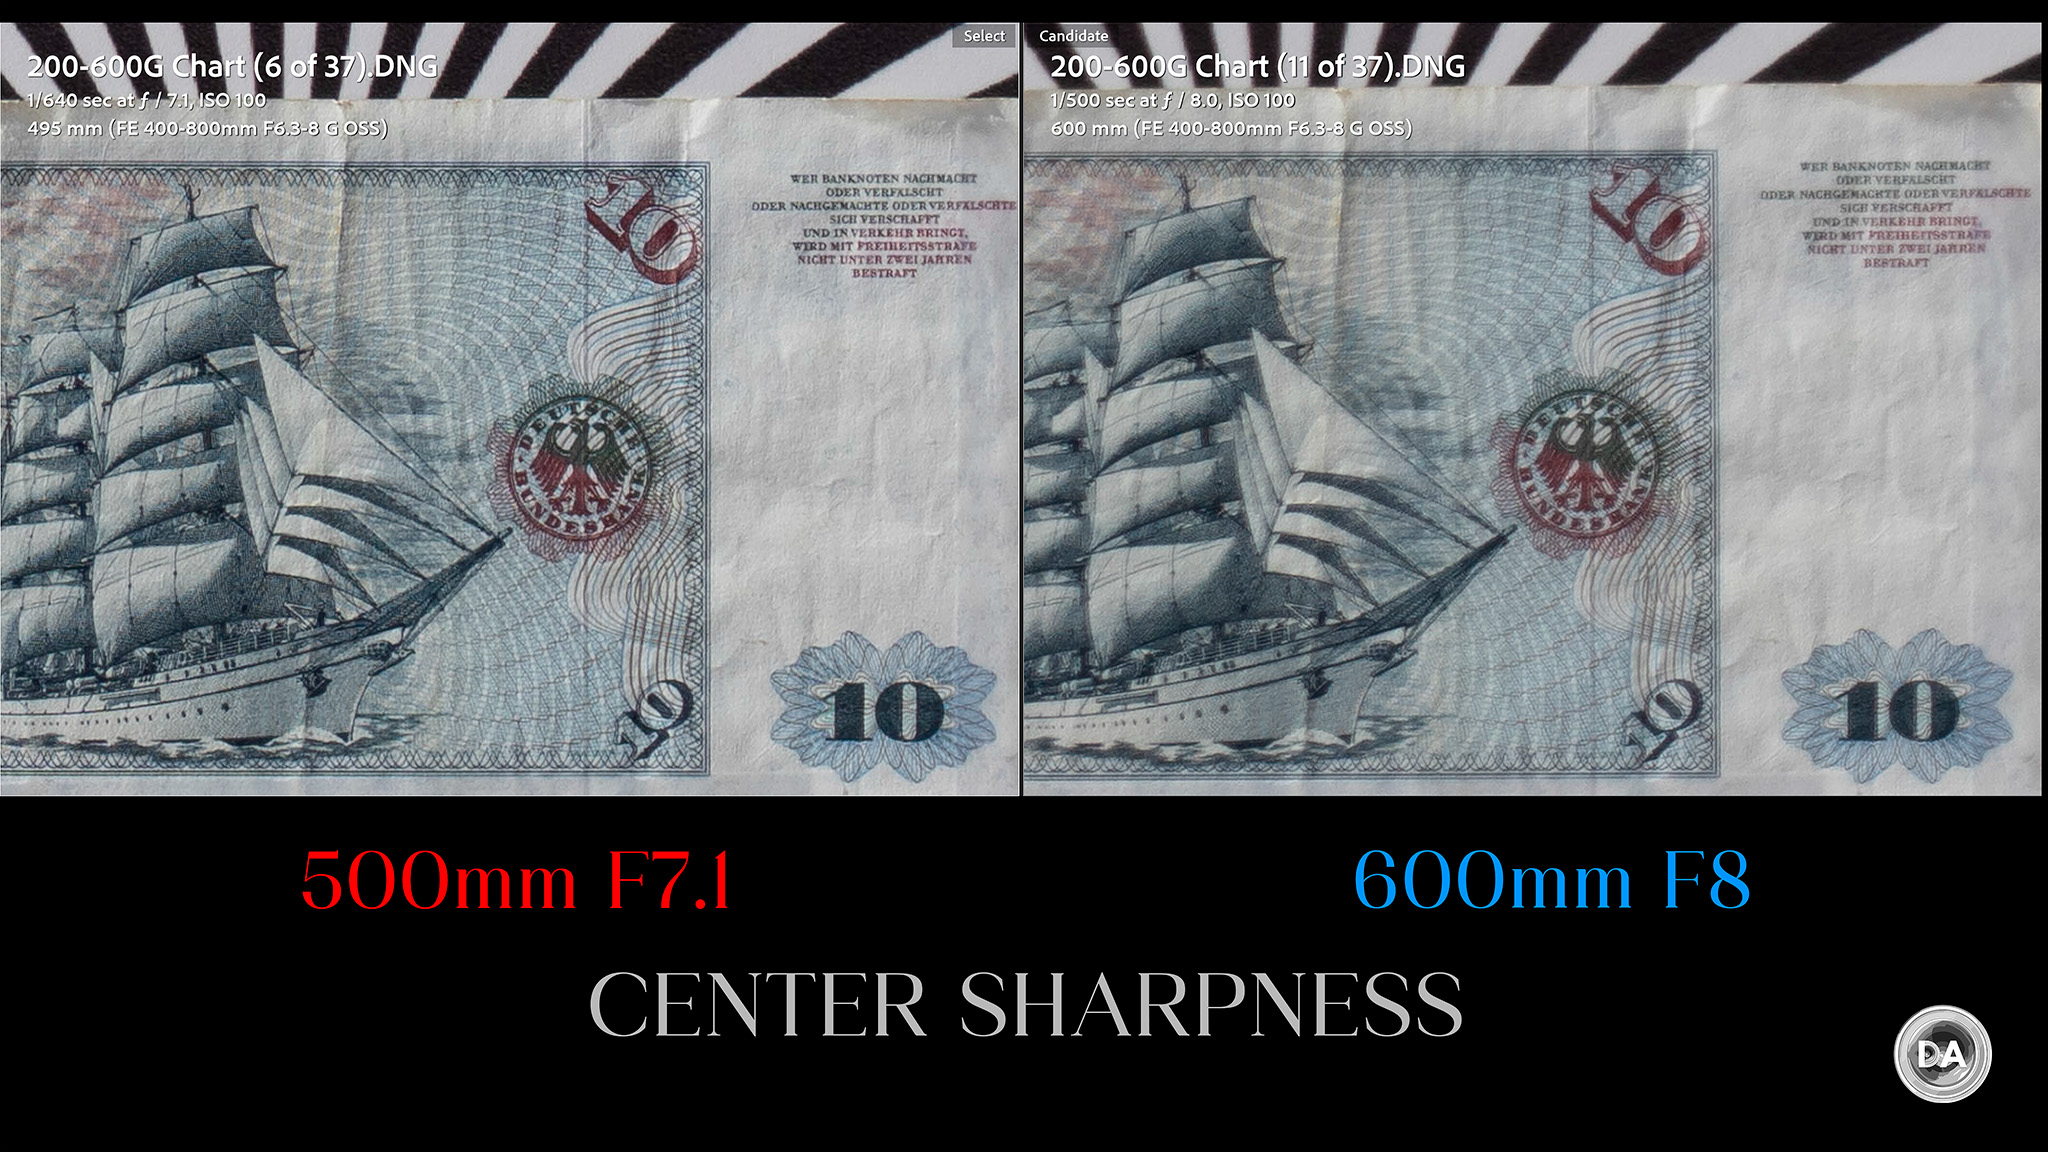
At 500mm the maximum aperture is F7.1, but I do see a bump in performance…particularly in contrast relative to 400mm.
600mm felt a little softer to me than our sharpness peak at 500mm. We have reached the smallest maximum aperture of F8 by this point.
Checking back in with the 200-600G, I found that comparing across multiple samples left me feeling that while there is some give and take, contrast favors the 200-600G by a small margin.
The truth of the matter is this is probably a matter of splitting hairs, however, as unless you were looking at this ridiculous level of magnification with them side by side (as I have here), you probably wouldn’t notice the difference.
This real world shot of Ferrari shows that while contrast isn’t off the charts, there’s a nice amount of detail being resolved at 600mm.
Moving on to 800mm shows decent resolution but lower contrast wide open. What’s interesting is that even a very mild stop down to F9 (one third stop) has a pretty dramatic effect on contrast. Here’s a look at the center:
Then the corners…
In both cases you can definitely see a noticeable difference.
I decided to see if that bore out in the real world. It definitely did. I used this as my test subject (nice and flat):
In both the cropped areas below, the F9 result is noticeably more contrasty than the F8 result.
So pro tip: if you buy this lens, don’t hesitate to stop it down that one third stop. You’ll get much better results at very little light gathering penalty.
And frankly, I feel like real world results at 800mm could use that bit of a boost. Detail and contrast are good but not great at F8:
That little boost definitely gives you the advantage over using the 200-600G and the 1.4x teleconverter. That combination can get you to 840mm with a maximum aperture of F9, but as you can see, the 400-800G is noticeably better than the TC combination at F9:
My conclusion is that the resolution may not be “wow” at 800mm, but it is better than what any of these type lenses have achieved previously (by reaching there with a teleconverter). What’s more, you are avoiding the inconvenience and expense of the teleconverter. Currently the 1.4x Sony TC costs $548, and that definitely would help close the $900 gap between the 200-600G and the 400-800G.
How about the bokeh? My answer to that is, “it depends”. When you are a longer distance to your subject (and thus the background is less blurred out), I find that the background gets a bit busy, with some jitteryness in the transition zone.
Ditto with the foreground obstructions that you will often encounter when birding.
Likewise here I found this complex background to be rather unappealing.
In more favorable ratios, however, where the subject is closer and the background is further, the bokeh looks much more pleasing.
This shot is somewhere in between, with the subjects being at a medium distance, but the background is a little less complicated.
My conclusion is that like many of these type lenses, the 400-800G is more optimized to try to get as much sharpness as possible rather than delivering amazing bokeh. If you want amazing bokeh at 800mm, grab the $13,000 Sony 600mm F4 GM and use a 1.4x TC on it. There’s only so much heavy lifting that a zoom lens like this can do.
I didn’t point the 400-800G right into the sun, but I also never saw any real flare issues when panning across it while tracking. You will see some loss of contrast at certain positions with intense midday sun, but it is obviously very easy to avoid these situations with such a narrow angle of view.
This isn’t a flawless lens optically, but neither does it have any significant flaws. Any optical shortcomings I see are put into perspective when I compare it to a lens that I think to be very good and have taken some amazing photos with. It lets me know that if I had this lens in similar conditions, I could expect as good or even slightly better images. Check out the image gallery if you would like to see more images.
Conclusion
Lenses like the Sony FE 400-800mm F6.3-8 G OSS are going to be completely wasted on a large swatch of the photography world but will immediately send a certain subset to place a preorder as quickly as possible. Many will find a lens like this too big, too heavy, and too expensive, and that’s fine. And even if you aren’t one of those, I would encourage some patience should you purchase one. Lenses like this have a learning curve, and you have to learn how to use a lens like this to its strengths and start to develop a feel for what situations it will and won’t thrive in.
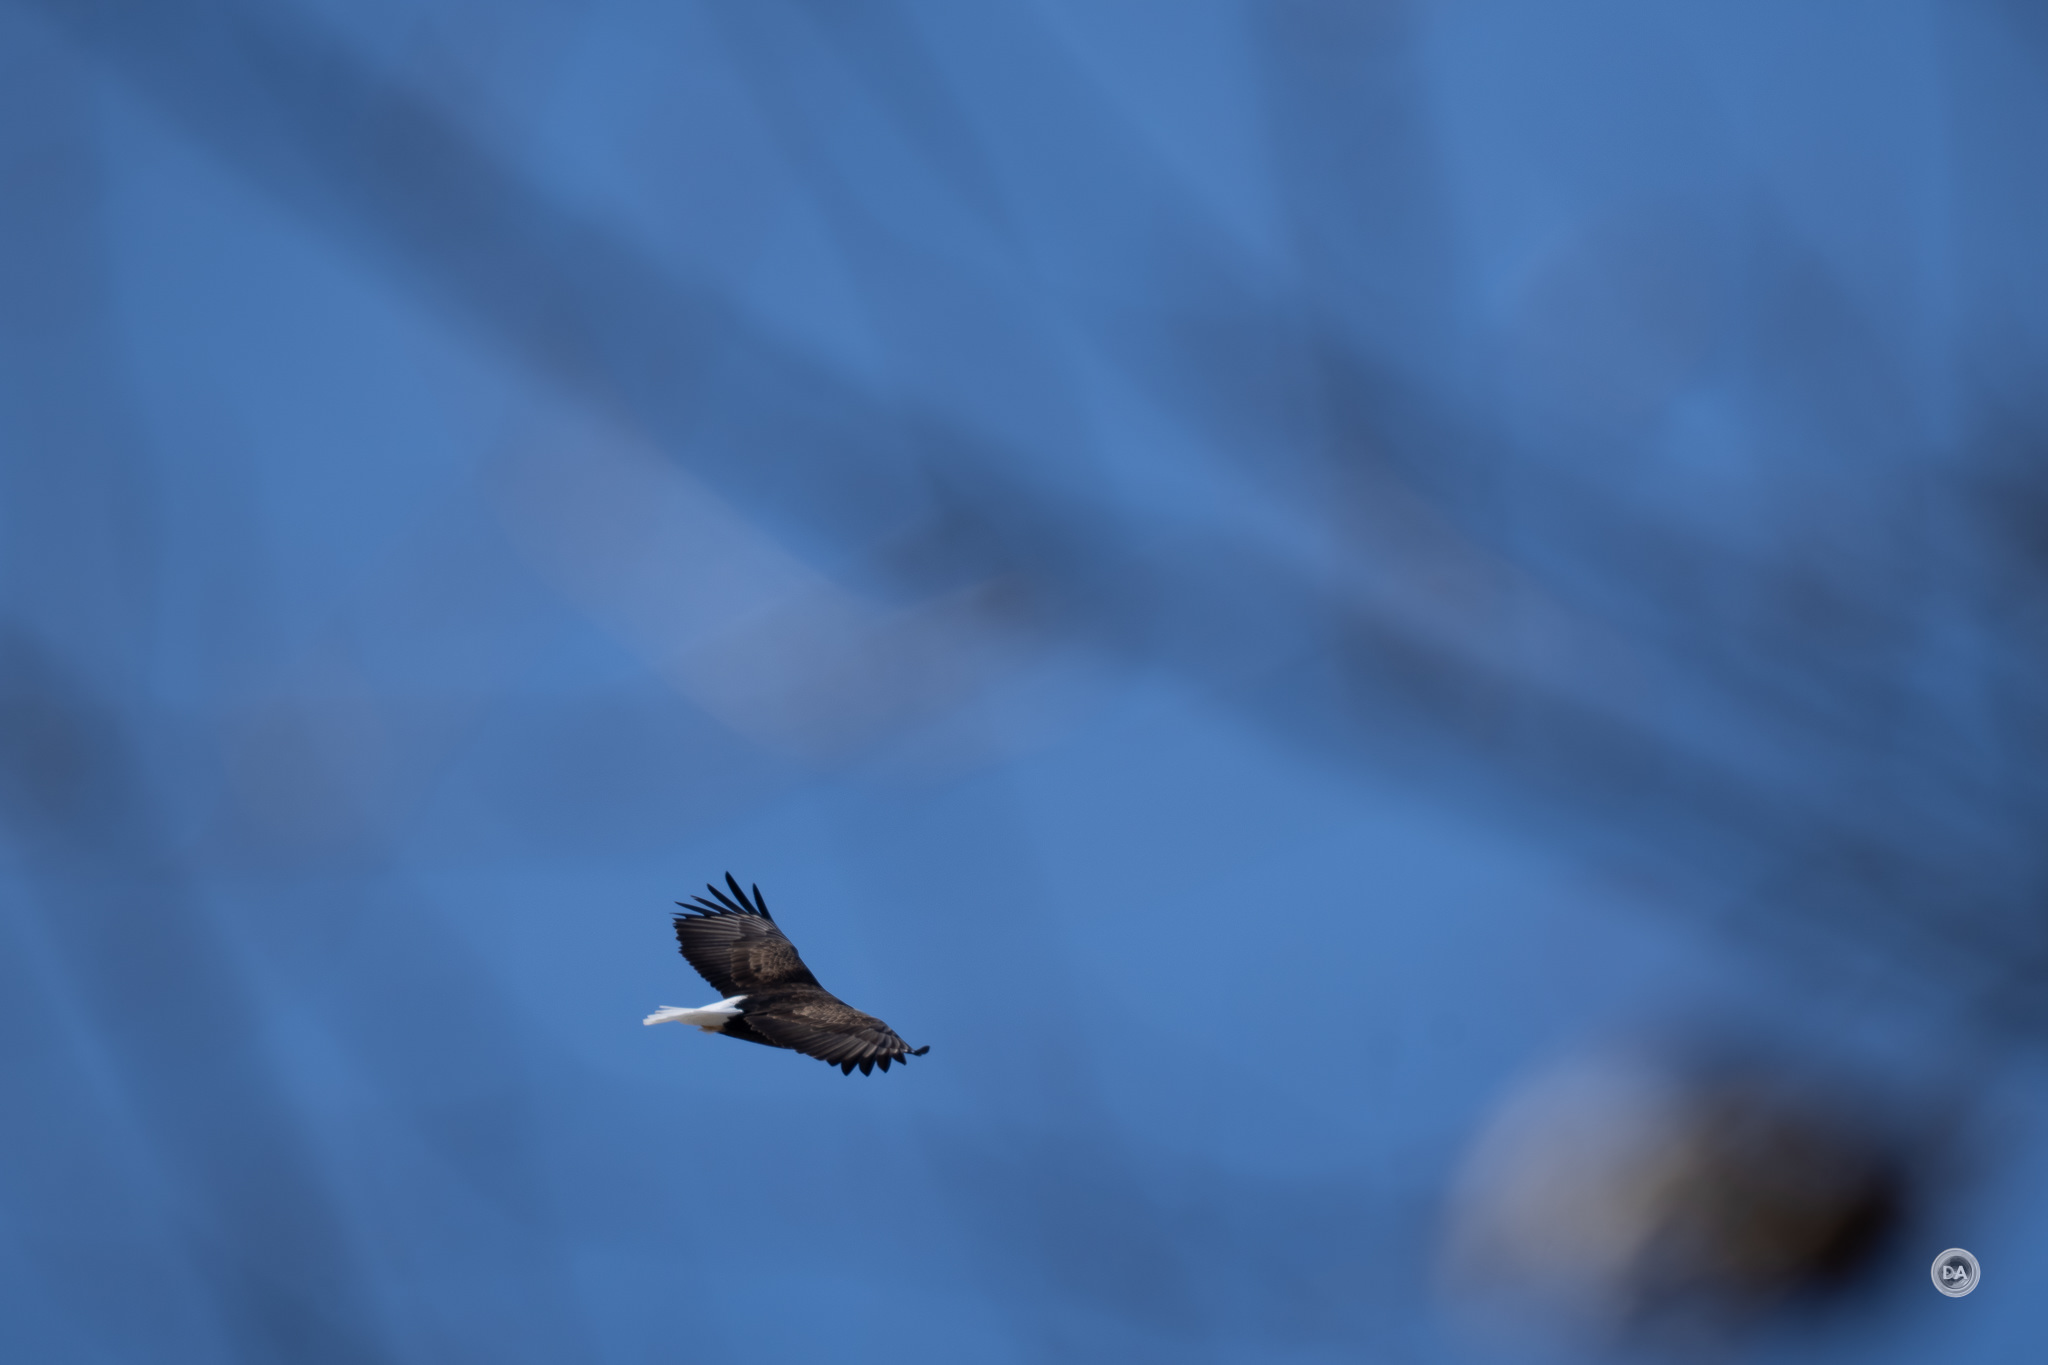
But while a lens like this isn’t easy to use, modern autofocus makes it infinitely easier than it would have been. To be able to get 30FPS (or even 120FPS on the a9III) while tracking across the full sensor is a pretty unbelievable experience. I used to hate reviewing lenses like this because long focal lengths made it so hard to acquire a bird in flight, for example. Focus would hunt back and forth, and even assuming you eventually acquired focus, it would rarely be with the framing you sent out to capture. But yesterday I was looking at hundreds of geese out on the ice, none of whom seemed interested in flying, until out of the corner of my eye I saw one take off. I turned and immediately was able to grab focus (at 556mm), and every frame in the 138 burst that followed was in focus…starting from this, the very first one.
That means that there will be far more situations where a photographer can get both the focus and the framing they want, and end up with more of the moments like this (770mm, F8), where it is actually a shot that I’m proud of.
This is, frankly, pretty much the ugliest time of the year where I live. So if I can shots that I like with this lens NOW, it lets me know that photographers shooting at better times of year will be able to get shots that they love. And that makes the $2900 Sony FE 400-800mm F6.3-8 G OSS not only the first Sony zoom to reach 800mm, but also makes it probably the best zoom to hit 800mm.
Pros:
The first Sony zoom to reach 800mm
Beautiful build quality including robust weather sealing
Excellent handling (internal zoom helps balance)
Good feature set allows you to stay out of the menus
Incredible autofocus performance – quiet, fast, and accurate
Pair it with a Sony sports camera and get amazing tracking
Strong, consistent optical performance across the zoom range
Low vignette
Good contrast and chromatic aberration control
Can be used with Sony’s 1.4x and 2.0x TCs
Better optically than 200-600 + 1.4x at long ranges
Cons:
Slow maximum apertures mean that you’ll need good light
Keywords: Sony 400-800mm, Sony 400-800 G, 400-800, Sony FE 400-800mm F6.3-8 G OSS, 400-800mm, G, OSS, Sony 400-800 Review, Sony 400-800mm Review, 200-600, Sony FE 200-600, 200-600, 200-600mm, Sony FE 200-600G, 200-600G Review, Full Frame, Review, Sony Alpha 1, Sony a7RV, Review, Hands On, Dustin Abbott, Real World, Comparison, Sharpness, Bokeh, Flare Resistance, Autofocus, Image Quality, Sample Images, Video, Photography, let the light in, weathersealing, #letthelightin, DA
DISCLAIMER: This article and description contains affiliate links, which means that if you click on one of the product links, I’ll receive a small commission. As an Amazon Associate I earn from qualifying purchases.
I was in a press briefing regarding this lens when the Sony rep said something that resonated with me. He noted with today’s high resolution bodies (I currently do my Sony reviews on the 61MP a7RV body) that getting length is relatively easy – just crop. But going wider is a different story. So Sony is going wider with their most recent standard zoom. Whereas the typical zoom range is 24-70mm, Sony is going that extra bit wider with the FE 20-70mm F4 G lens, which is just enough to make this a very unique lens – a hybrid wide angle/standard zoom. The difference between 20 and 24mm is significant for landscape work. Look at how much more of the building is visible in this comparison:
That can make an even more dramatic difference indoors, allowing you to include a lot more in the frame.
Perhaps most importantly for many photographers, the new 20-70G (as we’ll call it for brevity in this review) goes wide enough that it can serve as the wide angle lens for many photographers, meaning that they need to spend the money on one less lens. Pairing the 20-70mm F4 with the amazing new 70-200mm F4 Macro G OSS II (my review here) would make for a lightweight, killer combo of lenses with near perfect image quality over what amounts to a 10x zoom ratio. That’s pretty tempting. The new 20-70G also makes for a unique travel lens, capable of giving you really wide results:
…but also the ability to zoom in and capture more details, like this:
That zoom ability makes it a reasonable portrait lens (though F4 isn’t exactly a dramatic maximum aperture), delivering crisp results with nice color and decent background blur.
There’s a lot here to attract photographers, particularly since the price point isn’t ridiculous (about $1100 USD). Are there any hidden fatal flaws here that should keep you from choosing this lens? You can judge for yourself by either watching my video review below or reading on to get the full picture.
Thanks to Sony USA for sending me a review loaner of this lens. As always, this is a completely independent review. *The tests and most of the photos that I share as a part of my review cycle have been done with the Sony a7RV along with the Sony Alpha 1 that serve as my benchmark cameras for Sony lenses.
Sony 20-70G Build and Handling
Sony has managed to increase the zoom ratio here without dramatically increasing the size of the lens. While there is no direct analog for this lens, the much older 24-70mm F4 Zeiss lens is slightly smaller and lighter, but dramatically so. The F4 aperture of the 20-70G ensures that it is significantly smaller and lighter than the 24-70mm F2.8 GM II or competing 24-70mm F2.8 lenses. Tamron’s 20-40mm F2.8 VXD lens is as wide, but obviously lacks a lot of the standard zoom range. Here’s a look at how a few options compare:
The Sony 20-70G is relatively compact and is roughly the same size as my Sony FE 50mm F1.4 GM – the closest size comparison I had.
The diameter of the lens is about 78.7mm (3.1″) and is 99mm (3.9″) in length. The weight is 488g or 17.2oz. The front filter thread is 72mm.
This is not an internally zooming lens as the inner barrel extends about 4cm when zoomed to 70mm.
The zoom action is smooth and well damped and the lens doesn’t seem to show any tendency towards zoom creep. This is good, as there isn’t a zoom lock on the lens.
Sony’s lenses have become increasingly feature rich in recent years, and that’s true here as well. That begins with a wide range of options for aperture control. This includes an aperture ring that can be used “clicked” with one-third-stop detents throughout the range from F4 to F22 or can be switched into auto for in-camera control. The aperture ring is thin but not difficult to find. The detents are on the firm side when in the clicked mode; you definitely feel each one of them.
There is also an option to declick the aperture on the right side of the lens. This allows the aperture ring to smoothly move through the aperture options and also allows for smooth aperture racks in video (though there is a bit of lag between ring input and the movement of the blades).
This particular switch is a little difficult to access as it is located on the bevel towards the lens mount. There isn’t a lot of room between the switch and the grip when the lens is mounted on the camera, and its position makes the ergonomics of reaching it difficult. Fortunately this is not a switch that most people will be reaching for often, so I don’t think it is a deal breaker.
On the opposite side there is an Iris Lock switch that will either lock you into the manual ring (if you don’t want to inadvertently move into automatic) or lock you into automatic if you aren’t an aperture ring person.
There are 9 aperture blades that help keep the aperture shape circular when stopped down.
On the left side of the lens there is an AF/MF switch along with a focus hold button (which can be programmed to a variety of functions from within the camera). There is a secondary focus hold button on the top of the lens which will be accessible when shooting in portrait orientation.
The minimum focus distances is 25cm (9.8″) and gives a very high 0.39x magnification.
The plane of focus isn’t perfectly flat, but there is good detail in the focus area. This will allow you to get very close and get some macro(ish) shots, like this shot of one of my honeybees:
That’s also very handy for video, as autofocus will continue right up until you are essentially on top of your subject.
This is thoroughly weather sealed lens, with roughly 14 seal points along with fluorine coatings on the front element.
That was particularly useful for me when shooting in the Mayan Riviera in Mexico, as the high heat and humidity means that everything immediately fogs up when coming out of an air conditioned environment. Weather sealing helps assure that there won’t be moisture inside that could produce mold or fungus over time.
The lens hood is petal-shaped and not particularly deep. There is no lock, but it bayonets on tightly and didn’t move.
Other than the ergonomic issues accessing a few of the minor switches, the lens handles very nicely and is a nice, compact fit on Sony’s full frame cameras.
Sony 20-70mm F4 Autofocus Performance
Sony has employed dual XD (extreme dynamic) Linear Motors to assure that autofocus is fast, quiet, and accurate. This is something that Sony has really perfected, as they use the appropriate number of XD motors and assure that autofocus is pretty much flawless.
This allowed me to nail focus in quick, reactionary situations, like this pelican coming in to knock a gull of its perch. My shutter speed was low for this kind of action (unexpected), but the focus was flawless and I actually like the dynamic result from the panning movement and shutter dragging here.
Getting eye focus on traditional subjects was easy, obviously. Here’s a shot of me and my new daughter-in-law:
Portrait and wedding photography will be a breeze with this lens and a decent camera body. Here’s the venue my son chose to be married at (you might recognize this location as one where the X-Men movies were filmed):
I came across a boa while out with the lens in Mexico, and, as you can see, focus was nailed on the eye:
The newest Sony cameras like the a7RV have insect detection mode, and that works nicely for nailing focus on one of my honeybees.
On the video front, video pulls are quick, quiet, and confident as you might expect with a first party Sony lens equipped with dual focus motors. There is a tiny amount of focus breathing. When I tested it on the a7RV and turned on the “Focus Breathing Compensation” setting there is a mild improvement and at very little crop because of the low amount of breathing to begin with. The lens also performed well (as expected) in my “hand test”, quickly transitioning back to tracking my eye after I blocked visibility of my eyes with my hand towards the lens.
My general focus results were excellent. I had zero issues either during stills or video focus:
Bottom line is that the autofocus is excellent.
Sony SEL2470G II Image Quality
At this stage I have come to expect that Sony’s new lens releases are typically going to be pretty fantastic optically, and that is definitely the case here. The MTF results show extremely sharp results at 20mm and with slightly poorer results at 70mm, though when stopped down the image quality is pretty much perfect at any point.
Image quality is pretty much pristine:
Longitudinal chromatic aberrations (LoCA) typically show up as purple/magenta fringing before the plane of focus and blue/green fringing beyond the plane of focus due to colors not being perfectly focused together. They typically diminish as the lens is stopped down to smaller apertures. I didn’t see any real world LoCA, though that wasn’t unexpected in a lens with a wider focal range and smaller maximum aperture. A lens like this would be more likely to suffer with Lateral chromatic aberrations (LaCA) that show up as fringing on either side of contrast areas (like tree trunks, for example) along the edges of the frame. Unlike LoCA, they do not improve when stopping the aperture down, but are much easier to correct for (typically a one click “remove chromatic aberrations” box in editing software). We can see once again that there is no evidence of any fringing near the edges of the frame.
So that is great, but there is at least one ugly monster hiding behind the lens corrections…distortion. The barrel distortion at 20mm is extremely strong and is also very non-linear.
You can see a fairly pronounced amount of wave (mustache pattern) after a manual correction. I had to use a +50 correct the distortion (one of the higher values I’ve ever entered), though vignette was fairly mild at just a +20 to correct. Fortunately the correction profile does a cleaner job of correcting the distortion, though you can see that there is some mild barrel distortion that remains even after the correction profile.
The correction profile makes the lens usable in most situations, though this probably won’t be a great choice for doing real estate work. For most lines, however, I didn’t notice the distortion until I specifically tested for it.
At 70mm there is a mild amount of pincushion distortion (-8 to correct) that is linear and easy to correct. Vignette remains low at just a +29 to correct.
The correction profile will obviously make sure you never see any distortion at 70mm.
So, the barrel distortion at 20mm is strong, but we’ve otherwise got a good performance.
So how about sharpness? I’ve used the very high resolution (61MP) Sony a7RV for this series of tests, which obviously sets an exacting standard for sharpness and contrast. Here’s a look at the test chart:
And here are the 20mm F4 crops at about 200% magnification, taken from the center, then mid-frame, and then extreme lower right corner:
This is a lens that handles the 61MP resolution point over most of the frame without issue at F4. The far corners are a bit softer, but the performance in the center and mid-frame is extremely good.
At 100% magnification and with real world subjects detail looked good all across the frame at 20mm:
Stopping down to F5.6 helps the corners, though they are sharpest at F8:
F11 is just very slightly less sharp due to diffraction, with increased softening at F16 and then at F22. You can see a pretty radical difference between F4 and F22:
Sharpness improves a bit more at 24mm, with slightly stronger results all across the frame (including the corners).
Here’s a real world shot at 24mm:
The performance at 35mm is nearly identical to that at 24mm, which is to say, excellent. Here’s a shot of the sargassum that the ocean constantly delivers to Cancun in August:
50mm is again virtually identical, with extreme sharpness in the center and mid-frame and a dip in the corners. Here’s a 50mm shot:
Contrary to the MTF charts, the copy I tested actually performed the best at 70mm. I saw the best sharpness across the frame, with a stronger performance in the corners than at any other point. Take a look at the edge performance here:
Real world results look great. This nearly 100% crop from a shot of my wife shows excellent detail even at F4:
This F5.6 landscape shot shows great detail everywhere in the frame:
Bottom line is that image quality is excellent, though the corners sometimes need a mild stop down to be excellent.
Contrast and colors were excellent, with nice saturation levels and good “pop” to the images.
Here’s a shot with a wide range of different colors:
Here’s another that looks pretty fantastic.
Flare resistance is quite good, particularly at wider apertures.
I could see a few more ghosting artifacts if shooting at a smaller aperture like F11, but not bad.
Sunbursts are good but not great. The blades of the sunburst lack definition, but look generally okay.
A lens with a maximum aperture of F4 and maximum focal length of 70mm is not going to strongly blur out backgrounds, but the quality of the bokeh is generally fairly good.
Your best case scenario for creating bokeh will be when you can get close to your subject and have a bit of distance to the background.
A lens like this excels more at having more in focus and delivering great detail throughout. I liked it for travel, though I also took along a compact prime with a larger maximum aperture for when I wanted to get some shots with a shallower depth of field. In general, however, image quality is pretty great!
That extra 4mm may not seem like much, but for some shooters it will transform this lens from “ho-hum” to “wow!” It makes it far more useful for travel, weddings, and landscape work, as it means you could carry just this one lens rather than a wide angle and a standard zoom zoom. It’s a killer landscape lens:
The strong distortion at 20mm makes me less likely to suggest it for interior/real estate work, but lines were generally good enough for most other applications.
I really enjoyed this lens as a travel lens for capturing both photos and video. It doesn’t have OSS (Optical Steady Shot), but the excellent IBIS in Sony’s recent cameras like the a7RV make this pretty much a moot point. The Sony FE 20-70mm F4 G has a nice build, excellent autofocus, and overall excellent image quality. It’s a great package at a price point of right under $1100 USD, and should be the perfect lens for those less concerned with low light performance or shallow depth of field and who instead want flexibility in their zoom range while retaining very high image quality. By that metric the 20-70G really excels. This is the kind of lens that only comes along when a company has a full catalog of lenses and can afford to get a little more creative in lens design. It’s a great time to be a Sony shooter!
Pros:
Wider than any standard zoom before it
Compact size
Beautifully built and well sealed
Feature rich
Extremely fast and accurate autofocus
Very low focus breathing
Extremely sharp in the center and midframe throughout the zoom range
Very low vignette
Beautiful color
Mostly good flare resistance
Low aberrations
Cons:
Very strong barrel distortion at 20mm
Declick switch is difficult to access
Corner performance wide open at some focal lengths not exceptional
Keywords: Sony, Sony 20-70mm, 20-70mm, F4, G, Sony 20-70 G Review, FE 20-70mmmm F4, Sony FE 20-70mm F4 G, SEL2070G, Full Frame, Review, Sony Alpha 1, Sony a7IV, Sony a7RV, Review, Hands On, Dustin Abbott, Real World, Comparison, Sharpness, Bokeh, Flare Resistance, Autofocus, Image Quality, Sample Images, Video, Travel, Mexico, Cancun, Photography, let the light in, #letthelightin, DA, Weather Sealing
DISCLAIMER: This article and description contains affiliate links, which means that if you click on one of the product links, I’ll receive a small commission. As an Amazon Associate I earn from qualifying purchases.
I was in a press briefing regarding this lens when the Sony rep said something that resonated with me. He noted with today’s high resolution bodies (I currently do my Sony reviews on the 61MP a7RV body) that getting length is relatively easy – just crop. But going wider is a different story. So Sony is going wider with their most recent standard zoom. Whereas the typical zoom range is 24-70mm, Sony is going that extra bit wider with the FE 20-70mm F4 G lens, which is just enough to make this a very unique lens – a hybrid wide angle/standard zoom. The difference between 20 and 24mm is significant for landscape work. Look at how much more of the building is visible in this comparison:
That can make an even more dramatic difference indoors, allowing you to include a lot more in the frame.
Perhaps most importantly for many photographers, the new 20-70G (as we’ll call it for brevity in this review) goes wide enough that it can serve as the wide angle lens for many photographers, meaning that they need to spend the money on one less lens. Pairing the 20-70mm F4 with the amazing new 70-200mm F4 Macro G OSS II (my review here) would make for a lightweight, killer combo of lenses with near perfect image quality over what amounts to a 10x zoom ratio. That’s pretty tempting. The new 20-70G also makes for a unique travel lens, capable of giving you really wide results:
…but also the ability to zoom in and capture more details, like this:
That zoom ability makes it a reasonable portrait lens (though F4 isn’t exactly a dramatic maximum aperture), delivering crisp results with nice color and decent background blur.
There’s a lot here to attract photographers, particularly since the price point isn’t ridiculous (about $1100 USD). Are there any hidden fatal flaws here that should keep you from choosing this lens? You can judge for yourself by either watching my video review below or reading the text review…or just enjoy the photos below.
Thanks to Sony USA for sending me a review loaner of this lens. As always, this is a completely independent review. *The tests and most of the photos that I share as a part of my review cycle have been done with the Sony a7RV along with the Sony Alpha 1 that serve as my benchmark cameras for Sony lenses.
Keywords: Sony, Sony 20-70mm, 20-70mm, F4, G, Sony 20-70 G Review, FE 20-70mmmm F4, Sony FE 20-70mm F4 G, SEL2070G, Full Frame, Review, Sony Alpha 1, Sony a7IV, Sony a7RV, Review, Hands On, Dustin Abbott, Real World, Comparison, Sharpness, Bokeh, Flare Resistance, Autofocus, Image Quality, Sample Images, Video, Travel, Mexico, Cancun, Photography, let the light in, #letthelightin, DA, Weather Sealing
DISCLAIMER: This article and description contains affiliate links, which means that if you click on one of the product links, I’ll receive a small commission. As an Amazon Associate I earn from qualifying purchases.
Sony just keeps hitting one home run after another. Their newest lens – the Sony FE 70-200mm F4 Macro G OSS II (or SEL70200G II) – is one of the most versatile telephoto lenses I’ve ever used. Perhaps that’s why the name has to be so long; this lens does a LOT of things. It covers the popular 70-200mm focal range, which covers from this:
to this at 200mm:
It delivers 1:2 macro all across the zoom range, allowing you to get ever closer as you move from 200mm towards 70mm, allowing you to get beautiful macro-like shots…like this one of tiny budding blackberries.
What’s unique about this is that it gives you a lot of different framing options, and the ability to get slightly different macro style shots at different focal lengths – not to mention the flexibility for video footage as you don’t really have to work about getting too close to the camera. It has updated OSS (Optical Steady Shot), which further enhances the ability to get stable video and photos without the need of a tripod. It’s smaller and lighter than the first generation 70-200mm F4, but unlike the Canon RF 70-200mm F4, it retains the ability to use teleconverters…which also allows you to get even higher macro performance (0.75x with a 1.4x TC [shown below] and 1:1 macro with a 2.0x TC).
The Tamron 35-150mm F2-2.8 VXD has stood out to me as being perhaps the most versatile lens on the Sony platform, and in some ways that’s still true (focal range and aperture), but this new Sony 70-200mm F4 Macro G is even more versatile in other ways. This is an incredibly useful lens that can do a lot of things well…and it might mean that you skip buying a macro and use this lens for even more things. Should the SEL70200G II (as Sony calls it) go to the top of your wishlist? You can judge for yourself by either watching my video review below or reading on to get the full picture.
Thanks to Sony USA for sending me a pre-release review loaner of this lens. As always, this is a completely independent review. *The tests and most of the photos that I share as a part of my review cycle have been done with the Sony a7RV along with the Sony Alpha 1 that serve as my benchmark cameras for Sony lenses.
SLE70200G II Build and Handling
The current trend on mirrorless is to try to take advantage of advancing lens manufacturing technologies and shrink the size of lenses. Canon changed their RF design from an internally zooming design to an externally zooming design, which enabled them to take a whopping 56mm off the length when retracted for storage (though when the RF lens is zoomed out it is only 2mm shorter). That makes it much easier to transport and even to balance on camera, though with Canon, that came at a price. Sacrificed at the altar of compact size was the ability to use teleconverters, which unfortunately limits the versatility of the RF lens. Sony has taken a similar route with the SEL70200G II, moving to a externally zooming design, though they learned from Canon’s mistake and compromised with the size just enough to allow for both the 1.4x and 2.0x teleconverters to be used without restriction. The first generation 70-200mm F4 was 175mm long (internally zooming, so that length was constant), while the new lens (by my measurement) is 150mm (5.9″) retracted, though it extends to about 205mm (8″) when zoomed to 200mm.
Not everyone will be happy about the transition to an externally zooming design, but I personally appreciate the route that Sony has taken here. The SEL70200G II is an easy lens to transport and fits in far more bags than the internally zooming design, but Sony’s approach has not left it compromised in performance. There are some advantages to internally zooming lenses.
The first is that they are often easier to handle the in field, with zoom adjustments typically taking no more than effort than what you can do with a finger. Sony has countered this by really doing a great job with the zoom action. I wouldn’t say the zoom action is quite as light as the excellent 70-200mm F2.8 GM II (internally zooming), but it isn’t much heavier.
The second objection is that people feel that internally zooming lenses are more weather sealed. This is often more perception than reality, and the SEL70200G II sports about 15 weather sealing points in the lens. This is a professional grade lens with professional weather sealing; internal dust and moisture should not be a problem.
Those that do video prefer internally zooming lenses because the balancing point remains constant for use with gimbals or stabilizers. Sony has done their best to make this a nicely balanced lens, but there is no question that the balance point does move when the lens is zoomed out.
The tradeoff is excellent portability and better balance when carrying the lens on a strap or harness.
The diameter of the lens is about 80mm (3.1″)*, which is the same as the previous model. The SEL70200G II retains the 72mm filter thread of the previous lens as well. The weight is 862g (30.4oz)* with the tripod collar attached, or 794g (28oz)* without. *These are my measurements, not official measurements. You can see from the image above that the SEL70200G II is both narrower and shorter than the Tamron 35-150mm, which is also an externally zooming lens.
As noted above, Sony left room for both the narrower 1.4x teleconverter (shown) and the thicker 2.0x teleconverter to be used without issue.
This really expands the versatility of the lens, as you can get up to 280mm (maximum aperture of F5.6) with the 1.4x and up to 400mm (F8) with 2.0x. Sony’s strong optical design in both the lens and the teleconverters mean that the lens remains very sharp even with the TCs attached. This shot is at 280mm, F5.6:
There are 9 aperture blades that help keep the aperture shape circular when stopped down. Geometry across the frame is really good for specular highlights even wide open, F5.6 remains perfect, and you can start to see the shape of the blades by F8:
The minimum focus distances varies through the zoom range, from as little as 26cm (0.86ft) at 70mm to 42cm (1.38ft) at 200mm. This dramatically cuts down the MFD on the first generation lens, which was a full meter (39 inches) and delivered only a 0.13x magnification. The much closer focus distance of the SEL70200G II delivers a 0.50x magnification throughout the zoom range (both 70 and 100mm are shown below), and when I add my 1.4x TC, that magnification climbs even higher to 0.75%.
What I enjoy about this is the ability change up the framing to what best suits the image while still being able to get very close. It should be remembered that MFD is not from the front of the lens, but from the sensor. I measure the lens length from the sensor at 16.7cm at 70mm, leaving less than 10cm as the working distance (about four inches). The lens measures 22.5cm from the sensor at 200mm, but that leaves about 20cm as a working distance (8″), which might prove more practical with some subjects. You can see from these photos that the 200mm position (second image) definitely gives you more space from your subject.
Up close performance is very, very nice, delivering rich images in both color and detail. You can see that depth of field is very shallow at F4 at this “macro” distance.
I use quotes around the word macro, as some debate whether any magnification lower than 1:1 qualifies as a true macro lens, though I’ve certainly seen (and owned) many lenses called macro which had the same 1:2 magnifications as this lens, so I think it is fair for Sony to use that designation.
Sony has upped their game in terms of the physical controls on recent lenses, though this G lenses doesn’t have quite as many as the 70-20mm F2.8 GM II lens. There’s no aperture ring (and thus no declick option or iris lock). But Sony has upped the total of Focus Hold Buttons to 3 here to allow one to easily fall to hand whether shooting in vertical or horizontal modes. This can be programmed to multiple functions from within the camera (my current preference is to control Eye AF so I can prioritize a certain eye).
There is an extensive bank of switches on the left side of the lens barrel. This starts with an AF/MF switch, following by an ON/OFF for the full time DMF (direct manual focus) function. I like this option, as one of my persistent complaints about Sony focus has been that sometimes it is very reluctant to focus on a close foreground object and focus stays “stuck” on a background subject. DMF allows me to quickly override that and pull focus forward, where typically autofocus will then focus without issue on my desired subject.
This is followed by a focus limiter complete with a new third position (Full, 3M to ∞, and Macro). The latter will be very handy when doing close up work to avoid by focus racks as the lens searches for the right focus position. I’m not sure the other positions will be often needed, as autofocus is incredibly fast.
There are two OSS (Optical Steady Shot) related switches that come next: an ON/OFF switch along with 3 OSS modes (1 Standard | 2 Panning | 3 Active – prioritizes stabilization of image capture rather than viewfinder).
The bottommost switch will be more easily accessed when either the tripod collar is removed or rotated to a vertical orientation.
I felt like the OSS worked better here than on the 70-200 GM II that I reviewed earlier in the year. I was able to get fairly consistently stable results at 200mm and 1/3rd of a second on my a7RV. That’s nearly six stops of assistance, which is great. The viewfinder also stayed very stable throughout the process as well, which really helps to do handheld macro work.
Don’t expect successful macro shots at handheld shots with shutter speeds that low, but I did find it easy to get nice handheld macro shots due to the excellent OSS:
Since this is an externally zooming lens, it needed a zoom lock switch, which Sony included. It can only be locked at the 70mm position, and I found that I did need it when hiking with the lens. The problem was not with zoom creep in general, but because movement would eventually cause friction on the zoom ring and cause it to extend.
The tripod collar is easily removed by loosening a tension knob and pulling the two sections apart. That same tension knob at lower levels allows you to rotate the tripod collar for shooting in a vertical positions There are markings but not detents at the cardinal positions. I have only one real complaint here, and that is that the tripod foot is not Arca compatible, so you will have to add a quick release plate before mounting it on a tripod.
The zoom ring is located nearest the camera body, and it is ribbed and rubberized. As noted, it moves very smoothly for an externally zooming lens, with no hitches or spots of uneven tension. A full zoom from 70-200mm takes roughly 90° of rotation.
The manual focus ring is located near the front of the lens. It is slightly narrower but has a similar ribbed design. Focus action is smooth but very light – not a lot of feel.
I appreciate the fact that the lens hood is color matched to the lens. Sometimes these “white” lenses come with a black hood, and it never seems like the hood was actually made for the lens. Sony has shifted to a petal shaped hood here, which is more rare on a telephoto lens. It does help reduce the overall size of the hood.
This smaller, lighter lens is a better balance for Sony’s smaller than average camera bodies. I really, really enjoyed using this lens and appreciated the excellent ergonomics and overall form factor of the lens. Sony’s 70-200mm F2.8 GM II is an outstanding lens, but the more than $1000 difference in price will help make this F4 version more appealing to those that decide that they can live without an F2.8 aperture.
Sony 70-200mm F4 Macro G II Autofocus Performance
An area where Sony is able to create a distinct advantage for its lenses is in the realm of autofocus. They has employed four!! XD (extreme dynamic) Linear Motors to the autofocus system here with one pair of motors on each side of the focusing group. This provides blazingly fast autofocus speeds that can keep with pretty much any kind of action. Sony also limits their top burst speeds on their sports cameras like the Alpha 1 or a9 series to Sony lenses, so I can get a full 30FPS with the SEL70200G II and my Alpha 1 whereas I would be limited to 15FPS if using a third party lens instead. I had no problem keeping up with basketball action during long bursts on my A1:
I got down low and shot through grasses to get this delightful shot of Nala with a little bit of a snarl on her face.
I was also extremely impressed by this shot, as focus ignored the tangled brush and fence in the foreground, the hairs from the mane hanging over the eyes, and nailed focus on the heavily shadowed eye perfectly.
Portrait and wedding photography will be a breeze with this lens and a decent camera body. It just nails focus on the eye:
I brought the lens along to a wedding of some friends, and every shot was perfectly focused.
The newest Sony cameras like the a7RV have insect detection mode, and that works nicely for nailing focus on one of my honeybees.
On the video front, video pulls are quick, quiet, and confident as you might expect with a first party Sony lens equipped with 4 focus motors. There is a very small amount of focus breathing and when I tested it on the a7RV and turned on the “Focus Breathing Compensation” setting there is a mild improvement and at very little crop because of the low amount of breathing to begin with. I would call the amount of focus breathing fairly good. The lens also performed well (as expected) in my “hand test”, quickly transitioning back to tracking my eye after I blocked visibility of my eyes with my hand towards the lens.
My general focus results were excellent. Focus is incredibly snappy and precise, and that allows the amazing optics to shine. Autofocus is a definite strength here.
Bottom line is that we have a top notch focus system here that is able to keep up with the most demanding photography or video scenarios.
Sony SEL70200G II Image Quality
At this stage I have come to expect that Sony’s new lens releases are typically going to be pretty fantastic optically, and I’m certainly not disappointed here. The quality of the optical design shines through in images that look great right out of the camera. Some lenses require some processing to give images sparkle, but this is a lens that will make you feel like you really don’t need to do much editing work at all. Here’s a RAW image with basically no edits other than my import sharpening.
I was just happy with the look of images, period, so prepare yourself for a fairly glowing section here.
Longitudinal chromatic aberrations (LoCA) typically show up as purple/magenta fringing before the plane of focus and blue/green fringing beyond the plane of focus due to colors not being perfectly focused together. They typically diminish as the lens is stopped down to smaller apertures. You can see in this image that there is no visible LoCA in either my real world or chart tests:
Lateral chromatic aberrations (LaCA) show up as fringing on either side of contrast areas (like tree trunks, for example) along the edges of the frame. Unlike LoCA, they do not improve when stopping the aperture down, but are much easier to correct for (typically a one click “remove chromatic aberrations” box in editing software). We can see once again that there is no evidence of any fringing near the edges of the frame. The transitions from dark to light are nice and clean.
Next we will take a look at distortion and vignette. Below you will see a series of images.
70mm uncorrected
70mm manually corrected
135mm uncorrected
200mm uncorrected
200mm manually corrected
280mm (with 1.4x) uncorrected.
Now, to parse that data: throughout the zoom range there is some pincushion style distortion. It is mild at 70mm (-5 to correct), more pronounced at 135mm (-9 to correct), and remains at the same level at 200mm (-9 to correct). What’s interesting is that adding the 1.4x TC obvious would create some barrel distortion, but in this case it actually just serves to correct the pincushion distortion and the end result is almost distortion free (I used a max of -1 to correct). Throughout the zoom range the distortion is quite linear and easy to correct cleanly. No big deal.
Vignette is also not a significant issue. It was strongest at 70mm, where I used a +38 to correct (about a stop and a half in the corners), but it dropped to a +22 at 135mm (one stop) and a +12 at 200mm (about a half stop). It was actually even lower with the 1.4x attached (+7), which would make this some of the lowest vignette I’ve ever seen on a zoom lens. These tests also show the SEL70200G II takes teleconverters (at least the 1.4x) very, very well.
So how about sharpness? This is the first lens I’ve tested using my new 61MP Sony a7RV for this series of tests, which increases the optical demands from the 50MP of the Alpha 1 that I usually run my tests on. Here’s a look at the test chart:
And here are the 70mm F4 crops at about 175% magnification, taken from the center, then mid-frame, and then extreme lower right corner:
This is a lens that handles the 61MP resolution point with aplomb. It is delivering exceptional sharpness everywhere in the frame, and is also delivering exceptionally good centering – every corner looked equally sharp. Exceptional.
When a lens is this good wide open, there isn’t a lot of room for improvement when it is stopped down. Comparing F4 and F5.6 showed virtually equal results everywhere save in the extreme corners, where I saw a mild uptick in contrast. F8 showed about the same result, though down just a percentage point or two due to the effects of diffraction.
Minimum aperture is F22, but by then diffraction has really raised its ugly head. The image is very soft; diffraction on high resolution cameras makes using apertures smaller than F11 just not worth it.
Real world results at most apertures at 70mm are just fantastic: great detail, great color, and no real optical flaws.
The performance at 100mm is very similar. I would say that the center and mid-range are about 1-2 percentage points lower, but the corners are a good 10% better.
135mm brings the highest performance yet, and while 70mm might still be the very slight winner in the center of the frame, the mid-frame and corners are incredibly good.
Real world results in the middle of the zoom range look gorgeous. Great detail, great color, and lovely bokeh:
At 200mm the results are about the same as at 100mm, so just a fraction off the high point at 135mm, but still exceptionally good. Once again most of the sharpness is available right at F4, with only a very mild improvement at F5.6:
Real world results look great.
That’s true at macro distances as well, where you can get great detail.
The big question is how the SEL70200G II handles teleconverters. I don’t have a 2.0x TC (not a huge fan of 2.0x TCs), but I do own the Sony 1.4x. There’s always some impact to image quality for the simple reason that you are adding 6 additional elements to the optical performance, resulting in some loss of light and the potential of more aberrations. As you can see from the image below, there is some mild softening of the image and less contrast, but the end result is still sharper than most lenses.
Real world images pack plenty of punch at 280mm:
If you are shooting with one of Sony’s higher resolution bodies, you can switch to APS-C mode and get up to 420mm equivalent reach, which obviously further extends the potential usefulness of the lens.
The bokeh from the lens is beautiful as well. At close distances it will completely blur out a background:
At medium distances the depth of field isn’t as shallow as an F2.8 lens, but the bokeh is still gorgeous.
If I shoot in the middle of the zoom range the bokeh quality is still excellent:
The truth of the matter is that many people can get by with an F4 telephoto lens. Depth of field is already quite shallow at many focus distances. The limiting factor is more shooting in lower light situations, though most modern Sony cameras do fairly well at higher ISO values.
Flare resistance is also quite good due to excellent coatings. I saw little impact from the sun other than some very mild prismatic veiling.
As you’ve probably seen throughout this review, the lens also produces excellent color. As noted, I felt like most images needed little to no processing. They just came out looking great.
Bottom line: there’s nothing really to complain here about. Not only is the SEL70200G II very versatile, but it is high performing at all those various tasks that it can accomplish. If you would like to see more images, check out my image gallery here.
Conclusion
I don’t need the Sony FE 70-200mm F4 Macro G OSS II. I’ve got the focal range well covered. But this is a lens that works so well that it makes you question if maybe, just maybe, you do actually need it. The SEL70200G II has few flaws and a long list of strengths. I love the packing, the versatility, and obviously the macro capabilities.
One area that I haven’t yet dealt with is the strength of the lens as a landscape option. Most people think wide angle lenses for landscapes, but often the “big scenes” actually work better with a telephoto lens. The ability to tap into the different focal lengths available here along with the great detail, contrast, and color makes this a really great landscape lens, and even more so because it packs quite easily.
This is a lot of lens, and I think it will work for a lot of different photographers. It is much more affordable than the incredible but incredibly expensive FE 70-200mm F2.8 GM II, which might make it a more realistic target for many photographers at the roughly $1700 price point. Sony is well into its second generation cycle for lens development, and the lessons learned over the last decade are clearly evident. Sony’s newest lenses are simply some of the best lenses I’ve ever tested, making new releases a joy to spend time with as a reviewer. The same will be true for those own the SEL70200G II. It’s fantastic.
Keywords: Sony, Sony 70-200mm, 70-200mm, F4, G, OSS, Macro, II, Sony 70-200 II Review, FE 70-200mm F4 Macro G OSS II, 1.4x, TC, Full Frame, Review, Sony Alpha 1, Sony a7IV, Sony a7RV, Review, Hands On, Dustin Abbott, Real World, Comparison, Sharpness, Bokeh, Flare Resistance, Autofocus, Image Quality, Sample Images, Video, Photography, Sony a9, Sony A1, let the light in, #letthelightin, DA
DISCLAIMER: This article and description contains affiliate links, which means that if you click on one of the product links, I’ll receive a small commission. As an Amazon Associate I earn from qualifying purchases.
Sony just keeps hitting one home run after another. Their newest lens – the Sony FE 70-200mm F4 Macro G OSS II (or SEL70200G II) – is one of the most versatile telephoto lenses I’ve ever used. Perhaps that’s why the name has to be so long; this lens does a LOT of things. It covers the popular 70-200mm focal range, which covers from this:
to this at 200mm:
It delivers 1:2 macro all across the zoom range, allowing you to get ever closer as you move from 200mm towards 70mm, allowing you to get beautiful macro-like shots…like this one of tiny budding blackberries.
What’s unique about this is that it gives you a lot of different framing options, and the ability to get slightly different macro style shots at different focal lengths – not to mention the flexibility for video footage as you don’t really have to work about getting too close to the camera. It has updated OSS (Optical Steady Shot), which further enhances the ability to get stable video and photos without the need of a tripod. It’s smaller and lighter than the first generation 70-200mm F4, but unlike the Canon RF 70-200mm F4, it retains the ability to use teleconverters…which also allows you to get even higher macro performance (0.75x with a 1.4x TC [shown below] and 1:1 macro with a 2.0x TC).
The Tamron 35-150mm F2-2.8 VXD has stood out to me as being perhaps the most versatile lens on the Sony platform, and in some ways that’s still true (focal range and aperture), but this new Sony 70-200mm F4 Macro G is even more versatile in other ways. This is an incredibly useful lens that can do a lot of things well…and it might mean that you skip buying a macro and use this lens for even more things. Should the 70-200G II go to the top of your wishlist? You can judge for yourself by either watching my video review below or reading my text review, or just enjoy the photos below.
Thanks to Sony USA for sending me a pre-release review loaner of this lens. As always, this is a completely independent review. *The tests and most of the photos that I share as a part of my review cycle have been done with the Sony a7RV along with the Sony Alpha 1 that serve as my benchmark cameras for Sony lenses.
Keywords: Sony, Sony 70-200mm, 70-200mm, F4, G, OSS, Macro, II, Sony 70-200 II Review, FE 70-200mm F4 Macro G OSS II, 1.4x, TC, Full Frame, Review, Sony Alpha 1, Sony a7IV, Sony a7RV, Review, Hands On, Dustin Abbott, Real World, Comparison, Sharpness, Bokeh, Flare Resistance, Autofocus, Image Quality, Sample Images, Video, Photography, Sony a9, Sony A1, let the light in, #letthelightin, DA
DISCLAIMER: This article and description contains affiliate links, which means that if you click on one of the product links, I’ll receive a small commission. As an Amazon Associate I earn from qualifying purchases.


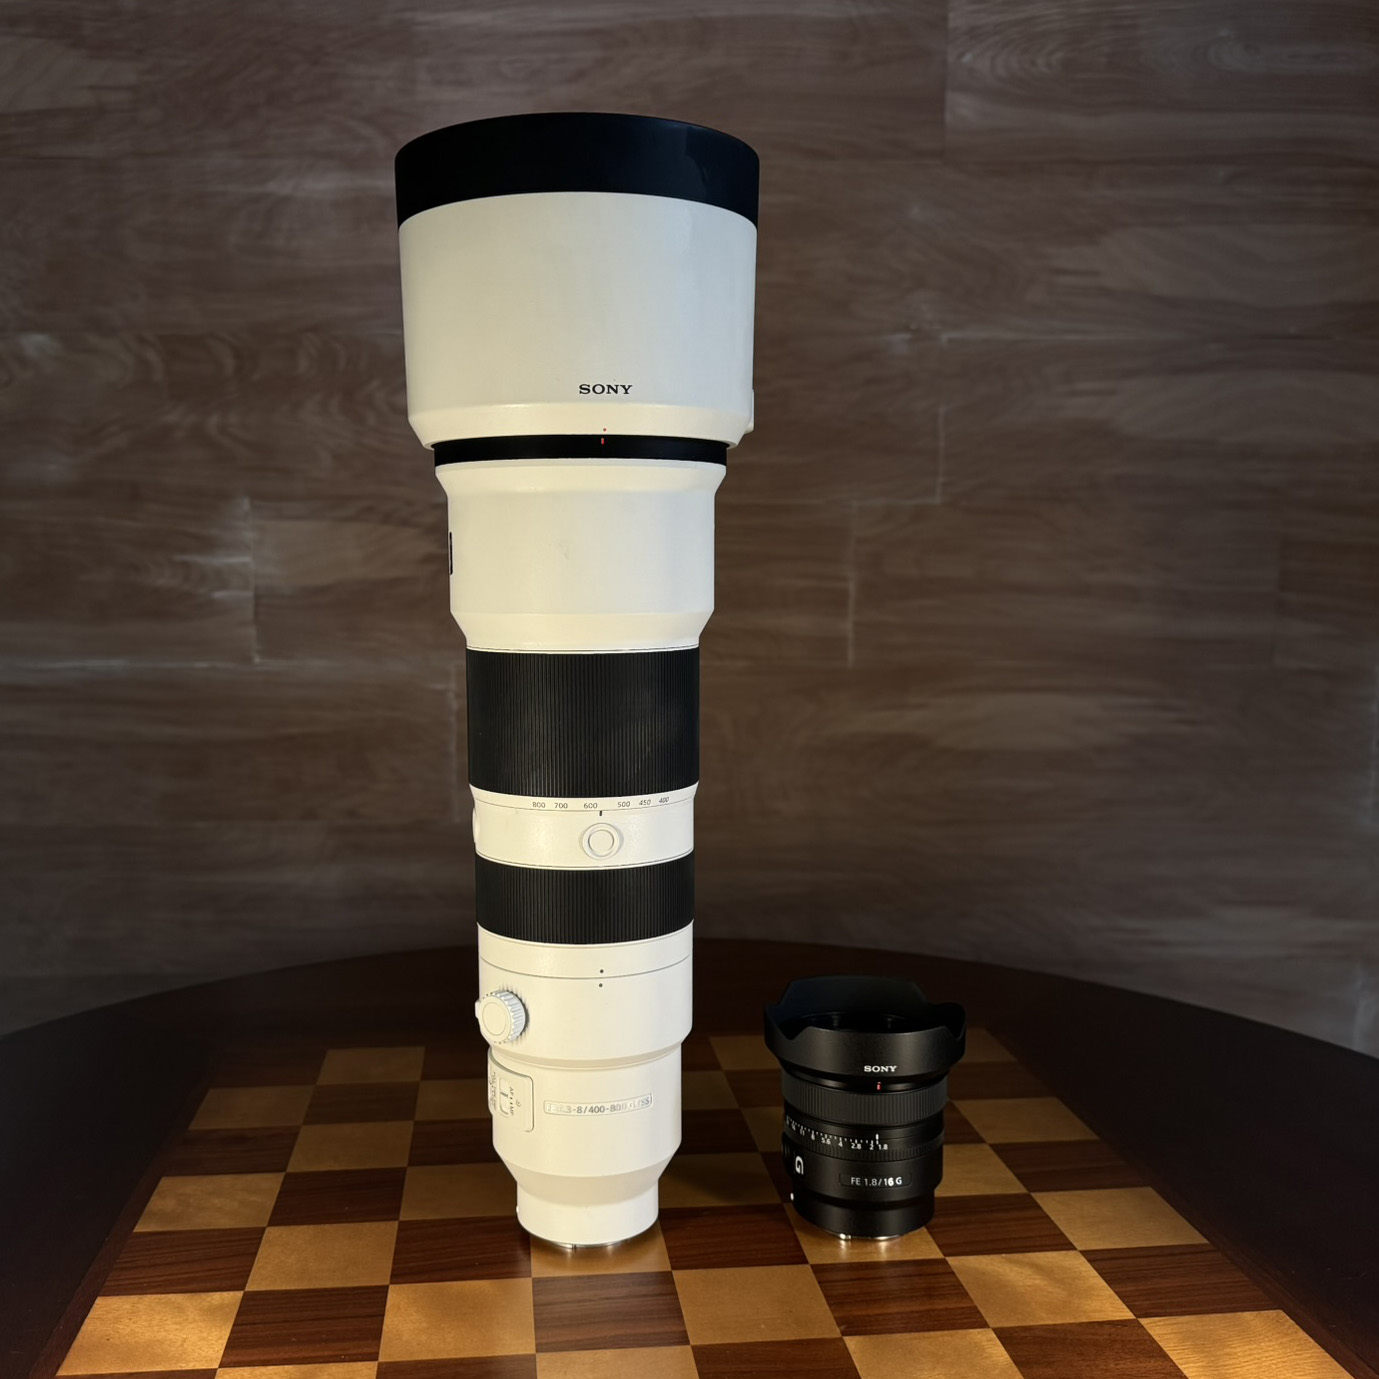


 Nikon Z 50mm Showdown – F1.4 vs F1.8 S
  Sony 50-150mm F2 GM vs Tamron 35-150mm F2-2.8
  Nikkor Z 50mm F1.8 S Gallery
  Nikkor Z 50mm F1.8 S Review