What do people want in a small, portable camera? A fixed prime lens and a camera high on style, like Fuji’s X100VI that I reviewed earlier this year? Or Sony’s own ZV-1 II camera with a fixed zoom lens? But Sony also has the third option covered, and that is a compact vlogging oriented camera with a more typical interchangeable lens mount. The Sony EV-10 II is Sony’s second generation vlogging specific interchangeable lens APS-C mirrorless camera. The main improvements are the upgrade to the 26MP sensor found in the a6700 (from the 24M sensor of the original EV-10), improved autofocus, much more robust video specs, and an upgrade to the common NP-FZ100 battery found in most of Sony’s better cameras. Does all of this add up to a camera worth considering? Find out my full thoughts in my video review below , read my full text review, or just enjoy the photos in the galleries below.
Thanks to Sony for sending me a review loaner of this camera. As always, this is a completely independent review. All thoughts and opinions are my own.
And what are the main things that are missing that people will be looking for?
No viewfinder
No IBIS
Bottom line: at a price tag of right under $1000 for the camera alone ($1100 with the PZ 16-50mm lens), this is the cheapest camera to get Sony’s new 26MP sensor and updated AF system. My experience says that you can get cheaper CAMERAS from other brands, but if you are interested in using more than one or two lenses, nothing beats Sony E-mount for lens selection and thus lower costs in the long run.
Keywords: Vlog, Sony, EV-10 II, EV, 10, II, Sony EV-10 II Review, APS-C, Video, YouTube, Review, Hands On, Dustin Abbott, Real World, Comparison, Sharpness, Bokeh, Flare Resistance, Autofocus, Image Quality, Sample Images, Video, Photography, let the light in, weathersealing, #letthelightin, DA
DISCLAIMER: This article and description contains affiliate links, which means that if you click on one of the product links, I’ll receive a small commission. As an Amazon Associate I earn from qualifying purchases.
What do people want in a small, portable camera? A fixed prime lens and a camera high on style, like Fuji’s X100VI that I reviewed earlier this year? Or Sony’s own ZV-1 II camera with a fixed zoom lens? But Sony also has the third option covered, and that is a compact vlogging oriented camera with a more typical interchangeable lens mount. The Sony EV-10 II is Sony’s second generation vlogging specific interchangeable lens APS-C mirrorless camera. The main improvements are the upgrade to the 26MP sensor found in the a6700 (from the 24M sensor of the original EV-10), improved autofocus, much more robust video specs, and an upgrade to the common NP-FZ100 battery found in most of Sony’s better cameras. Does all of this add up to a camera worth considering? Find out my full thoughts in my video review below or read on in my text review.
Thanks to Sony for sending me a review loaner of this camera. As always, this is a completely independent review. All thoughts and opinions are my own.
And what are the main things that are missing that people will be looking for?
No viewfinder
No IBIS
Bottom line: at a price tag of right under $1000 for the camera alone ($1100 with the PZ 16-50mm lens), this is the cheapest camera to get Sony’s new 26MP sensor and updated AF system. My experience says that you can get cheaper CAMERAS from other brands, but if you are interested in using more than one or two lenses, nothing beats Sony E-mount for lens selection and thus lower costs in the long run.
Build and Handling
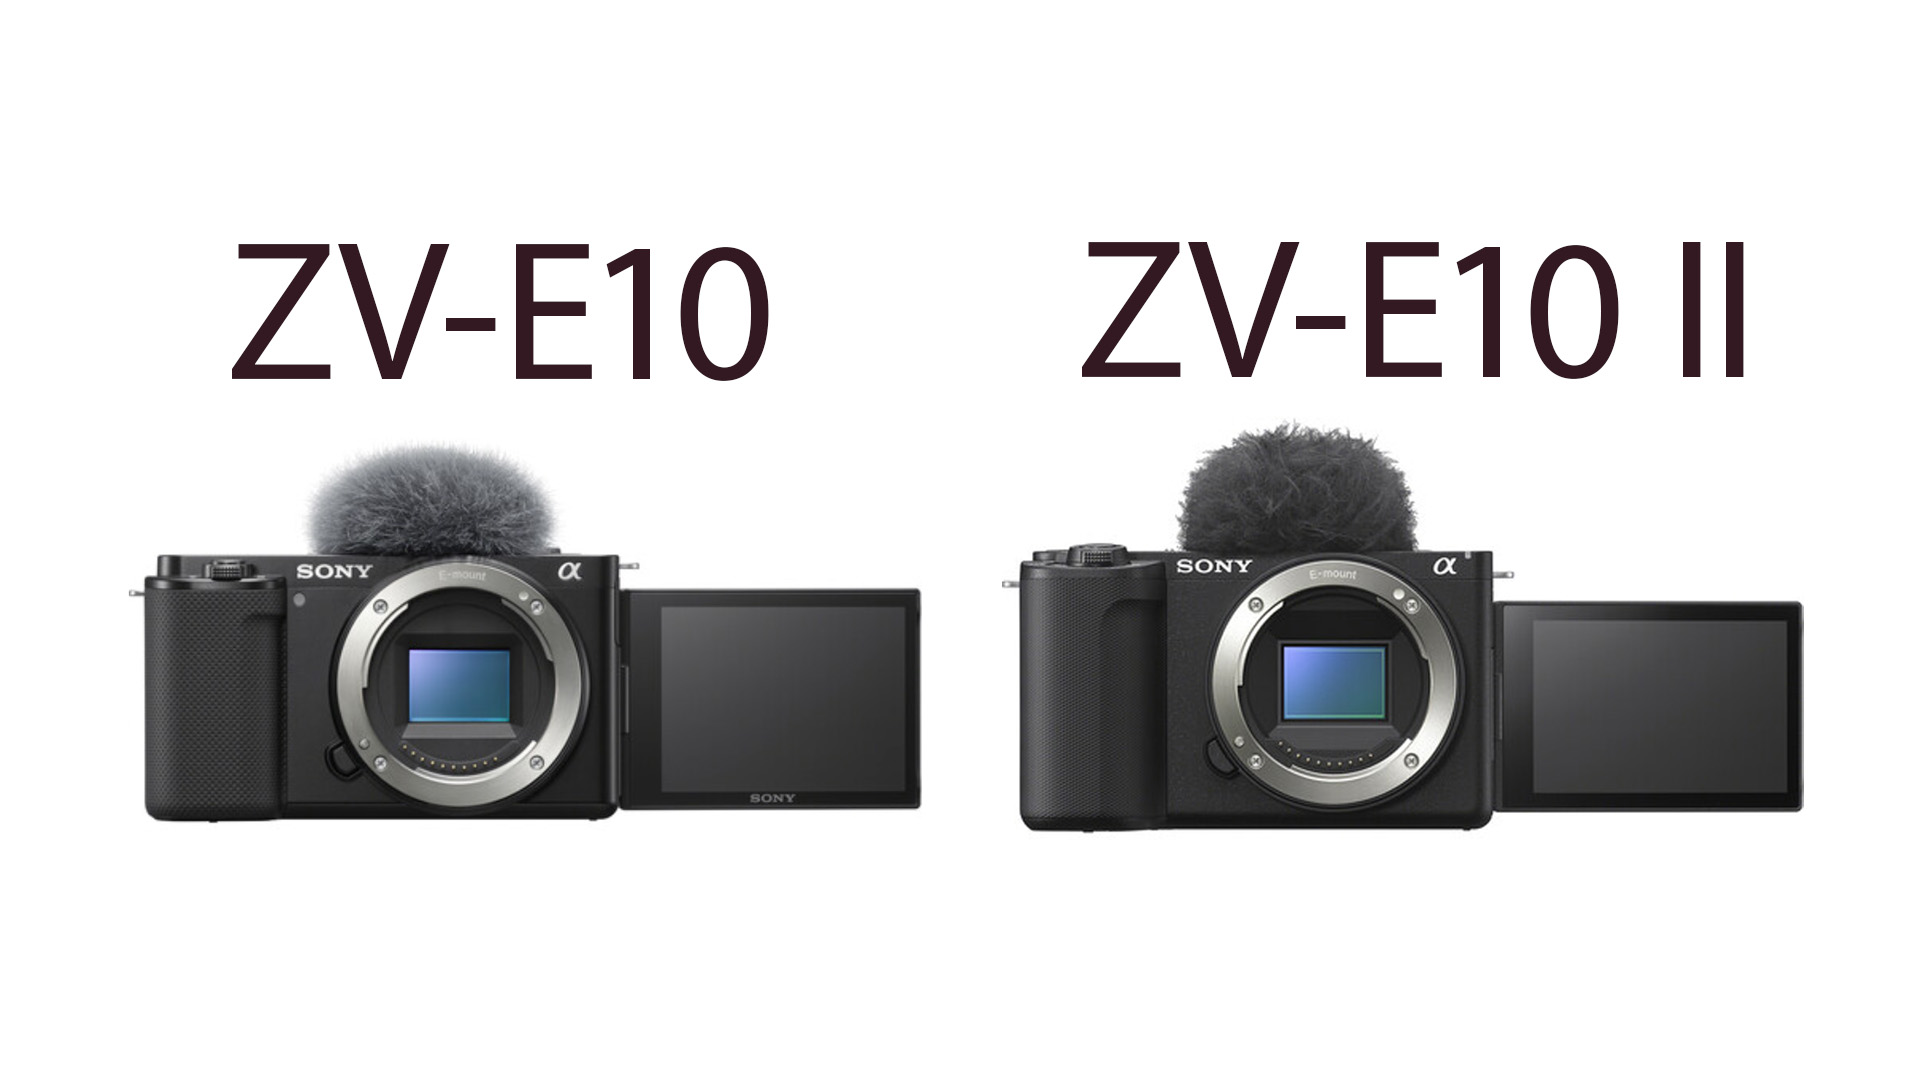
The ZV-E10 II is a very compact and lightweight camera, though it has grown a little bit since the original ZV-E10. The dimensions are 114.8 x 67.5 x 54.2 mm (w x h x d), or 4.5 x 2.7 x 2.1″. The width is the same as the first generation camera, but the height has grown by 3mm and depth by 5.5mm. This is mostly to accommodate a very positive change – the swap from the smaller NP-FW50 battery (1080mAh) to the larger NP-FZ100 battery (2280mAh) employed in their better cameras.
The weight of the camera with the battery and memory card inserted rises a bit, from 343g to 377g (13.3oz). There are always two perspectives about this kind of change, as for some people their absolute priority is to go as small and light as possible. But this change increases the rated number of shots from the ZV-E10’s 440 shots and 80 minutes of actual video recording to 610 shots and (perhaps more important in a vlogging camera!) 130 minutes of actual video recording time in the ZV-E10 II. That’s an additional 50 minutes of video recording, and while it is often fairly easy to swap batteries when shooting stills, having to swap batteries during long format video recording can be disastrous. Having a spare battery or two is still a good idea, but there’s no question that you’re better off with this level of battery life if you were going out for a day in a new city while traveling or vlogging. It’s much more likely that 130 minutes of recording time would get you through the day if you just had a camera on a strap around your neck than 80 minutes.
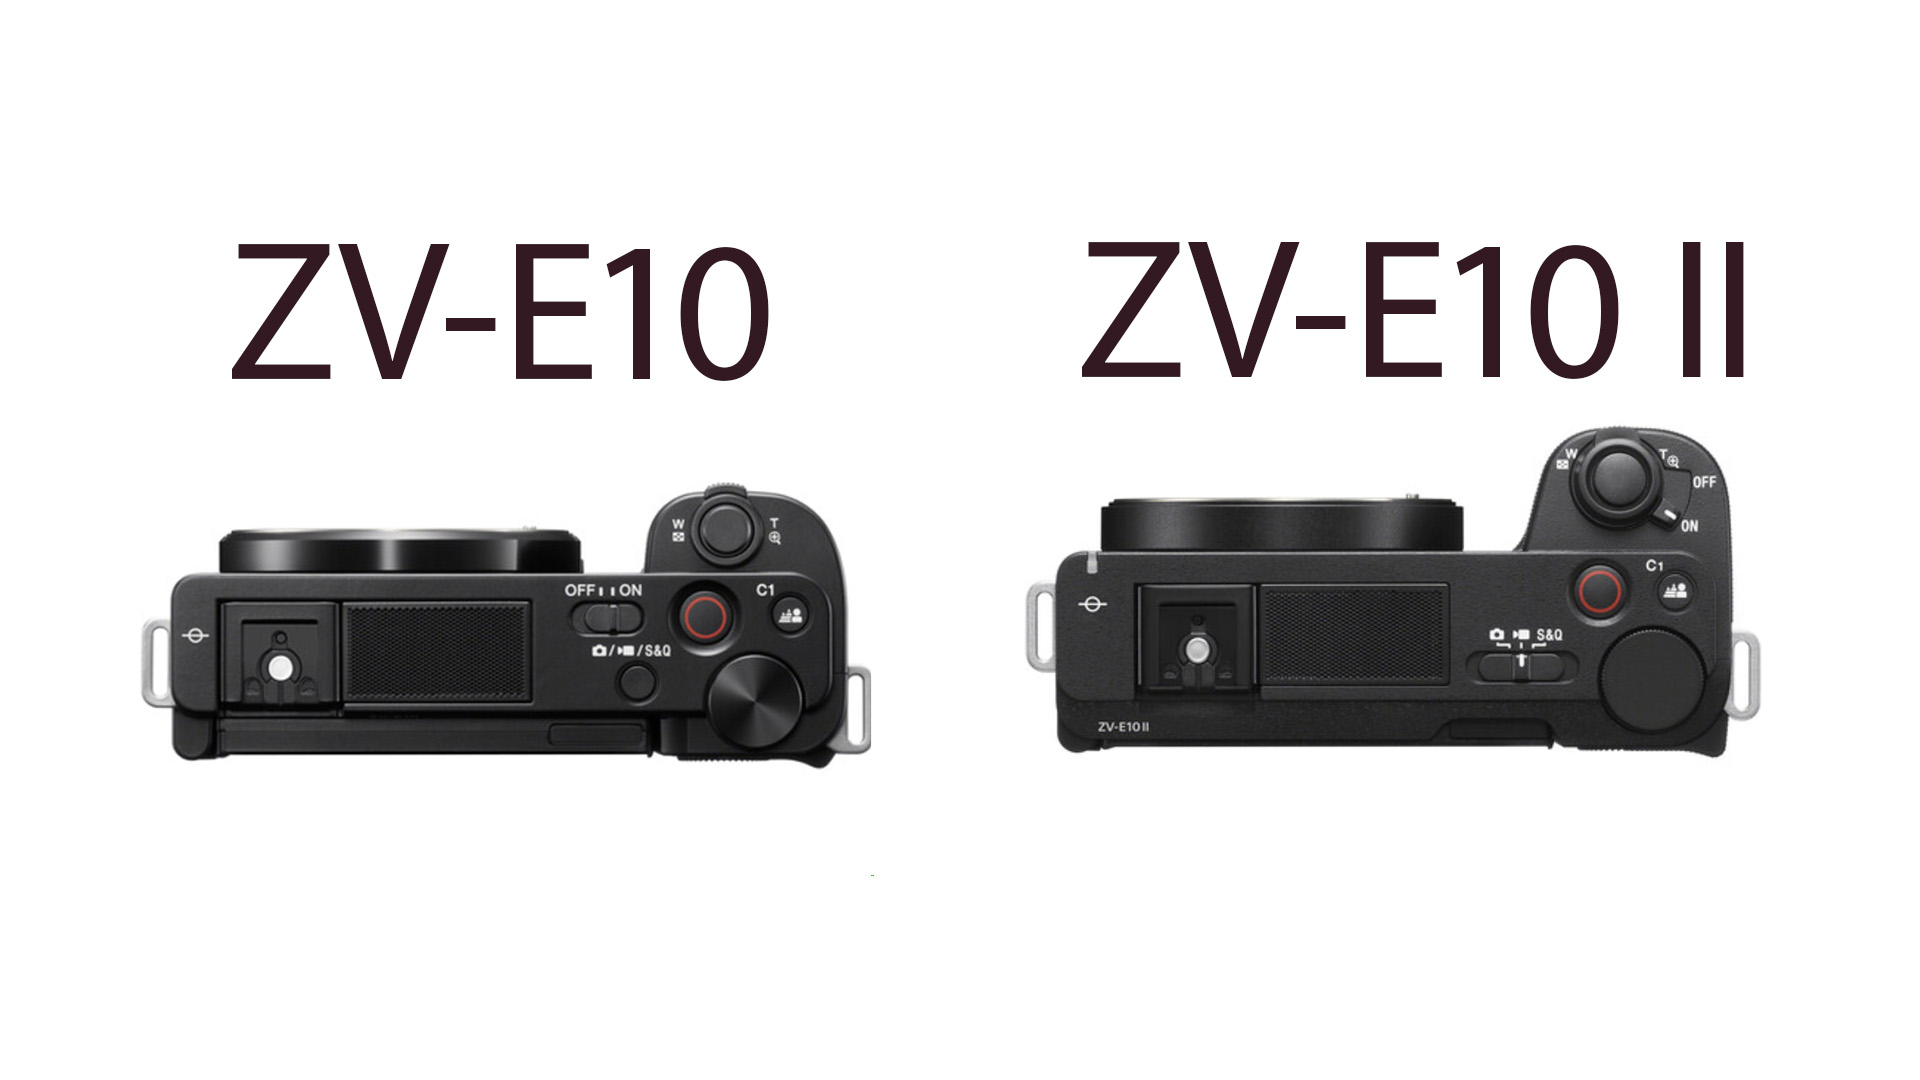
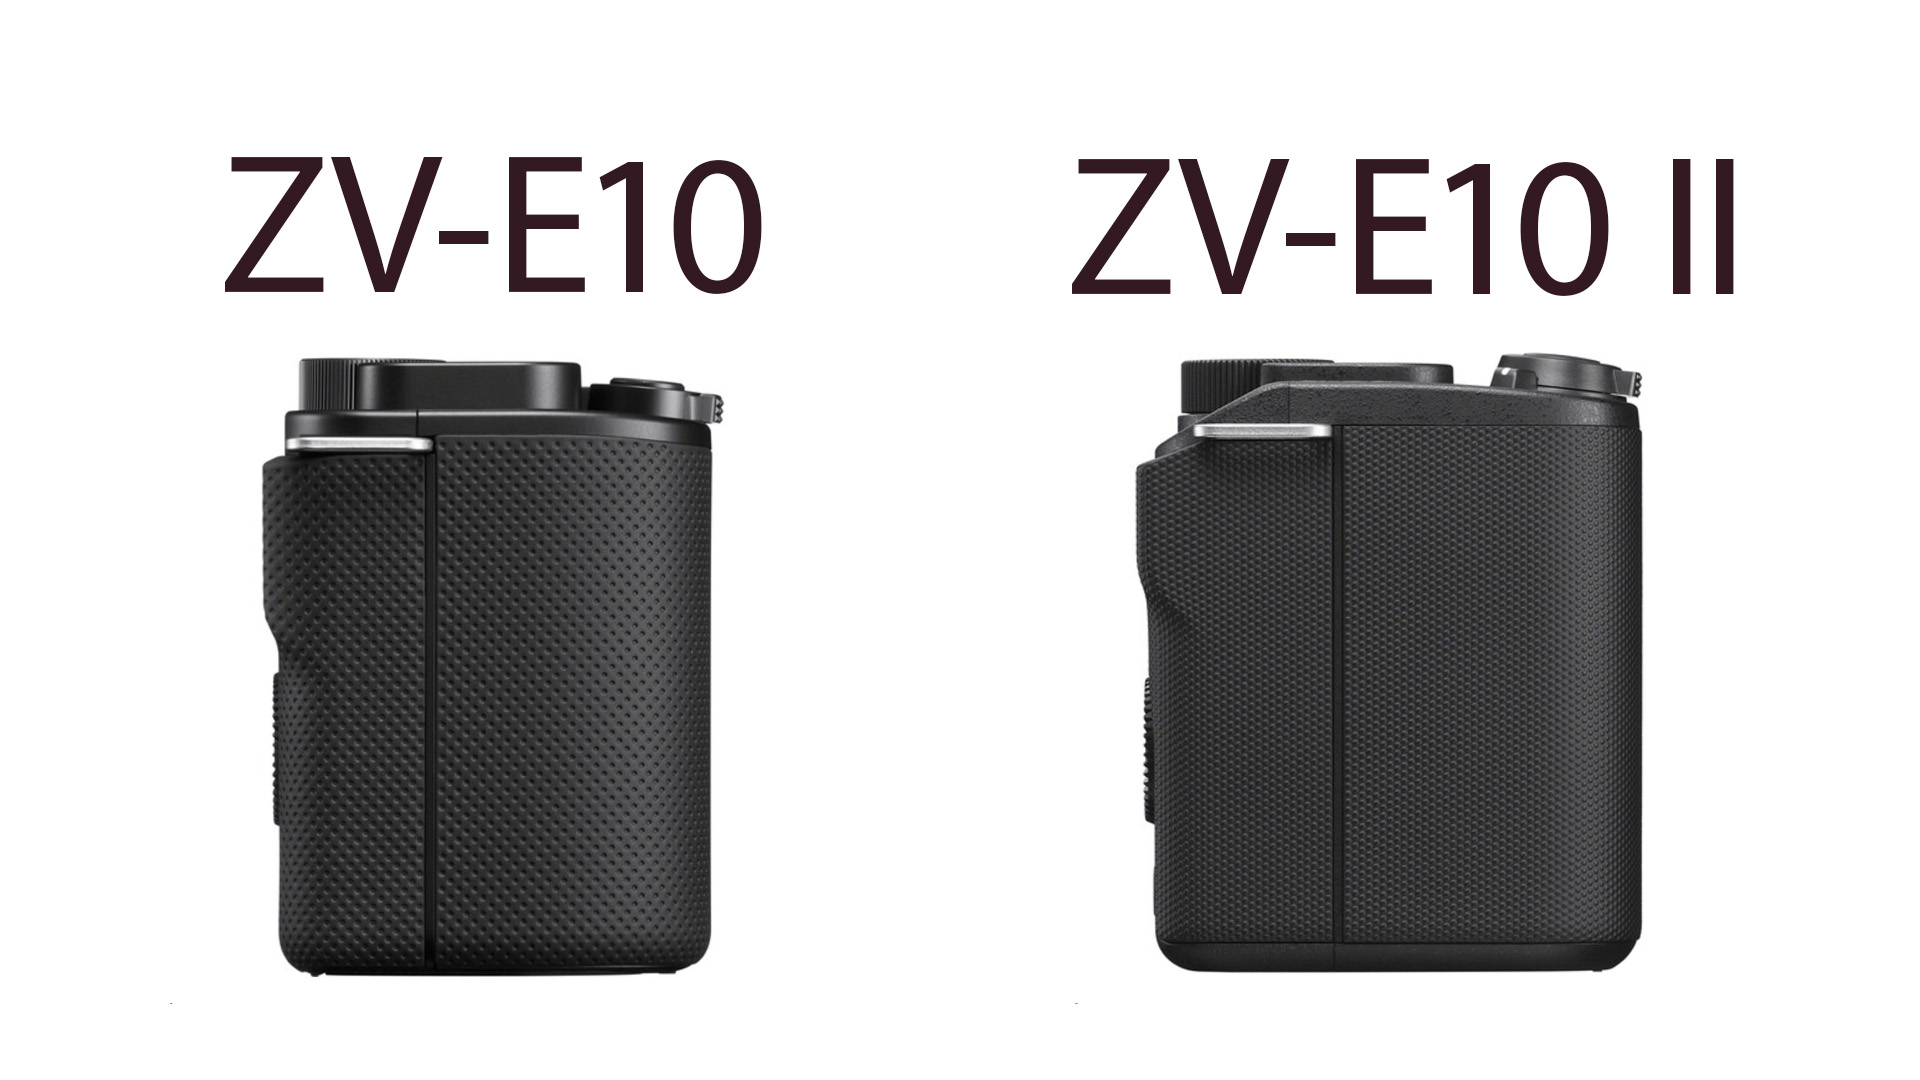
The secondary takeaway from this is that you get a much more robust grip than you did on the ZV-E10. You can see that the original grip is rather small, while the ZV-E10 II has a more accommodating grip that gives more space for the fingers to wrap around it. I found that the camera still wasn’t tall enough to accommodate my hands (my pinky has to wrap underneath), but my other fingers were comfortable on the grip.
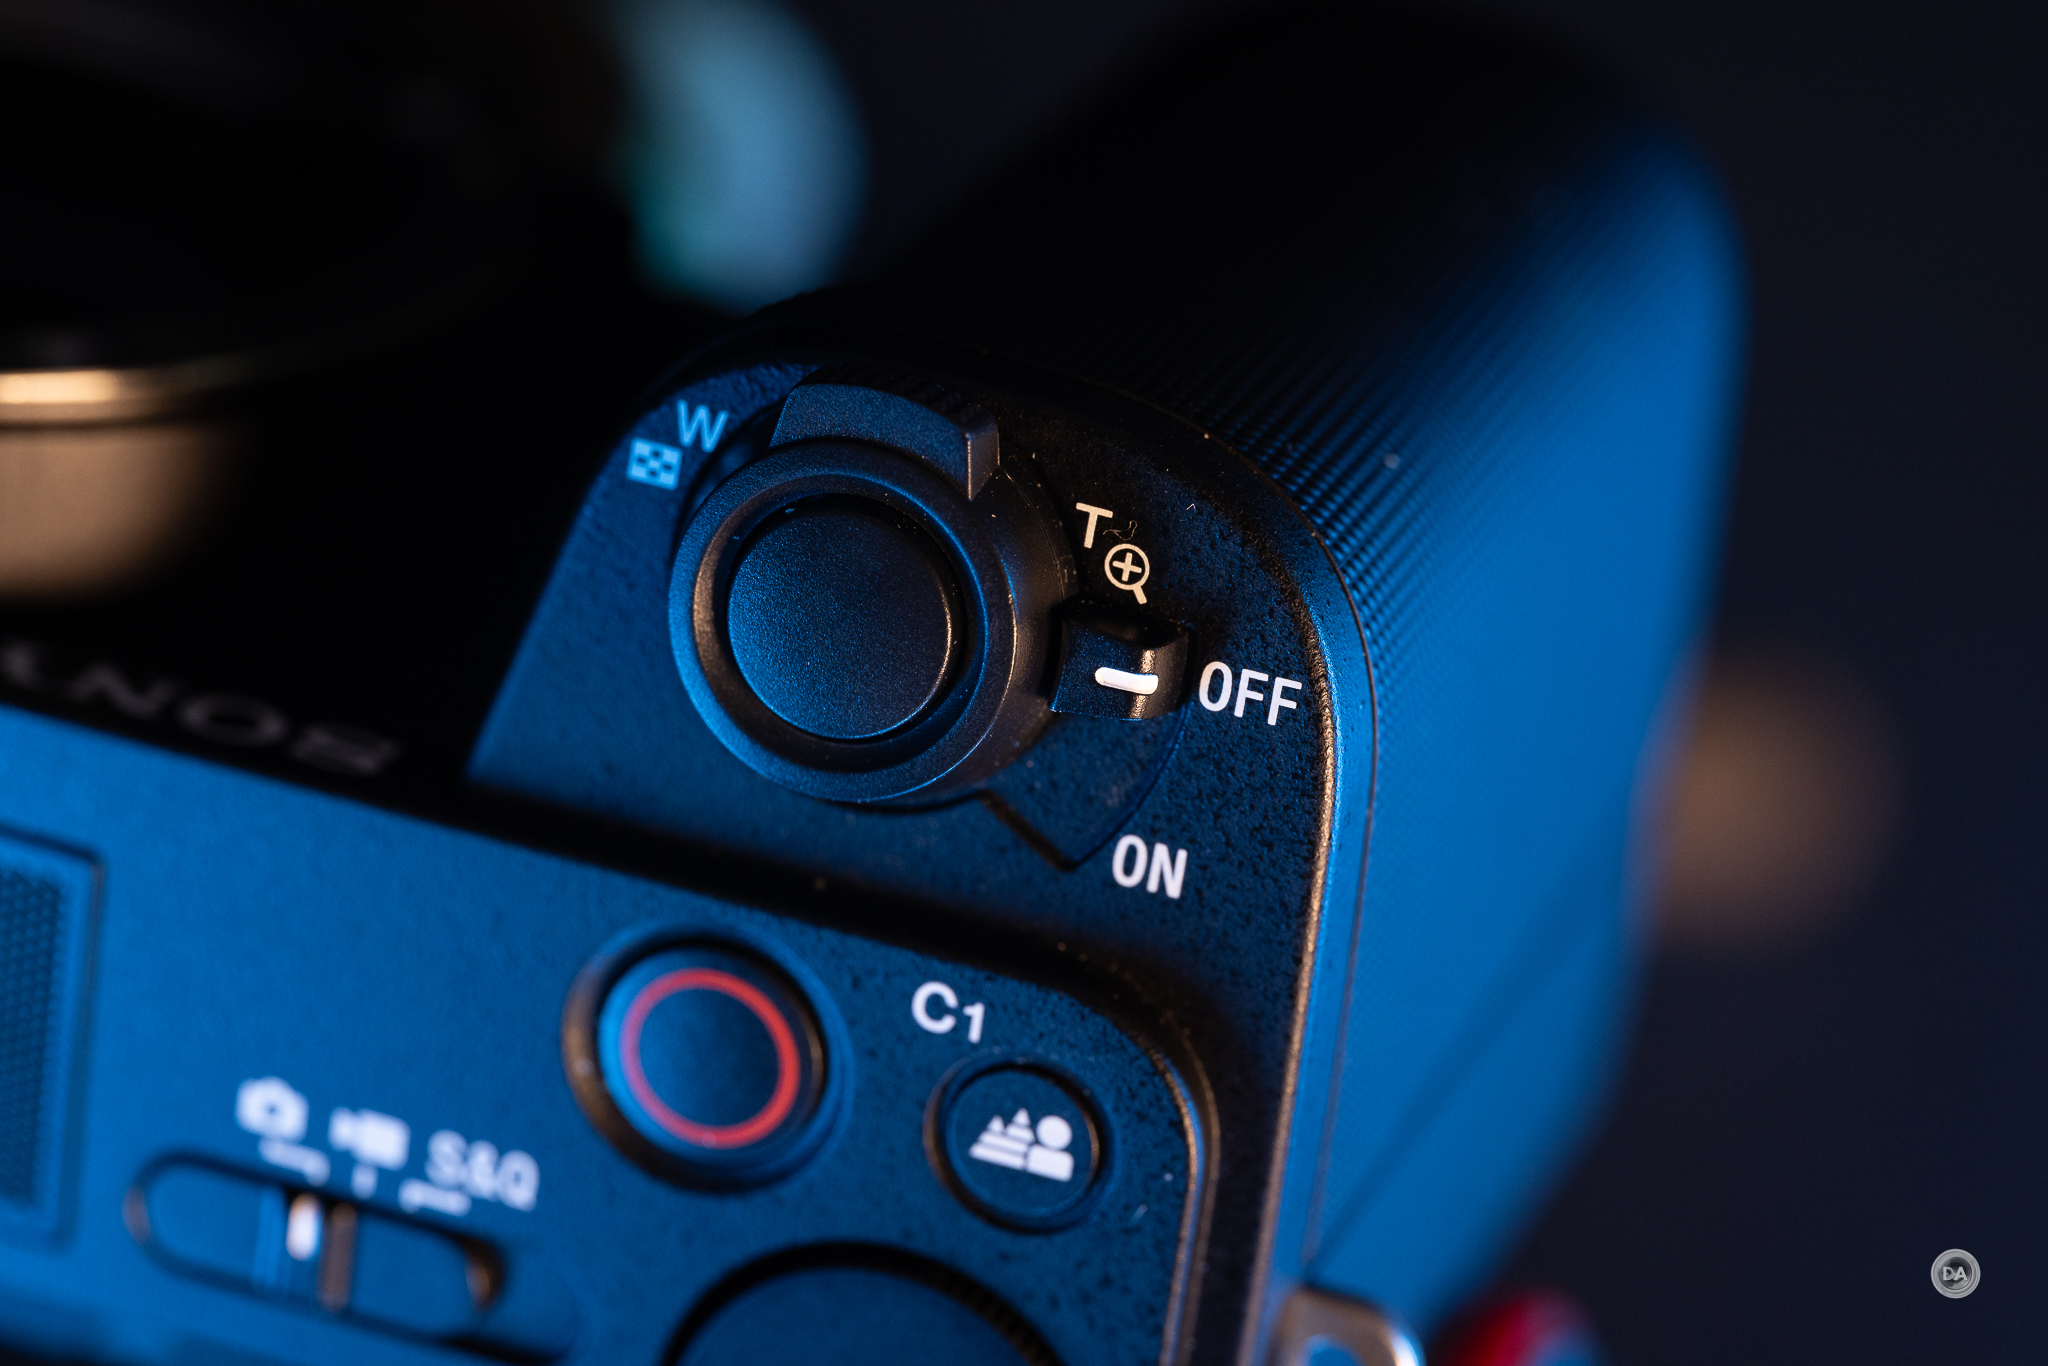
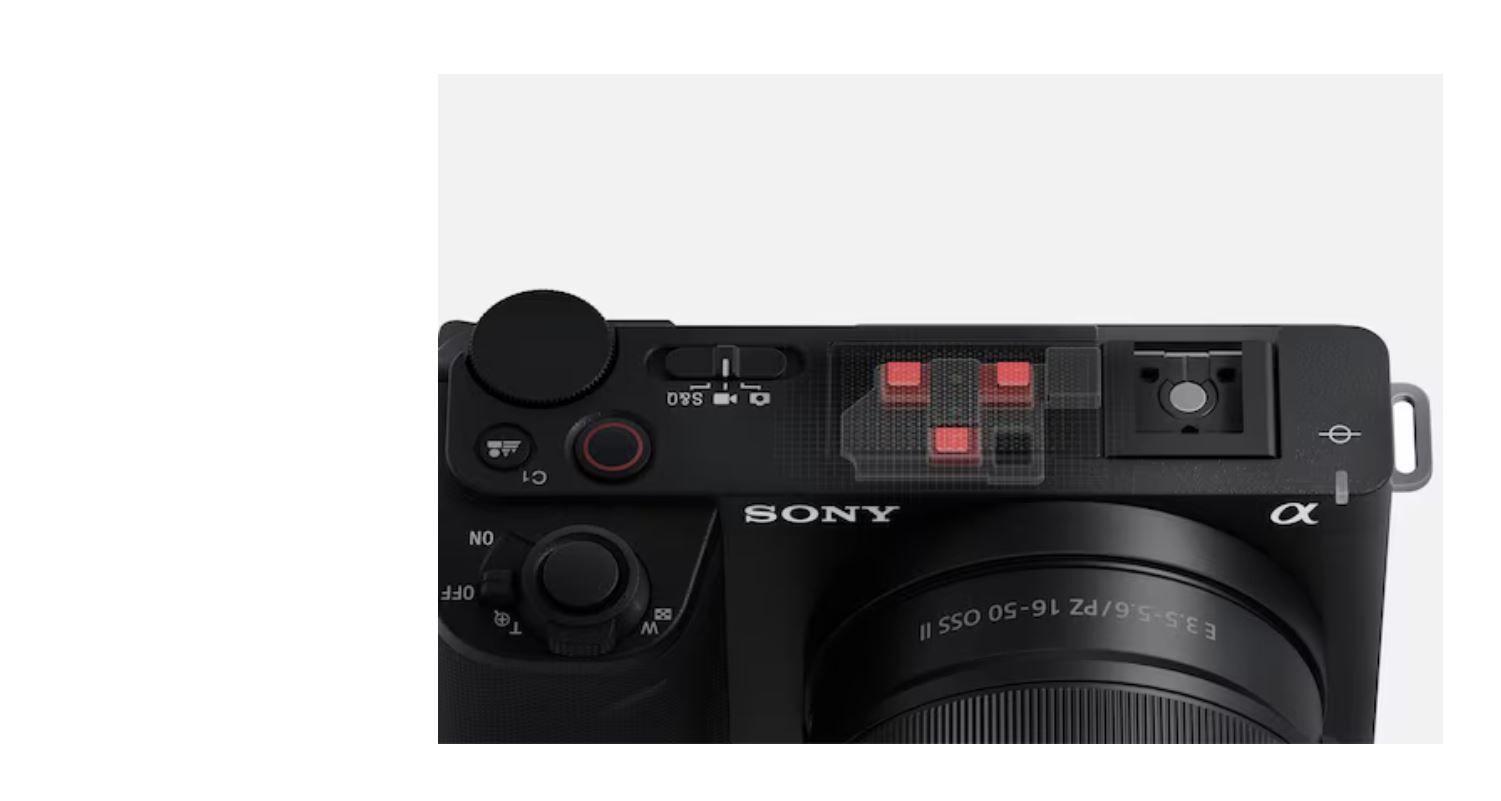
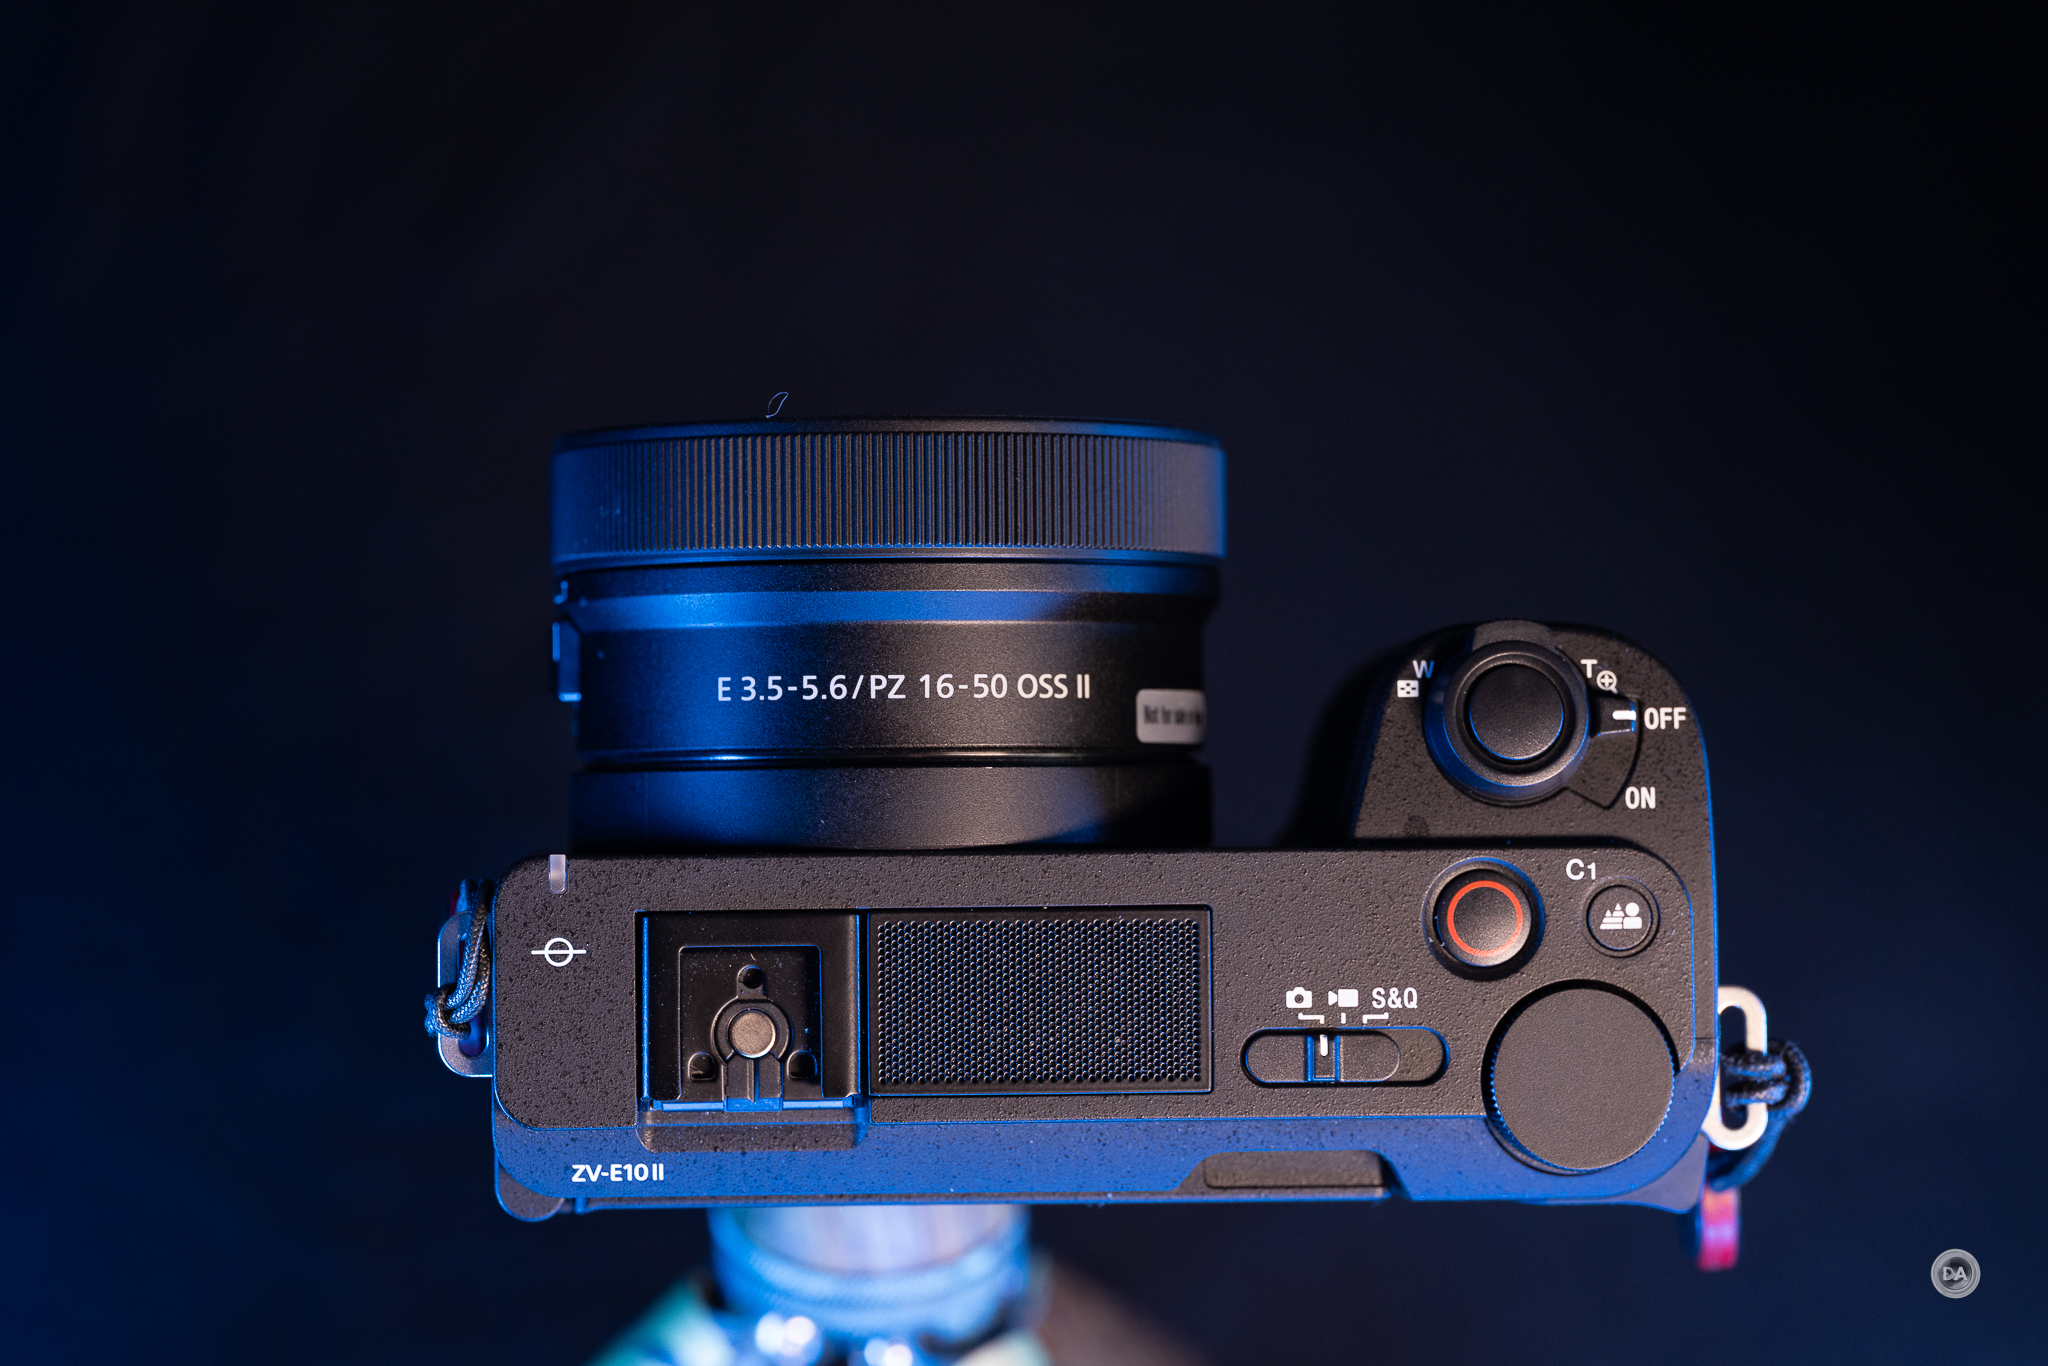
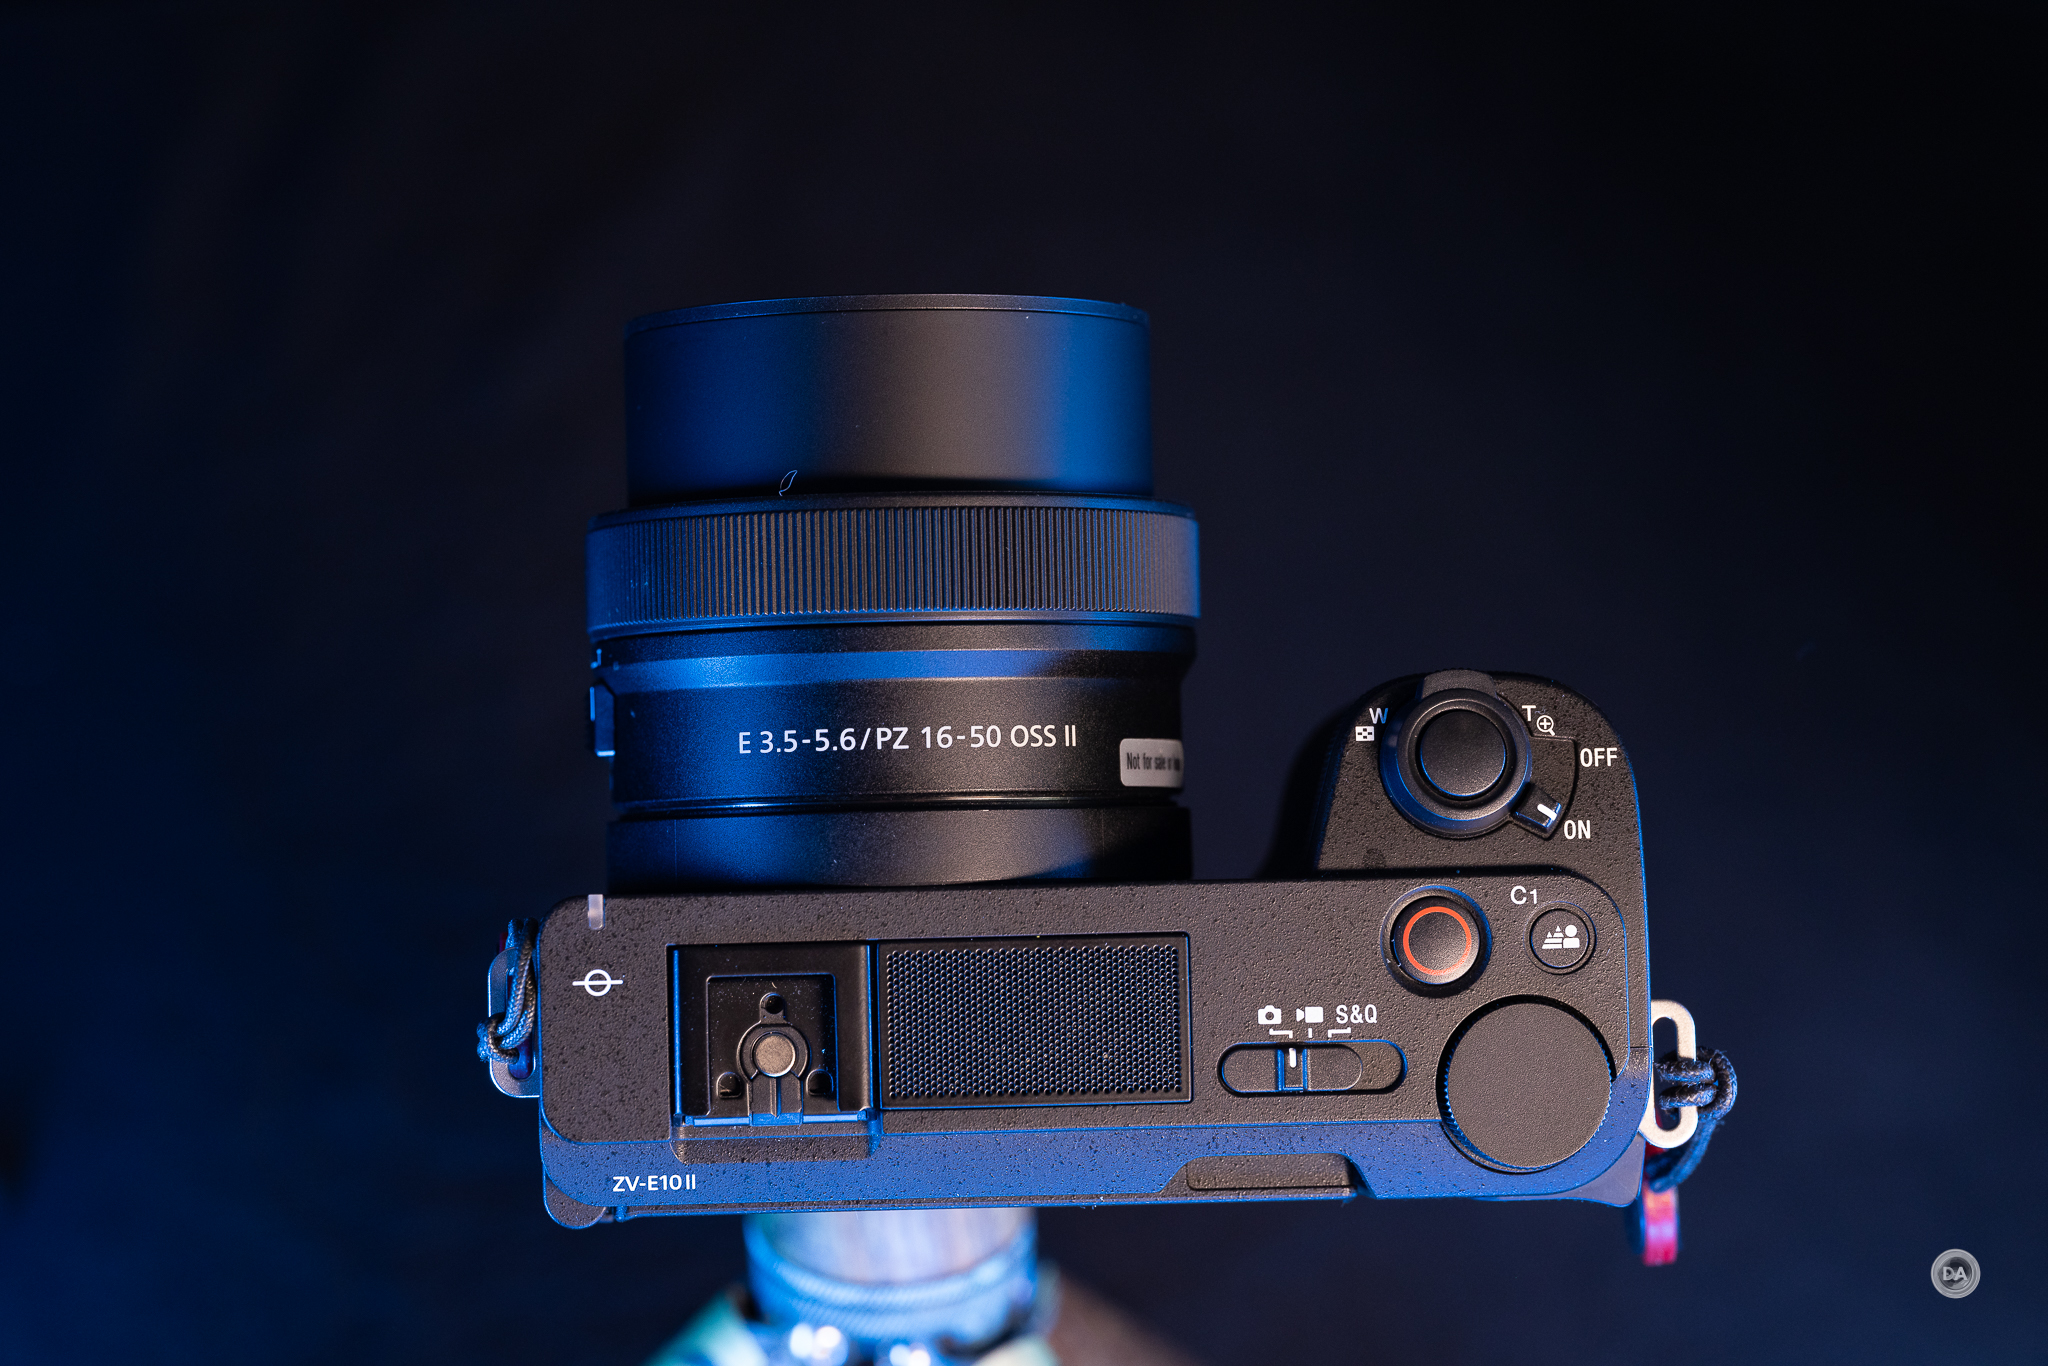
You can see from the comparison image above that the extra grip space has allowed for a minor restructuring of controls. The Powerzoom controls remain at the front of the camera, but the ON | OFF lever has moved from a separate switch mid camera to a position to the right of the shutter button. I found that I did sometimes hit the Powerzoom control when trying to turn off the camera due to not having the muscle memory initially, but the advantage of having the power toggle there is that it is much easier to control the camera one handed.
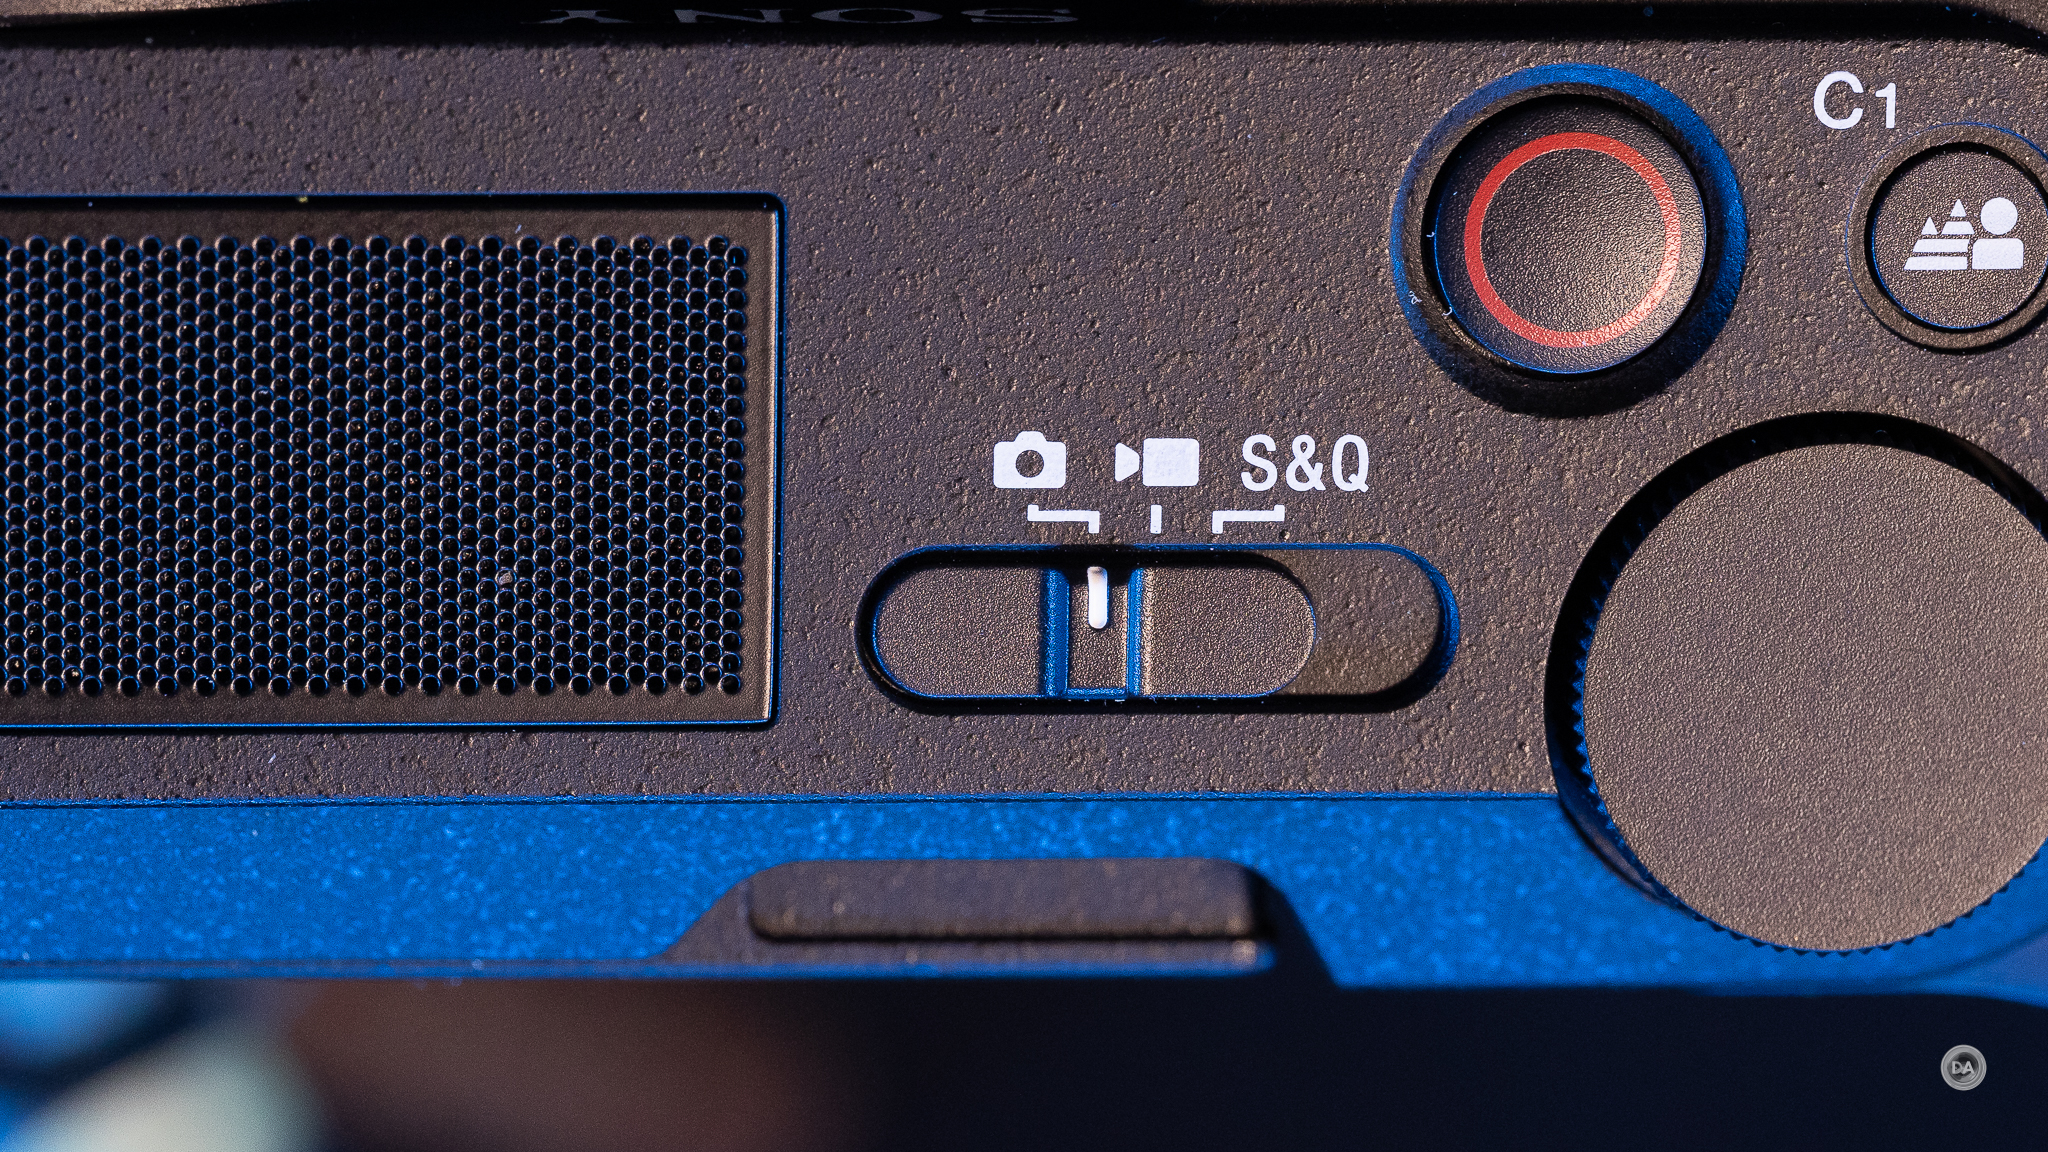
The video record button and the C1/Background Defocus button are in the same location as before, but the mode control has changed from a button selector to a three position switch (STILLS | VIDEO | S&Q).
This is a better system, as it gives quick and direct control as opposed to having to interact with the LCD screen.
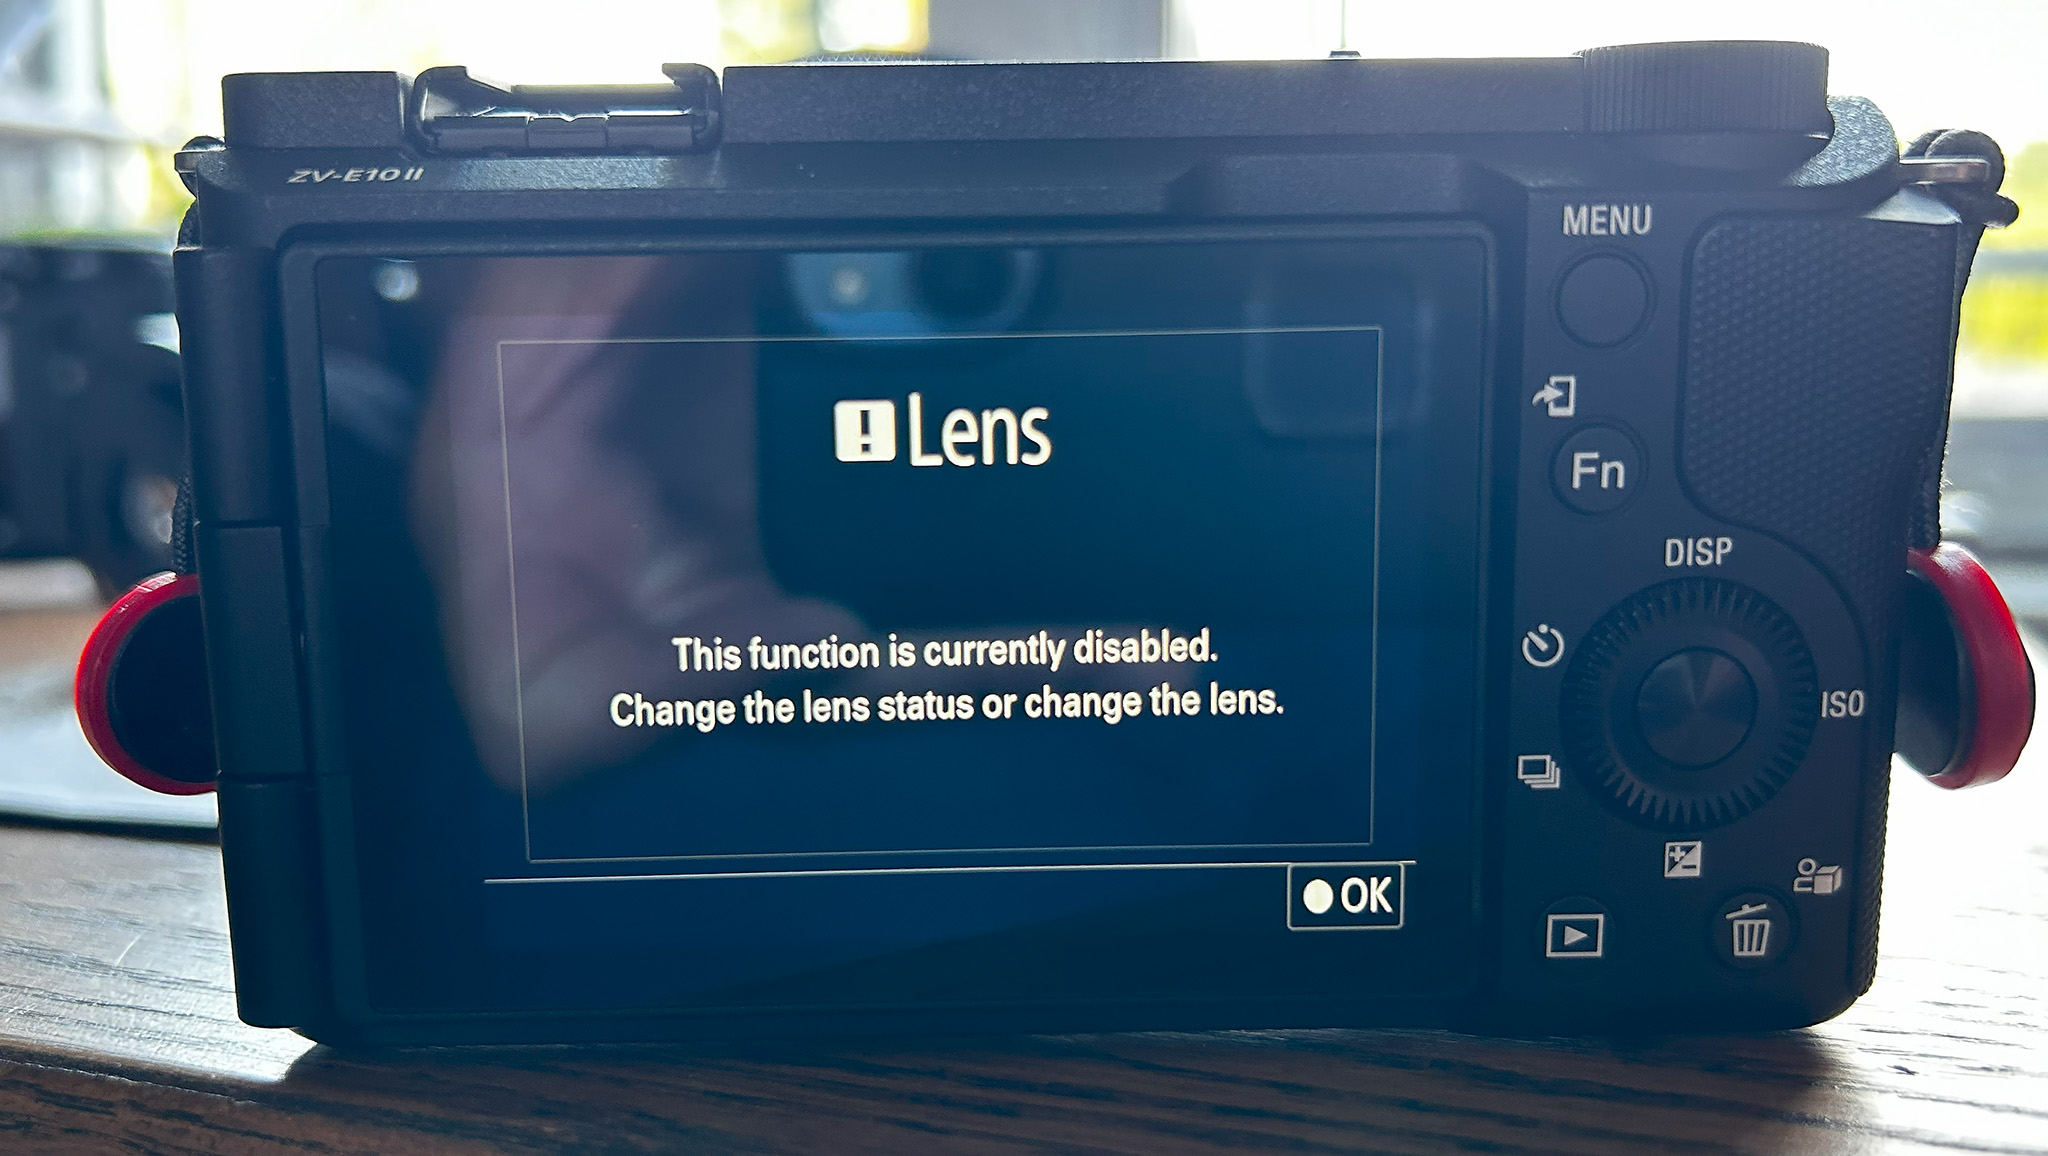
The C1/Background Defocus button is unique to this type of camera, and it’s native purpose is to open the aperture to the widest option to defocus the background. That’s only going to have limited effectiveness with a slower lens like the kit zoom, as this doesn’t actually magically make backgrounds more defocused. I did note that (as expected) that this feature will not work with a lens with an aperture ring unless you have the aperture ring in A (auto) mode. If you have an aperture preset and hit the button, you will get this message:
I personally wouldn’t find this function particularly useful, as I’m always aware of aperture and can quickly switch it to my preferred aperture setting anyway, but those who want to operate as simply as possible might appreciate this function. This also serves as the C1 button, however, which means “customizable”, so you can assign many other values to it instead if you don’t want or need a Background Defocus option.
The ZV-E10 cameras have a unique and more robust built in microphone. This three-capsule microphone is more robust than most on-board microphones, with better pickup and noise reduction performance (a wind reduction muff is included). You have the option of choosing Auto recording or choose from Front, Rear or All Directions settings to match your shooting environment or priorities. This might allow you to prioritize getting sound from in front of the camera, or recording your voiceover behind the camera, or mixing the environmental sounds with your voice. Further expanding your options is the fact that the “hotshoe” is Sony’s MI-shoe, or multi-interface shoe. This will allow you to record digital audio through a compatible microphone.
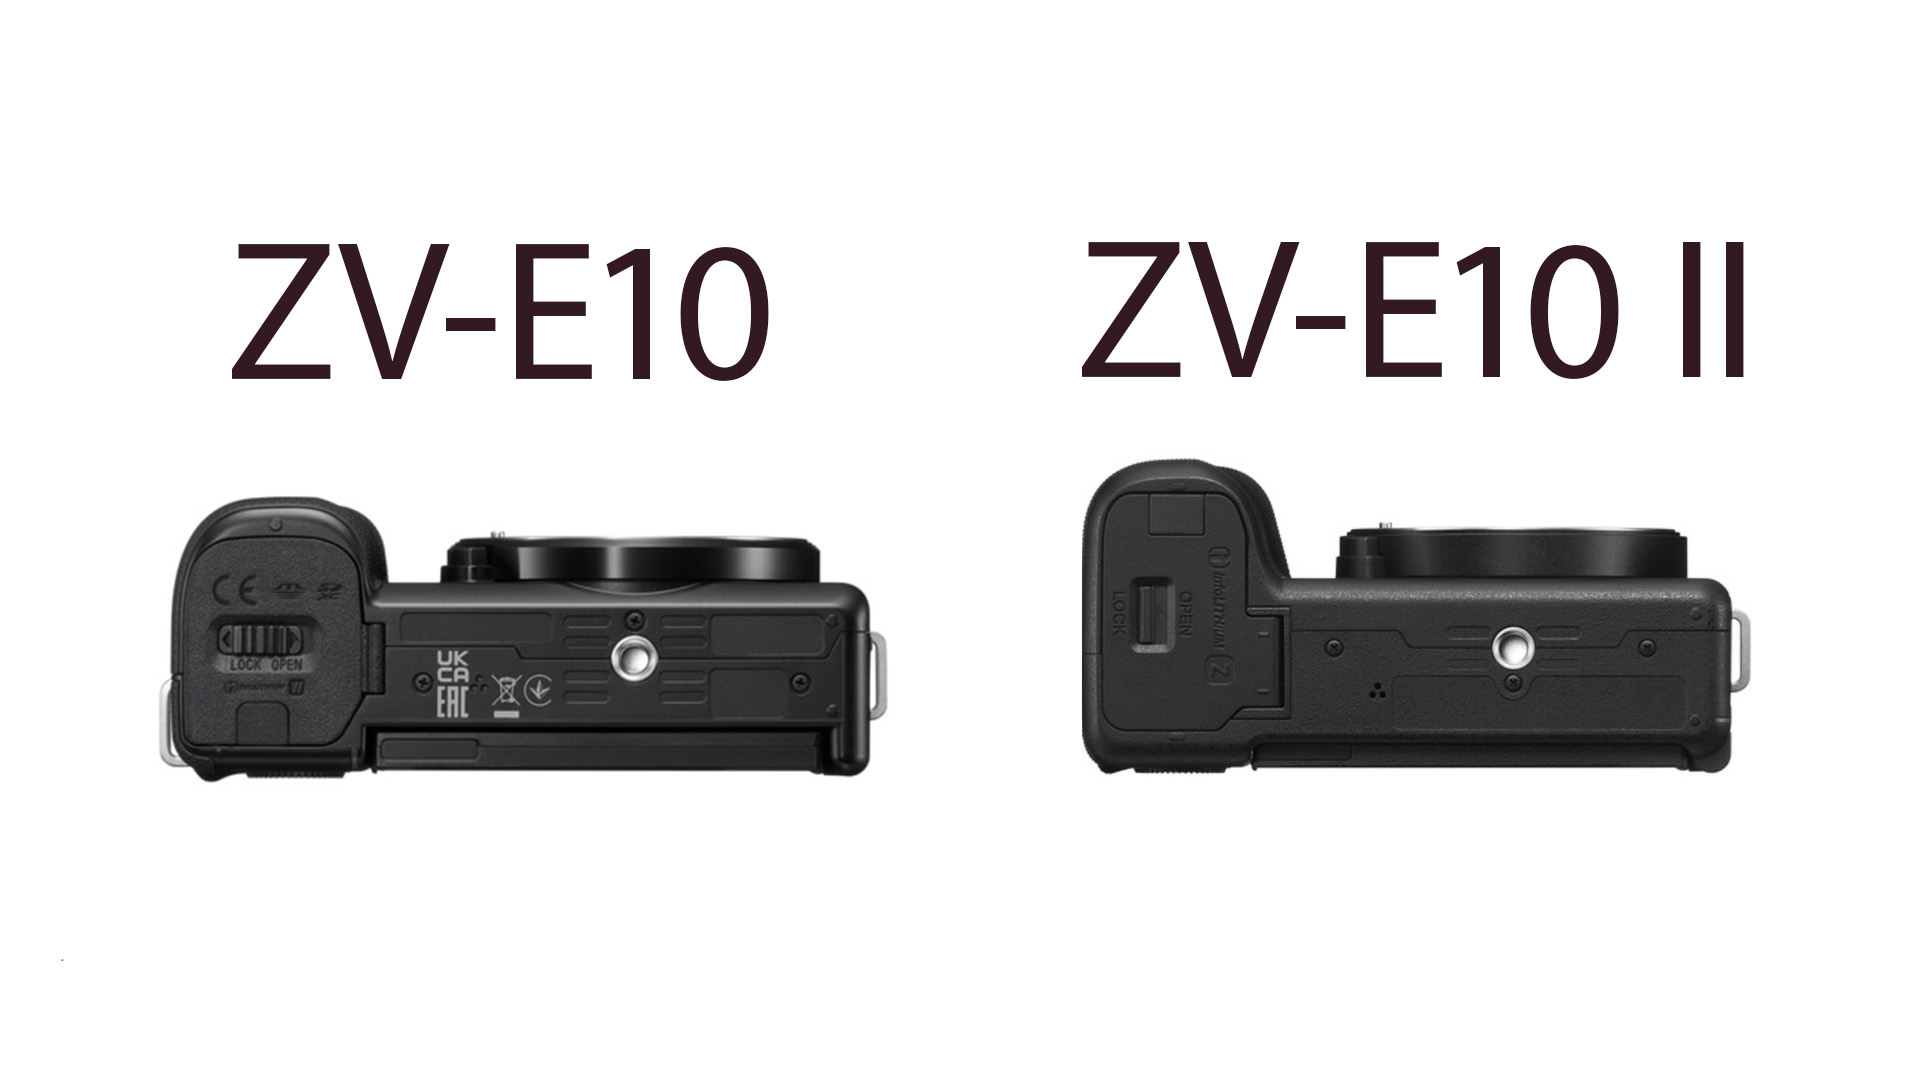
The bottom of the camera is mostly the same, though the battery door is oriented a little differently to accommodate the larger battery.
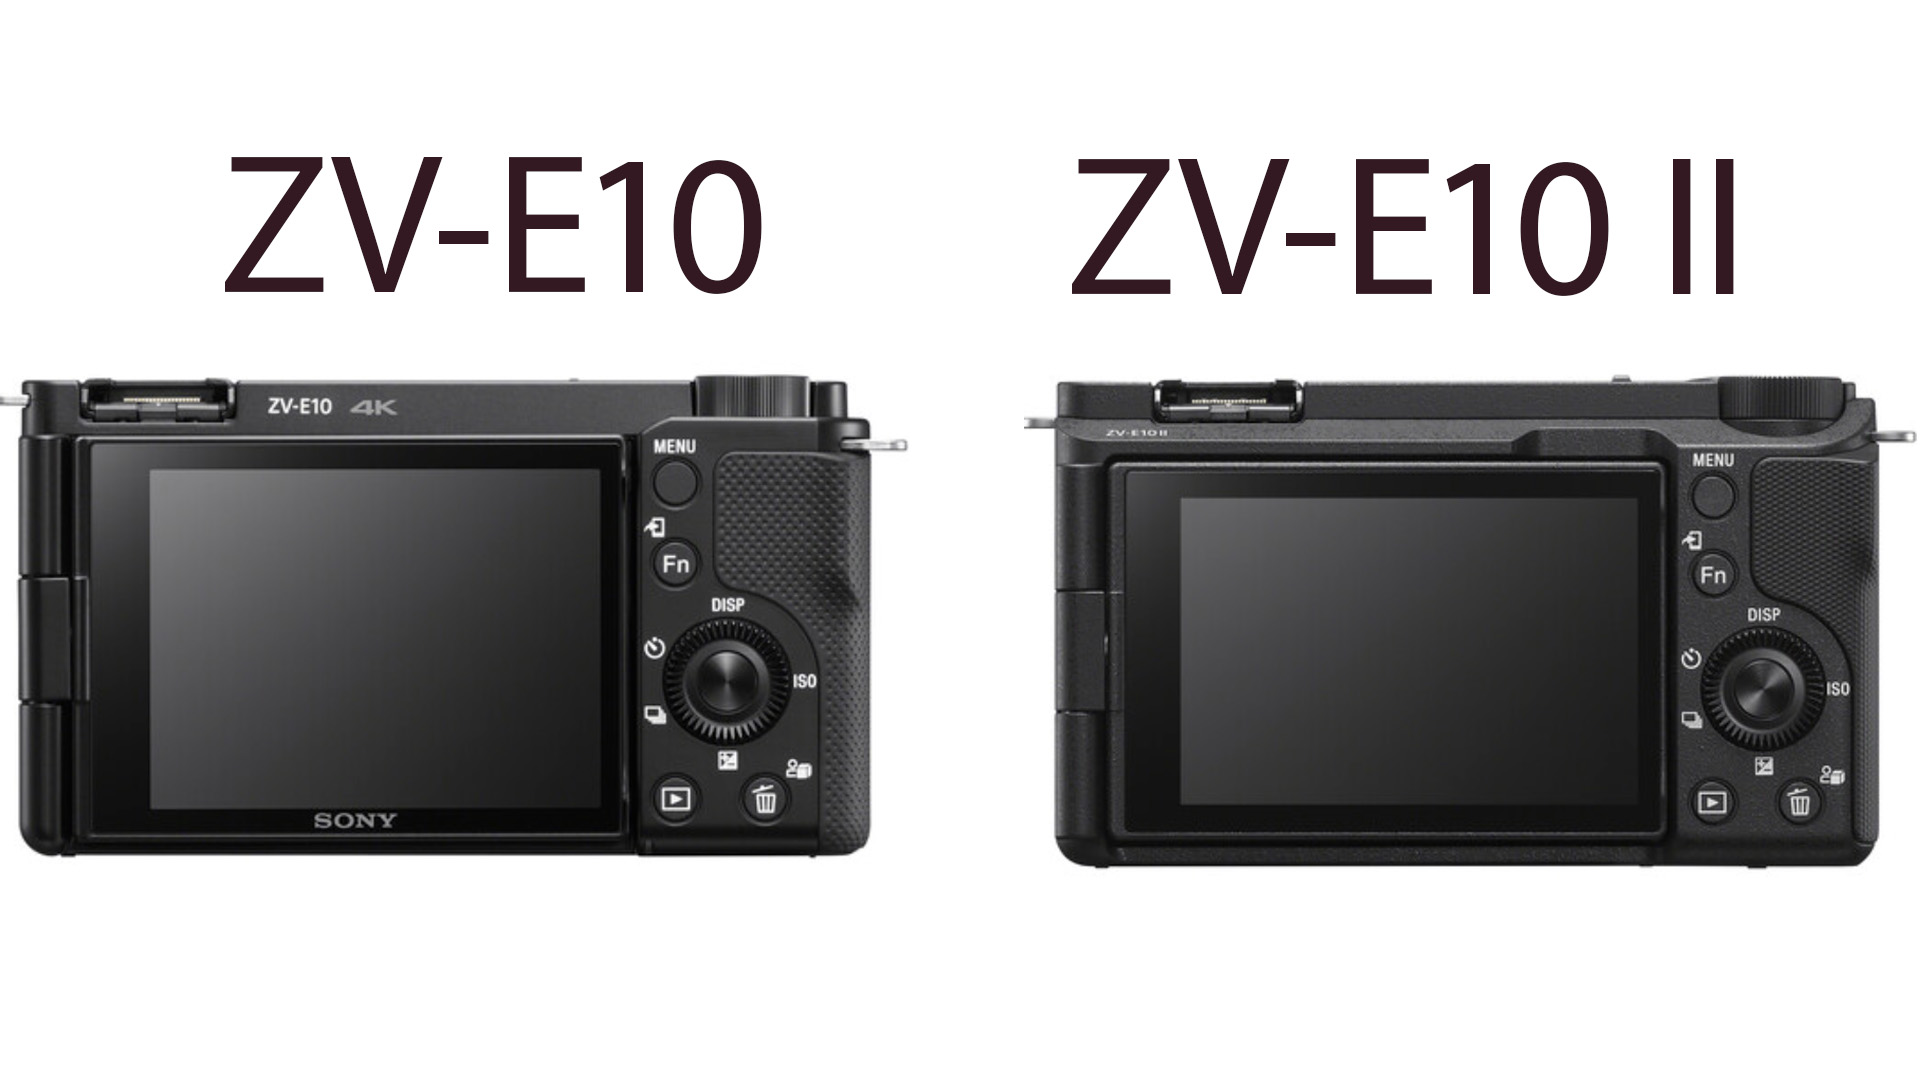
The font view is largely the same. The slightly taller body of the ZV-E10 II makes the LCD screen look a bit smaller, but both are a 3″ fully articulating touchscreen LCD. The resolution is slightly higher at 1.036 million dots rather than .921m dots on the older model. Sony’s touch capabilities have improved over the past few years, and are now more responsive and allow for full menu navigation and many other options.
I have zero complaints about the LCD screen itself, though…
There is no viewfinder in this design, and (due to muscle memory) there were many time that I pulled the camera up to my eye only to then remember that there was no viewfinder. I did find that in bright sunny conditions that I really missed having a viewfinder, as seeing the LCD screen in some lighting was difficult.
The right side view is mostly the same, though the difference in the thickness of the camera is very apparent from this angle. The grip material is a bit different than the typical grip on, say, the a6xxx series. It’s largely a series of raised microdots.
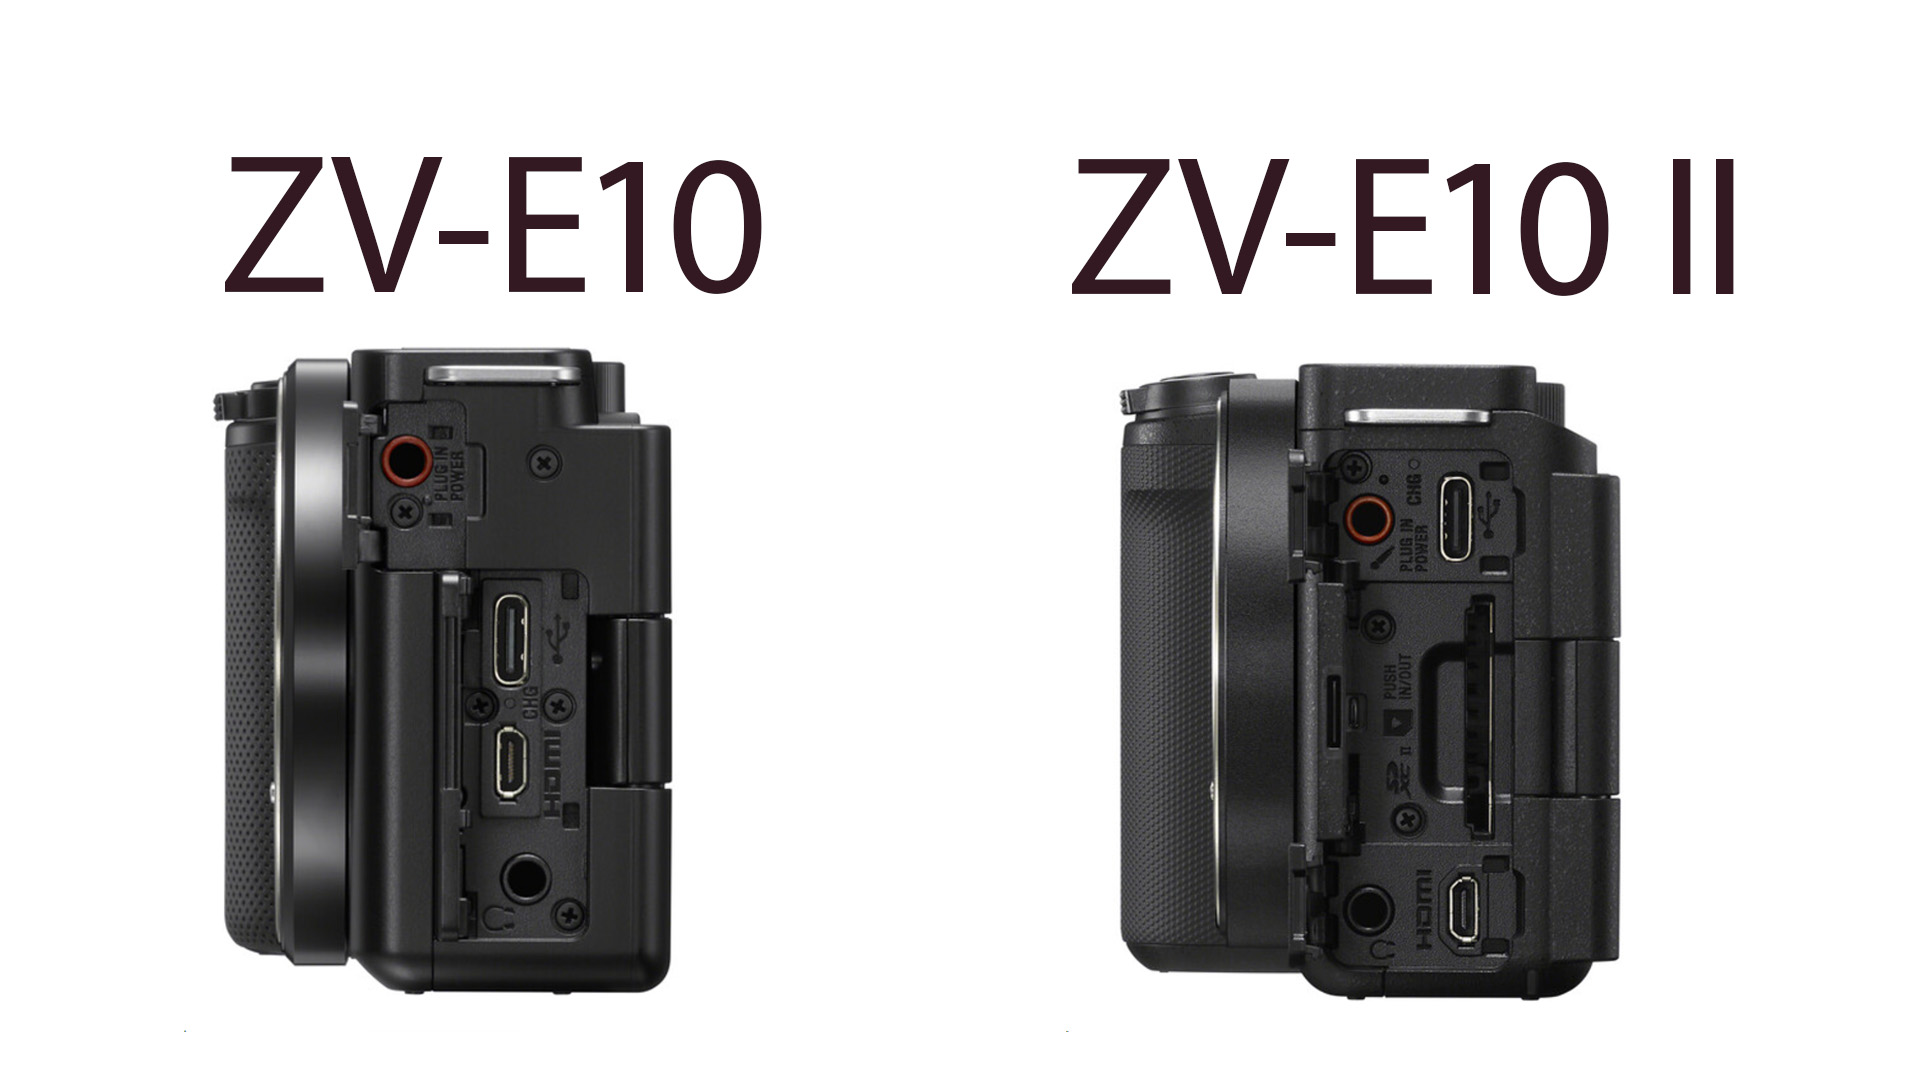
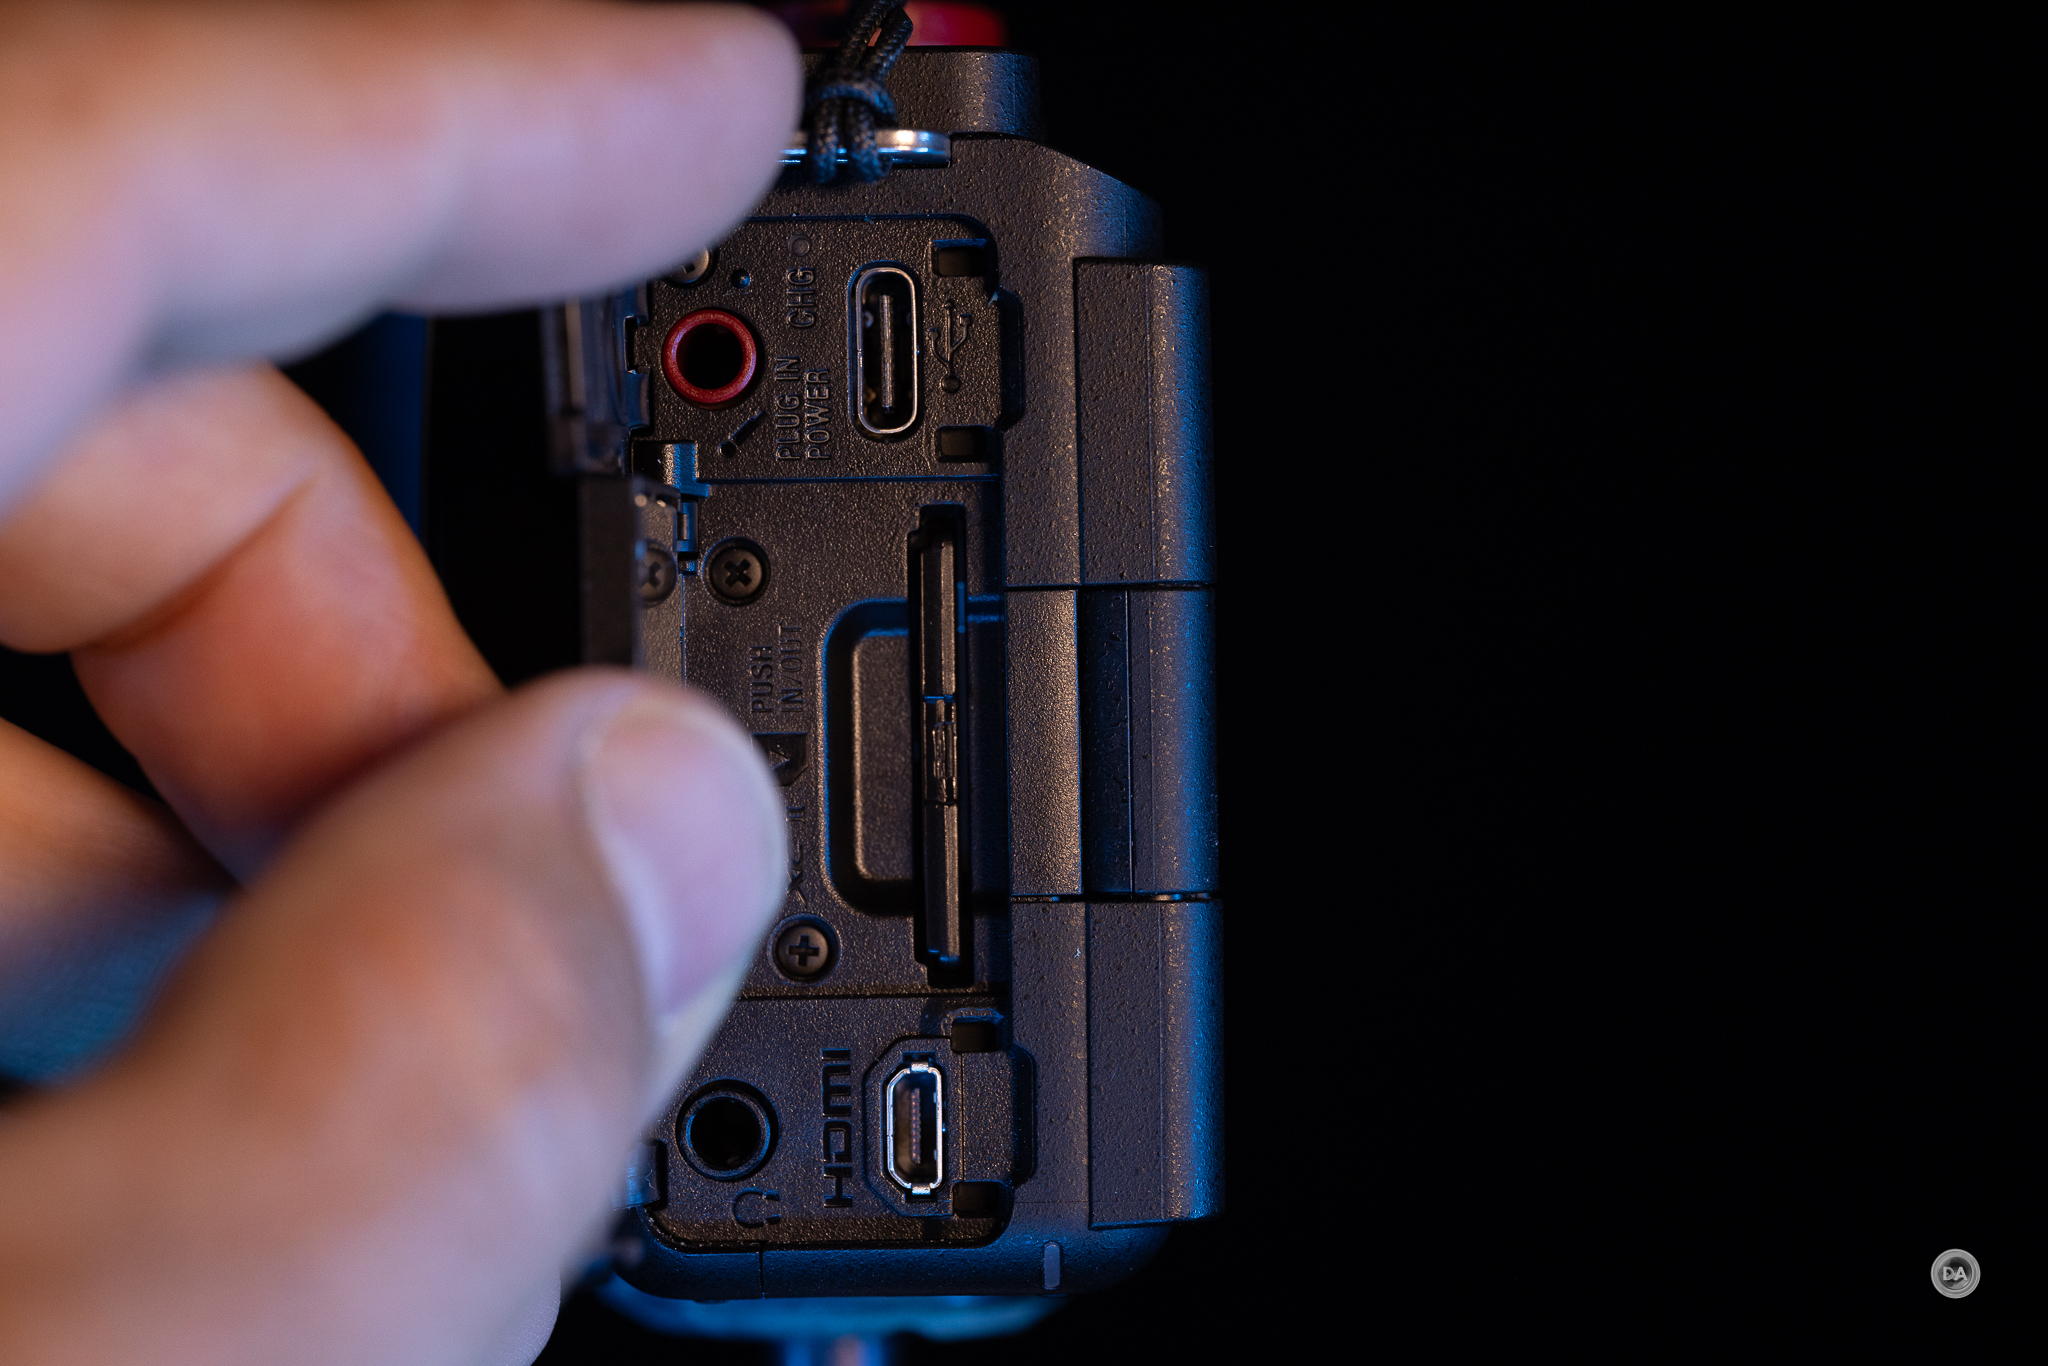
A bigger change is found on the left side of the camera, as (thankfully!) the single UHS-II rated SD card slot has been relocated to the side of the camera instead of in the battery compartment on the bottom of the camera. I vastly prefer the side location, as bottom locations will often be interfered with if you are using a QR plate or something similar. This change means that there is a slightly different organization of the ports located there, though it adds up to the same thing.
The USB-C and microphone input are located in the top compartment, with the micro-HDMI and headphone monitoring jack located in the bottom compartment. The new SD card slot falls in the middle of the two.
The rear view is pretty much identical, though with a minor change to the top plate and a little sculpting to allow easier access to flipping out the screen and for accessing the top wheel. All other button and dial positions are the same.
The controls are adequate, and between the two wheels it is easy enough to control most functions.
The Powerzoom controls have two functions. If you have a Powerzoom lens attached (like the E 16-50mm F3.5-5.6 PZ OSS II lens), you can directly access the Powerzoom function in a much easier way than by the controls on the tiny lens itself. A secondly application is in video mode, however, and it will allow you to control the Clear Image Zoom or Digital Zoom function. It’s very welcome to have the ability to smoothly control zoom and be able to get smoother results for video.
The ZV-E10 II can be bundled with the Sony E PZ 16-50mm f/3.5-5.6 OSS II lens. The lens retails for $298 when sold separately, but only adds $100 when sold in a bundle with the camera. It’s worth getting the lens in kit, as you aren’t going to find a better zoom lens for $100. This is the MK II version of the lens, and offers both improved OSS (Optical Steady Shot) for more stability and faster autofocus. Optically it is the same as the previous generation lens.
There are more exciting lens options out there, but it does provide a decent general purpose lens for either video or stills use, and the PowerZoom function is definitely useful in certain applications.
The other big thing that the 16-50mm PZ adds is optical stabilization, allowing you to get stable results for your video and vlogging captures. For just $100 it is well worth adding to the kit.
So other than the missing viewfinder (which I do miss!), the Sony ZV-E10 II is a good handling little camera that is easy to use.
Autofocus and Bursts
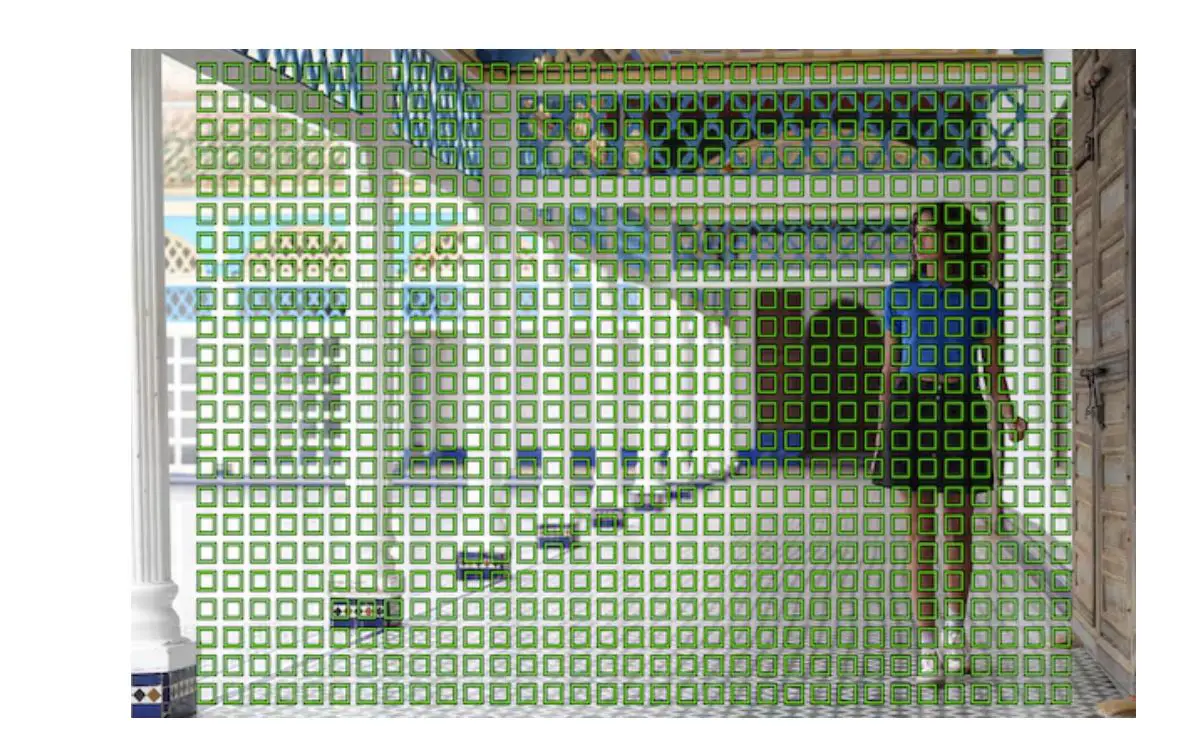
This is another area of key upgrade to the formula. The previous generation EV-10 had an older generation AF system inherited from a camera like the a6400, which had 425 Phase Detect autofocus points backed up with a Contrast AF system. The EV-10 II inherits the more advanced AF system from the a6700 which touts 759 Phase Detect points over a 495 point Contrast AF system. It has intense coverage across the frame.
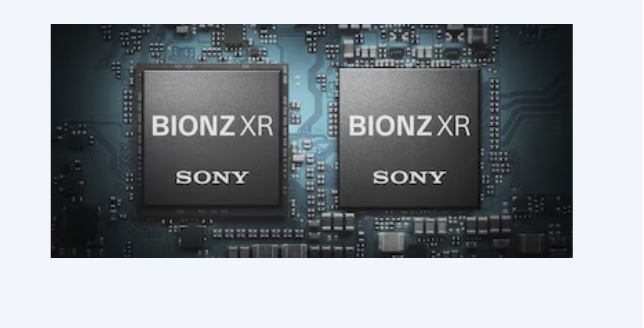
It has the updated Bionz XR processing unit that allows for more processing speed for a variety of camera function, including autofocus.
What the a6700 has than the EV-10 II lacks is the AI processing unit to give more advanced tracking. The EV-10 II does have the ability to track subjects, though the categories are limited to Human, Animal, and Bird. Frankly serious tracking (in my eyes) needs a viewfinder, as it is very difficult to properly frame a fast moving subject when you can’t block out ambient light.
We still have an excellent focus system here, however, easily able to track action and deliver well focused results.
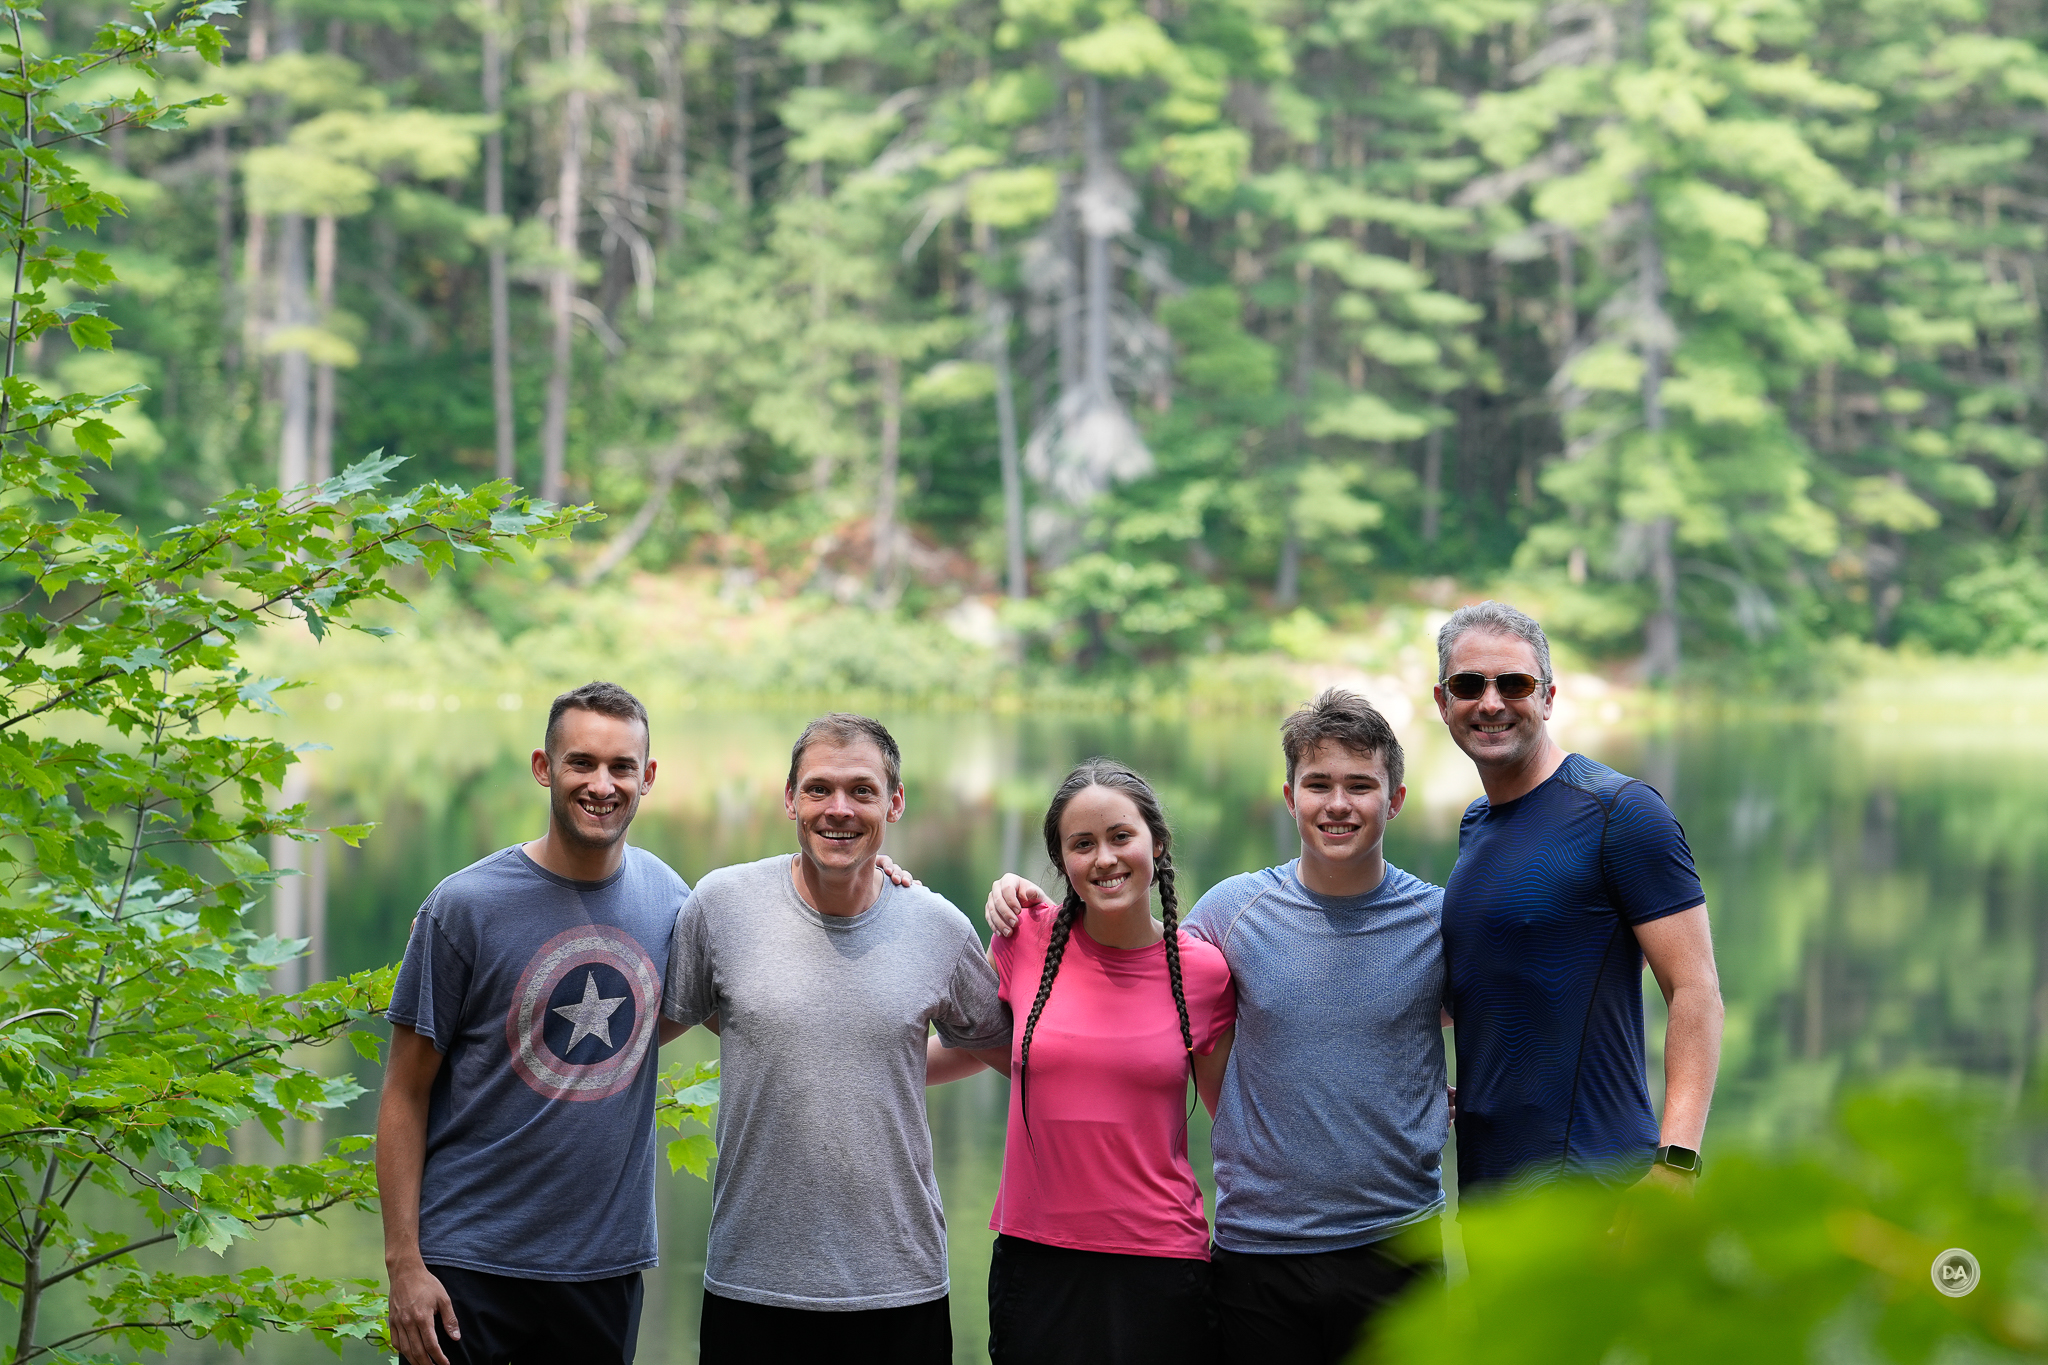
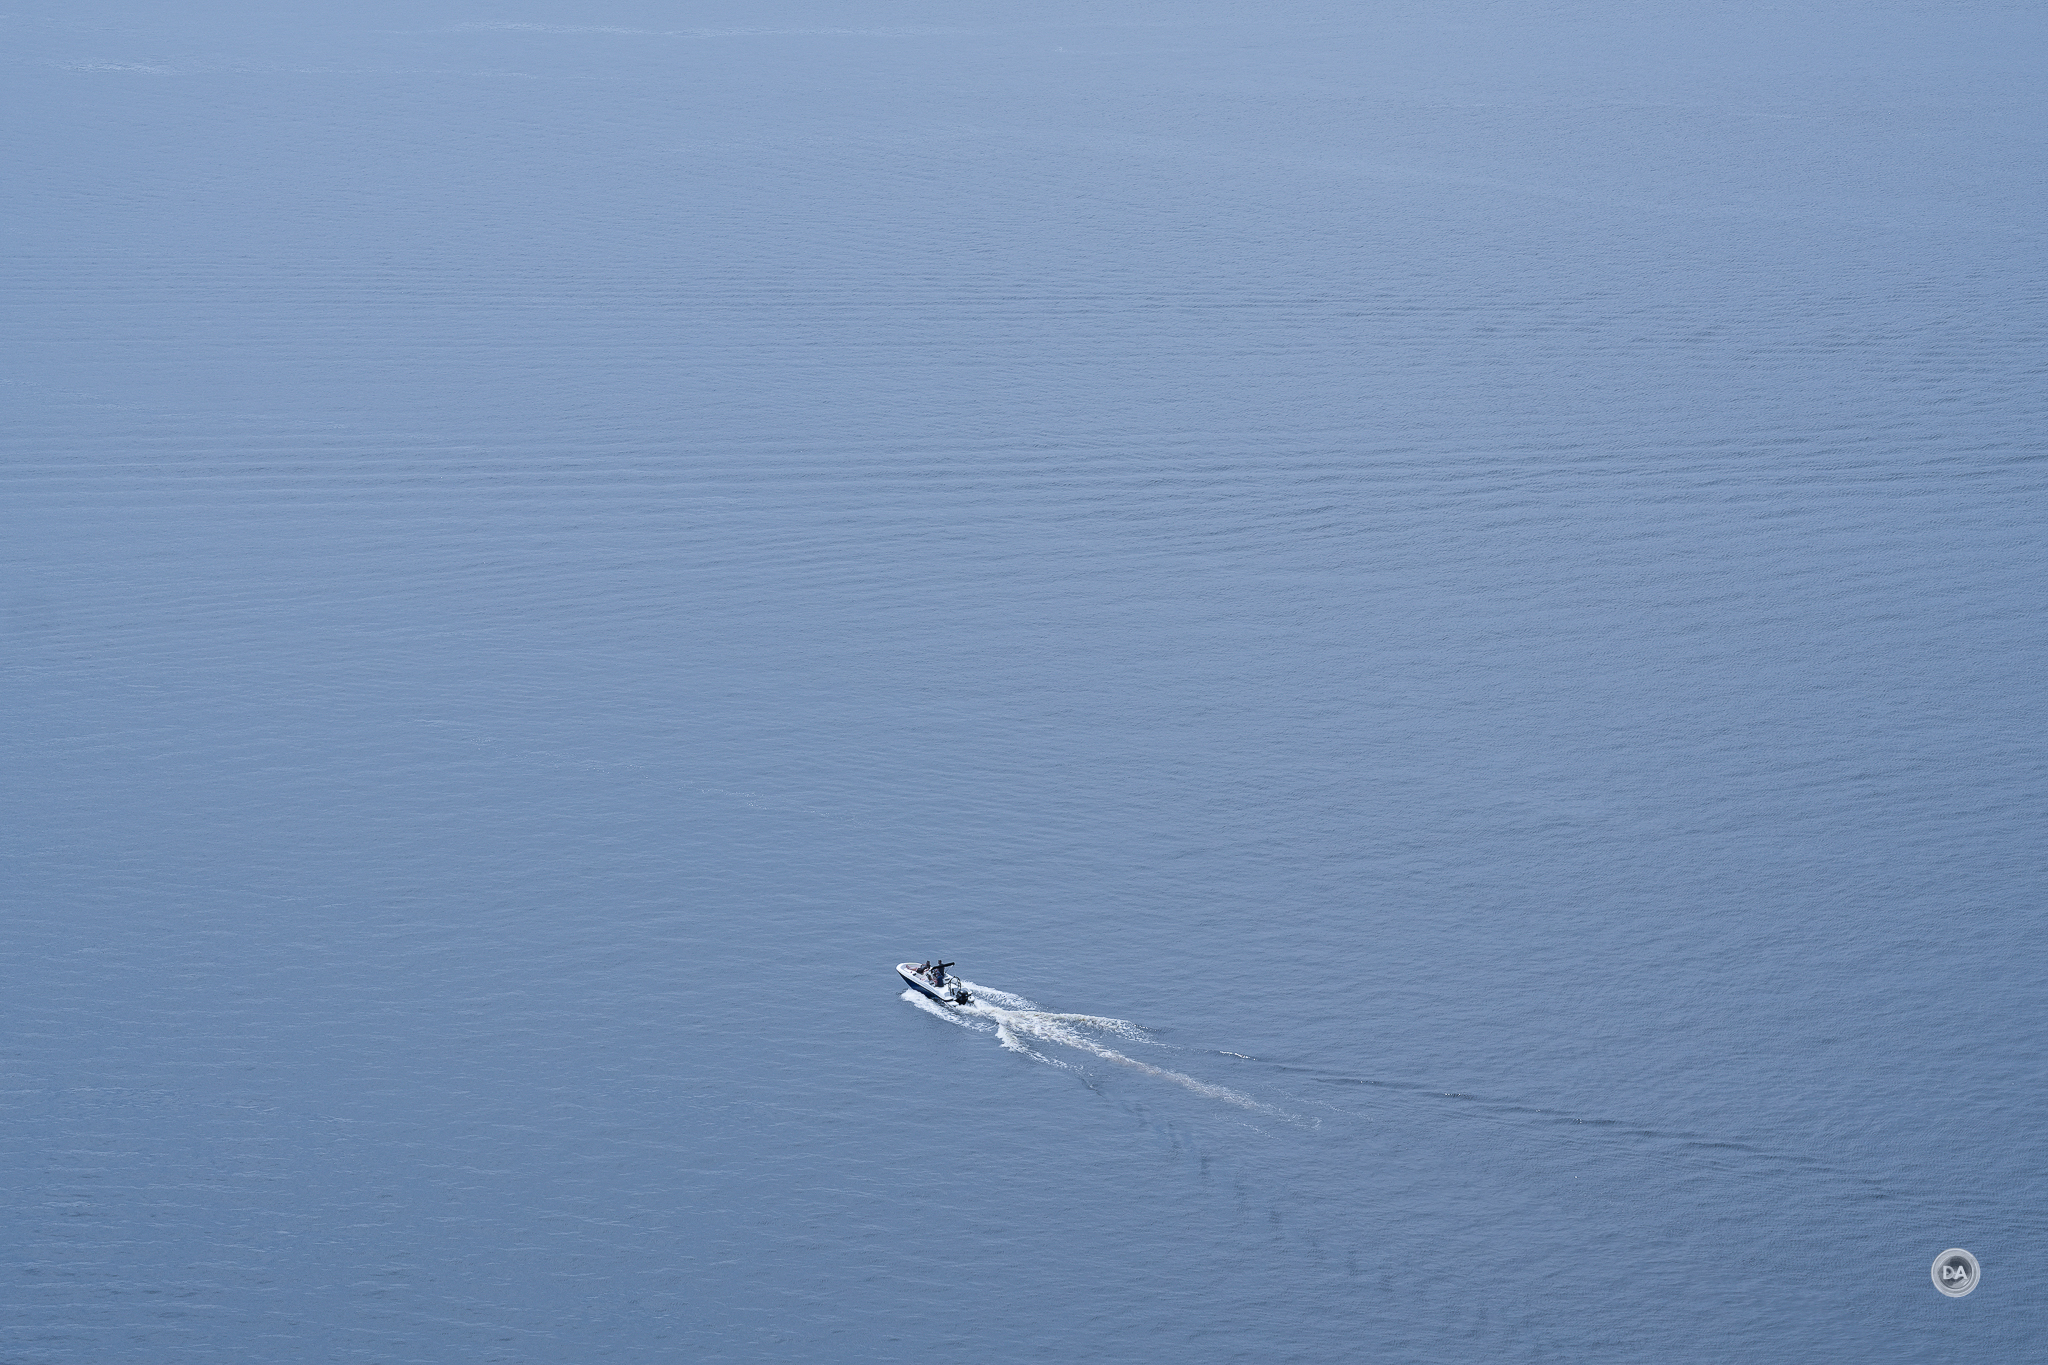
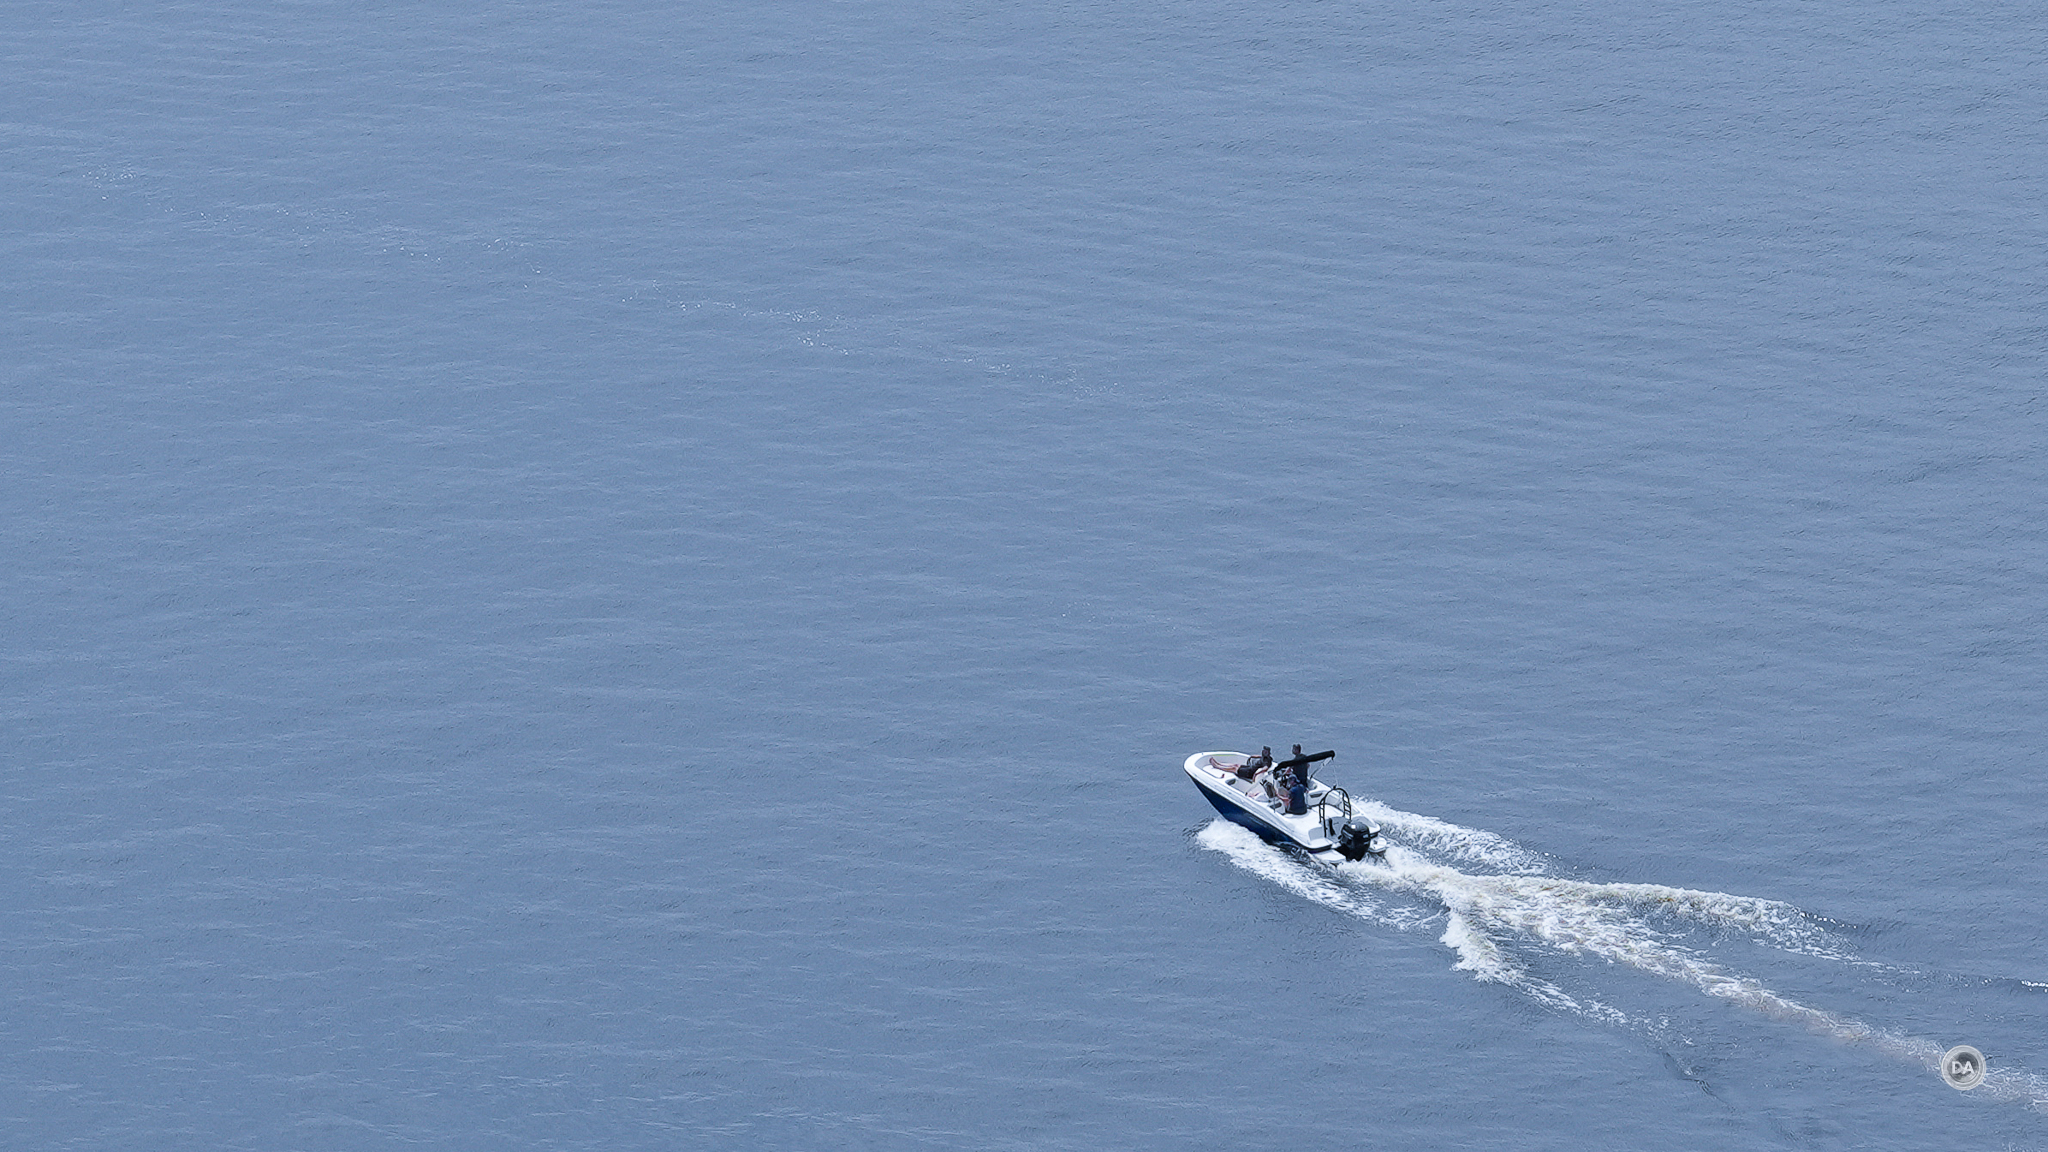
I was able to put the camera in the hands of a stranger with an 85mm lens attached (128mm full frame equivalent) and got perfectly focused results of our group of hikers due to the excellent face recognition (and despite the narrow depth of field).
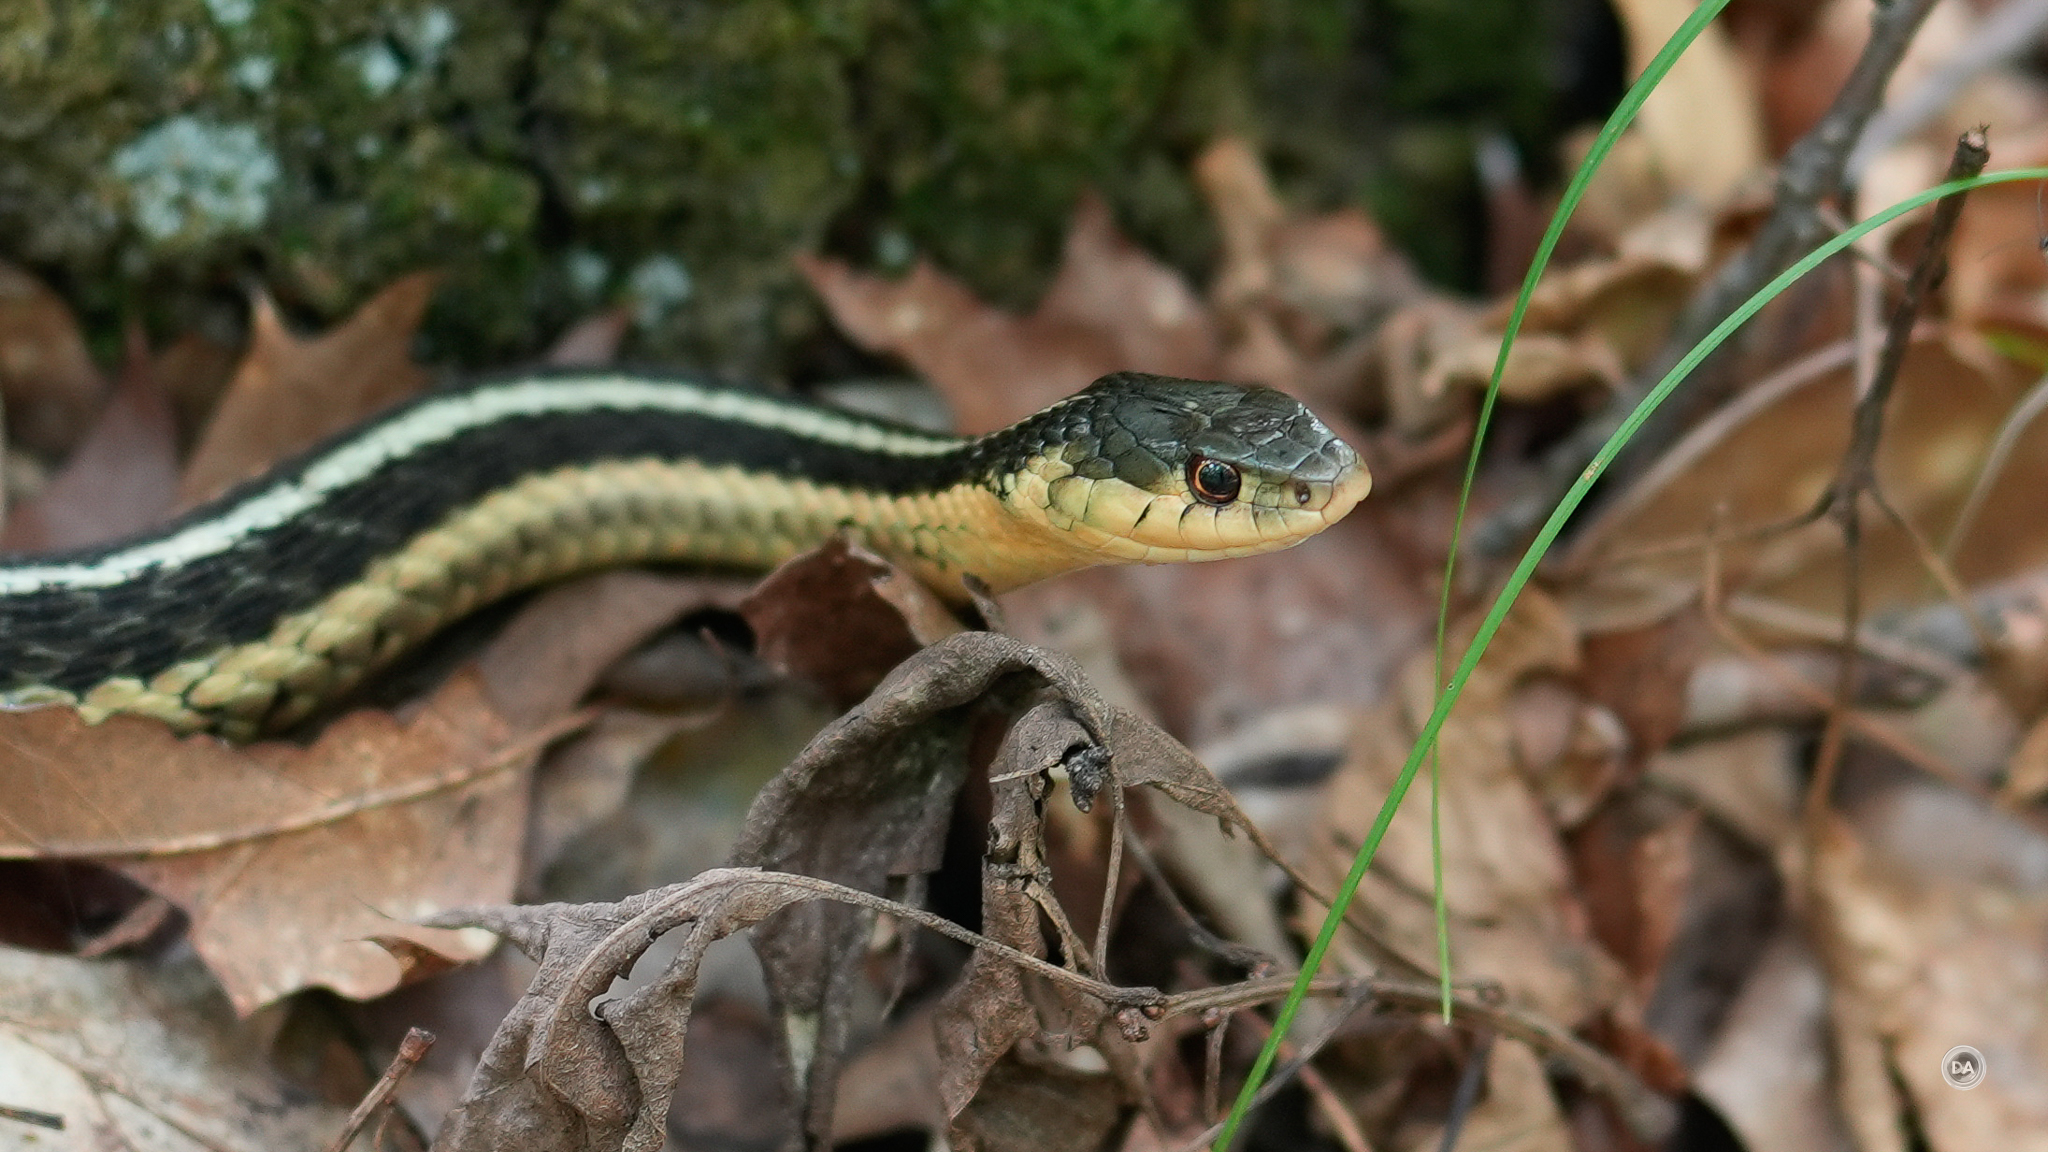
I was also able to get very nice focus results even at F1.4 of a snake I spotted along the trail. Eye AF in animal grabbed the proper focus even though the scene was very complicated (lost of branches, grasses, and leaves in the way).
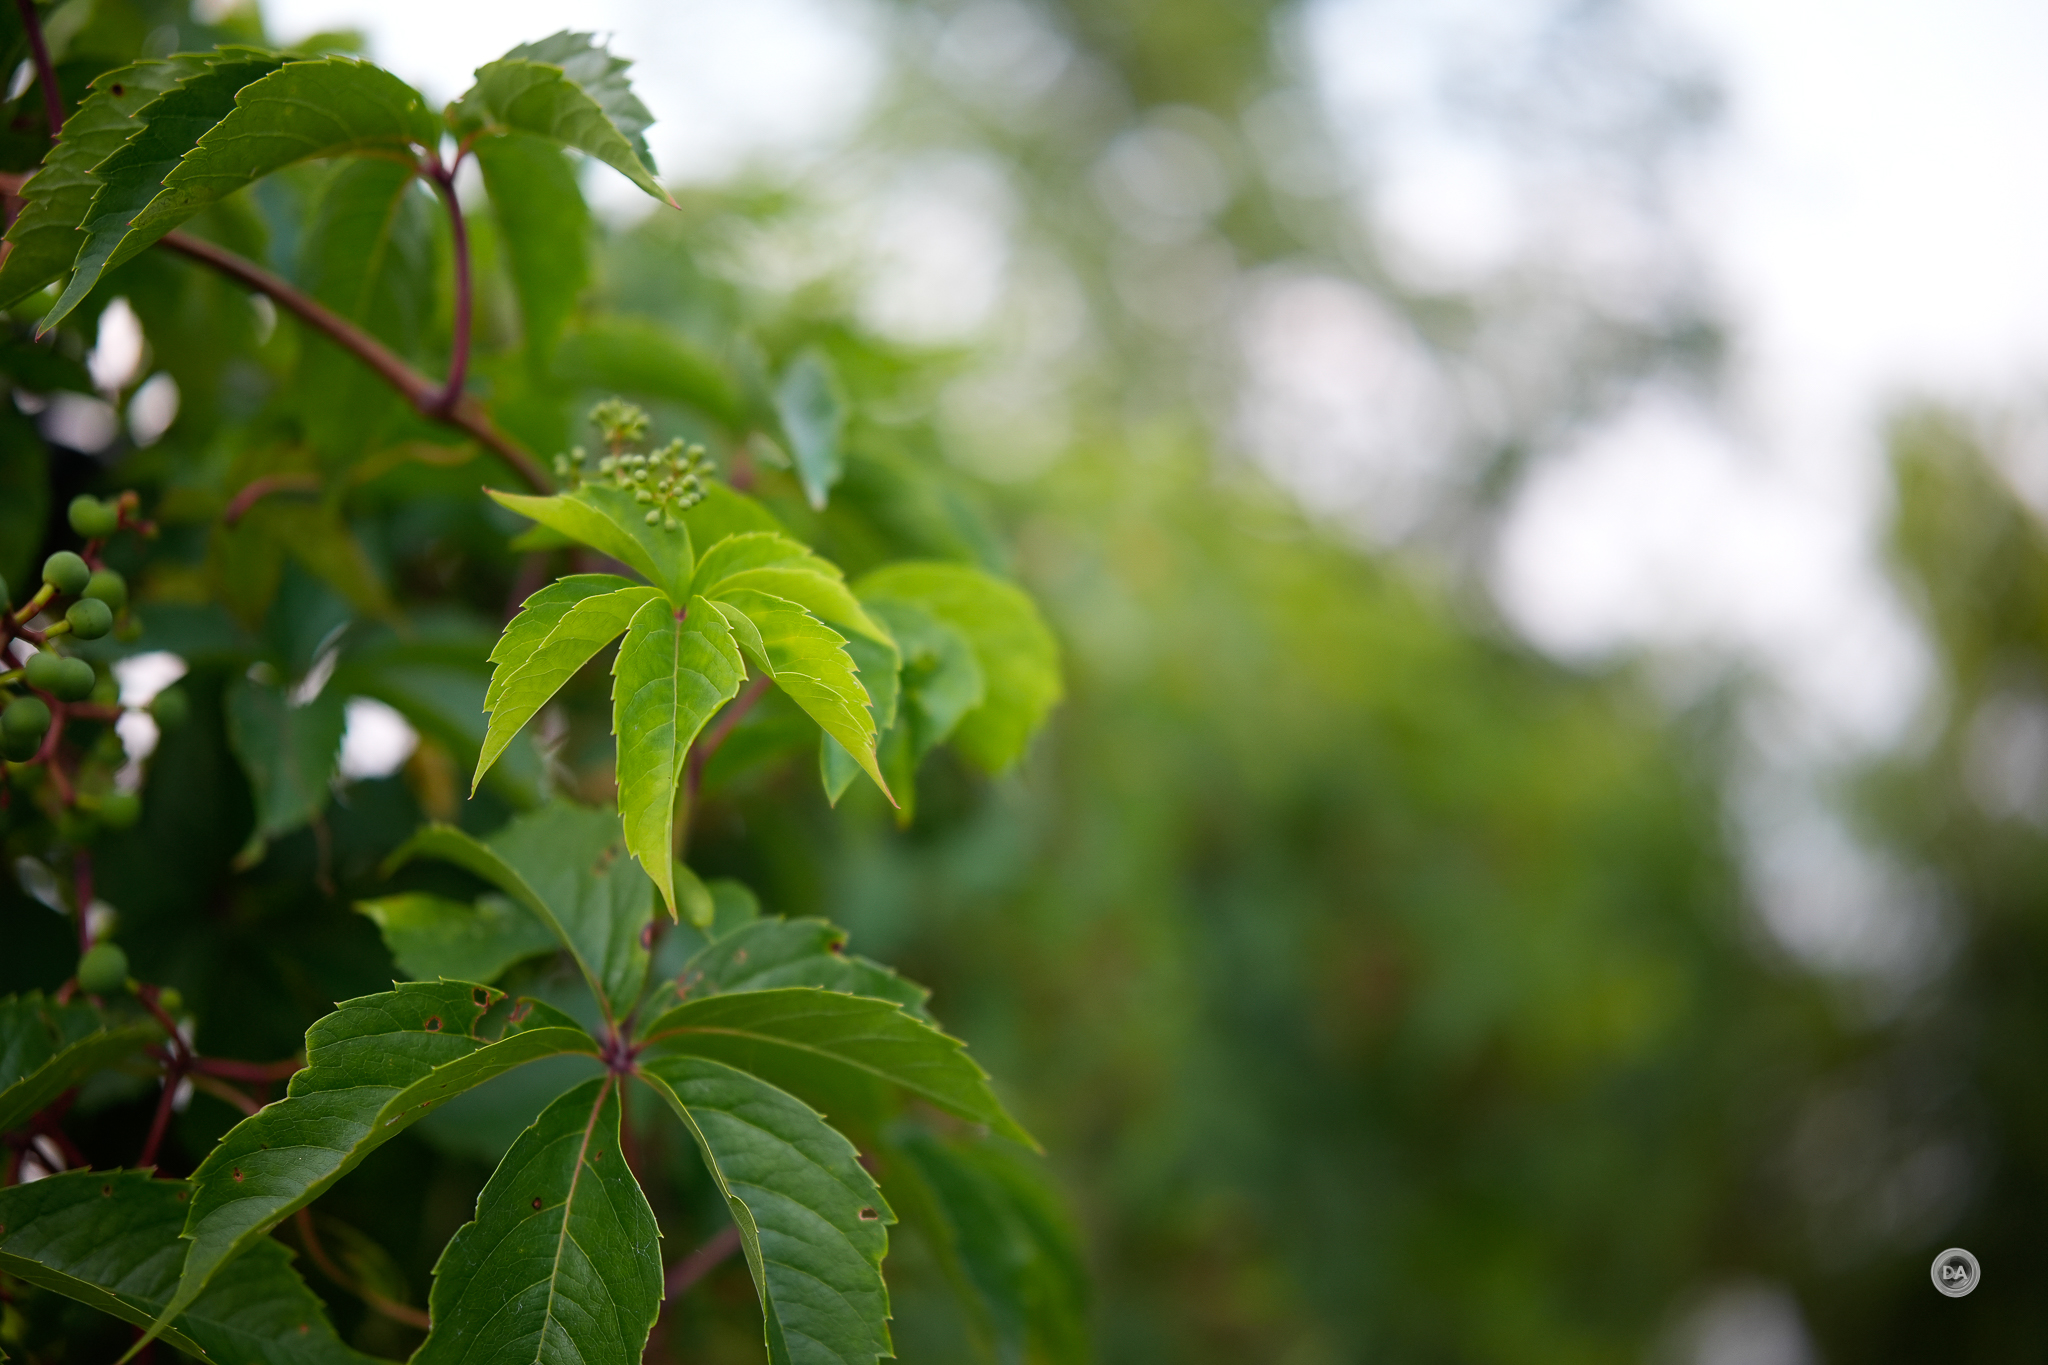
I also had zero problems grabbing shallow depth of field shots. The one below is at F1.2 taken with the excellent Viltrox Pro AF 27mm F1.2 (an amazing lens!)
I don’t really have any complaints about autofocus for stills. I was able to get well focused images in a variety of situations and don’t really have any complaints.
What is unique here is a shift to a purely electronic shutter. Rather than a hybrid mechanical/electronic shutter, Sony has gone all in on the electronic shutter. That shows some confidence with this processing unit and that they anticipate the readout to be fast enough to having less rolling shutter issues. The advantage is that we now have a max shutter speed of 1/8000th rather than 1/4000th, but the dark underside of the switch is that the max flash sync speed is only…gulp…1/30th second. Don’t buy this camera for studio work!
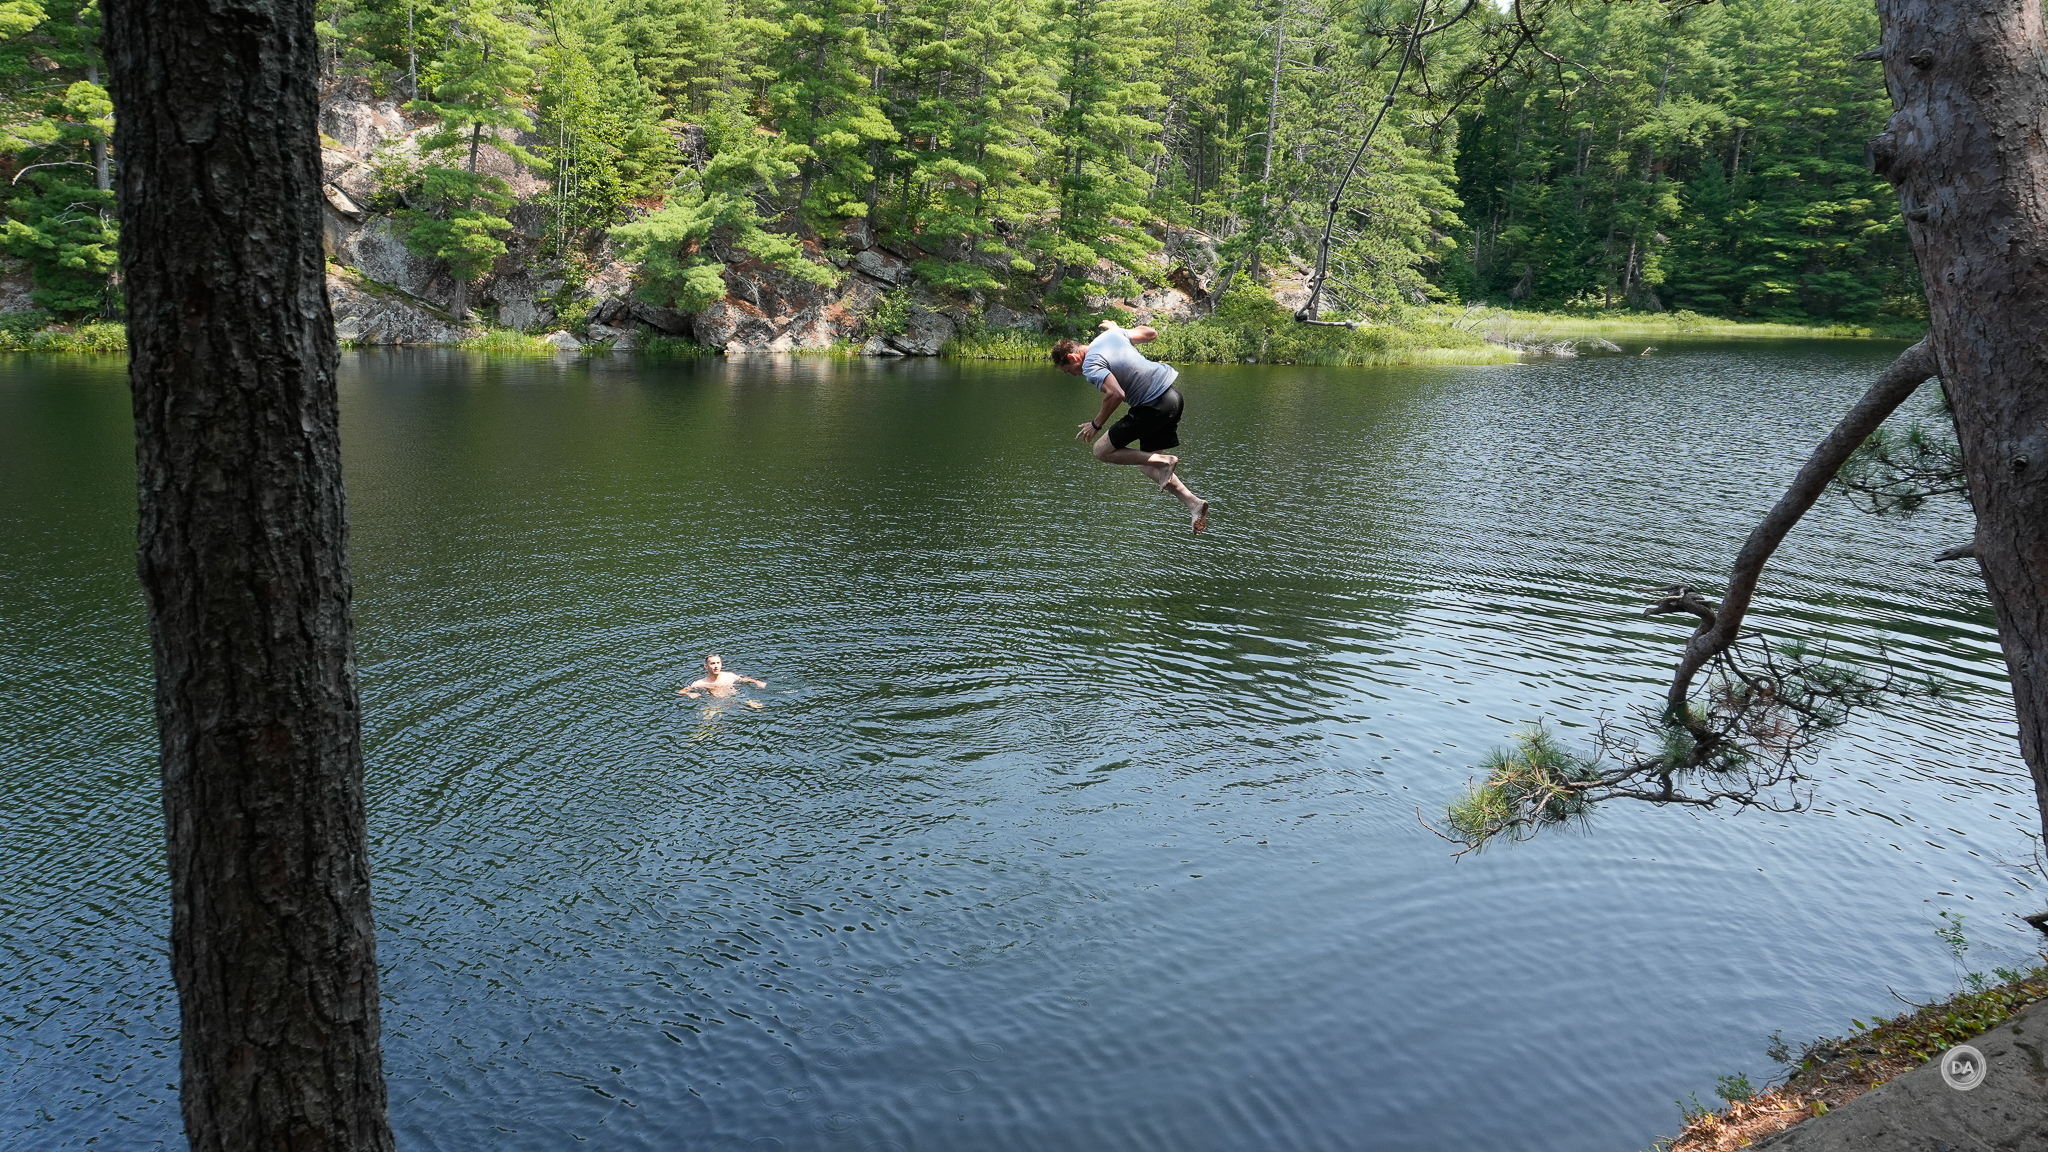
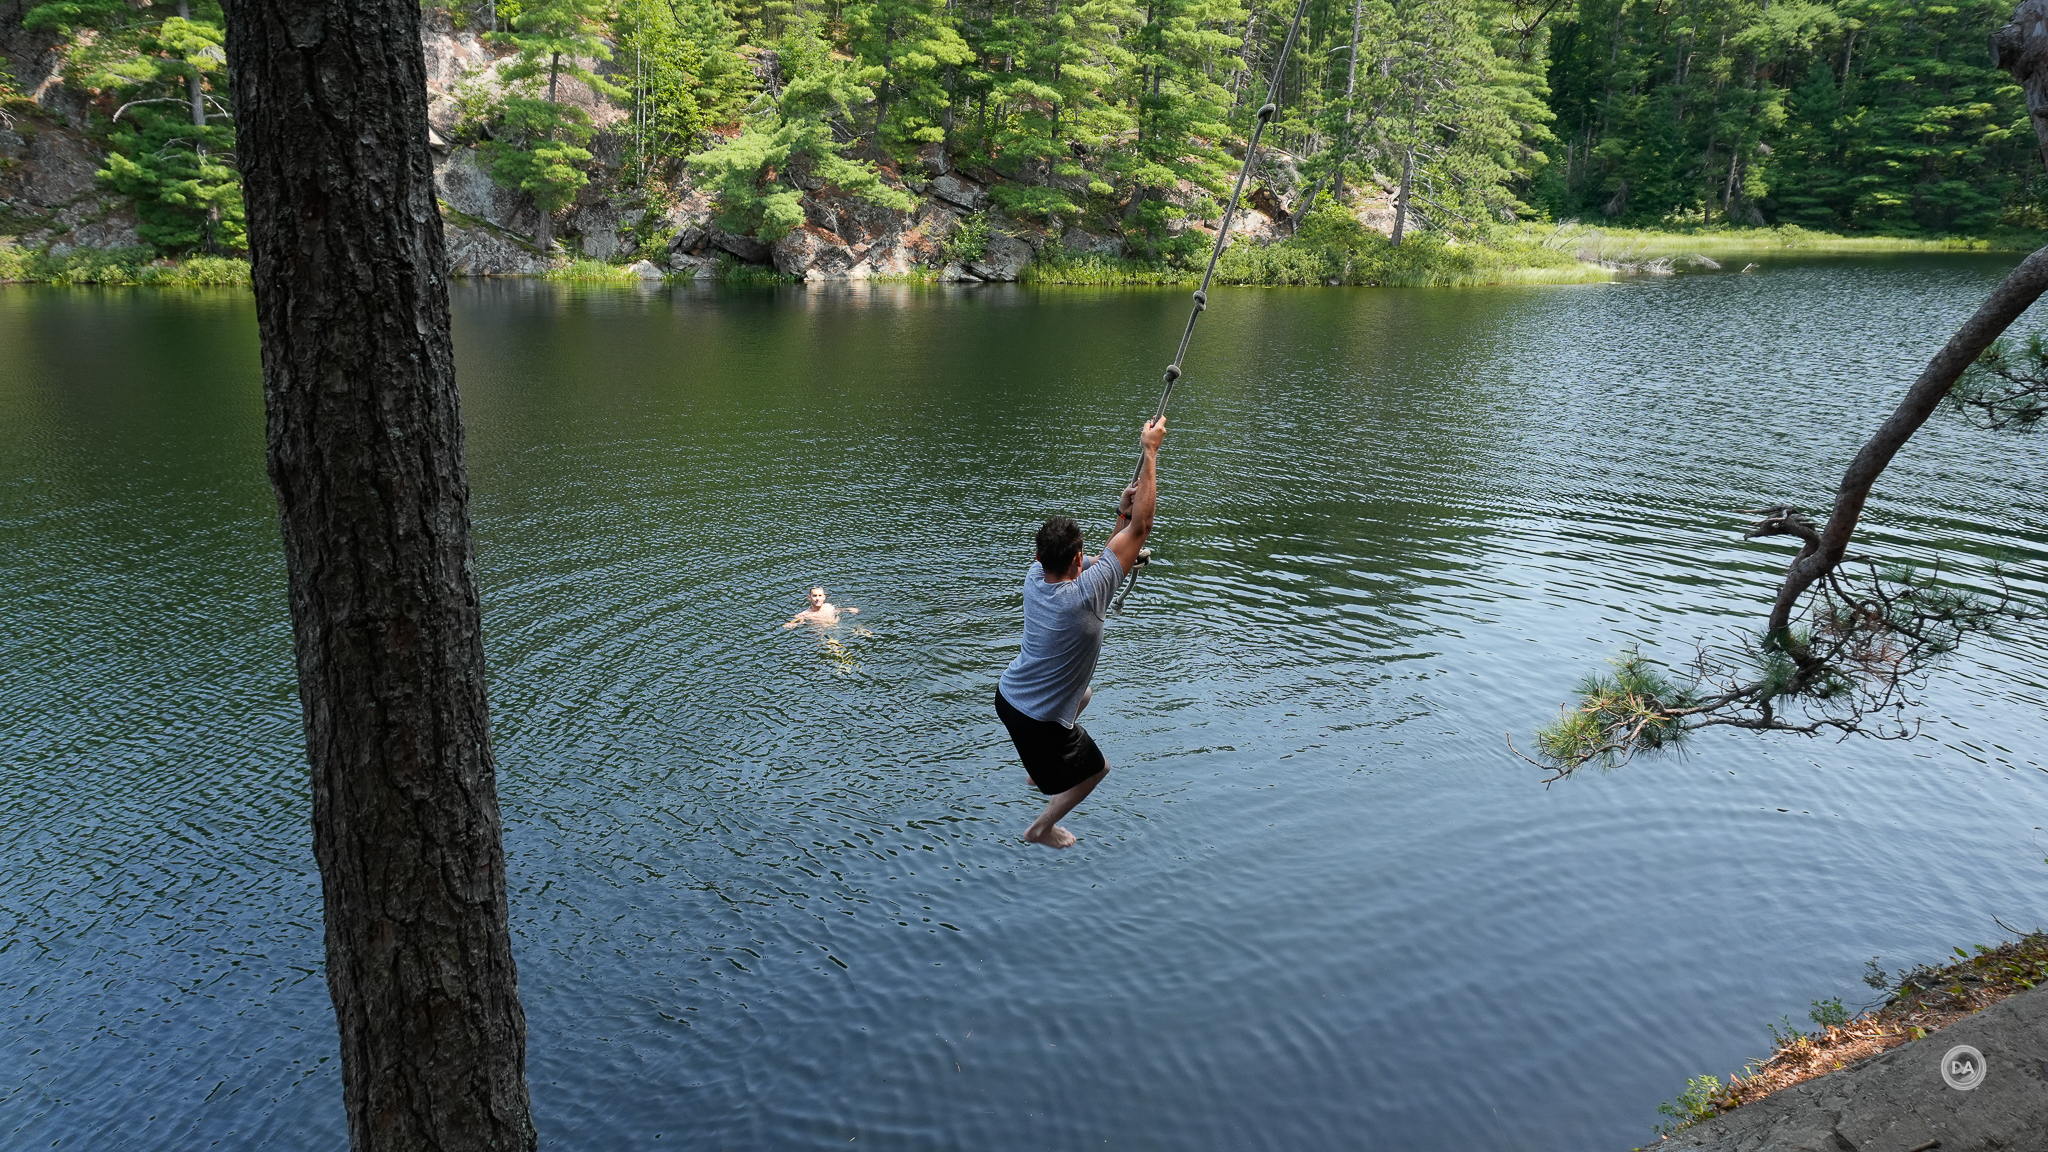
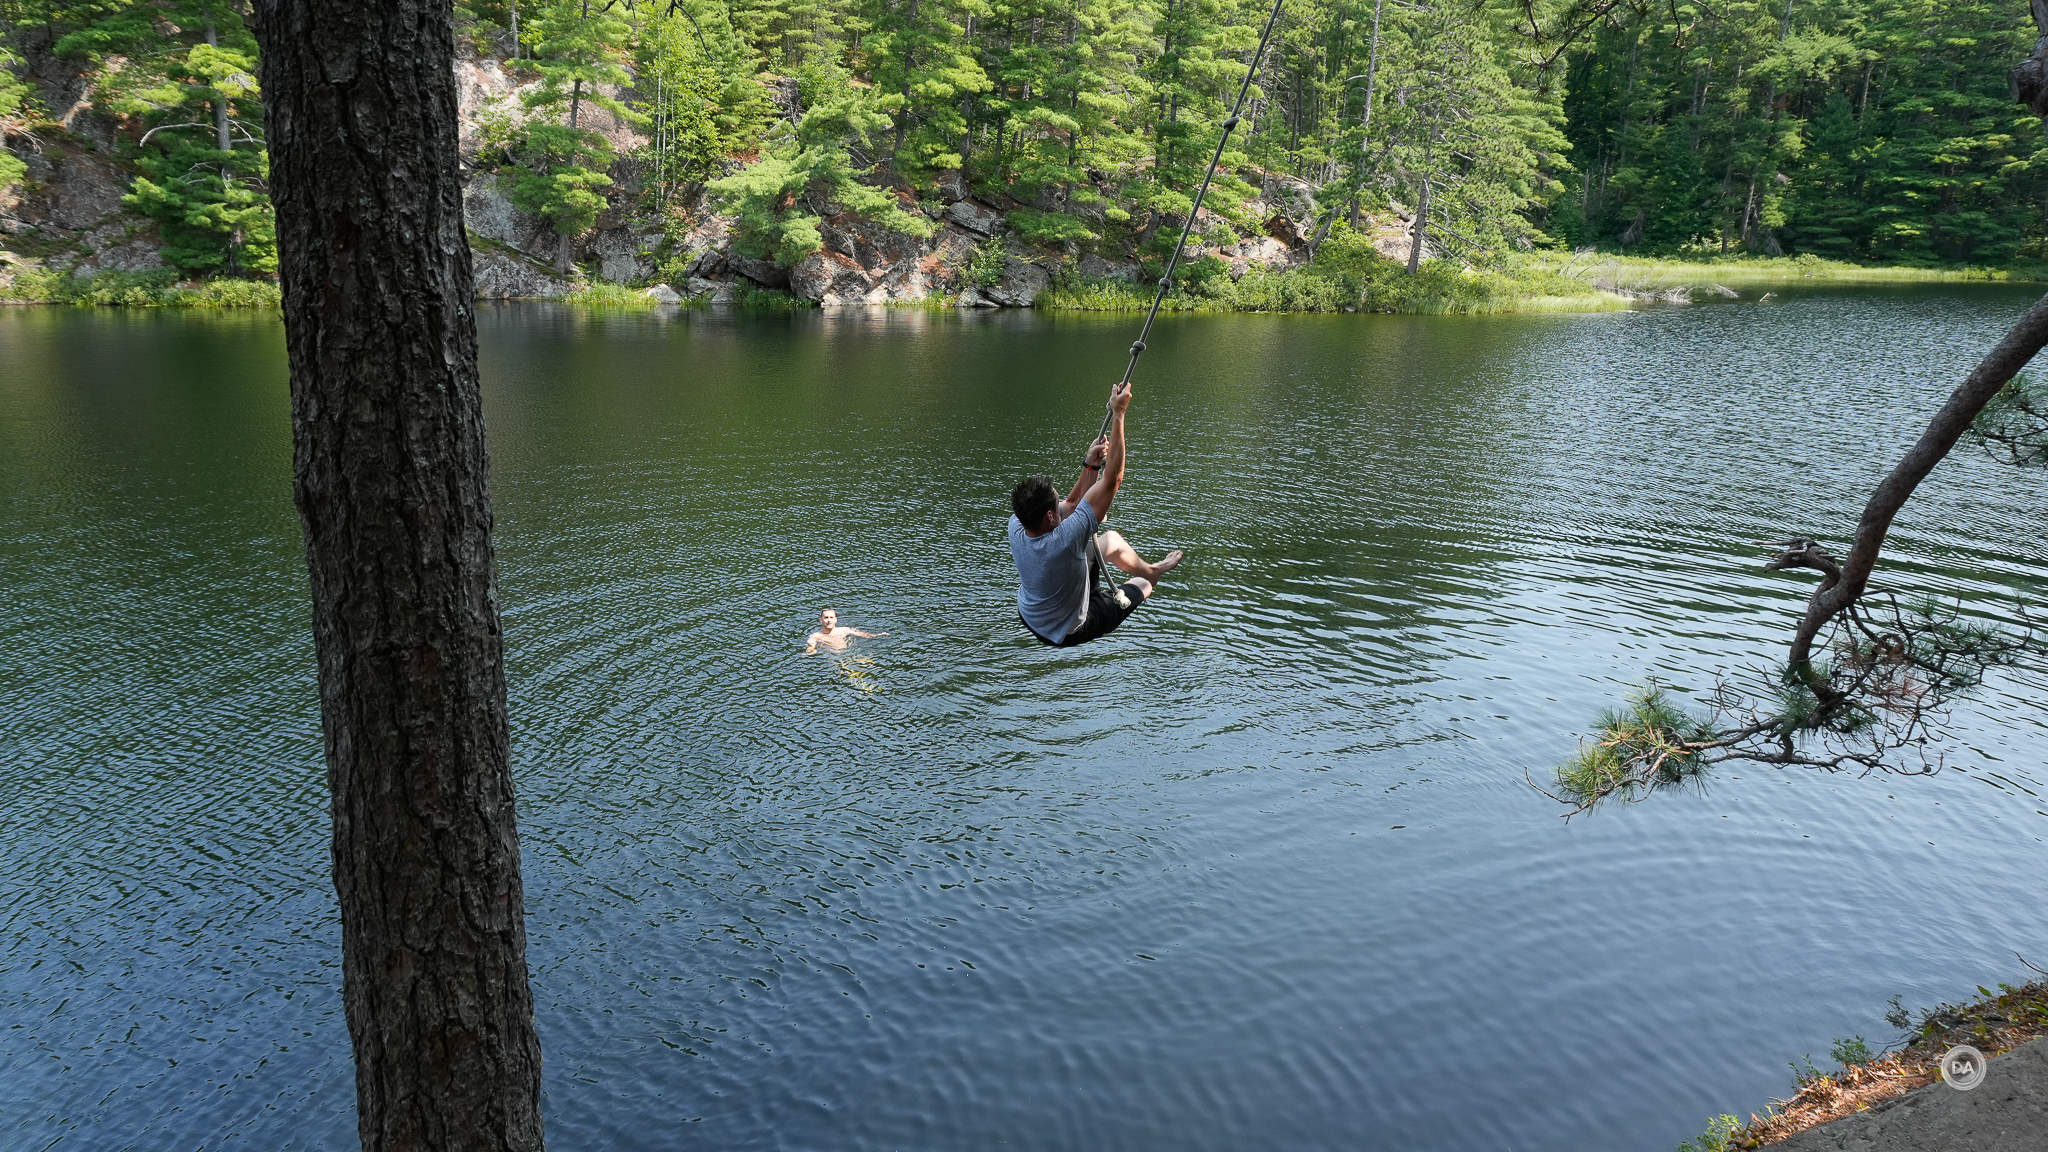
Max burst rate is 11 frames per second, which is pretty good, though the buffer depth will be the issue if you are shooting anything other than JPEGs. Now, to be fair, the buffer depth has actually improved. Extra fine JPEG depth has moved from 99 frames to 143, and full RAW (uncompressed) has grown from 46 to 59 frames. Where I got trapped is that Lossless Compressed RAW is now an option (it wasn’t before), which reduces the buffer depth to 22 frames. But because I was shooting a prerelease camera, Lightroom currently can’t open the RAW images from the camera, so I also needed to shoot JPEGs. Lossless Compressed RAW + JPEG drops to 17 frames, which meant that on my rope swing burst sequences, I actually ran out of frames before the big splash.
But if you want a deep buffer, you do have the option of choosing Fine JPEG (rather than Extra Fine), where you can get over 1000 frames before the buffer fills. That should be enough for you! Overall these specs are actually pretty good for this class, and considering that the storage medium is only UHS-II SD, that tells me that the processor is doing a great job of moving information.
Video
Obviously video is a very important aspect of a vlogging oriented camera, and there are a number of ways where Sony has improved the video recording capabilities.
Before hitting that, however, I do want to quickly comment on the microphone capabilities. As noted previously, there are three different microphones in the system and three options for how sound is recorded. I definitely found that selecting the right mode made a big difference, with the “Front” priority for vlogging do a great job of getting my voice and not sound from behind the camera. Sound quality isn’t at the level of having a separate mic system, but definitely sound better than the average audio from a camera.
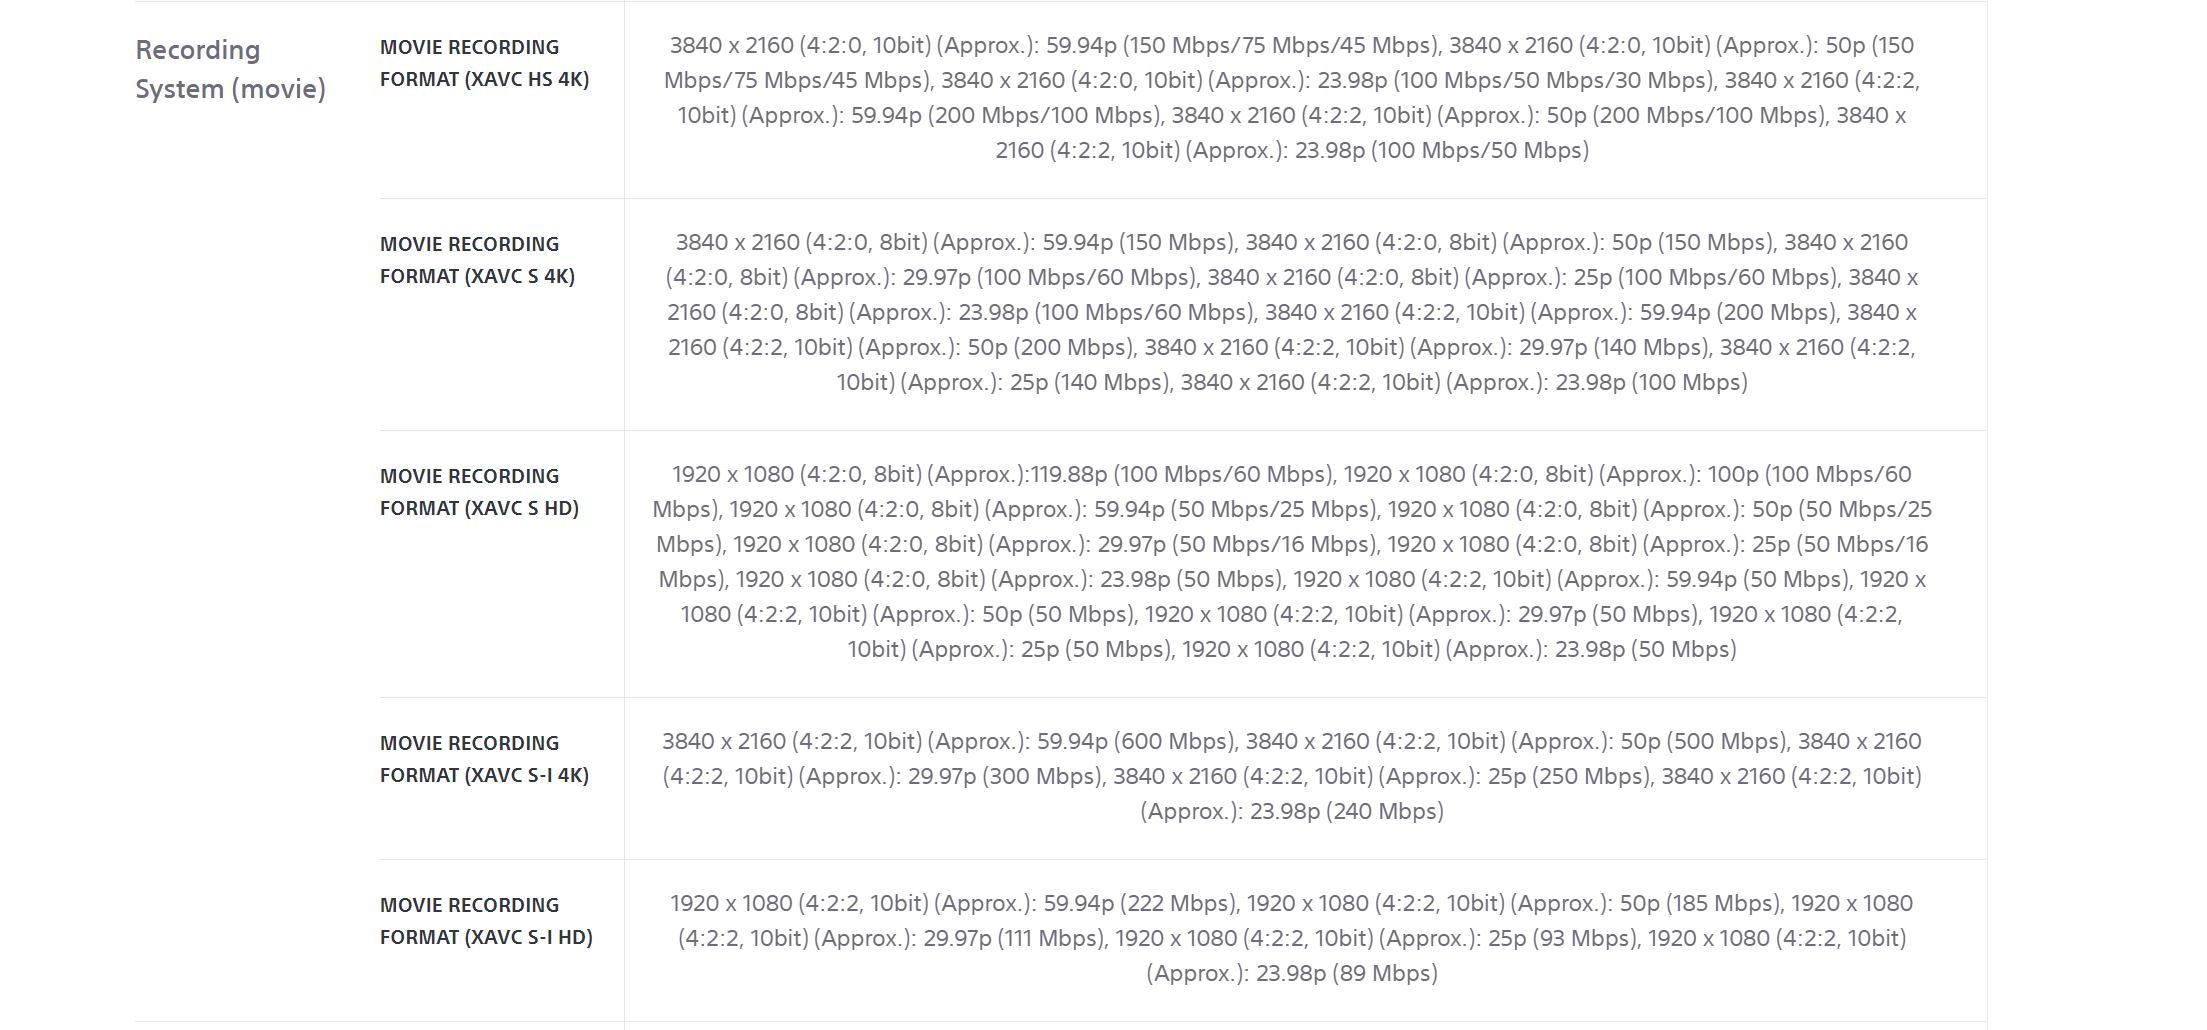
Video recording in the original ZV-E10 was rather bland. It was limited to 8 bit internal video recording with a limit of 4K30. The new ZV-E10 II is much more robust. It starts with 10 bit internal recording and resolution as high as 4K60. And there isn’t a big crop for that recording, either, with 4K30 being a full sensor and 4K60 only having a very mild 1.1x crop. The footage is downsampled from a full pixel 5.6K readout and looks highly detailed. There is now a much wider variety of resolution, codec, and bit-rate options available. Here’s a quick look at them:
Also of note is that Full HD recording is available up to 120FPS for true slow motion capture.
I like the quick CineVlog option on the touchscreen that switches to the S-Cinetone color profile and shoots a widescreen 2.35:1 look with black bars top and bottom that is recorded at 24FPS for a cinematic look. It’s a nice touch for those who are looking for quick and easy cinematic looking footage.
Bitrates are as high as 600Mb/s. Gamma curve options include HDR-HLG, Sony S-Log 2, Sony S-Log 3. The camera includes S-Cinetone and S-Log 3 color, which make for better grading control and full utilization of the 14-stop dynamic range. You can also assign LUTs or use the Creative Looks mode to apply preset color effects to your footage while shooting. There is no RAW video output via HDMI, however. In camera footage looks pretty fantastic (this is a screenshot from a video clip).
Video AF did a great job of tracking my face/eye during vlogging segments and also of tracking for other video shots, including those with some action involved.
I’ve mentioned the background defocus option previously, and there is also a Product Showcase option that emphasize any product moved towards the camera rather than staying locked on the eye. This mode seems to work well and be quickly accessed from the on-screen options that can accessed by touch. The camera also receives Sony’s Focus Breathing Compensation corrections that will help eliminate or reduce focus breathing on any Sony lens.
While we aren’t into any truly high resolution options available on high end cameras, there’s no question that this is a MUCH more robust video camera than the previous generation, and if you are buying the ZV-E10 II for its intended purpose, this is well worth the price premium of $300 over the previous generation camera.
Image Quality Breakdown
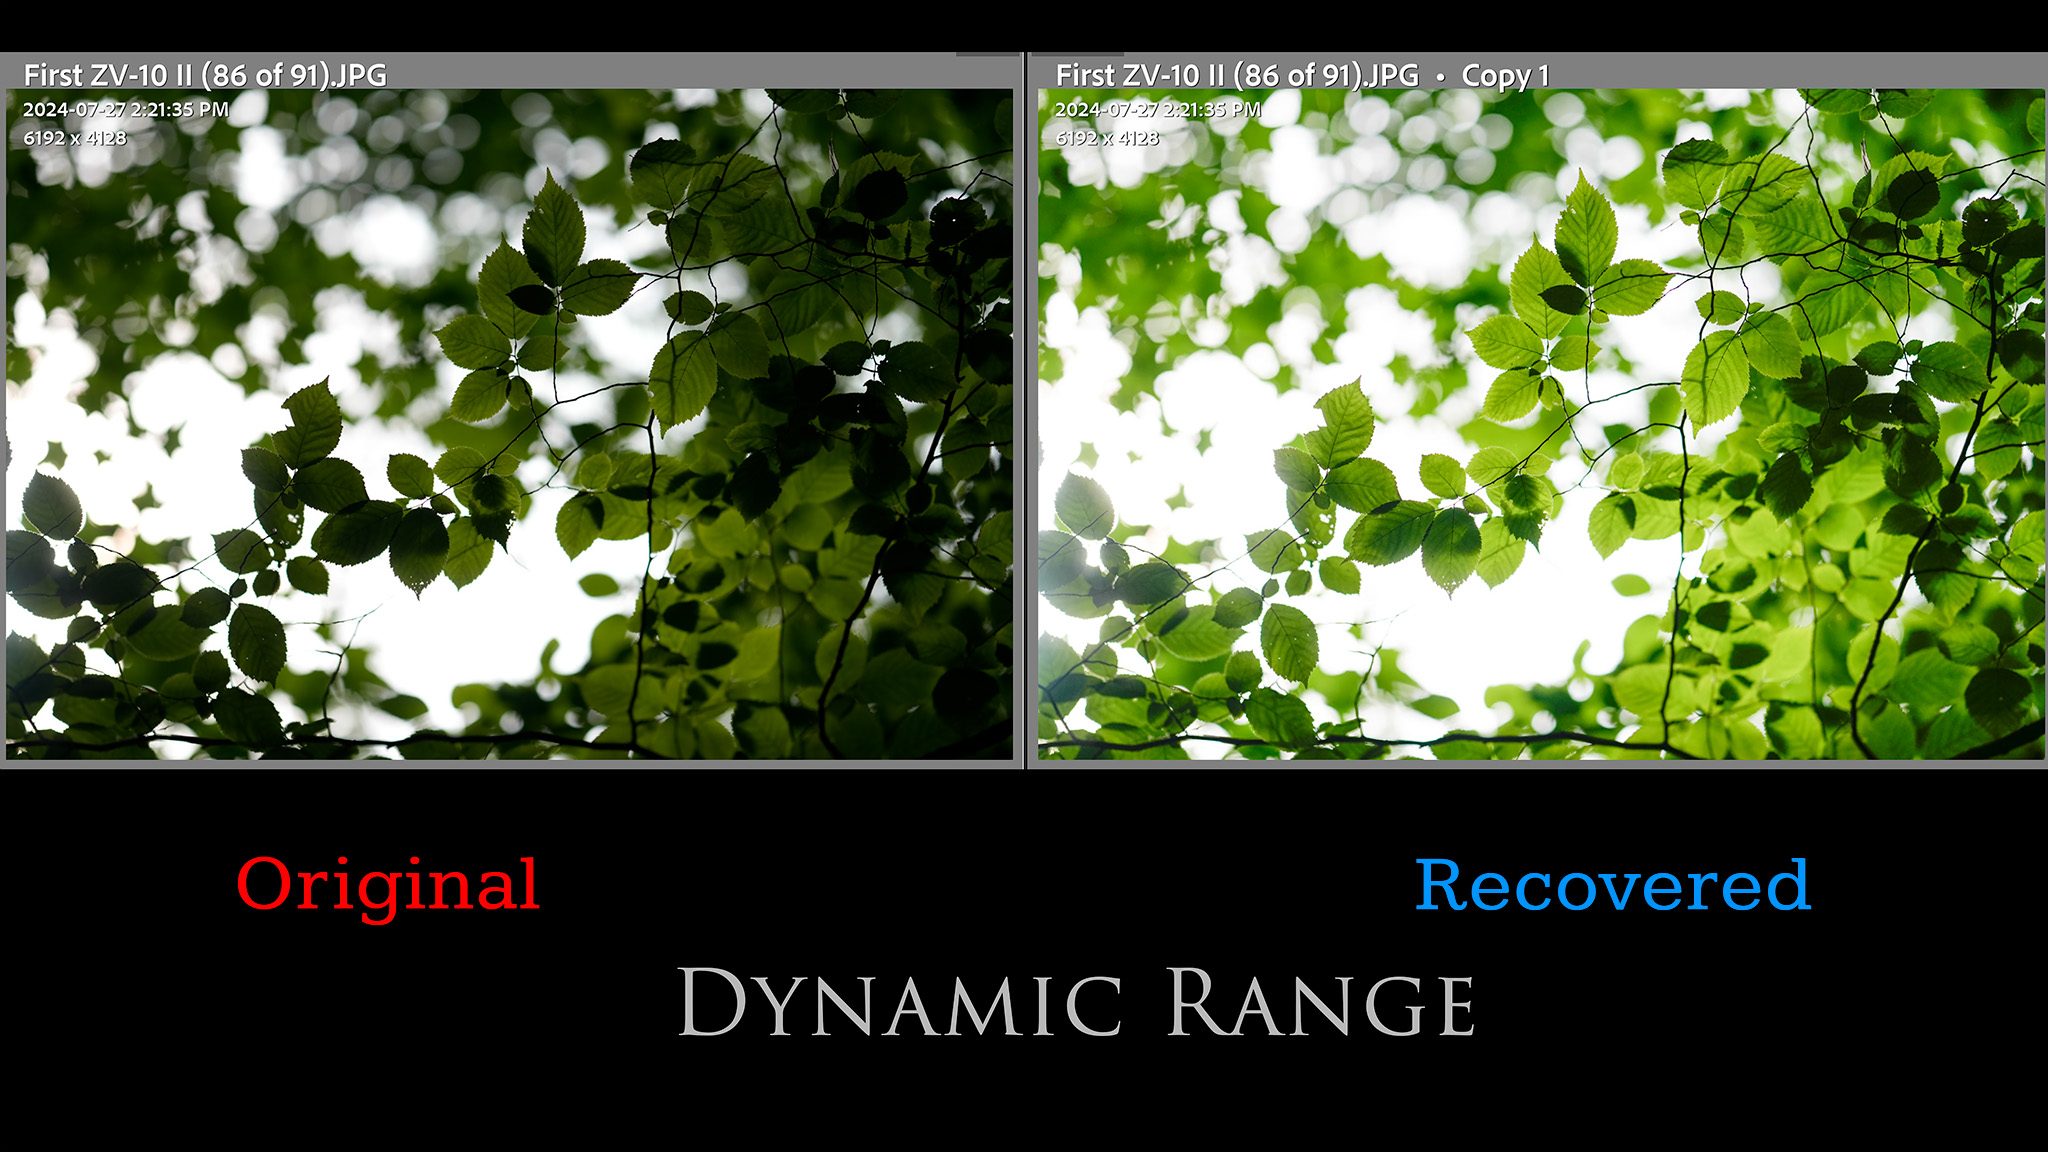
As noted in the intro, the ZV-E10 II inherits the APS-C-format 26MP Exmor CMOS found in either the FX30 or a6700 cameras. This increases the resolution from 24 to 26MP and also increases both the dynamic range (nearly a half stop) and ISO capabilities (slightly) of the camera. The Bionz XR processor further helps with this. The ZV-E10 II is capable of producing great looking images with great color, detail, and dynamic range.
Unfortunately I was limited in being able to torture test this sensor due to Lightroom/ACR being unable to open the RAW images yet because of this being a prerelease review. All of the images shown in this review are all out of camera JPEGs. I will revisit this section when I have a chance to review the sensor on either this camera or the a6700.
According to Photons to Photos, dynamic range has increased from 10.53 stops to 10.95 stops, high enough to beat all of the APS-C competitors from Canon, Fuji, or Nikon. Low light performance manages to top the ZV-E10 despite the resolution bump as well, which is impressive.
In camera JPEGs look very good, capable of beautiful color:
…and also of great detail:
Skin tones look good in my shots as well:
Even with JPEG images I was able to recover a few images that didn’t meter the way I personally wanted even if technically correct. I’ve added nearly two stops into the recovered result here.
The native ISO range is from 100-32,000, though in the case of shoting JPEGs, I prefer to keep it at ISO 12,800 or less, as noise reductions gets a little aggressive above that. I can tolerate shots in color at ISO 12,800:
…but above that find only B&W tolerable. Here’s an ISO 32,000 JPEG:
That aside, the tests of others tell me that the High ISO performance here is about as good as you’ll find on an APS-C sensor, so overall this is a great little camera in terms of sensor performance.
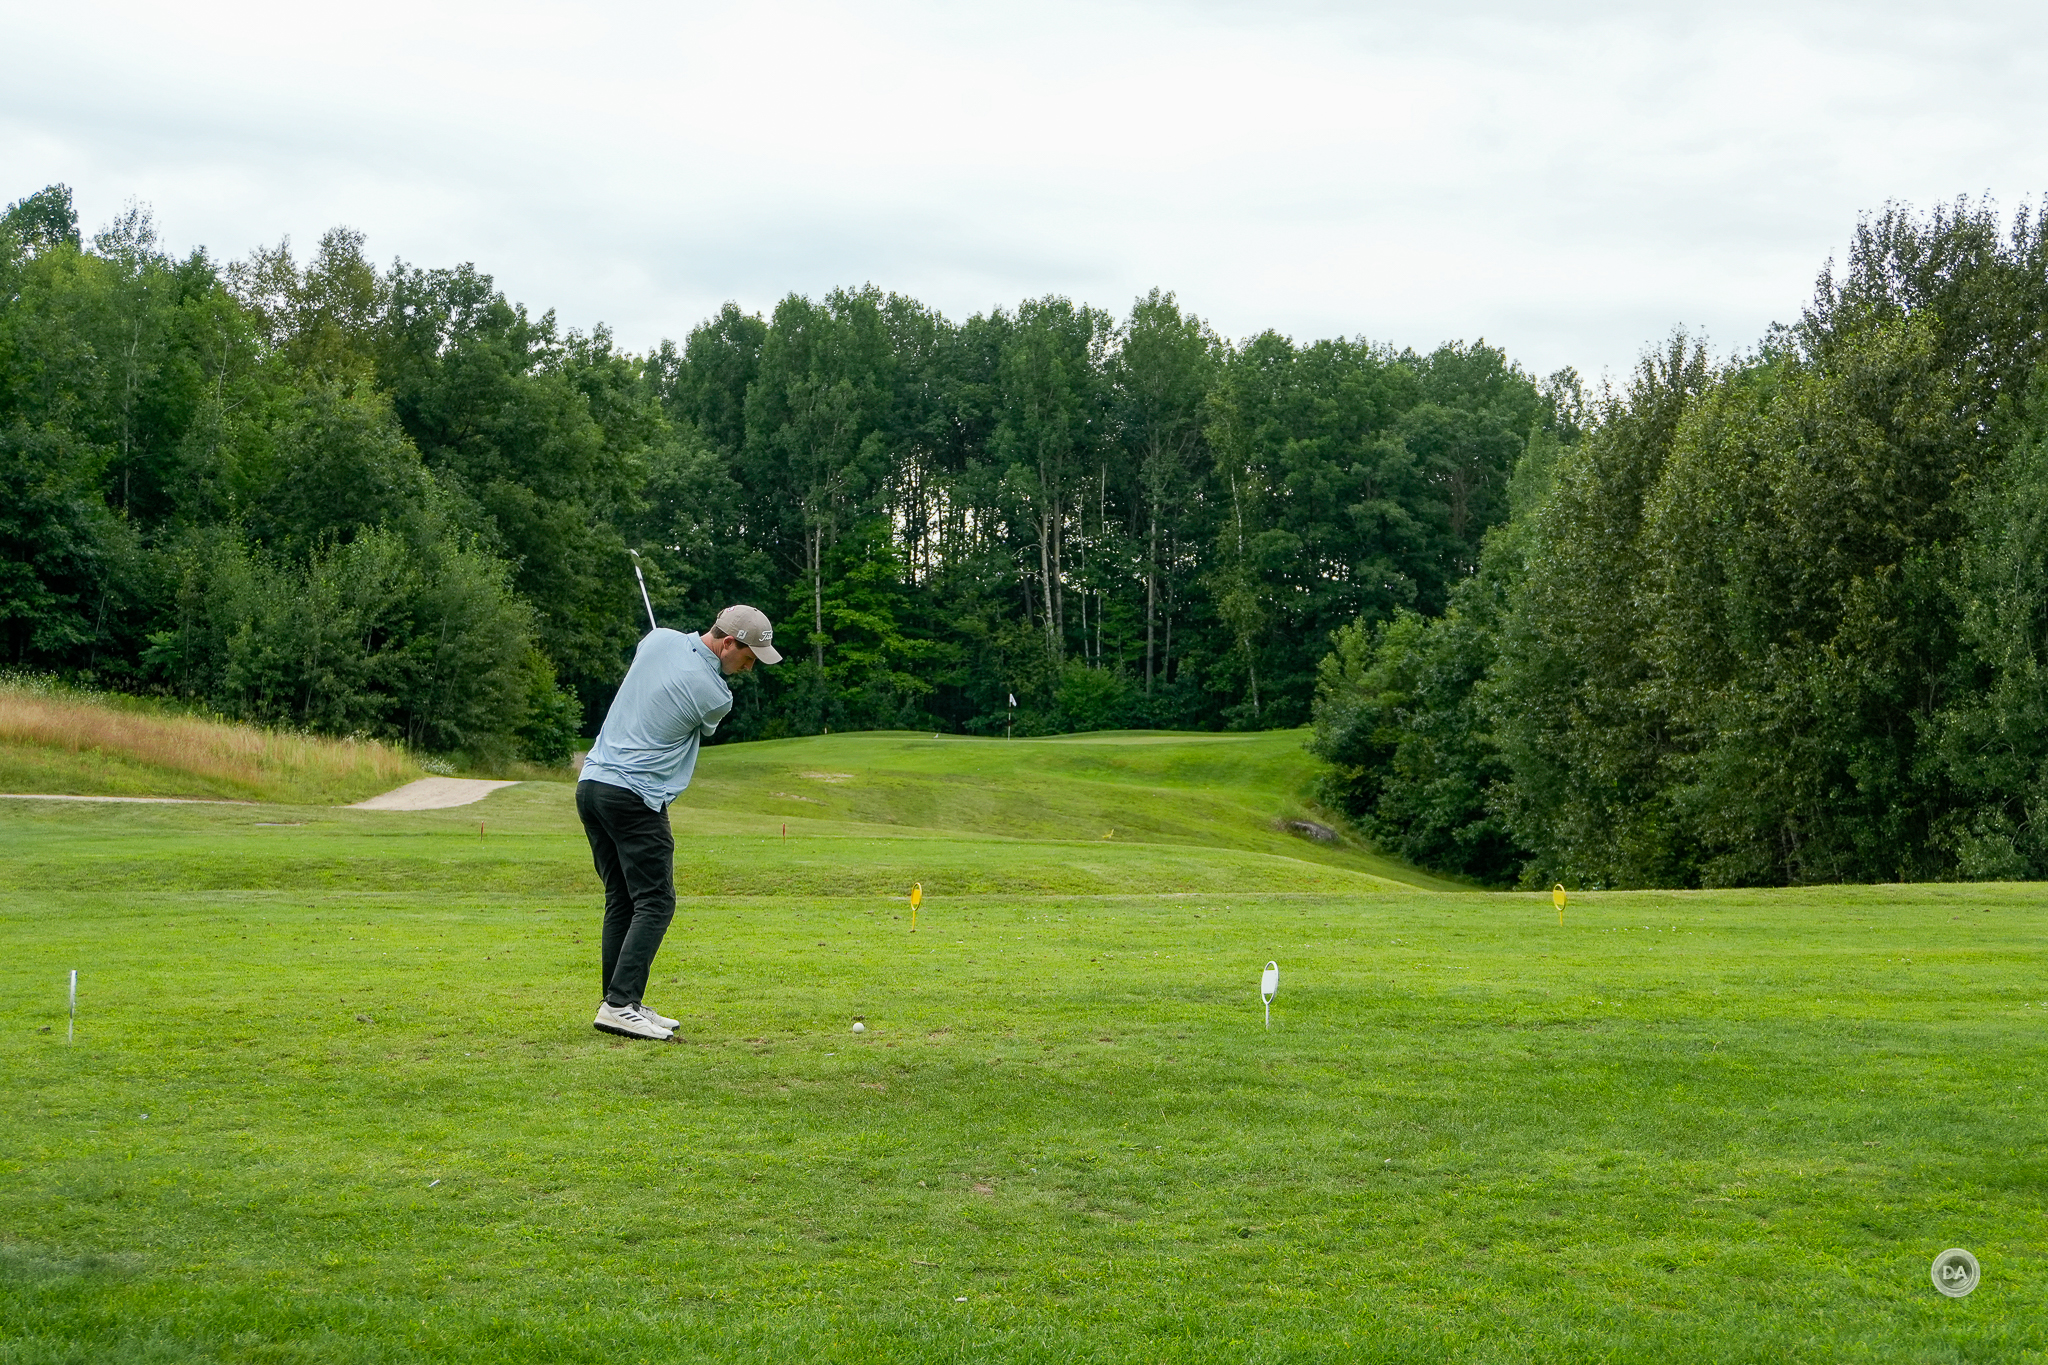
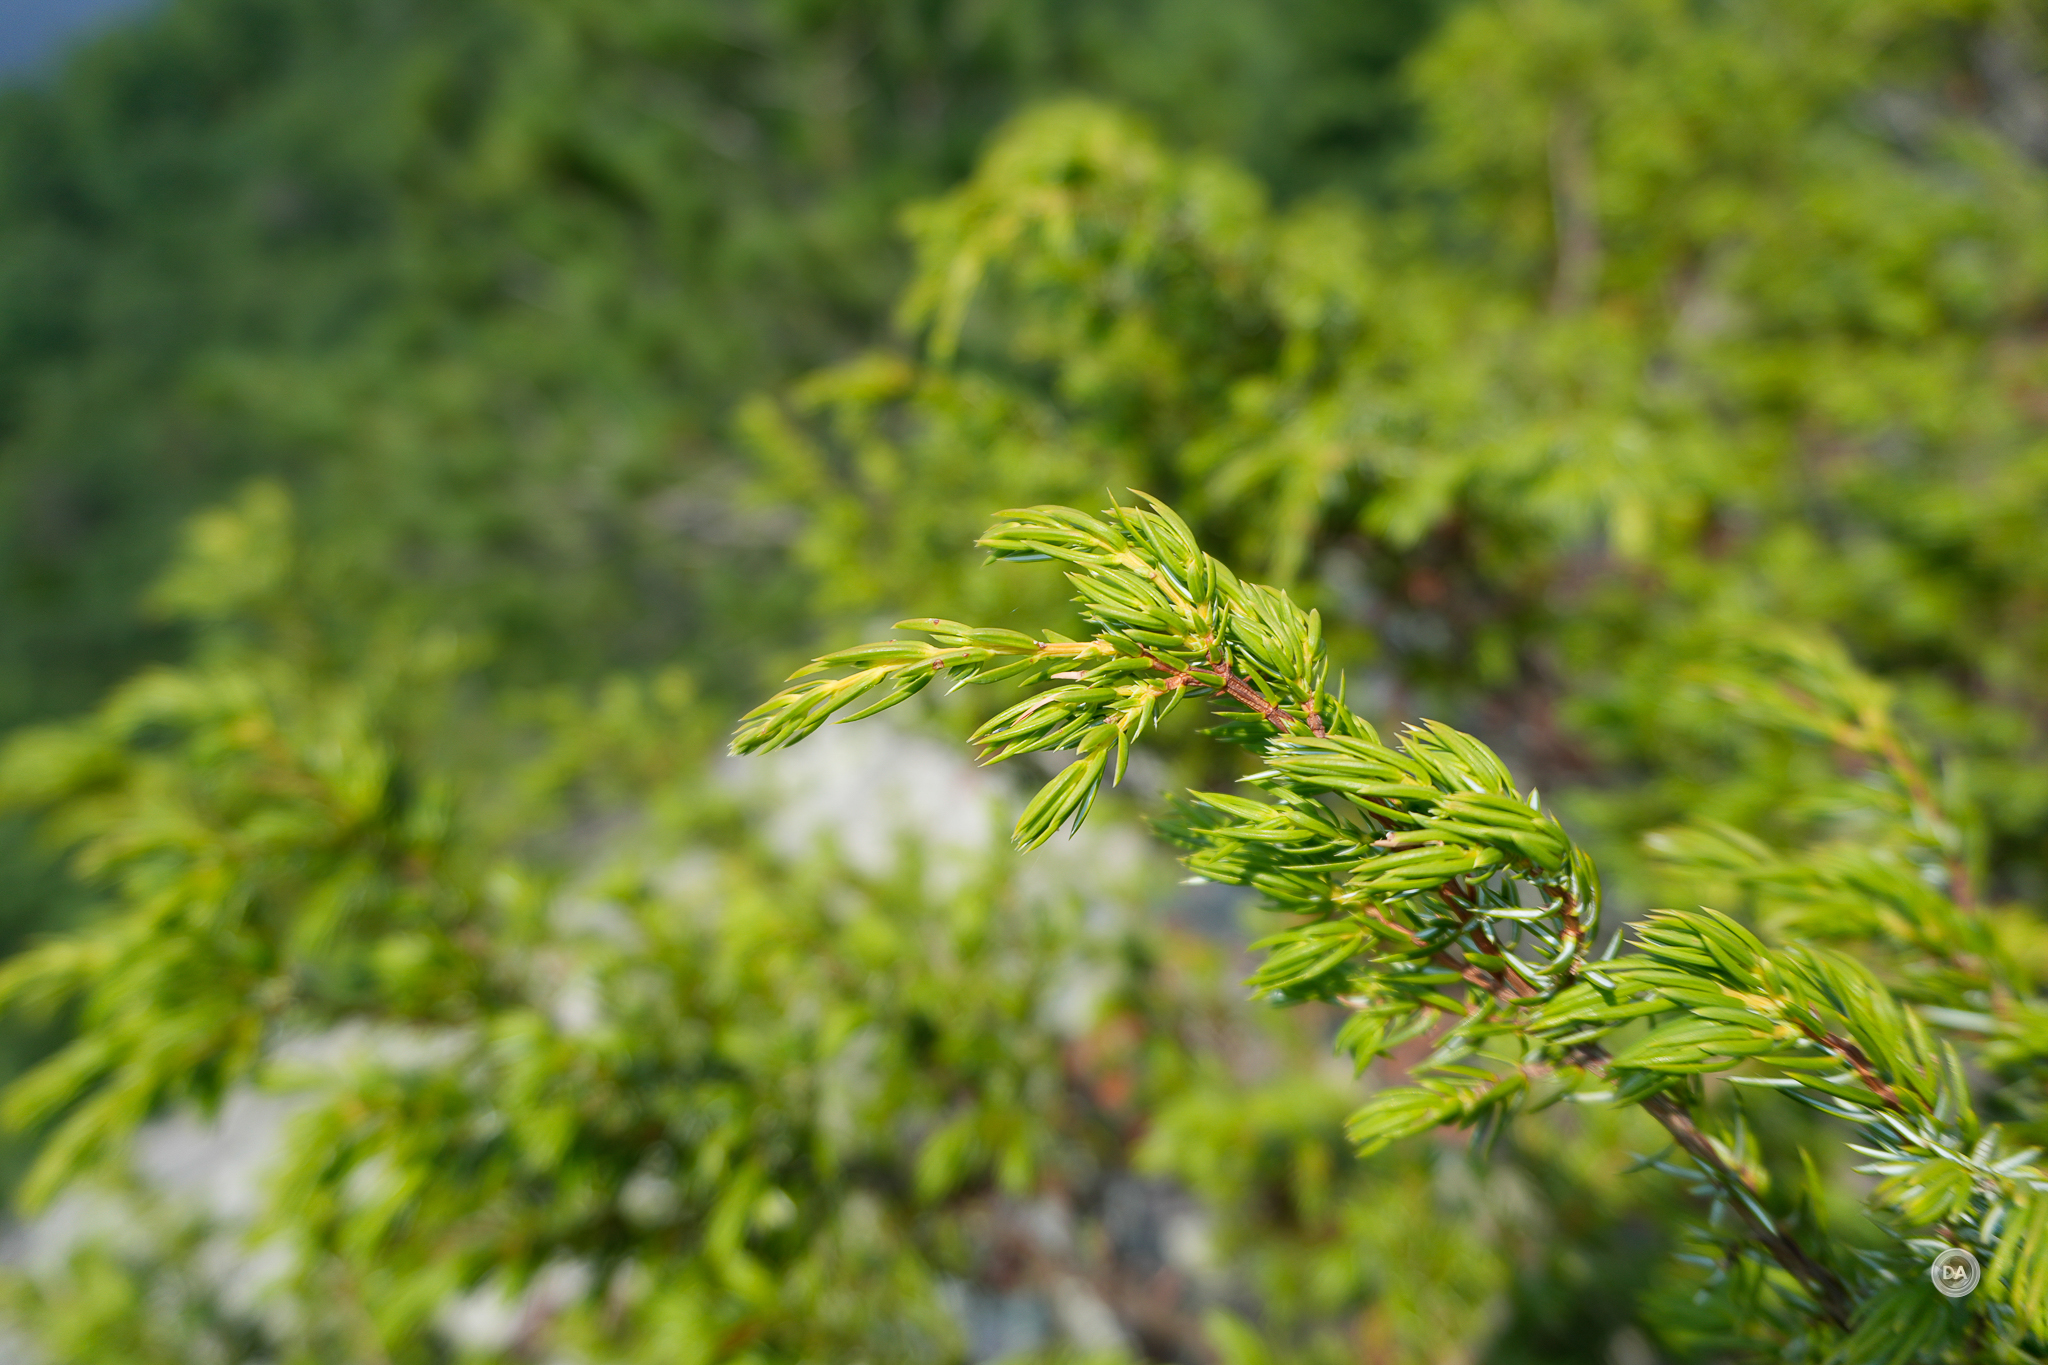
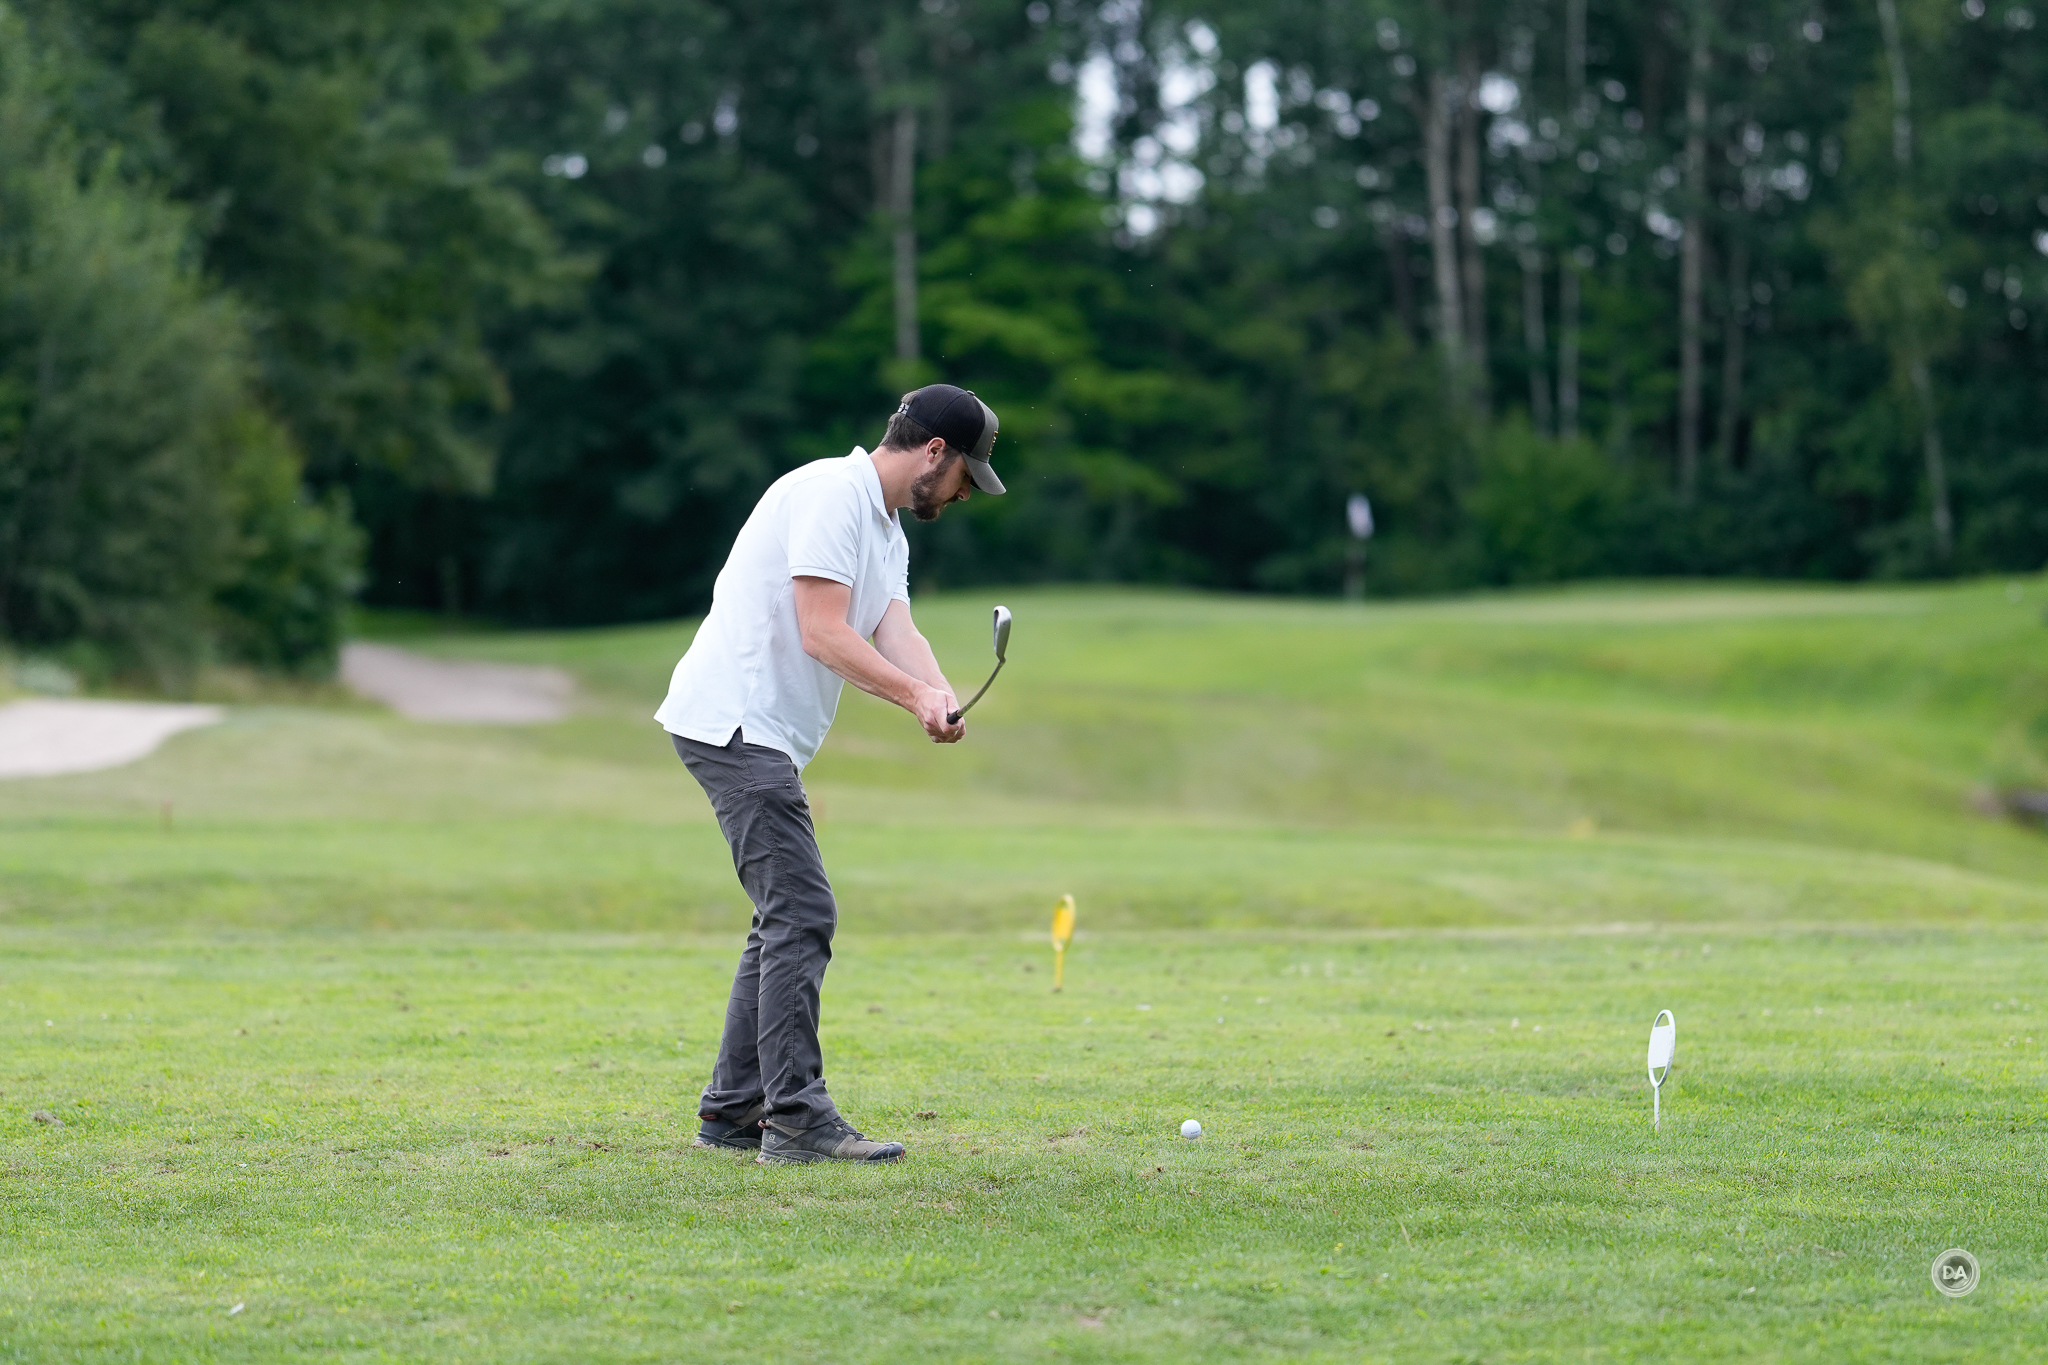
I’ve used the Sony ZV-E10 II for big hikes, in the golf bag for beautiful moments that might pop up there, in a waist carrier on cycling trips, and at family events for a lightweight carry-along camera. I’ve also shot some B-roll footage for my channel with it, and, though I don’t actually Vlog, I have shot some Vlog sequences with it for intros. This is a very competent compact camera, though I do miss having a viewfinder…particularly in bright conditions.
There’s a far more robust suite of video options, a bigger battery to allow you to capture it all, and a great new sensor that affords more flexibility for both video and stills.
So is there a fly in the ointment? Perhaps. The ZV-E10 II has received a pretty significant $300 price hike, and while I think you can pretty easily make the argument that the various improvements are worth that increase, the $1000 price point moves it into contention with far more cameras. Sometimes people in this zone are looking at the price of competing cameras and wondering if a Sony is worth the additional cost. But as I mentioned in the intro, I think the value of Sony cameras is when you consider the lower cost of the whole ecosystem. There are dozens of reasonably priced compact lens options on Sony, either APS-C specific or full frame compatible, and there just isn’t any other brand that can match the sheer amount of available options. So if you’re interested in going deeper than just the kit lens, I think Sony just might be worth spending a bit more on the camera. Vlog away!
Pros:
New grip for larger battery is more comfortable
Battery life is much improved
Some handling and control improvements
Having zoom controls on camera is useful
Upgraded LCD resolution
Improved autofocus system
Deeper buffers
New sensor has higher resolution and better performance
Vastly improved video specs
4K60 mode has minimal crop
3 Capsule microphone offers better sound and more flexibility
Cons:
I miss having a viewfinder
No IBIS
Flash sync speed only 1/30th second
$300 price increase from EV-Z10 brings more cameras into contention
Keywords: Vlog, Sony, EV-10 II, EV, 10, II, Sony EV-10 II Review, APS-C, Video, YouTube, Review, Hands On, Dustin Abbott, Real World, Comparison, Sharpness, Bokeh, Flare Resistance, Autofocus, Image Quality, Sample Images, Video, Photography, let the light in, weathersealing, #letthelightin, DA
DISCLAIMER: This article and description contains affiliate links, which means that if you click on one of the product links, I’ll receive a small commission. As an Amazon Associate I earn from qualifying purchases.
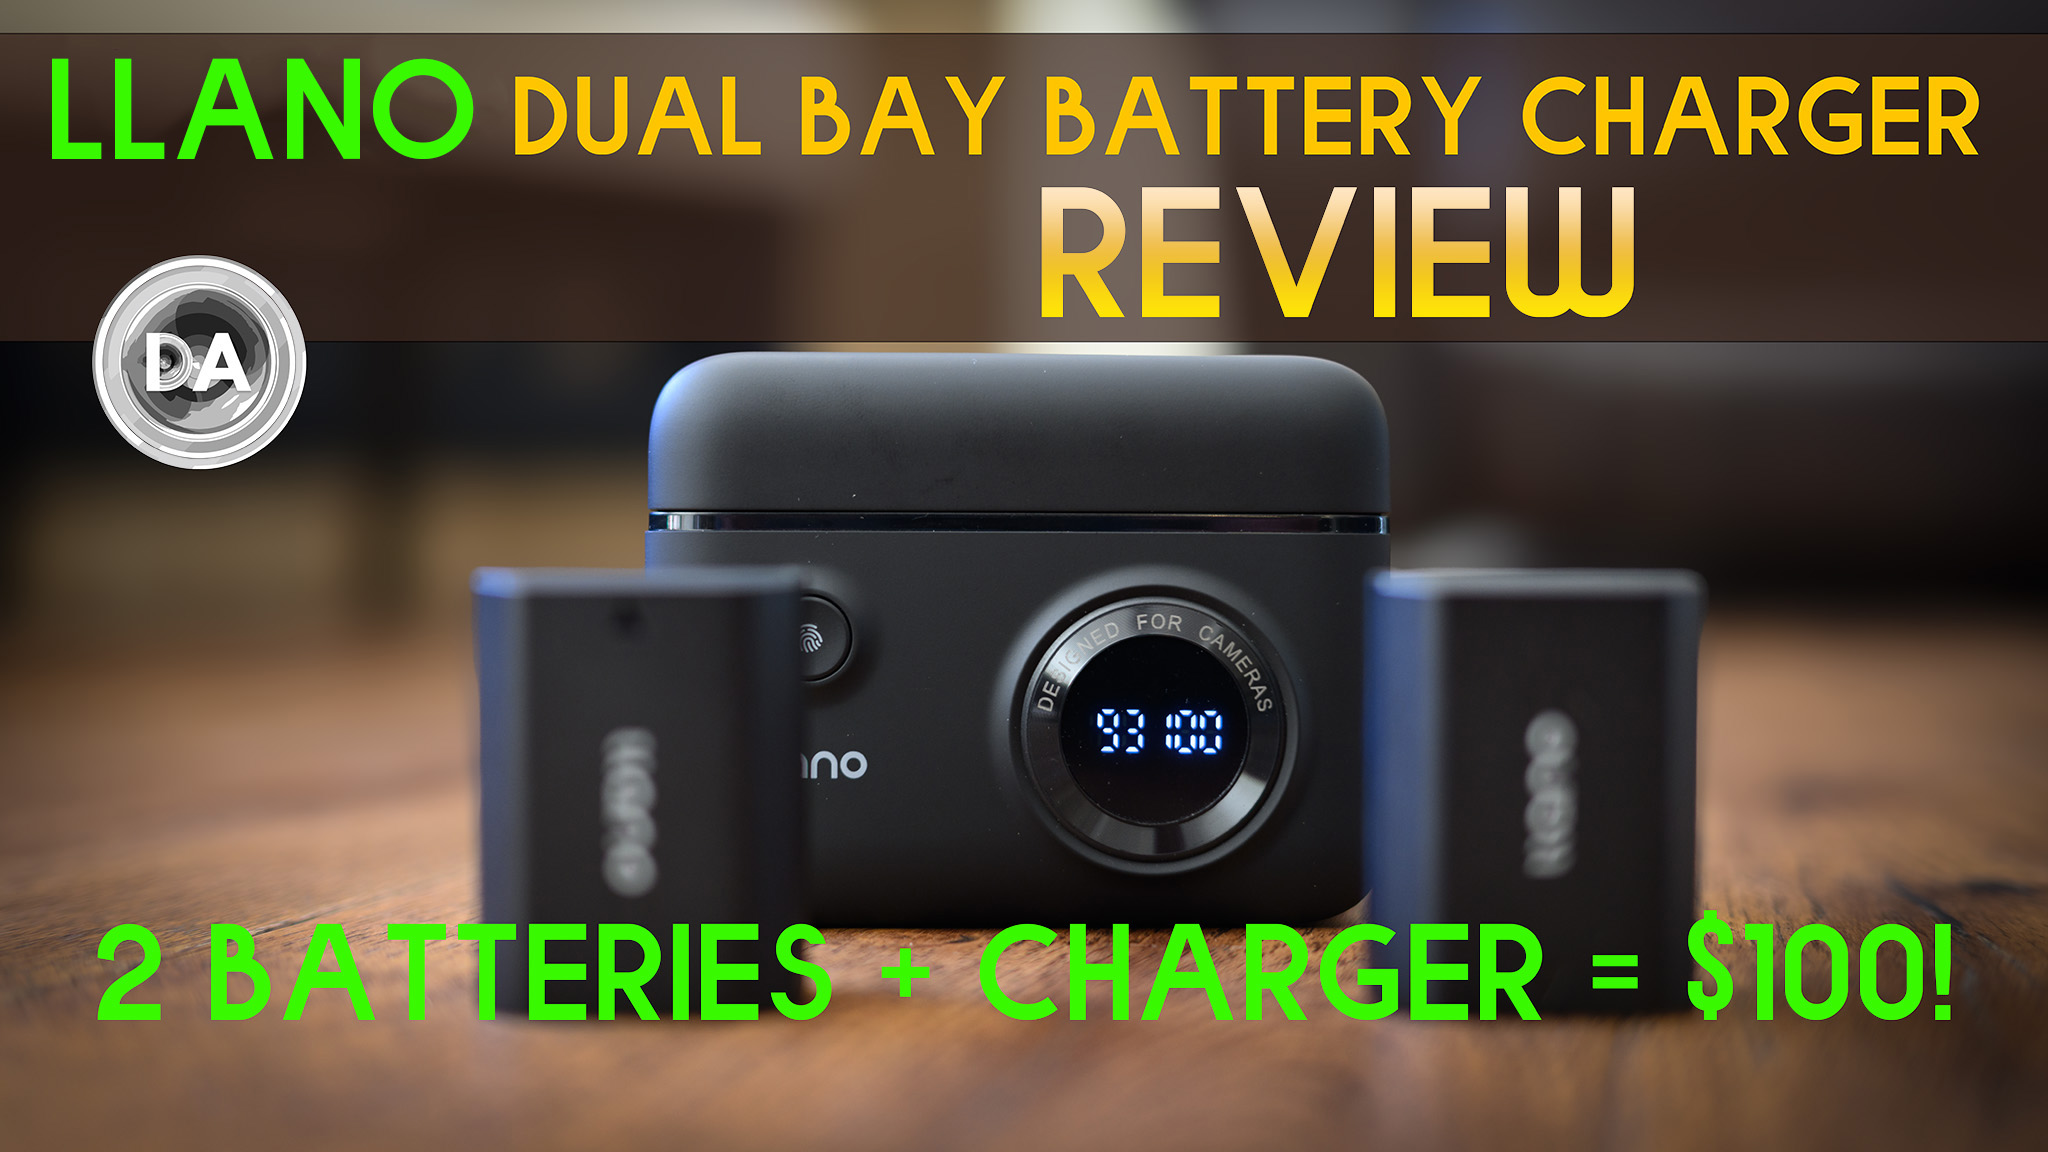
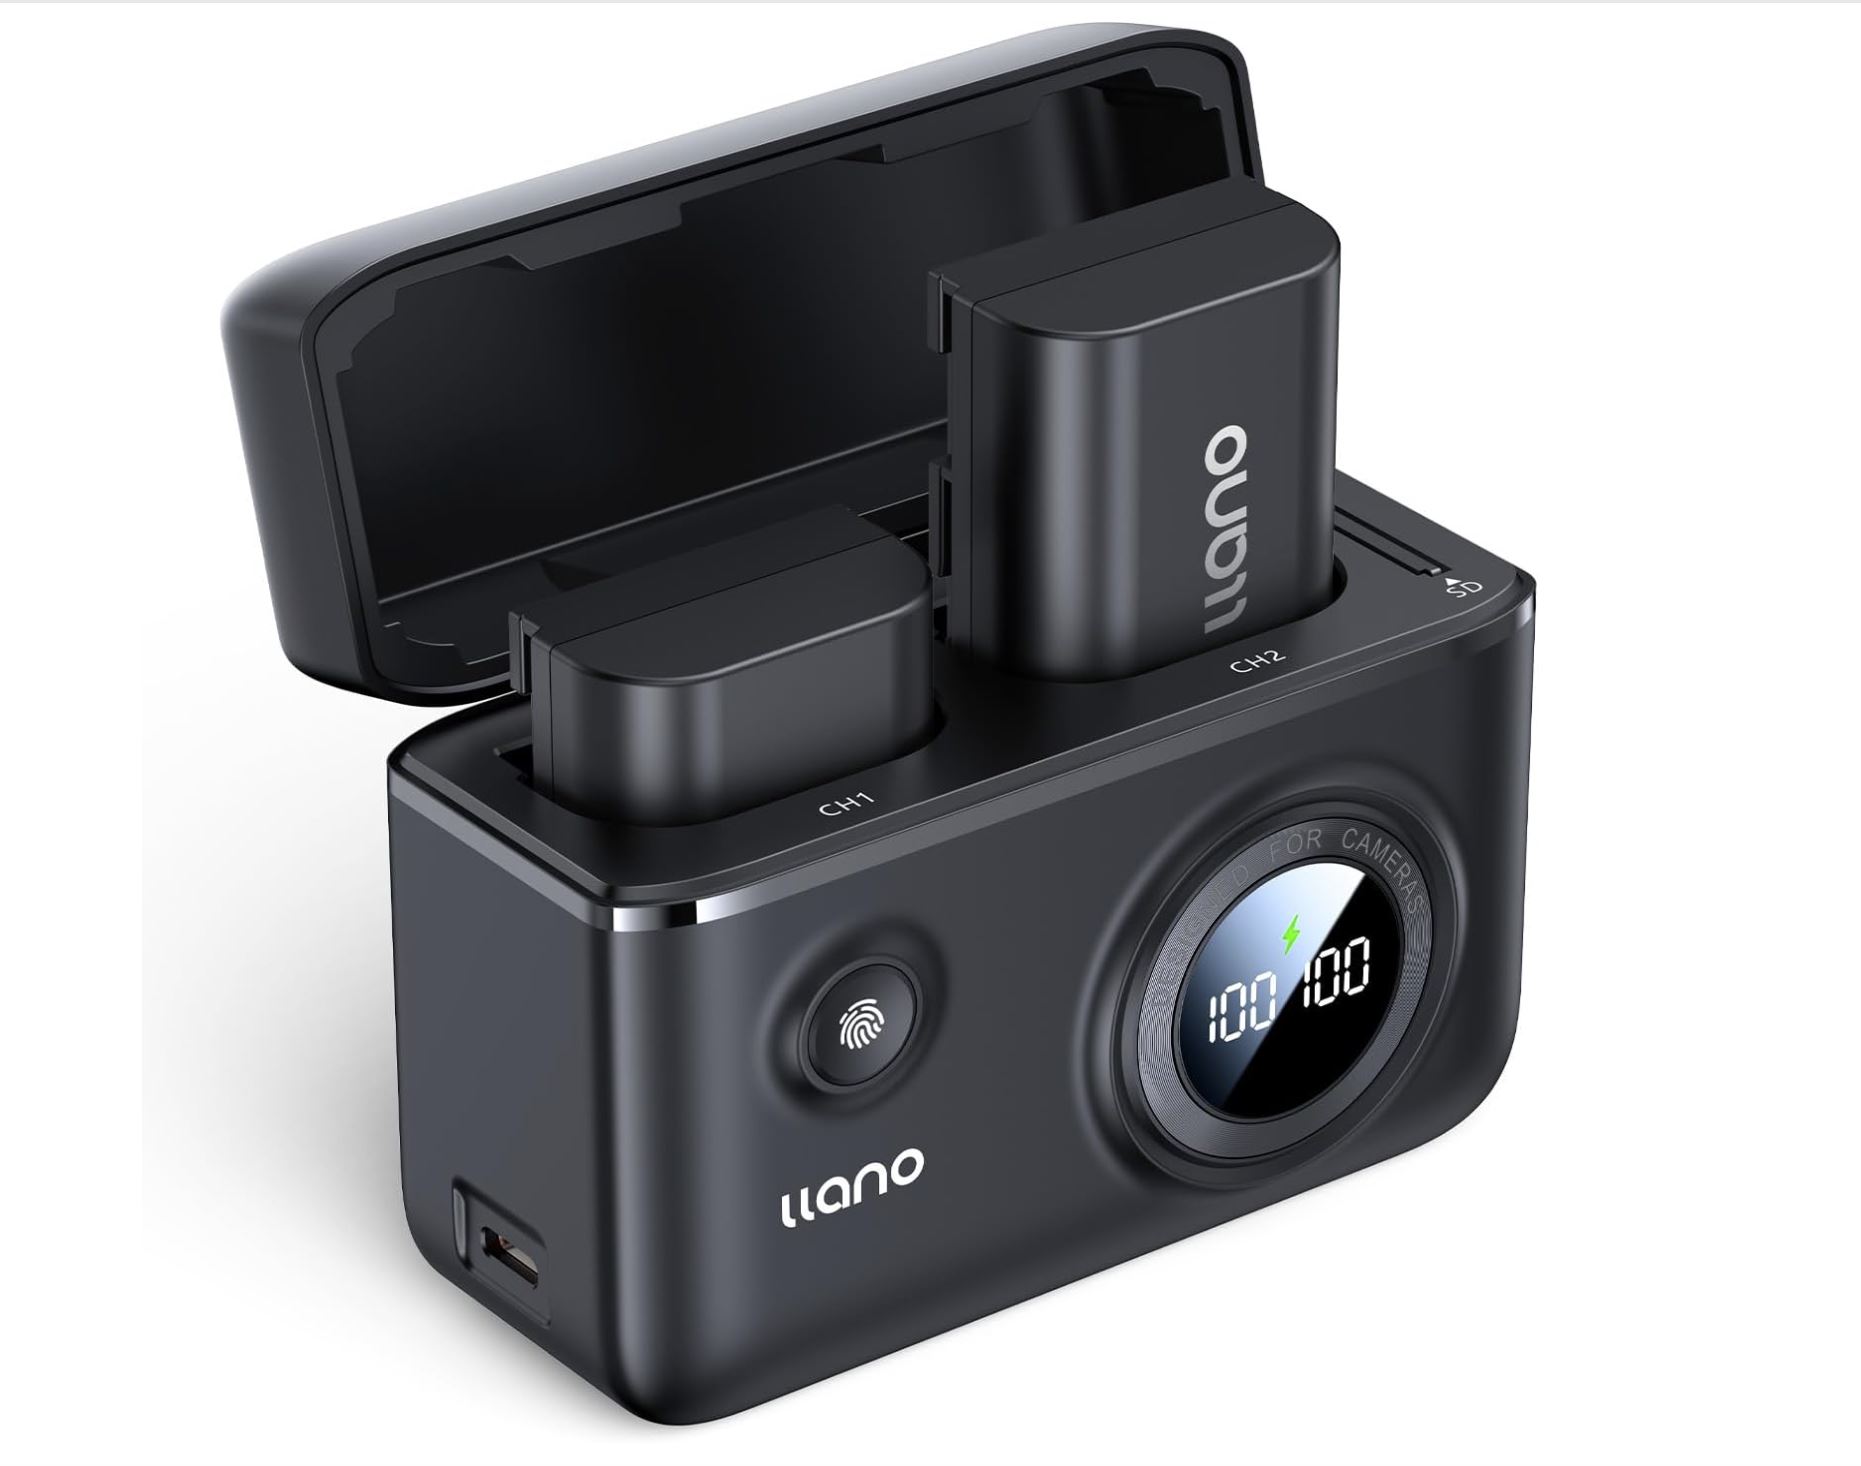
Photographers are always looking for new and improved ways to power their cameras. There are few things more disappointing than having an amazing photo opportunity and discovering that your camera is dead. llano has a very slick approach, giving you a camera themed charging case with dual bays and the capacity to charge at up to 18W of power delivery. They sell a very reasonably priced kit that comes with two replacement batteries for your camera as well, and I’ve been successfully using those batteries exclusively in my Sony and Canon cameras for the past five weeks. So what do I think about the llano approach? Find out in my video review here.
Thanks to llano for sending me a review sample. As always, this is a completely independent review. All thoughts and opinions expressed here are my own.
The full review can be found in the video linked above, but here are some of my review notes for those who are more text oriented.
How Well Does the Charger Work?
Unboxing – a very nice presentation in the packaging
Includes batteries, charger, manual, wrist strap, pouch, charging cable.
Nice soft touch materials
Spot to store SD card
Front button allows you to monitor state of charge even if the charger isn’t plugged in.
Underreports state of charge vs camera (charger showed 78-80%, camera showed 92%).
Batteries click into place nicely
Battery charge time test (drew 13 watts initially – took about 170 minutes for full charge) – trickle charges at end. In camera charge draws 12-13 watts.
Vs Sony dedicated charger (costs as much as Ilano + two batteries – rated at 150 minutes) – Started 10:47 End 12:39 neither charger drawing any current. Sony drew 26 watts initially but slowed later. Much better charging feedback from Ilano.
Drew 17 watts when charging dual batteries (rated at 18W). Biggest advantage is that you can charge two batteries almost as fast as you can charge 1
Conclusion – a little slower than Sony charger, but dual bay, USB-C powered = more charging options, and a cleaner interface.
I can’t yet account for the long term reliability of the batteries (after only six weeks), but there is no question about value. 2 Ilano batteries + charger for under $100 – to get the equivalent from Sony or Canon would be over $250.
DISCLAIMER: This article and description contains affiliate links, which means that if you click on one of the product links, I’ll receive a small commission. As an Amazon Associate I earn from qualifying purchases.
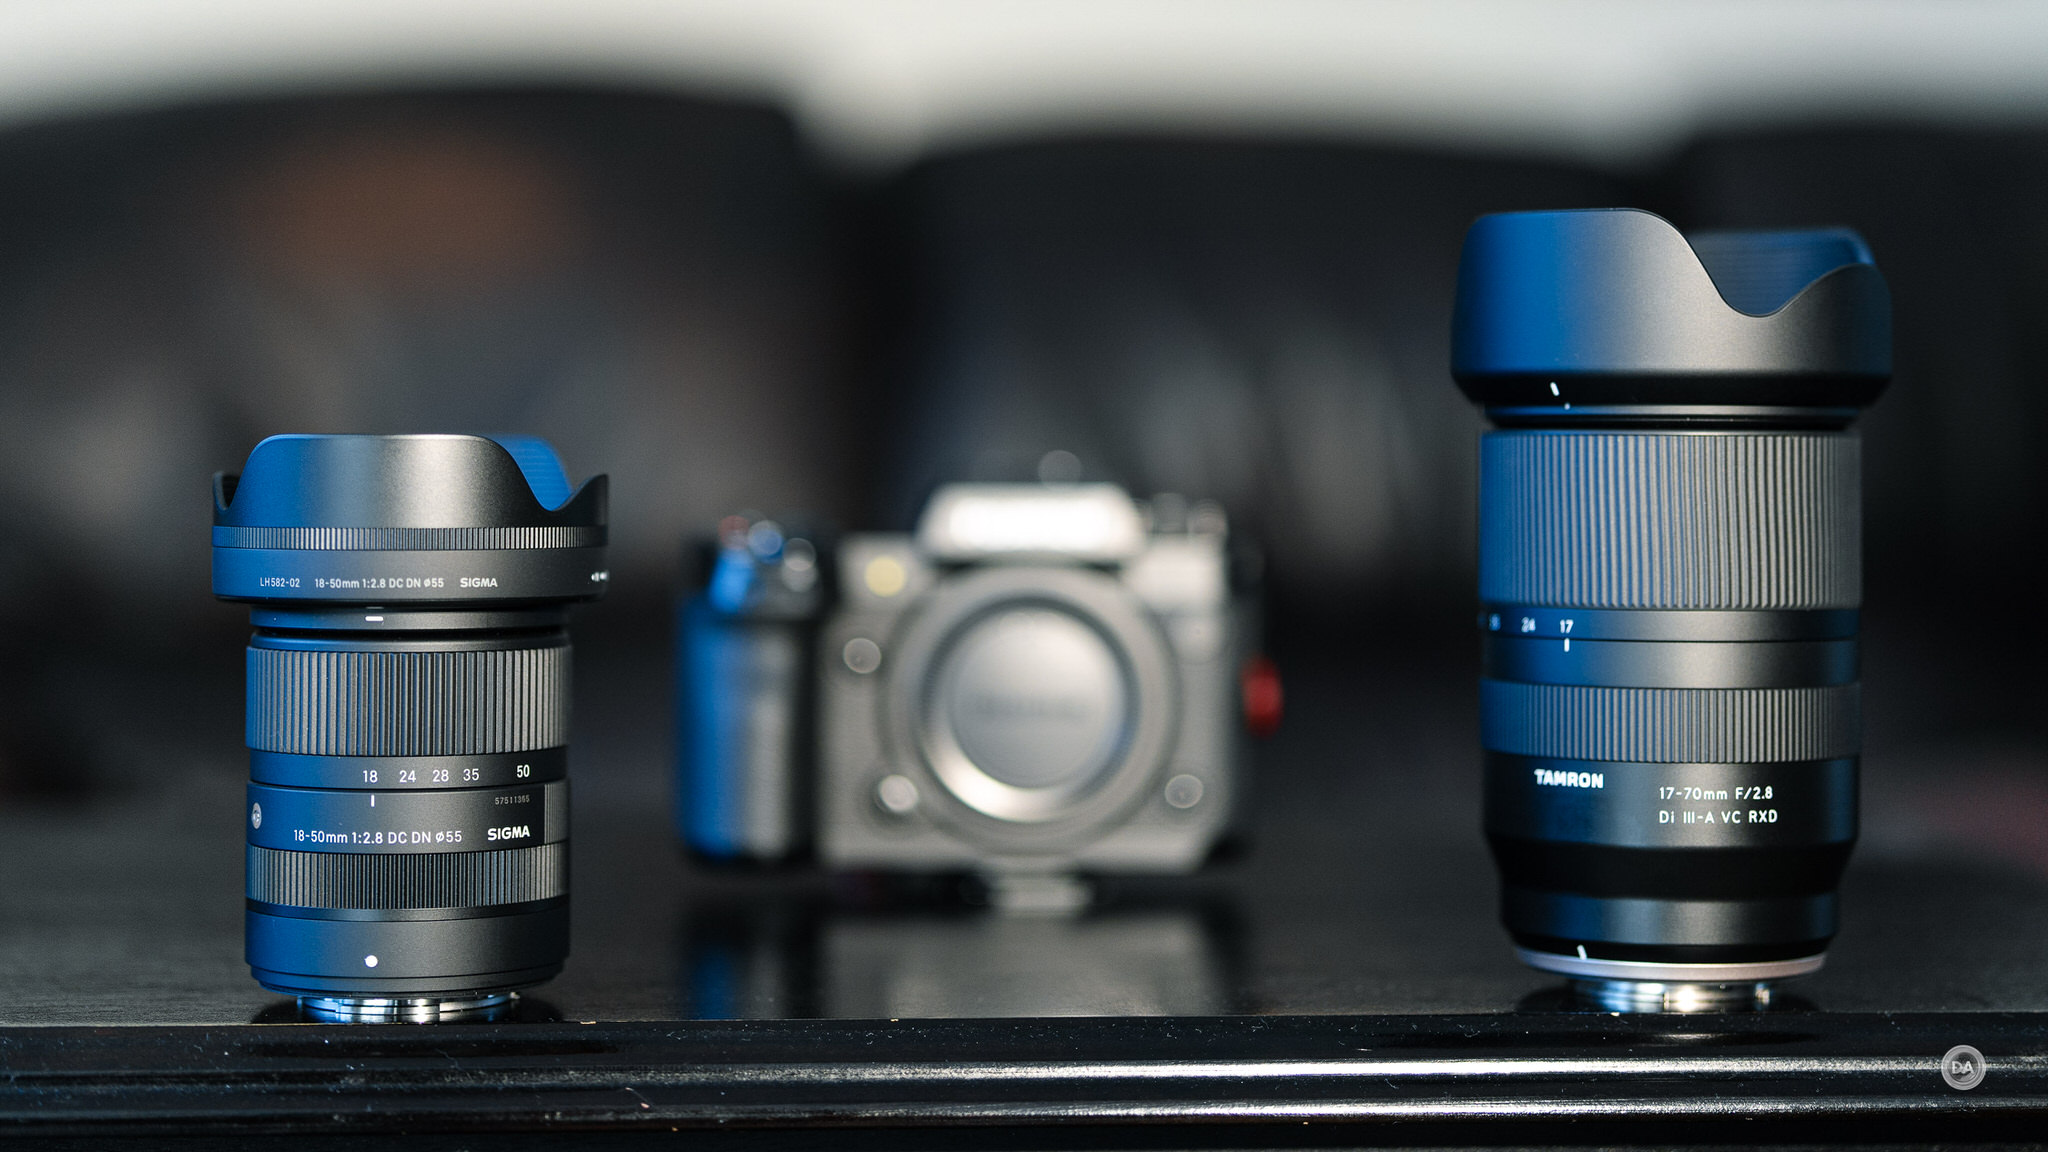
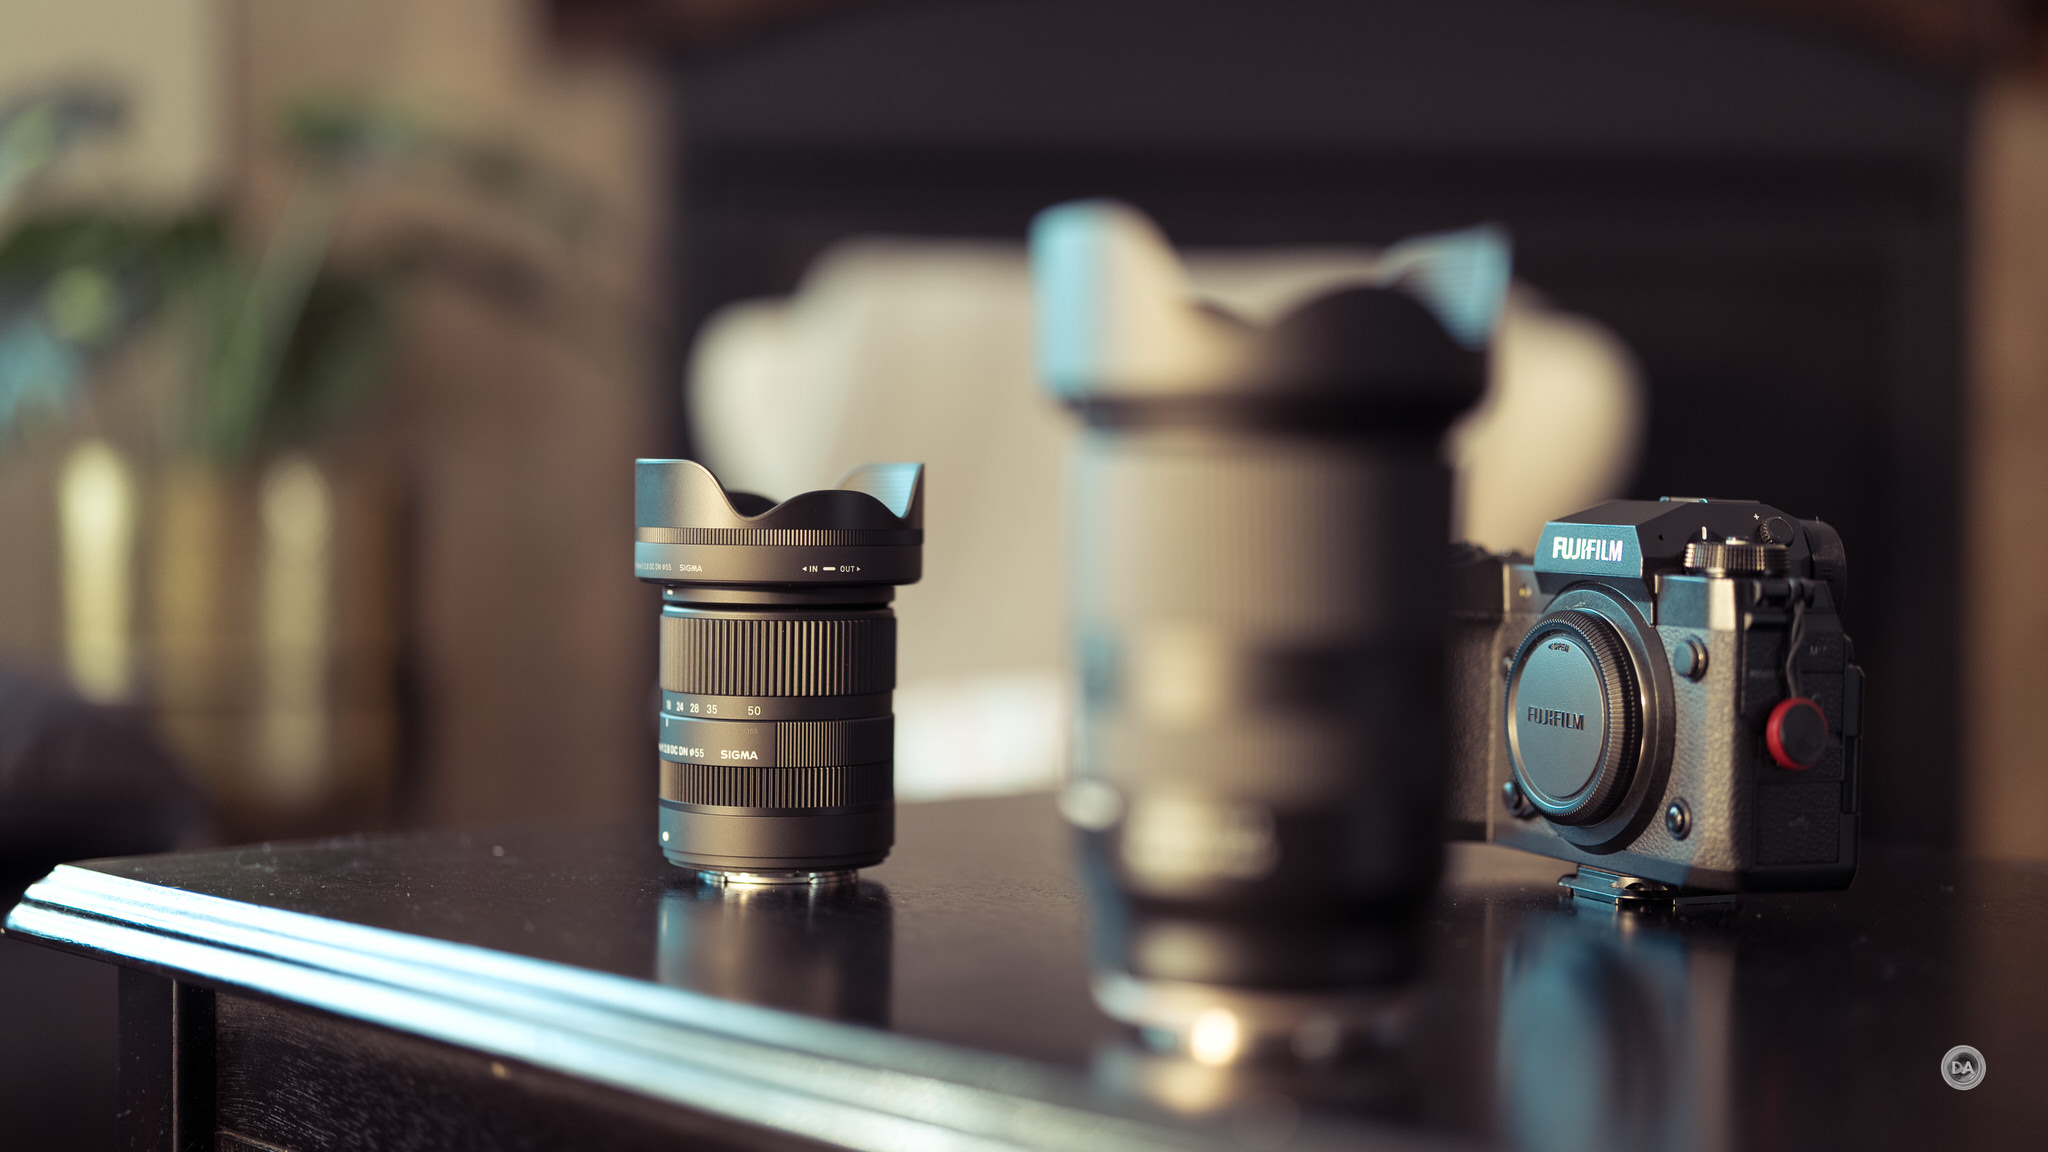
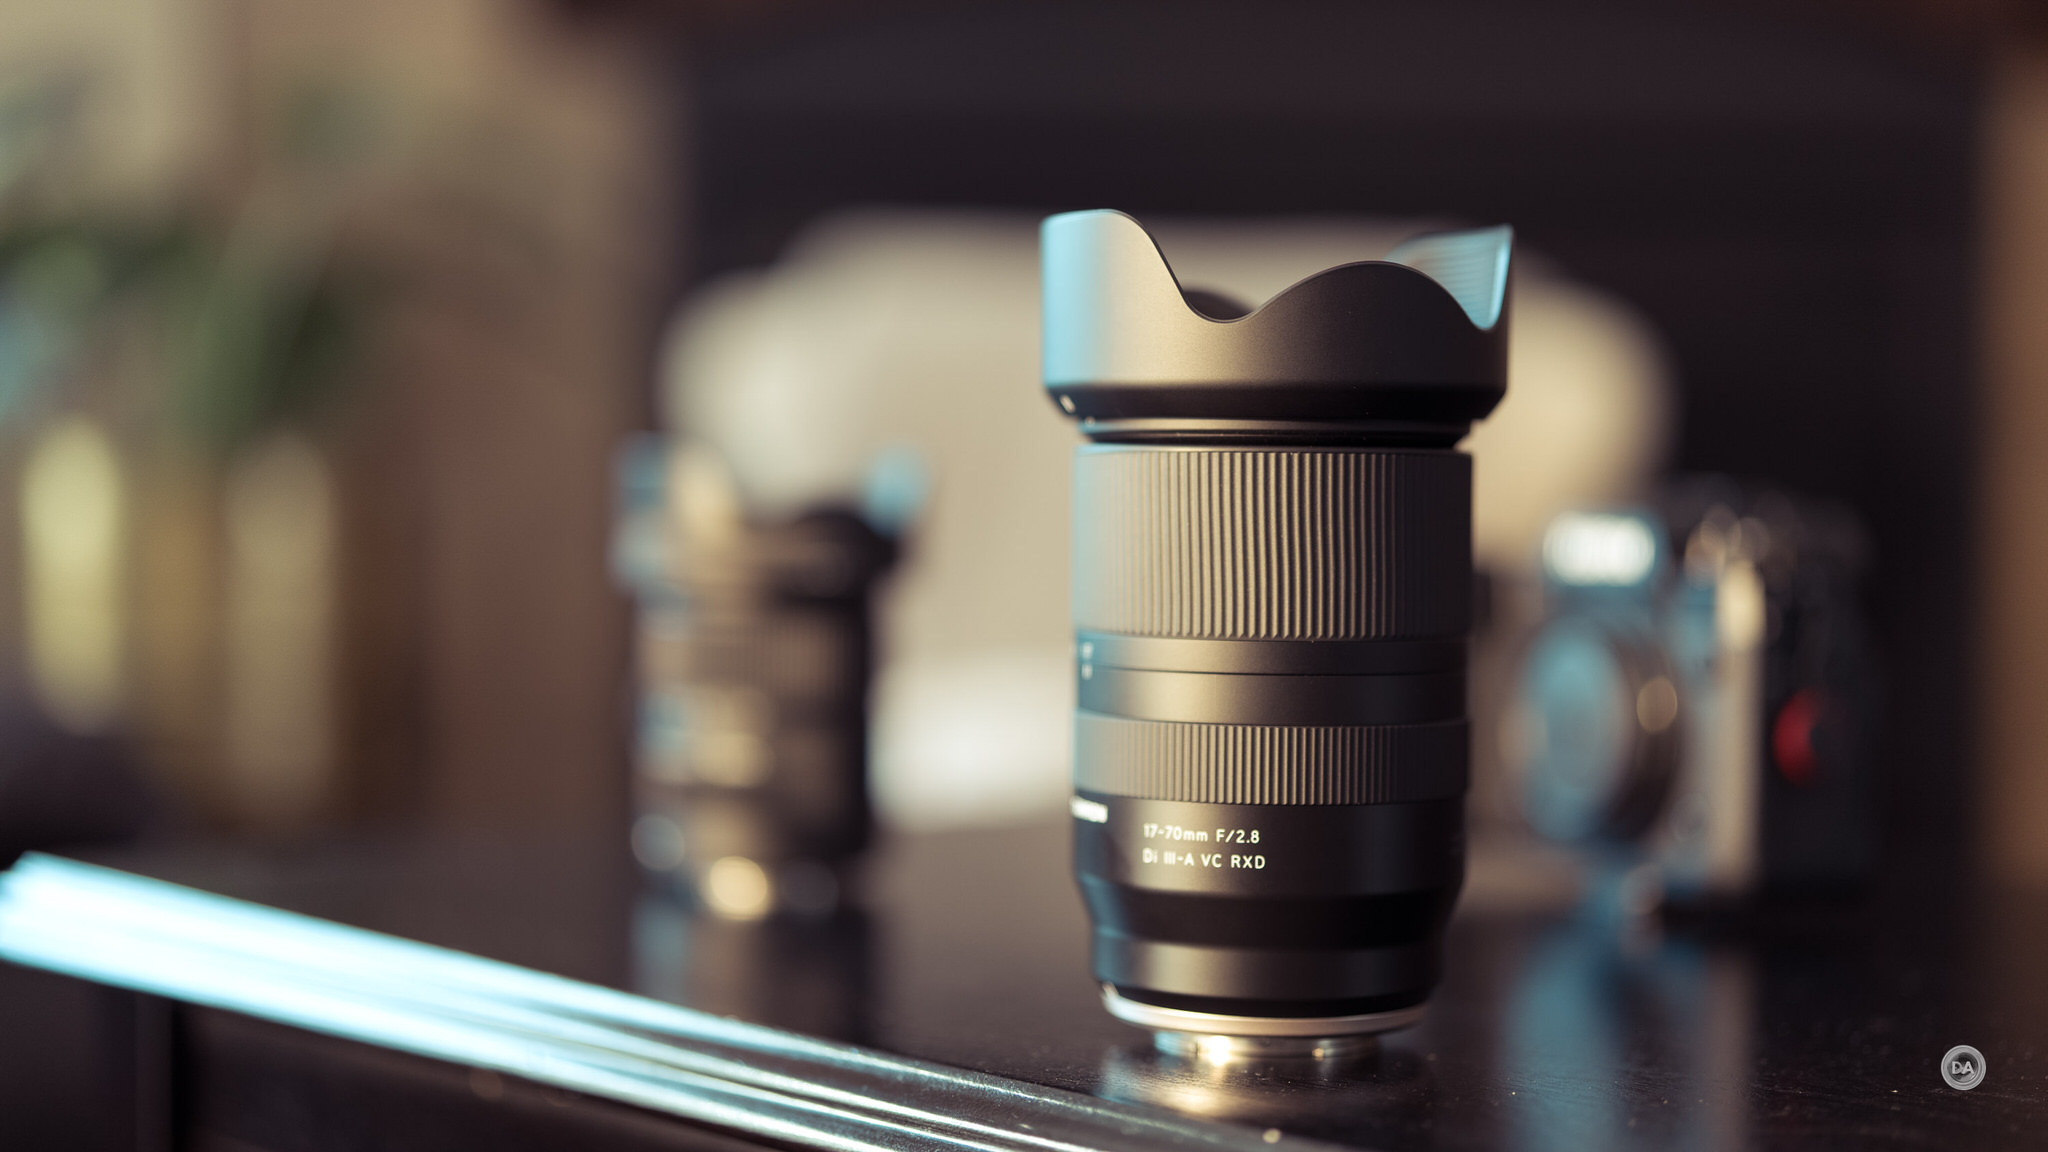
Sigma 18-50mm F2.8 vs Tamron 17-70mm F2.8 on Fuji X-Mount
Dustin Abbott
February 15th, 2024
A fast aperture, standard zoom can often be the most important lens in any person’s kit. These are the types of lenses that cover 80-90% of most photographer’s needs, but do so in a more compelling way than most kit lenses. The constant maximum aperture of F2.8 helps in low light and creates a more shallow depth of field, and the focal length covers from moderately wide to short telephoto. The two main third party competitors on the Fuji X-mount platform come from Sigma (the Sigma 18-50mm F2.8 DN) and Tamron (the Tamron 17-70mm F2.8 VC RXD). I’ve spent extensive time with both lenses (I currently own both of them) and have been comparing them for months. My findings are summarized in this video review.
Thanks to TTArtisan for sending me a review copy of this lens. As always, this is a completely independent review. All opinions and conclusions are my own. I’m doing this review on a 40MP Fujifilm X-H2 camera.
Both of these lenses are critical and commercial successes. The Sigma has a 5 out of 5 star rating at B&H Photo with 112 reviews, while the Tamron has a 4.5 star rating with 54 reviews. Both companies took radically different approaches to this formula, however, as the Sigma is the smallest, lightest, and cheapest option (including the Fuji 18-55m F2.8-4 OIS and 16-55mm F2.8 LM WR options) while the Tamron is the largest lens in class but also has the largest zoom ratio and has both a constant F2.8 aperture along with an optical stabilizer.
You can find my full reviews of all of these lenses by clicking the appropriate link below:
DISCLAIMER: This article and description contains affiliate links, which means that if you click on one of the product links, I’ll receive a small commission. As an Amazon Associate I earn from qualifying purchases.
Traveling with the Tamron 28-200mm and the Sony a7RV
Dustin Abbott
October 31st, 2023
I was very pleasantly surprised by the Tamron 28-200mm F2.8-5.6 Di III RXD when I reviewed it in 2020. I’ve typically been underwhelmed by the optical performance of “superzoom” type lenses as there are simply too many compromises to try to accommodate all the different focal lengths from wide angle to telephoto. But the Tamron 28-200mm was different. It was actually sharp across the zoom range, and while the bokeh isn’t as smooth as a lens like their 28-75mm or 70-180mm F2.8 zooms, it really is pretty good. But I’ve also seen that lenses that look pretty good at lower resolution points can fall apart when put on high resolution bodies. I added the 61MP Sony a7RV to my kit this year, and I was curious as to whether the Tamron would still hold up when mounted on such a high resolution camera. I took the Tamron and Sony combo on a trip to Cancun, Mexico this year to see how the combo would handle and if the Tamron was still the best travel option out there for Sony FE. You can get my thoughts in the video below.
The Tamron 28-200mm used in this review is a retail copy I’ve owned for three years. As always, this is a completely independent review. *The tests and most of the photos that I share as a part of my review cycle have been done with the Sony a7RV along with the Sony Alpha 1 that serve as my benchmark cameras for Sony lenses.
*Tamron just released a free firmware update for the 28-200mm that improves autofocus tracking performance. Visit this page for more information.
I’ve included an image gallery of various photos from the trip below covering the gambit from some wildlife, architecture, portraits, landscapes, and more. This will give some flavor of the various kinds of images that are easy to get with the Tamron and its very flexible focal range.
Keywords: Sony, Tamron, withmytamron, A071, Tamron 28-200mm, Tamron 28-200mm, RXD, F2.8-5.6, Mexico, Cancun, Haven Riviera, 28-200mm, 28-200, Di III, Sony FE, Tamron 28-200mm Review, F2.8, Tamron 28-200 Review, 28-200mm F2.8-5.6, Dustin Abbott, Autofocus, Sample Images, Video, Video Test, review, Video review, Real World, Wide Angle, Sony a7RV, Portrait, Sharpness, Resolution, Bokeh, Sony 24-240mm, Travel, All-in-one
DISCLAIMER: This article and description contains affiliate links, which means that if you click on one of the product links, I’ll receive a small commission. As an Amazon Associate I earn from qualifying purchases.
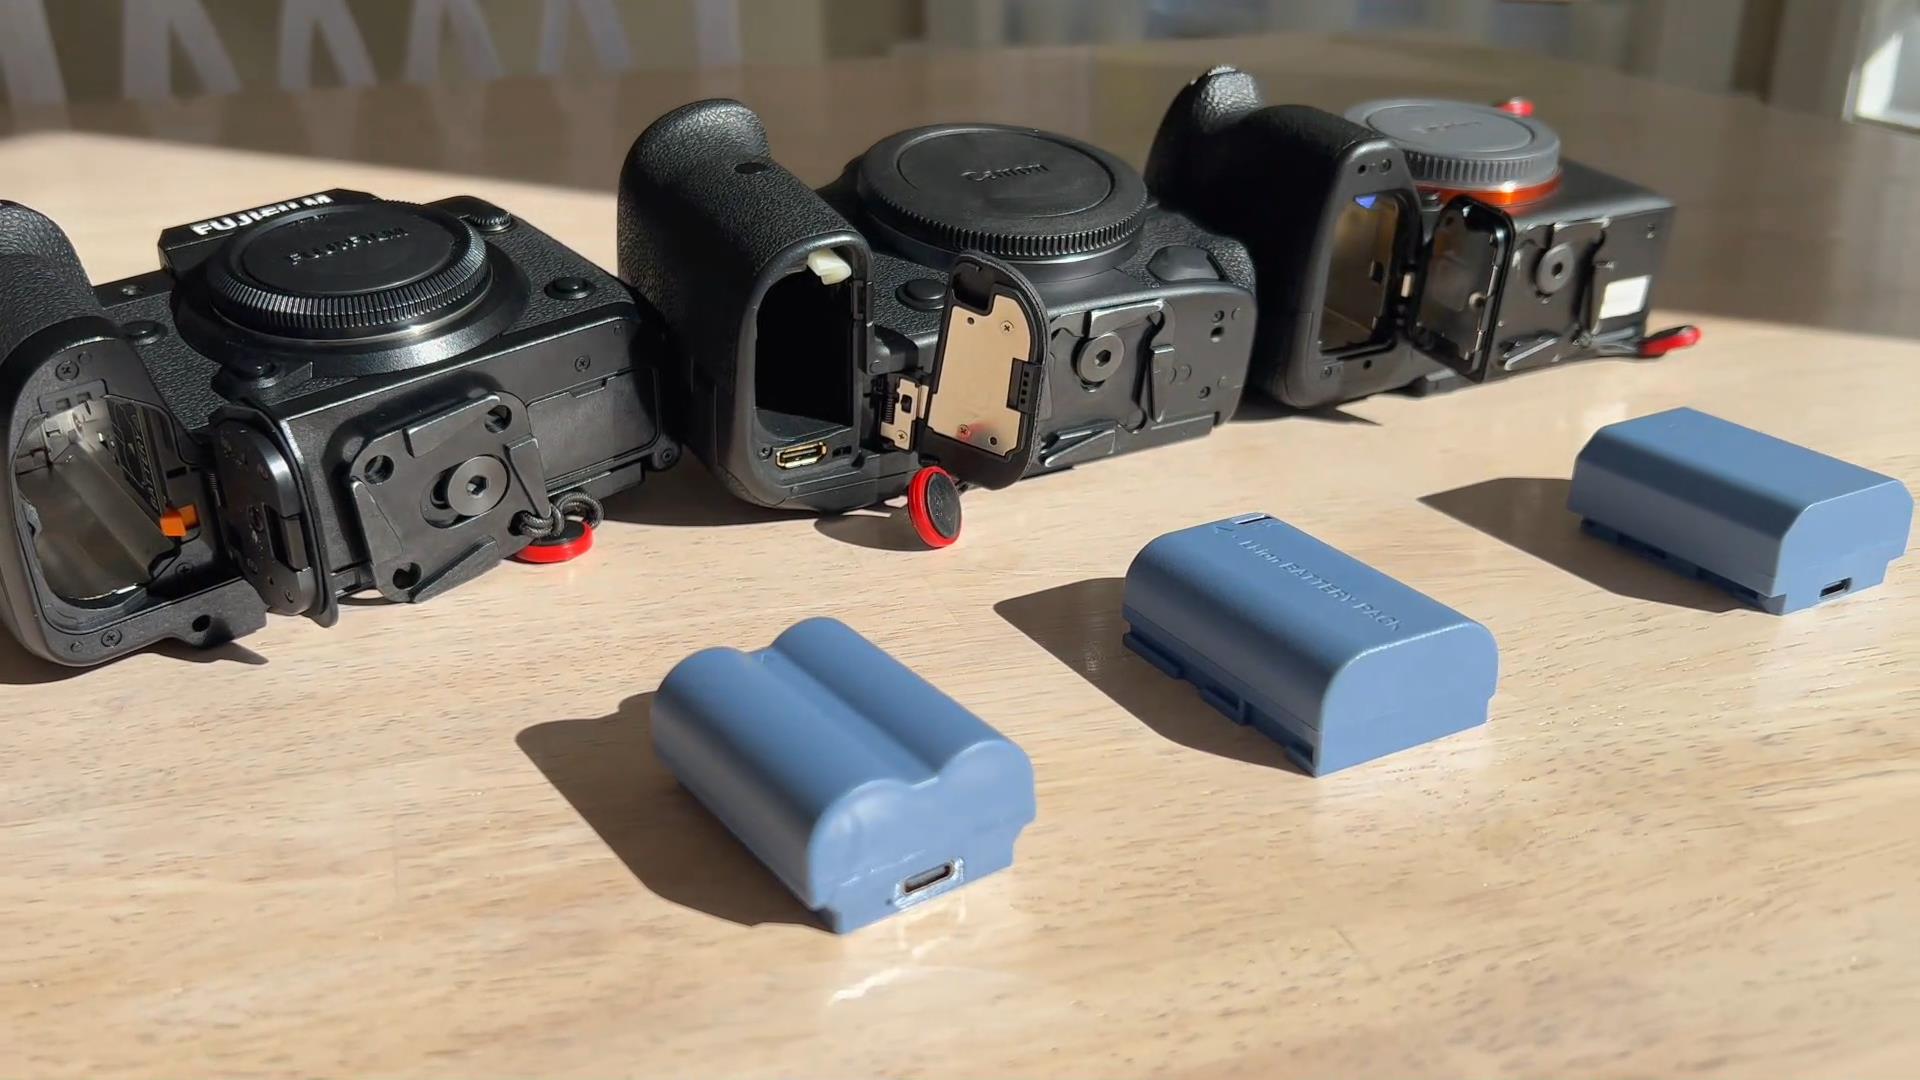
SmallRig Camera Batteries with USB-C Charge Review
Dustin Abbott
October 21st, 2023
One of the first things one has to consider when buying a new camera is whether or not you need a backup battery or two. If you are buying into a new camera system, or if the same brand has updated to a new battery type, the answer is probably “yes”. One of the great frustrations that we sometimes haven’t considered when saving or planning for that new camera is the reality that it potentially uses batteries or a new memory storage card that we don’t have…and suddenly we are looking at hundreds of additional dollars in expenditure. I’ve been in situations before where my shooting was cut short by the reality that my battery had unexpectedly died, so I’ve learned to have backup batteries and charging solutions on hand…particularly if I’m doing paid work. I’ve been exclusively using batteries from SmallRig in my Fuji, Sony, and Canon cameras over the past six weeks, and I’m happy to report that they are an excellent way to get upgraded power at a price point usually close to half what the OEM batteries from Canon, Sony, or Fuji. You can get my full thoughts in this video:
A quick word on SmallRig. I started using SmallRig products about five years, though first as grip extenders and L-brackets for my Sony mirrorless cameras. It took some time before Sony came up with grips that were accommodating enough for those of us with larger hands, and SmallRig helped make my cameras much more ergonomic.
I’ve bought other SmallRig accessories over time, most recently a truly excellent mount for my Atomos Ninja monitor/recorder. My previous one was miserable and actually made me use my Ninja less frequently because it was so unstable mounted on my camera. The SmallRig one was much sturdier and better engineered while still coming at a very reasonable price, something that has, in my experience, been a hallmark of SmallRig.
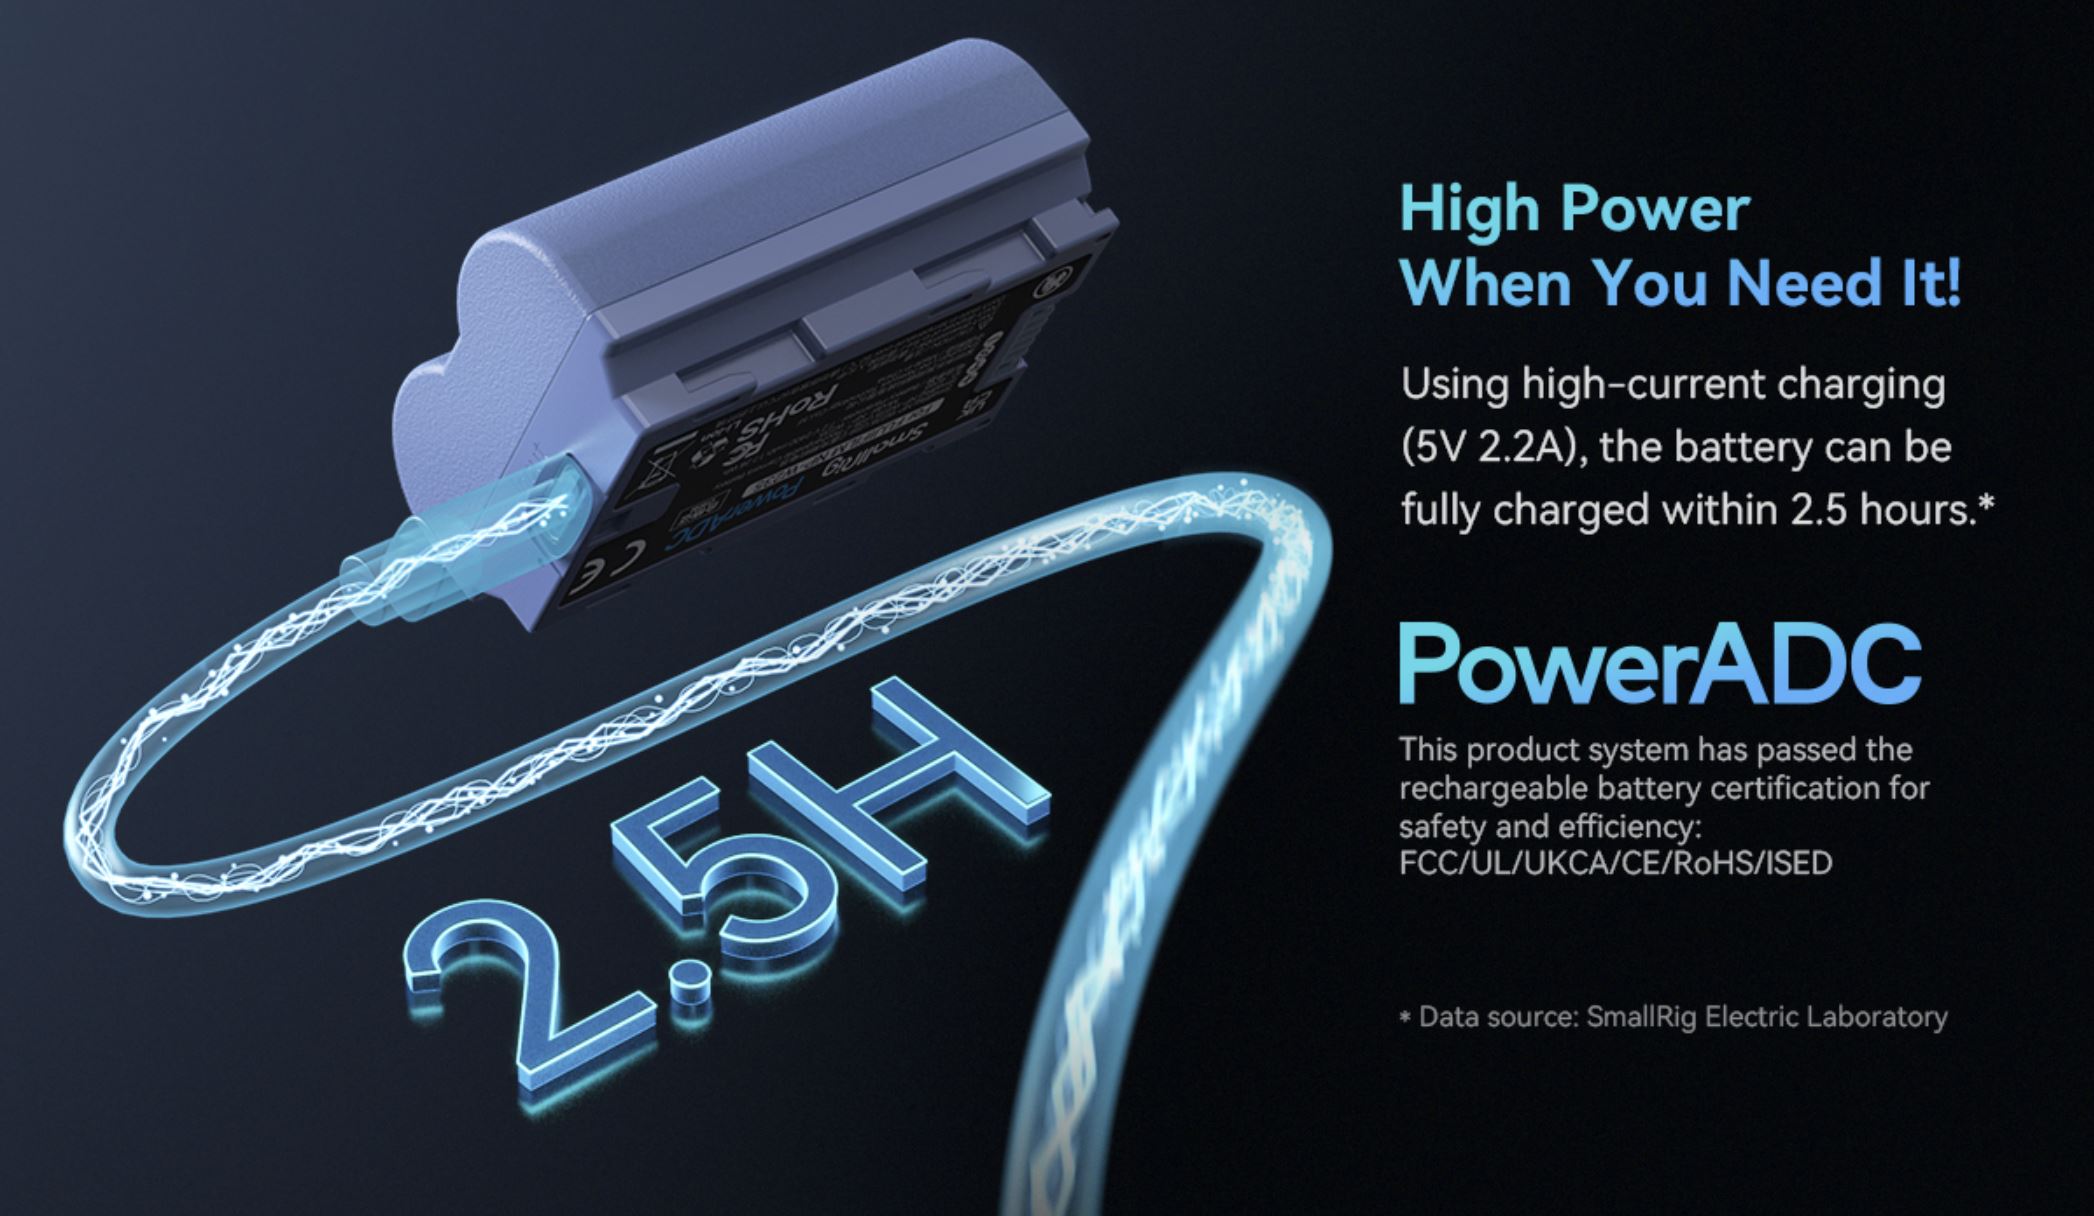
Batteries are a different SmallRig product for me, but I was intrigued by the premise (and price). The premise was that the SmallRig batteries not only offered higher capacity (2400 mAh) but also the unique addition of a USB-C port so that they could be directly charged. This opens up so many additional possibilities, as while most modern cameras will allow you to charge the battery in camera (eliminating the need for a separate charger), that also means that your camera will be tied up for the multiple hours involved in a full battery charge.
The USB-C port allows you to use a ubiquitous USB-C charge cable and connect it to a power brick, power bank, USB outlet, etc… No additional chargers needed. Not only that, but the SmallRig batteries can charge slightly faster via USB-C by accepting a little more current (5V 2.2Amp) and completely charge in 2.5 hours.
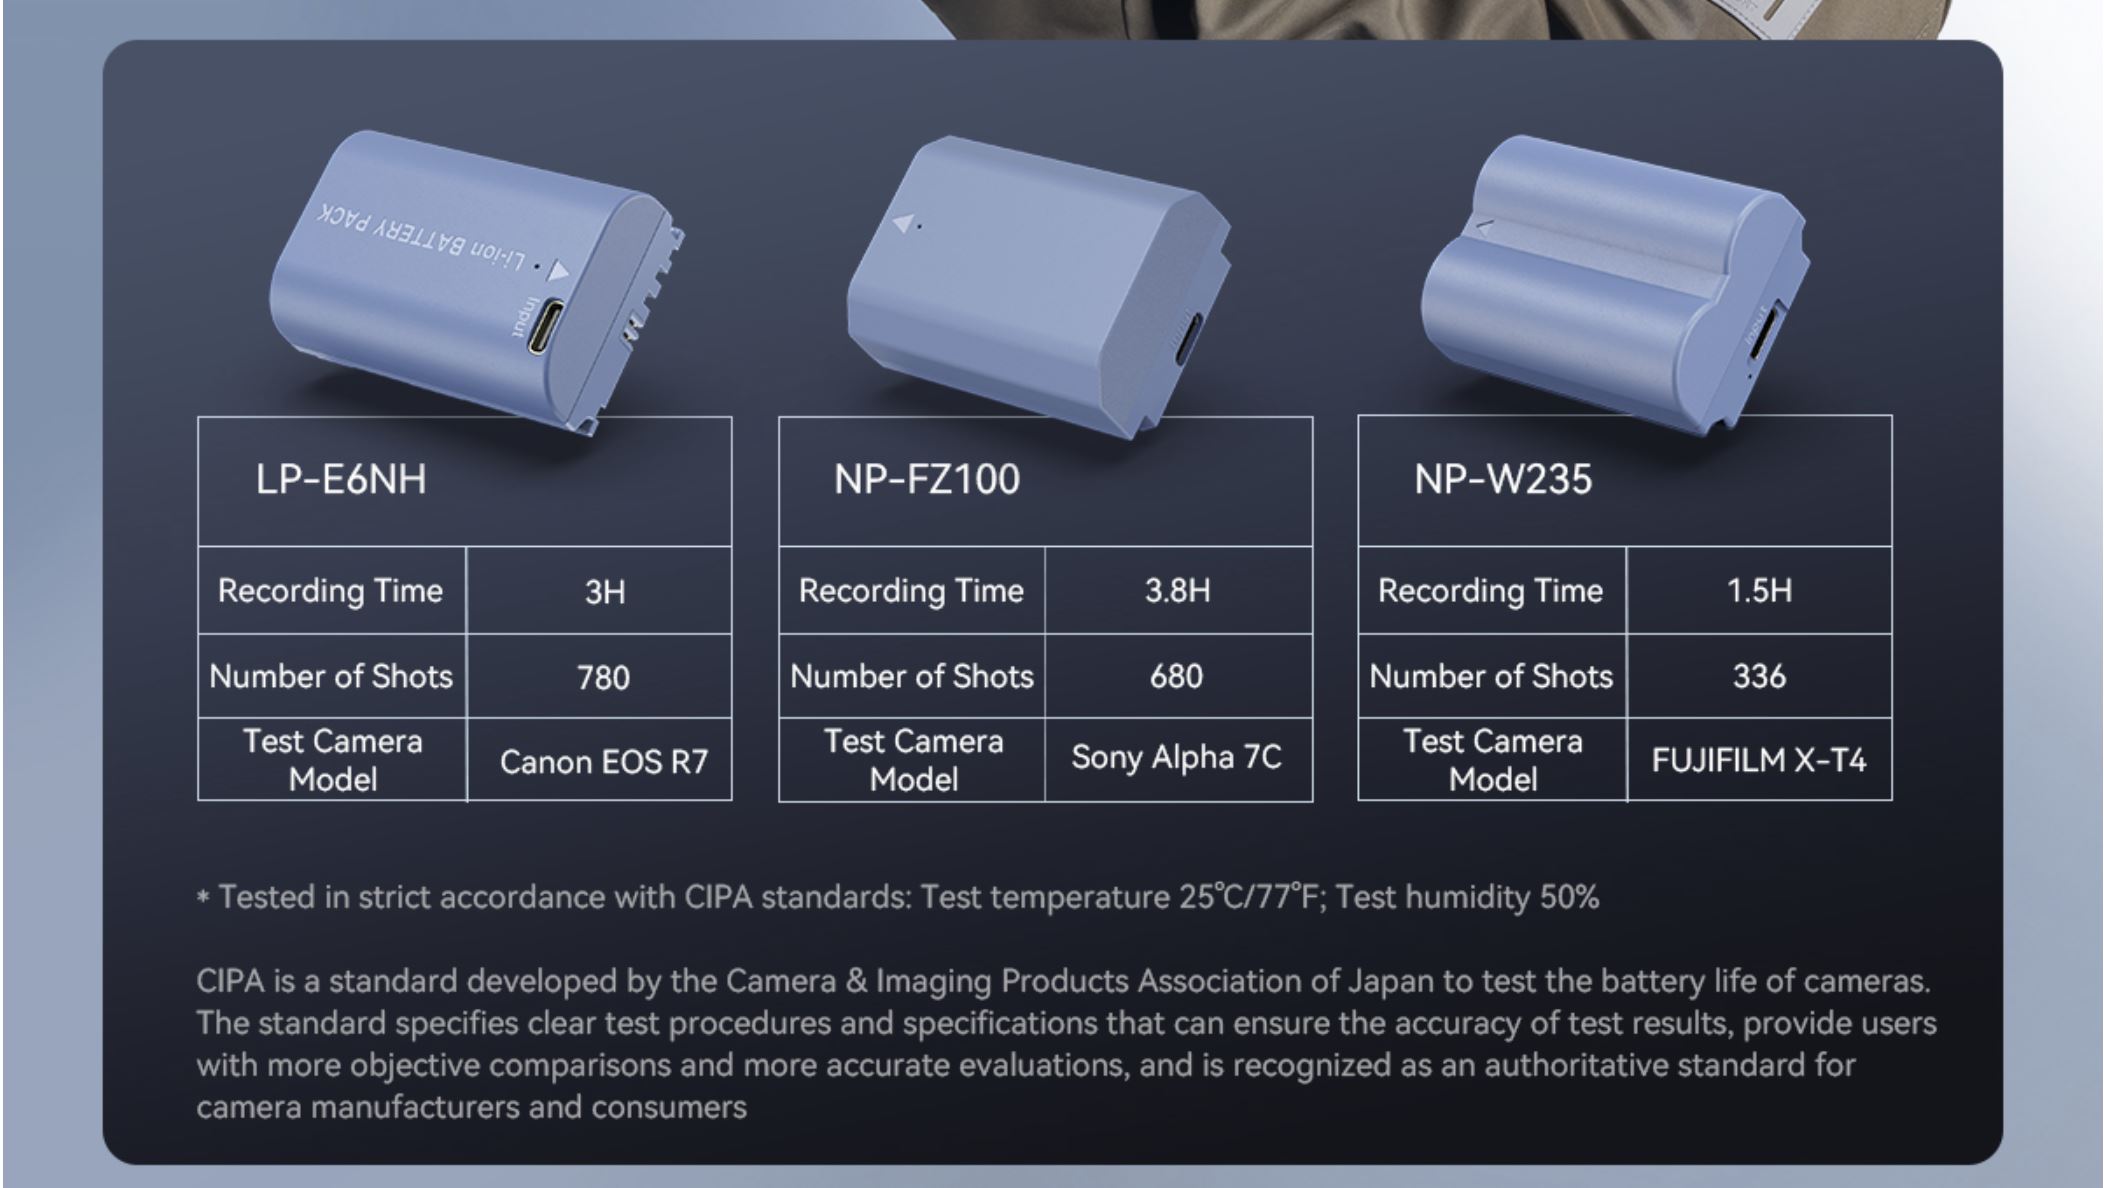
Real world use has been flawless. Unlike third party batteries that I’ve tried before from different companies, I have gotten no error messages or warnings on any of my cameras. They seem to function flawlessly. The 2400 mAh capacity is larger than all the OEM batteries I compared them to, ranging from 270mAh larger (Canon) to 120mAh larger on Sony.
So, in summary, you are getting more capacity, no use issues, an additional way to charge, and a price point that ranges from $30 less (Fuji) to $40 less (Canon). If you want more of my thoughts, check out my video review.
DISCLAIMER: This article and description contains affiliate links, which means that if you click on one of the product links, I’ll receive a small commission. As an Amazon Associate I earn from qualifying purchases.
Pergear released a 14mm F2.8 wide angle prime for full frame cameras a few years ago, and while it was nicely sharp, there were some areas that could be improved. But Pergear is back with a second attempt that has improved on a number of those shortcomings. The new Pergear 14mm F2.8 II features:
More compact size
Reduced flare (though this remains a vulnerability)
A reduced minimum focus distance (from 43cm to 21cm for the new version)
An improved design for the attachable filter holder
I didn’t test the first lens, but while there are a few areas where this ultra wide angle prime shows its budget origins (it costs $299 USD), but it also has some serious strengths, including incredibly sharpness even on my high resolution Sony a7RV (61MP).
It also has very low distortion for such a wide angle lens, making this a valid budget option for capturing interior spaces and retaining clean lines.
While colors are not also as accurate as more expensive lens with better optical glass, there was a certain charm to the color rendition in many images, leading to rich looking images.
If you’ve never shot with an ultra wide angle lens (the Pergear 14mm F2.8 II has an impressively wide 114° angle of view), you’ll discover that while the focal length does provide some composition challenges (you often need to get much closer to subjects than you might expect!), such a wide angle lens provides wonderfully dynamic images.
The Pergear 14mm F2.8 II is a manual everything lens, so won’t be for everyone, but a lens like this is easy to focus and shoot with…with a few caveats. Should you consider the 14II for an extreme wide angle alternative for your full frame mirroless camera (it comes in Sony E-mount [tested here], Canon RF, Nikon Z, and Leica L)? You can judge for yourself by either watching my video review below, reading my text review, or just enjoy the photos below.
Thanks to Pergear for sending me a review sample of this lens. As always, this is a completely independent review. *The tests and most of the photos that I share as a part of my review cycle have been done with the Sony a7RV along with the Sony Alpha 1 that serve as my benchmark cameras for Sony lenses.
Pergear 14mm F2.8 II Build and Handling
Pergear has reduced the size of the MK II version of the lens and given it a different profile. It is very compact now for a full frame lens at just 65mm in diameter and 80mm in length (2.56″ x 3.15″) and weighs in at 500g (17.6oz).
This is a manual everything lens, so both focus and aperture will be controlled via the corresponding rings on the lens barrel. The first ring is the manual focus ring which has a nice, definite damping with a surprisingly quality feel to the focus action. The focus throw is not long; about 110° from minimum to infinity.
There is a distance scale on the ring itself, while on the non-rotating part of the barrel there is hyperfocal markings for almost all the potential aperture values.
There is a narrow manual aperture ring beyond this with light but noticeable detents at half stop marks between F2.8 and F5.6. From F5.6 to F22 there are only single stop clicks for each aperture value.
The aperture action feels good, though I did note that the ring moves a little to the left of F2.8 and what feels like a full additional stop after F22, denoting a slight calibration issue.
Up front there is a very small fixed lens hood that helps protect the bulbous front element.
Typically this would preclude the use of traditional filters, but Pergear has a clever solution for that. There is a nicely made attachment that bayonets on the front of the lens that looks like an extended lens hood but is actually a filter holder with 82mm filter thread. The attachment is all in metal and nicely engineered with good tolerances. It bayonets in tightly and securely.
Just using the filter holder itself added no additional vignette, though vignette definitely intensified when using a stronger ND filter.
If I had one recommendation, it would be include an 82mm pinch cap in addition to the metal cap that fits over the fixed lens hood.
The lens feels complete with the filter holder in place, and I would be happy to keep the attachment on all the time and use a pinch cap to protect it. The included lens cap fits over the fixed lens hood.
The aperture iris has ten blades. You won’t be creating a lot of bokeh with this lens, so this is less about creating a circular aperture and more about creating a nice clean sunstar (even aperture blades produce the same number of blades on the sunstar, so we have a ten-bladed sunstar here).
The minimum focus distance is improved to 22cm, though the maximum magnification level is still very low (it looks like approximately 0.07x or so to me):
That doesn’t make for overly blurred out backgrounds, though I did still think that some close up images still had a certain charm to them.
There is no weather sealing on the lens, though it is internally focusing, so there should be relatively few ways that dust or moisture can intrude into the lens. The complete lack of electronics also means that there are fewer potential components to be impacted.
The Pergear 14mm F2.8 II has a surprisingly heavy weight for its compact size, but that’s largely due to having a very high degree of build of all metal and glass. It doesn’t feel like a budget lens in terms of the fit and finish, and isn’t bad to handle in the field at all.
Pergear 14mm F2.8 II Manual Focus Observations
Many people have a very negative perception of manual focus lenses as they don’t enjoy manual focus or feel like it will result in a lot of missed shots. The truth of the matter with a lens like this is that there is actually very little focusing involved. If you are shooting at 14mm and stop down to F4 then focus a distance of 2 meters in front of the camera, everything from less than a meter away from the camera to infinity will be in focus. The copy of the lens that I tested actually had a properly calibrated infinity focus, too, so I could just turn the focus ring to the hard stop at infinity and pretty much everything would be in focus all the time.
The only time I messed with focus is when I needed to focus on a close subject, and then using a focus aid like a colored focus overlay or magnifying the image in the viewfinder or on screen made nailing focus simple. I didn’t have one misfocused shot in my whole catalog of images taken with the lens, and, frankly, I didn’t spend much time focusing with it.
It may seem intimidating to use a manual focus lens, but that’s really not much of a difficulty here.
What I did find more of a challenge is metering in certain situations. There are no electronics in the lens, and I sometimes find that lenses without electronics and heavy vignette (which this lens has) makes for some challenges for metering. Some shots tend towards underexposure. I typically shoot in Aperture Priority (AV) mode, and most of the time the camera did a fairly good job metering, but not always. The worst sequence, in fact, was when I shot my test chart for various lens evaluations, and I actually ended up manually setting the exposure for the appropriate stops as I moved throughout the aperture options because I didn’t trust the camera’s metering results. I would say that this will provide more a challenge for less experienced photographers than manually focusing.
One final observation is that lenses without electronics will not transmit any EXIF data to the camera, so your photos will be missing some data like the lens designation, lens focal length, and the aperture value. The EXIF data will only record camera related information like the shutter speed and ISO value. There is some penalty to using a lens like this without electronics, but it’s not quite as severe as some people might think.
Pergear 14mm F2.8 II Image Quality
The Pergear 14mm F2.8 II has a few optical weaknesses, but it also has some very impressive attributes for such a wide angle lens – namely incredible sharpness and very low distortion for such a wide angle of view. My first 14mm lens was a very similar kind of lens – the Rokinon (Samyang) 14mm F2.8, which I reviewed back in 2013. In some ways this Pergear lens reminds me of that one, in that, despite some evidence of being a lower budget lens, the images you can produce are quite impressive. But the Pergear is a much stronger lens all around, with better build, much lower distortion, and excellent sharpness that (unlike the Samyang) reach all the way to the corners. This is an extremely sharp wide angle lens even on a 61MP sensor.
There are a few optical issues to highlight, but a lot of strengths here. There’s one of each to look at if we inspect our distortion and vignette chart:
We see a surprisingly strong performance for distortion. There is a negligible amount of barrel distortion that you could easily leave uncorrected (I did not bother with correcting it in my real world images). I used a +3 to correct the barrel distortion for the result on the right above. Vignette is much more heavy, requiring a +76 to correct at F2.8 (nearly three stops), though I will note that vignette does diminish as you stop the lens down. Note that any kind of heavier vignette like this will get magnified in long exposure shots when using filters. The comparison below shows the same shot without a filter (left) and with a six stop ND filter on the right:
This isn’t a mechanical vignette issue (caused by the filter itself), but rather the natural vignette being amplified because comparatively less light is reaching the edges of the frame.
Longitudinal chromatic aberrations (LoCA) typically show up as purple/magenta fringing before the plane of focus and blue/green fringing beyond the plane of focus due to colors not being perfectly focused together. They typically diminish as the lens is stopped down to smaller apertures. I didn’t see any real world LoCA, though that wasn’t unexpected in a lens with such a wide focal length and a low magnification figure. There just isn’t much room for narrow depth of field with a lens like this. A lens like this would be more likely to suffer with Lateral chromatic aberrations (LaCA) that show up as fringing on either side of contrast areas (like tree trunks, for example) along the edges of the frame. Unlike LoCA, they do not improve when stopping the aperture down, but are much easier to correct for (typically a one click “remove chromatic aberrations” box in editing software). We can see once again that there is no evidence of any fringing near the edges of the frame.
So far only the vignette shows in the negatives, and that’s a very common issue with wide angle lenses.
So how about sharpness? I’ve used the very high resolution (61MP) Sony a7RV for this series of tests, which obviously sets an exacting standard for sharpness and contrast. Here’s a look at the test chart:
And here are the 14mm F2.8 crops at about 180% magnification, taken from the center, then mid-frame, and then extreme lower right corner:
We see an extremely sharp center, good (though slightly softer) mid-frame, and corners not far behind the mid-frame. That’s very good for such a wide angle lens, particularly in the corners. The lens is probably helped by the low distortion there, as the corner sharpness doesn’t take a hit by being stretched.
At a more typical 100% magnification, this translates to excellent real world sharpness, allowing you to take great photos even at night:
Stopping down to F4 sharpens up the midframe and corners further. Here’s a look at the upper left corner with F2.8 on the left and F4 on the right.
There’s more sharpness on tap by F5.6, and the corners really sparkle by this point (F4 on the left, F5.6 on the right):
Landscape aperture shots look great, with lovely detail all throughout the frame.
F5.6 and F8 look great, but after that diffraction on my high resolution test camera will start to diminish contrast. F11 still looks pretty good, but the image is noticeably softening by F16 and very soft by F22.
I didn’t get a chance to shoot stars, but I did see a low instance of coma in the corners of the frame for nighttime images, so this actually would be a pretty decent budget astro lens.
While Pergear says that this lens is improved for flare resistance, I still find this to be perhaps the biggest single weakness for the lens. In certain positions there are large ghosting issues, like the left hand of this lens.
In some positions, the flare resistance was fine, like in this shot:
Pulling down that same composition to a different spot, and we see a flashing of light across the frame.
Colors were not fully accurate, in my opinion, with a slight green bias. In my tropical shots, I felt like it worked, and images actually looked really great.
I loved a lot of my early morning shots along the ocean, as I felt the optical glass complimented this type of shot.
In some other settings, however, I felt the greens were a little oversaturated and had a slightly cartoonish look.
In general, however, I’m very impressed with the image quality from this lens. I did feel like I needed to spend a bit more time with basic edits (no correction profiles, a delicate hand with colors, etc…), but I was able to get a lot of images that I really liked.
For the money, I would say that you would be hard pressed to get more bang for your buck in an extreme wide angle lens. If you would like to see more images, check out my image gallery here.
Conclusion
To be honest, I didn’t have high expectations for this lens. Pergear is still “young” as a lensmaker, and a wide angle, wide aperture prime for full frame is not an easy engineering challenge. It’s clear that the first generation lens had some strengths, but it also had a number of significant weaknesses. There isn’t a huge time gap between these two releases, but from what I can see I would say that Pergear was probably wise to accelerate the development of this second generation lens, as there are some clear signs of maturing design in this Pergear 14mm F2.8 II. You can definitely get some great images even from the most high resolution full frame camera available right now.
The Pergear makes for a great night lens as well, as you don’t really need to think about focusing (once focus is set), allowing you to quickly grab images in any kind of lighting condition.
For most people, a 14mm lens is never going to be their primary lens. It’s probably not even your second lens. It’s a more specialized lens for certain situations, so, as a byproduct, I think there is a definite market for the Pergear 14mm F2.8 II because its price is so low. A smaller investment of under $300 USD makes more sense than spending $1000+ on a lens you might use less frequently. But what makes a lens like this intriguing is that for a small investment you can get a lens that is capable of producing really dynamic, engaging images. If you’re looking for a relatively inexpensive lens that will give you the kinds of images that a kit lens cannot give, the Pergear 14mm F2.8 II is an intriguing option despite having a few shortcomings.
Keywords: Pergear 14mm F2.8 II, Pergear 14mm, Pergear, 14mm, F2.8, II, Wide Angle, Full Frame, Pergear 14mm F2.8 II Review, Sony, Review, Sony Alpha 1, Sony a7IV, Sony a7RV, Review, Hands On, Dustin Abbott, Real World, Comparison, Sharpness, Bokeh, Flare Resistance, Autofocus, Image Quality, Sample Images, Video, Travel, Mexico, Cancun, Photography, let the light in, #letthelightin, DA
DISCLAIMER: This article and description contains affiliate links, which means that if you click on one of the product links, I’ll receive a small commission. As an Amazon Associate I earn from qualifying purchases.
Pergear released a 14mm F2.8 wide angle prime for full frame cameras a few years ago, and while it was nicely sharp, there were some areas that could be improved. But Pergear is back with a second attempt that has improved on a number of those shortcomings. The new Pergear 14mm F2.8 II features:
More compact size
Reduced flare (though this remains a vulnerability)
A reduced minimum focus distance (from 43cm to 21cm for the new version)
An improved design for the attachable filter holder
I didn’t test the first lens, but while there are a few areas where this ultra wide angle prime shows its budget origins (it costs $299 USD), but it also has some serious strengths, including incredibly sharpness even on my high resolution Sony a7RV (61MP).
It also has very low distortion for such a wide angle lens, making this a valid budget option for capturing interior spaces and retaining clean lines.
While colors are not also as accurate as more expensive lens with better optical glass, there was a certain charm to the color rendition in many images, leading to rich looking images.
If you’ve never shot with an ultra wide angle lens (the Pergear 14mm F2.8 II has an impressively wide 114° angle of view), you’ll discover that while the focal length does provide some composition challenges (you often need to get much closer to subjects than you might expect!), such a wide angle lens provides wonderfully dynamic images.
The Pergear 14mm F2.8 II is a manual everything lens, so won’t be for everyone, but a lens like this is easy to focus and shoot with…with a few caveats. Should you consider the 14II for an extreme wide angle alternative for your full frame mirroless camera (it comes in Sony E-mount [tested here], Canon RF, Nikon Z, and Leica L)? You can judge for yourself by either watching my video review below or reading the text review…or just enjoy the photos below.
Thanks to Pergear for sending me a review sample of this lens. As always, this is a completely independent review. *The tests and most of the photos that I share as a part of my review cycle have been done with the Sony a7RV along with the Sony Alpha 1 that serve as my benchmark cameras for Sony lenses.
Keywords: Pergear 14mm F2.8 II, Pergear 14mm, Pergear, 14mm, F2.8, II, Wide Angle, Full Frame, Pergear 14mm F2.8 II Review, Sony, Review, Sony Alpha 1, Sony a7IV, Sony a7RV, Review, Hands On, Dustin Abbott, Real World, Comparison, Sharpness, Bokeh, Flare Resistance, Autofocus, Image Quality, Sample Images, Video, Travel, Mexico, Cancun, Photography, let the light in, #letthelightin, DA
DISCLAIMER: This article and description contains affiliate links, which means that if you click on one of the product links, I’ll receive a small commission. As an Amazon Associate I earn from qualifying purchases.


 Viltrox AIR 15mm F1.7 X Review
  LK Samyang AF 85mm F1.8 P Review
  LK Samyang AF 16mm F2.8 Prima Review
  Tamron 16-30mm F2.8 Di III VXD G2 Review
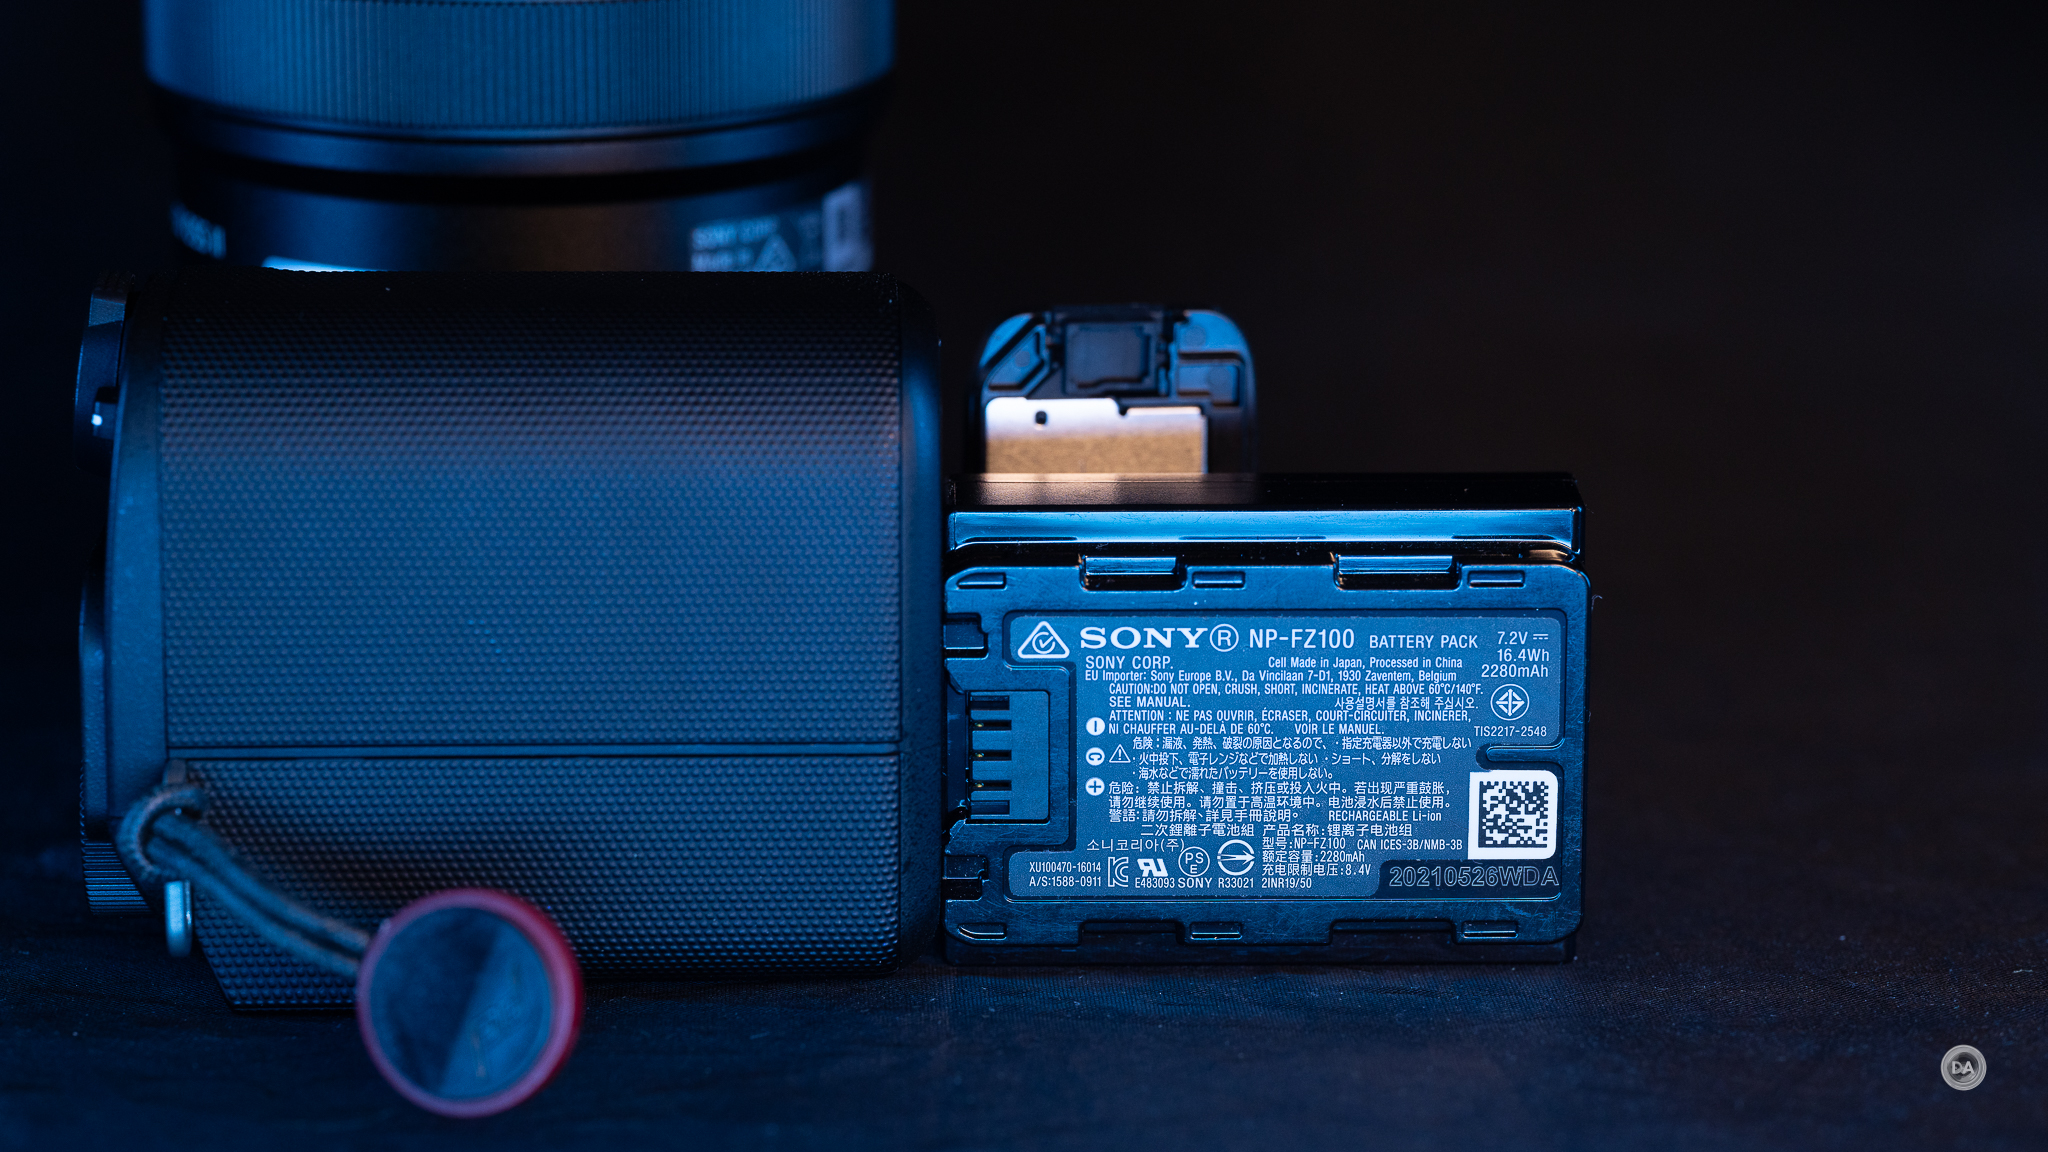


 GOOVIS ART Head Mounted Display Review