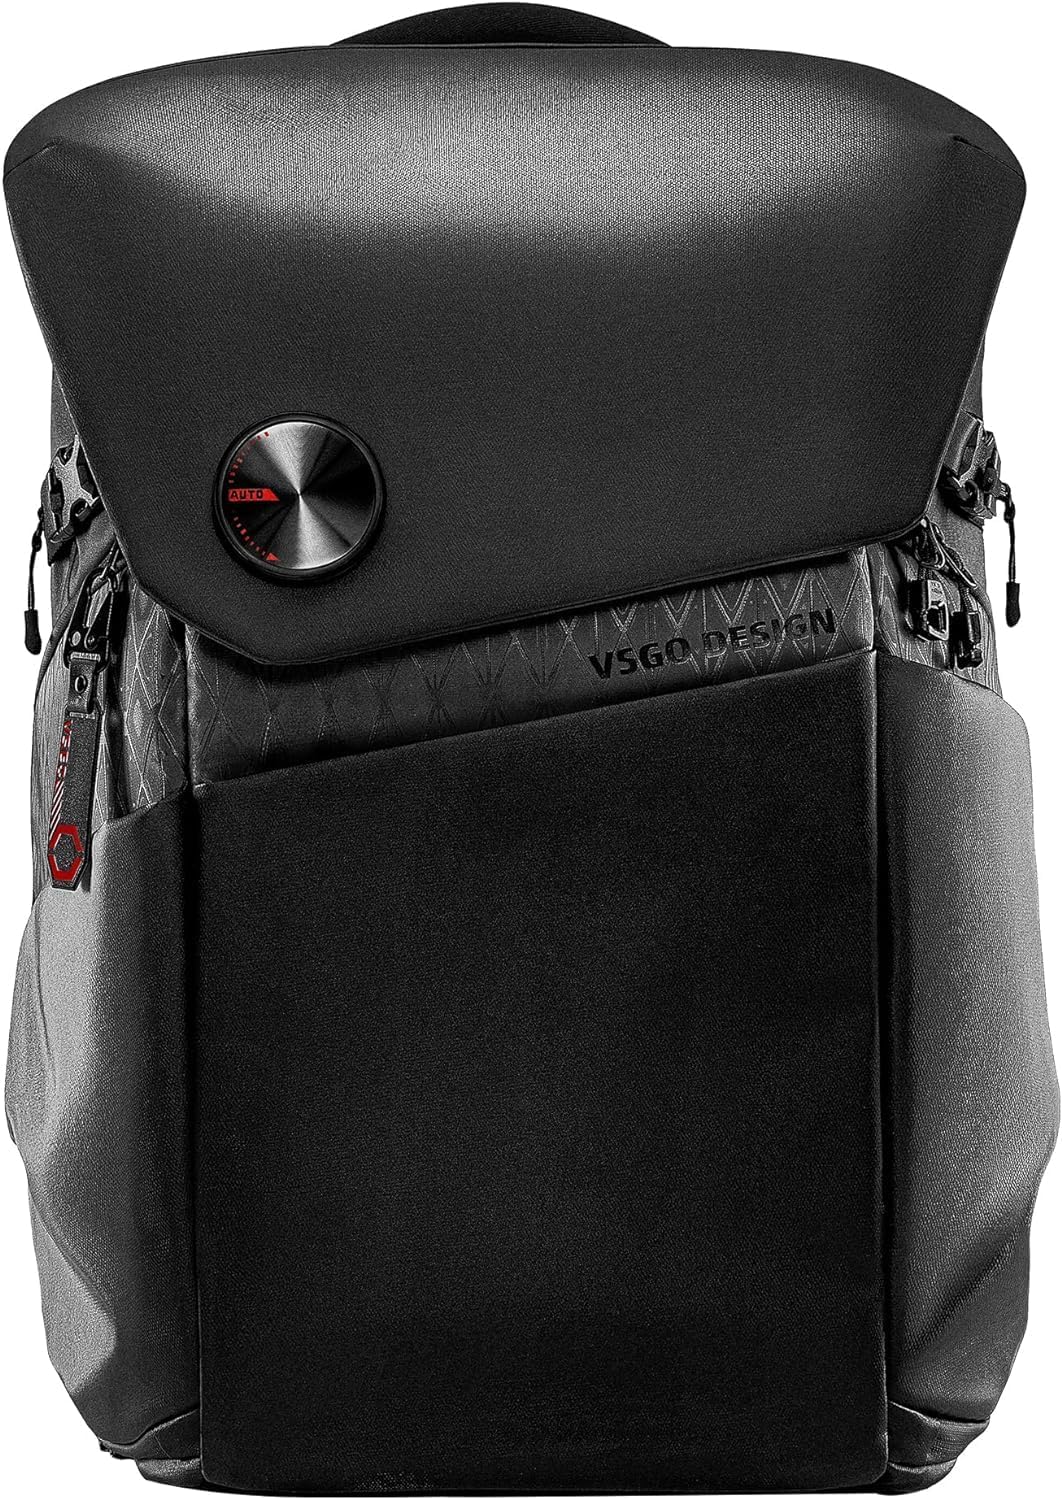
The VSGO Black Snipe 25L Photography backpack has become my new everyday photography backpack of choice. I’ve been using it to haul my gear to shoots, on trips, and to the office. There’s a great combination of style, comfort, and flexibility in this bag that sets it apart from the dozens of other camera bags that I’ve used. With a little discount you can nab it off of Amazon for about $225, and, while that’s not cheap, neither is the quality of the bag. Find out the reasons why I like this backpack so much in my video review here.
Thanks to VSGO for sending me a review sample of this bag. As always, this is a completely independent review. All of the thoughts and opinions expressed here are my own.
25L capacity – dividers for different photography packouts.
MagneticFidlock for main flap
Quick access to cameras from top or side.
Lightweight at only 1.85kilos
Water resistant, non scratch exterior.
Multiple attachment points for tripods (side or bottom).
Adjustable chest and waist straps.
Things I Like
Stable platform for standing the bag
Great feeling handle
The strong top divider will lock in place
Very sleek looking
Padding on straps and back very comfortable
Access to two separate cameras – top and side
Zip attach is also a tool
Many attach points for accessories, carry, attaching to luggage.
Very large laptop sleeve (up to 17.3”) with lock (have had iPads and laptops slip out of bags when that flap is thrown back)
Can be easily configured to handle BIG lenses and actually access them through the top.
Things I Don’t Like
Zippers can be fiddly
Double layer top zip makes for a tighter fit for gear
Not cheap
Conclusion
One of the closest comparisons I have is to the Peak Design Everyday 20L Backpack I reviewed about six years ago and have used for years. The VSGO 25L bag has better spaces, is more comfortable to use, has better access to the cameras and to orienting the space, and is typically a good $50+ cheaper. That’s a winning combination, and the reason why the VSGO Black Snipe 25L is my new everyday camera backpack of choice.
Keywords: VSGO, Black Snipe, Everyday Backpack, Everyday Backpack, Photography, 25L, Photography Backpack Review, Camera Backpack, Dustin Abbott, Review, Peak Design, Hands On, Real World, Photography, Backpacking, Hiking, Camera, Lenses, #letthelightin, DA
DISCLAIMER: This article and description contains affiliate links, which means that if you click on one of the product links, I’ll receive a small commission. As an Amazon Associate I earn from qualifying purchases.
A few years ago Sigma began to carve out a very nice niche for itself with the introduction of its ART series primes. These quickly became legitimate alternatives to some of the top first party primes and it was no longer “second rate” to have one in your lens kit. Meanwhile third party rival Tamron was accomplishing something similar with its pro quality stabilized zooms like the 24-70mm f/2.8 VC, 70-200mm f/2.8 VC, and, most recently, the superlative 15-30mm f/2.8 VC (which has rapidly become one of my favorite lenses, particularly since I got the Fotodiox WonderPana filter system for it). But it’s clear that Tamron was keeping an eye on Sigma’ success with the ART series and has been quietly working behind the scenes to create its own pro-grade prime lenses. This new line of primes has now been unveiled, and I’ve been spending some quality time with the Tamron SP 35mm f/1.8 and Tamron SP 45mm f/1.8 VC lenses over the past few weeks.
It’s been a long time since Tamron has been associated with prime lenses (with the exception of some fine macro lenses like the recent 90mm f/2.8 VC). At one point, however, Tamron was making a number of quality prime lenses and had an innovative “Adaptall” mount system that allowed a user to swap mounts according to their camera’s mount system. I’m glad to see Tamron returning to the production of prime lenses, and fully anticipate that the newly released 35mm f/1.8 VC and the 45mm f/1.8 VC are only the first in a line of SP (Super Performance) prime lenses.
I will refer to Sigma’s ART series primes some during this review because I do believe that these are the most logical competitors for these new lenses. Sigma has produced some excellent prime lenses (and even a few innovative zoom lenses) in its ART series with exceptional optical performance and beautiful designs. I’ve reviewed the majority of them (see my reviews here). But Tamron has a few tricks up its sleeves as well. They have pioneered a number of their own innovations over the past several years, and most of those are being implementedcheck out my reviews here into their new primes. And fortunately for Tamron, several of these play to some of the weaknesses of the Sigma ART primes.
45mm? Yeah, I scratched my head, too. I posed the question to Tamron, and got the reasonable response that these two lenses were the opening salvo of more Tamron SP primes, and there was a certain amount of shared R&D costs between these two first lenses. They share the same front element sizes, and perhaps the move towards 50mm might have exceeded the shared design for the two lenses. I would have preferred 55mm to 45mm, myself, but that’s not what we got. Some readers have already expressed additional interest because of the 45mm focal length – so it all comes down to your own preferences. Tamron (probably wisely) elected to develop an excellent 45mm lens rather than a less excellent 50mm lens. The reality is that it doesn’t behave much differently in practice to any 50mm lens. Here’s what the difference between a 45mm and a 50mm looks like in real life:
Step back a few more feet (this is from about four feet/1.25m away) and that difference will become near imperceptible. By the way, this is also what the difference between f/1.4 and f/1.8 looks like. The 50mm f/1.4 shot is from my SMC Takumar 50mm f/1.4, which, despite its age, still has some of the nicest drawing I’ve seen from a 50mm lens. Those of you debating between a 35mm and 50mm prime may find this focal length (45mm) an acceptable compromise. And, just for fun, here’s what the difference between the 35mm and the 45mm Tamrons looks like.
Here are the raw numbers: the lens is 544g and 3.6″/91mm long. This is 270g less than the Sigma 50mm f/1.4 ART (815), but 254g heavier than the Canon EF 50mm f/1.4 (a lens not in the class of these lenses in any way). the Sigma is also 9mm longer. The Tamron has ten elements in 8 groups, including 1 LD (Low Dispersion) element and 2 Aspherical elements. In short, the Tamron is a medium sized lens that is visibly smaller than its Sigma competition.
Tamron Technologies
If you are reading both the 35mm and the 45mm reviews, you will find some overlap as they are released simultaneously and I had them both in hand at the same time. The reviews differentiate in a variety of areas to deal with unique qualities of each lens.
One area where Tamron has been on the cutting edge is in the implementation of its image stabilization systems. Tamron’s VC (or Vibration Compensation) systems have consistently been amongst the industry’s best since their introduction, and they have been the first (and, so far, the only!) lens manufacturer to successfully implement one in a standard wide aperture zoom (the SP 24-70 f/2.8 VC) or wide angle/wide aperture zoom (the SP 15-30 f/2.8 VC). These new prime lenses will be the first with an aperture this wide to receive in lens stabilization. In a Canon system the EF 35mm f/2 IS (an excellent lens that I own) has been Canon’s widest aperture prime to receive image stabilization. Both these new Tamron primes will now become the title holder. The Sigma ART prime lenses have a “sexier” (and larger) f/1.4 aperture, and while Tamron’s VC will allow for lower minimum shutter speeds in some situations (with a static subject), I suspect that some photographers will at least initially view these lenses as being less “pro grade” because of not having an f/1.4 aperture. The actual design and build of these suggest that they are most certainly pro-grade lenses (more so than the ART series, at least in build), but many consumer grade prime lenses also have an f/1.8 aperture (including Canon’s own “nifty fifty” that costs only $125), so Tamron will have a “perception gap” to overcome.
The inclusion of VC is a feature that many photographers will perceive as very valuable, and is a matter of priority for those that shoot video. The VC performance here is very good. It is completely unobtrusive, with almost no hints of its operation beyond the steady viewfinder and the nicely stabilized images. High resolution sensors really punish camera shake, so having good stabilization makes a huge difference. The VC is almost silent and does no unseemly jumping when activated. Handholding 1/10th second images is a piece of cake, and slower shutter speeds are possible with good technique and a static subject. This image is 1/8th second and essentially perfectly sharp:
Sony mounts do not come with VC. I’m always a bit disappointed by this, for, while I know that there is the possibility of interference with the in body image stabilization (and users would have to choose between the two systems), my feeling is that the best stabilization is in the lens where the system can be tuned to the individual needs of the lens. Sony users are familiar with this pain, however, so this is nothing new.
Another area that Tamron has been developing some valuable expertise is in the development of moisture resistance/weather sealing. They have included this feature on a broader range of lenses than anyone else, and, while there are differing opinions on the value of moisture resistance, it is also a strongly desired feature by many photographers. Photographers with pro grade camera bodies (with weather sealing) want the liberty to match lenses that also have weather sealing so that they can shoot in a broader range of weather conditions. The options for a weather sealed 50mm lens have been very slim. Tamron has gone to a whole new level (for them) with the weather sealing on these lenses, with actual seals at the appropriate places (even the focus ring), a rear gasket, and expensive fluorine coating on the front element. They back up this weather sealing with an industry leading six year warranty (in North America), which suggests they are serious about the build quality of these lenses. And these lenses are beautifully built, with a premium feel that is a real joy to handle and use.
Here’s a video breakdown of the size and build quality of these new lenses:
Moisture resistance is an area where the ART series has lagged, with no lens in the series claiming moisture resistance, so this is one more area where Tamron can distinguish its new primes. The 45mm VC appears to be a seriously pro-grade lens, with one of the higher levels of build quality that I’ve seen in a while. I’ve reviewed a LOT of lenses this year (I’m somewhere near 25 for the year), but this lens is near the top of the heap when it comes to build quality. Only the Canon 100-400L II and the Zeiss lenses that I’ve reviewed this lens match the build level here (and this includes several Canon L series lenses that I’ve reviewed this year).. This is manifest in a number of ways, including a body that is primarily made of metal (including metal filter threads!!), a metal mount (obviously), and a quality feel to the switches. There is a rubber gasket around the lens mount, and Tamron has also included expensive fluorine coatings on the front elements that further help the moisture resistance and makes lenses both easier to clean and more resistant to scratching. This lens quickly becomes one of the top options for a 50(ish)mm lens for photographers that need to shoot in sometimes adverse weather conditions.
The new build design is really quite beautiful. It’s simple and clean, and faintly reminiscent of Sigma’s ART series, although the materials here are actually higher grade. I do find the texture variety on the Sigma ART series a little more appealing, but I do really like this new, clean design. The black is broken up by white lettering (etched rather than printed) here and there along with an “SP” (Super Performance) badge and a light metallic ring near the lens mount that Tamron euphemistically calls “Luminous Gold”. This deviation from the black on black is probably the design aspect that most distinguishes the lens from the ART series, however, and will help Tamron with branding. Several surfaces have a slightly rubberized/soft touch feel that has a tactile pleasing quality.
The focus ring is extremely nice. It is very generously wide and almost perfectly damped. It glides smoothly either in MF mode or in full time manual override, and while the stops at minimum and infinity focus aren’t as definite as a true manual focus lens, they are definite enough that you don’t try to focus past them. There is also sufficient travel (nearly 180 degrees) to accurately focus manually. The focus rings on these lenses are some of best I’ve used outside of dedicated manual focus lenses, and are better than several of those, too. This becomes very important when one considers the amazing minimum focus ability of these lenses. At macro distances most photographers prefer manual focus anyway, and these lenses are joy to use in a pseudo-macro fashion. The lens has focus distance window but no hyperfocal markings (not surprising). Both lenses take a moderate, inexpensive, and easy to find 67mm filter for those nice metal filter threads that is shared with a number of other lenses.
The build quality here is a new high for Tamron, and belies the moderate price point ($599 USD). The look of the Sigma ART series is still perhaps minutely better, but the build quality of these new Tamron primes exceeds any of the four Sigma ART series lenses I’ve used.
The attention to detail in the fresh design carries over to redesigned front and rear lens caps. The front cap is both chunkier and more contoured than previous Tamron lens caps. It has a more premium feel, which was (I’m sure) the point. As lens caps go it is very nice, and the center pinch portion has a notably precise action that feels better engineered than any previous lens cap I’ve used. The rear cap is also a huge step forward. The previous Tamron rear caps have been on the (ahem) bottom of my list of favorites. I tend to trade them out with Canon caps for the Tamron lenses in my kit while the Tamron caps tend to go to the more lowly vintage lenses in my collection that don’t get used often. Those caps only screw on at distinct points and lack flare. These new caps are another matter. They are contoured, for one, flaring out towards the lens in both a stylish and functional way. They mount easier as well and certainly wouldn’t get demoted in my collection.
Tamron has even redesigned the font for its name in a more serious, contemporary style. These two lenses represent an attempt to move upscale, and my perception is that it is working.
Perhaps to deflect some criticisms over moving some of its manufacturing out of Japan on some of its less premium offerings, these lenses remind us twice that they are both designed and manufactured in Japan (and then again on the hood).
There are two switches on the body with a different look and feel than any other Tamron lens I’ve used. They resemble (wait for it…) the ART series a bit more, save these are a bit wider and flatter. They are the basic switches you would expect, with an AF (Autofocus)/MF (Manual Focus) switch (full time manual override is always available), and the second switch is an ON/OFF for the VC (Vibration Compensation). The switches placement is a little different than usual, with a more side by side look than the typical stacking. There is internal sealing around them to complete the moisture resistance.
Another effective technology that Tamron has recently developed is in its coatings. This from Tamron’s press release, “eBAND Coating deployed to thoroughly suppress ghosting and flare eBAND (Extended Bandwidth & Angular-Dependency) and BBAR (Broad-Band Anti-Reflection) coatings, both providing outstanding anti-reflection effect, are applied to critical element surfaces for maximum light transmission. Internal reflections from element surfaces which cause ghosting and flare are reduced to an absolute minimum. Flawless, crystal clear images can be obtained. eBAND Coating, a hybrid nano-structured layer with extremely low refractive index coupled with multilayered anti-reflection coating technology, efficiently minimizes reflection of extremely angulated incident light—something that cannot be achieved by conventional anti-reflection coatings alone.”
Techno-speak aside, these coatings provide an almost complete resistance to flare and ghosting. Many prime lenses are susceptible to a variety of flare defects, from veiling to ghosting to a variety of flare related artifacts., but despite thorough torture testing during my time with the lenses I found them extremely resistant to flare.
As you read the various reviews as they start to pour in, I think you will find a general consensus that these lenses are seriously well made pieces of kit.
But AreThey Super Performance?
Watch the video here to see me break down Tamron’s various claims about the “Super Performance” of these lenses.
I’m happy to announce that yes, they are definitely super performing prime lenses. Both lenses have been able to perform extremely well in my tests. They aren’t Zeiss Otus level (nothing is), but they will stand against anything else on the mere mortal level.
Here’s an image quality breakdown from the Tamron SP 45mm f/1.8 VC in bullet form:
Sharpness is strong across the image frame from wide open. I don’t see the biting resolution/contrast of the Otus series, but even wide open landscape shots show high resolution across the frame without any hint of that haziness/indistinct edges that softer lenses will show. The lens also exhibits a nicely flat focal plane. I haven’t found a situation where I would hesitate to use the lens wide open. I’ll leave the chart testing to those that excel at it, but I suspect that these lenses are resolving just about as high as the ART series lenses at equivalent apertures. Stopping down to more typical landscape apertures produces biting sharpness across the frame. I’m always happy when I zoom in to images at a pixel level and discover that images look even better then. Here is a series of images and crops that have been a bit mind blowing:
Flare resistance is exceptional. No hazing, ghosting, or flare artifacts that I’ve seen. These lenses perform more strongly in this aspect than any ART series lens that I’ve used, though they are good performers as well. I simply could not introduce any kind of flare artifacts when putting the sun into the frame. Very nice!
Bokeh quality is very nice from the rounded nine bladed aperture iris. Bokeh quality is creamy and soft, with a nice transition to defocus. This is true of the bokeh before the plane of focus and beyond it. The nine rounded blade aperture is doing its job, too, with bokeh highlights remaining round when you stop the lens down. My own objection is a common one – towards the edge of the frame the bokeh highlights take on a somewhat “cat-eyed” quality and are less round. When putting bright defocused lights into the scene (like with the Christmas lights below) the bokeh shows a minimum of busyness.
At a pixel level there are some very, very light concentric circles (commonly referred to as “onion bokeh”) that become a little more pronounced as the lens is stopped down. This “activity” is less pronounced than it was with the Zeiss Otus 1.4/55mm, however, and none of us are complaining about it’s bokeh. Inside many bokeh circles there is an inner line, and typically the less pronounced that is, the better. Bokeh highlights will be softer. The Tamron does a better job with this than many of the 50mm lenses I have similarly tested. The overall roundness of highlights across the frame is better than that of, say, the Canon 50mm f/1.8 STM that I recently reviewed. At close focus distances the lens creates extremely strong blur that looks a lot like a macro lens.
The combination of nice optics and strong bokeh performance means that this is a lens capable of producing a lot of beautiful images! The ability to focus down so much closer than other 50mm lenses (more on that in a moment) opens up all kinds of new possibilities. On the other end of the aperture spectrum, stopping down the nine bladed aperture produces some delightful sunstars/sunbursts that add a lot to an image.
Vignette control is also a strength. There is a slight bit of vignette visible in the corners at wide open apertures, but far less than competing primes. The use of a slim circular polarizer did not add any obvious vignette. In most situations there isn’t enough vignetting to even be noticeable, and when you compare it side by side with other lenses you quickly get a sense of how good this performance is. The frame below (which should be white from corner to corner) shows a small amount of vignetting (roughly one stop) wide open on a full frame body. In field use I haven’t noticed enough vignette from the lens that I would feel the need to correct anything. This, combined with low native distortion (a tiny amount of barrel distortion), means that those of you concerned about not having a lens profile in camera to correct for these things shouldn’t have much to worry about.
This landscape shot was taken wide open and the primary corner (upper left) that should be light shows relatively little vignette.
Color rendition seems very good overall. Colors are natural and rich. You can judge for yourself by checking out the Lens Image Gallery.
The parade of optical goodness comes to a crashing (and surprising) halt when it comes to the chromatic aberration control. This is definitely the optical weak point. I was surprised by the amount of both purple and green fringing I saw in high contrast areas. This is one area where the Sigma ART 50mm definitely exceeds the optical performance of the lens. It seems like so many modern lenses seem to have this monster defeated, so I’m frankly disappointed by this performance. In most cases chromatic aberrations can be easily corrected in post, but it’s a stage that I personally prefer to avoid. Here is the worst example I saw during my review period.
This sample also shows off the very impressive sharpness, though. If you want to see many more image samples, including some full size images you can download, please visit the Lens Image Gallery here. I’m always happy when Roger Cicala from LensRentals weighs in on any lens. He has the unique opportunity to test large batches of lenses (unlike most of we reviewers) and can thus spot trends like sample variation. He tested the two new Tamron primes on the optical bench and found that A) they resolved very highly and B) the sample variation result was excellent on the 35mm and exceptional on the 45. That’s an encouraging report, and you can check it out here if you would like.
Close Encounters of the Magnification Kind
I’ve saved one of the best features of the lens until last. When I first saw the press release for the 45mm, I did a double take. High maximum magnification figures are not the norm for 50mm lenses. I’ve got an older Zeiss Planar T* 1.7/50mm that I really love, but I don’t use it as often as what I’d like because its minimum focus distance is two feet/60cm. Here’s what minimum focus distance looks like for my Zeiss – this is a not very impressive amount of magnification of my little SMC Takumar 55mm f/1.8.
I will often reach for the SMC Takumar 50mm f/1.4 when I’m shooting with my vintage glass primarily because it’s minimum focus distance is much better. It will focus down to 45cm (around 18 inches), resulting in a somewhat standard for 50mm .15x magnification. Here’s what that standard looks like:
Some of the new releases better that mark by a bit (the Sigma ART allows for .17x magnification). The fresh design of the Canon 50mm f/1.8 STM is much better and allows for focus down to 14″ or 35.5cm, giving a .21x magnification figure. But the new Tamron SP 45mm is in a league of its own, allowing for a minimum focus distance of 11.4’/29cm, and maximum magnification of .29x. Here’s what minimum focus distance looks like with it.
Umm, wow! I doubt that I need to tell you how impressive this performance is. Here’s a side by side visual comparison:
You can get close enough to give a very macro look to the image, with the background completely diffused. This opens up any number of creative shooting options, and just look at how high the resolution is here even at f/1.8.
I find that it can focus close enough and resolve highly enough that I can treat it much like a macro lens, right down to needing to consider closing down the aperture because the depth of field is so narrow (depth of field at minimum focus is only .18 inches or just 4.47mm – that’s tiny!). The performance is good enough that if you don’t need true 1:1 life size reproduction and mostly want to shoot flowers or similarly small objects you would probably be very satisfied with using this lens as your macro lens. The working distance isn’t terrible and that is already a lot of magnification. A bit of cropping and suddenly you have life size. Adding an extension tube would get you even closer! The fact that the focus ring works so well (most macro photographers like to use manual focus) makes this a treat to use at close focus range. This is a very, very key selling point for me. By the way, the Tamron 35mm f/1.8 is even more impressive, offering up a .40x magnification that is just incredible!
Tamron accomplishes this through the use of a floating element (Tamron calls it their “Floating System”). They’ve done a fabulous job of its implementation, and if they manage to do something similar with an 85mm lens (magnification figures are even worse there!) it could be a pretty revolutionary lens.
This is one of the features that I’m most excited by because it fits my own shooting style so well.
AF Performance
This is an area where these lenses really need to distinguish themselves. I own the Canon EF 35mm f/2 IS, and it is a focusing standout. It’s fast, but more importantly, it is exceptionally accurate. My images from it are always well focused, so its a lens I will frequently use for professional work – from portraits to reportage. I can trust it. I won’t own a lens that I cannot trust to consistently and accurately autofocus.
The Achille’s heel for the Sigma ART series in my experience (and that of many other photographers – particularly other Canon shooters) has been sometimes inconsistent autofocus accuracy. Both Tamron and Sigma are forced to reverse engineer Canon, Nikon, and Sony’s autofocus algorithms because these companies will not license their technology to them. My experience says that Tamron has been able to more effectively accomplish this, and I get very consistent results from some of the professional grade zooms from Tamron. I use them almost exclusively for my event and wedding work and typically don’t have to discard one image out of a thousand for missed focus. Large aperture primes are very demanding for autofocus, so this is a key point for Tamron if it wants to convince photographers to choose its lenses over first party choices.
Things got off to a good start when I performed calibration. The 45mm required only a +1 AFMA adjustment while the 35mm needed a -2. I prefer small adjustments as a matter of principle; it means that those without the ability to perform microadjustment in their camera bodies can still expect reliable performance out of the box. I did notice a difference even in that +1 adjustment, however, as autofocus accuracy was improved.
The autofocus motor in the lenses is Tamron’s USD (Ultrasonic Drive). This is a true ring type AF motor similar to Canon’s USM. The AF feels a bit more snappy in the 35mm. The 35mm is roughly similar in speed to my Canon 35mm f/2 IS in most situations, although I would still give the Canon the slight nod. The 45mm is a bit slower, however, though it is marginal. I rarely find Tamron’s AF speed with its wide aperture lenses to be top of the class (the 70-200 f/2.8 VC is the best of the bunch). They are more like middle of the pack. The best USM motors from Canon focus faster, and I would also give a slight edge in speed to Sigma’s 50mm f/1.4 ART. One thing to consider is that these lenses focus closer than their competitors, so if the lens is completely defocused it will take a split second longer to achieve focus as it has a larger focus range. Less extreme focus changes come quickly, and the lens has proven able to focus confidently even in challenging situations like backlit or dimly lit environments. There is a split second feeling of momentum gathering before the elements fly into motion which is accompanied by a faint sliding sound like the elements moving along. It isn’t as quiet as Sigma’s HSM motors, nor is it as fast as the better USM motors from Canon. If you are familiar with the focus speed of Tamron’s 24-70mm f/2.8 VC lens then you have a pretty good idea of the focus speed of this lens. The 45mm lens is probably a hair quicker. I’ve used the 24-70 VC on several different continents and in many professional applications and its always gotten the job done for me, so I suspect this lens will as well. The reality is that I haven’t really seen a 50mm lens that focuses with the speed of, say, the Canon 135mm f/2L. I would say that the Tamron 45mm is a bit behind Canon 50mm f/1.2L or the Sigma 50mm f/1.4 ART, but these lenses advantage is marginal.
It seems like every 50mm lens has some kind of focusing quirk. The 50mm f/1.8 even in STM guise focuses at a similar speed. The EF 50mm f/1.4 has inconsistent focus and tends to break. The 50mm f/1.2L tends to backfocus, and the Sigma 50mm f/1.4 ART simply focuses inconsistently at times. The Tamron? I’d just love to see a bit more speed here, particularly considering that it is moving a bit less glass than its top competitors (f/1.2 and f/1.4 respectively).
Focus speed is adequate…but what about focus accuracy? This is where the rubber meets the road!
I’m happy to report that I’m getting excellent focus accuracy results. As per usual, lenses on the 6D prefer AF points closer to center (it has a super focus point in the middle and unexceptional focus points beyond). While focus takes longer on the outer points (and will hunt in poor conditions), once focus locks it does so accurately. My 70D body has more robust cross-type AF points across the frame, and the lens focuses more quickly with them. Par for the course for the 6D, but I’m very accustomed to that by now. Fortunately the 6D makes up for it in a lot of other ways!!
I’m very happy with focus accuracy; if the 45mm focused just a little more quickly I’d be ecstatic. Here’s a few other focus samples (all wide open):
Interestingly, however, in a Japanese language interview (it doesn’t translate perfectly) Tamron engineers intimated that they prioritized accuracy over speed. It was probably the right choice. The 45mm is fast enough…and accuracy is paramount for me.
Portrait notes: Some of you that have read my reviews in the past know that I like to try wide aperture lenses out in a portrait environment. Environmental portraiture is typically very demanding on an AF system because you are shooting at wide apertures and looking for pin point focus on eyes. This is where the focus inconsistencies of many lenses are exposed. I went out today to shoot a portrait session. The weather was not particularly cooperative; it was a very, very bright and my open window for shooting was not the best. But, I was on a deadline with these lenses, and I thought, “Why not a torture test?” I shot almost every portrait shot wide open (f/1.8), except for three frames I dialed down to f/2.2.
I took a few tools to help combat the light. I used the Lite Genius Lite-Scoop II flash modifier I reviewed a few months back for my Metz 64 AF-1 flash unit. I prefer to shoot with my flashes off camera, but did not have time nor the inclination for a complicated light setup. The flash was on the camera with the modifier in place. I also took along an ND8 filter that I happened to have in the appropriate 67mm size so that I could bring the shutter speed down in certain situations. I also went with Manual HSS mode and shot with really high shutter speeds in other situations to just overpower the ambient light. The Metz has a lot of power and enables me to do this in most circumstances. I went through the roughly 100 shots from the session at a pixel level and found that my focus consistency was very good despite the challenging conditions. I slightly prefer the 35mm’s focus speed and accuracy, but the 45mm was rock solid as well (the 35mm may be a bit sharper).
Here is a gallery of portrait shots from the sessions and crops. These were all shot at f/1.8. They will also give you a chance to evaluate bokeh and color in an environmental portrait environment. These are not conditions that I would normally like to shoot portraits in, but the lenses themselves worked very well.
Manual focus is actually quite nice due to the combination of the nice focus ring I mentioned previously along with the rock solid VC. I don’t usually have the luxury of an image stabilizer when I manually focus, so it makes manual focus a kinder experience than on most AF lenses. Videographers will appreciate this along with a full 180 degrees of focus throw. These are perhaps the nicest manual focusing autofocus lenses that I’ve come across.
EOS M3 notes. While these lenses are on the larger side of what I would deem natural for my smaller EOS M3 mirrorless body, the focal lengths are appealing crossover ones. I was happy to find that the lenses focused nearly as quickly and accurately as native M mount lenses, although video AF Servo shooting can be a bit slow when making major transitions. Images produced with the combination are very appealing. It’s ironic that many recent Tamron lenses behave more mannerly via the EF adapter than most of the Canon lenses. Something about the way they achieve focus seems to agree with the M3. I recognize this affects only a few of you, but just in case…
How about Canon’s DPAF? A few readers were interested in how these lenses would work with Canon’s DPAF. I have a Canon 70D body, the first to use DPAF, and one of the few DSLRs to have quality servo AF during video recording. The lenses that work best with DPAF for video are those with stepping motors like Canon’s STM, but I’m happy to report that while these lens don’t focus quite as quickly as STM motors (and are bit louder in doing it), they focus smoothly and accurately. If you are using something else to record your audio I don’t see an issue. Here’s a little sampling of videos using DPAF.
DPAF works well for stills, too, though not as fast as typical contrast AF. All in all, the autofocus doesn’t wow you with speed, but makes up for it with accuracy. My guess is that the primary reason is that the lens has a longer focus throw than many competitors, a detail that will bring a sparkle to videographer’s eyes.
Conclusions
I’ve reviewed a LOT of 50mm lenses in the past year or so. I’ve reviewed the Canon 50mm f/1.2L along with the nifty fifties (50mm f/1.8II and STM), Sigma’s 50mm f/1.4 DG and 50mm f/1.4 ART, the Rokinon 50mm f/1.4, Zeiss Planar T* 1.4/50mm, Makro-Planar 2/50mm, and the Otus 1.4/55mm. On top of that I’ve done mini-reviews of some vintage 50mm glass, including the SMC Takumar 50mm f/1.4, 55mm f/1.8, Helios 44-2, and Zeiss Planar T* 1.7/50mm. That’s thirteen, by my count, not including the lens at hand. I’ve been on a bit of a “holy grail” quest for the perfect 50mm lens. This Tamron isn’t it, but it comes closer to finding the balance that I want than most. It’s currently on my personal Christmas list.
The fact that this lens is only f/1.8 and a Tamron might cause you to think that this is not a serious, pro-grade lens. This could not be further from the truth, though. My time with these lenses (not enough!) lets me know that Tamron means business. These are lenses designed for working professionals despite the reasonable price. They are built more like Zeiss lenses than Tamrons of old, save these are weather sealed. The optical performance is stunningly good, and there are some killer apps like VC and a crazy minimum focus distance that really set this lens apart from the pack. If it was a 50mm f/1.4 VC lens the line-up to purchase would already be forming.
It’s a reasonably sized lens that wouldn’t be onerous to pack along or carry. The image quality and bokeh is as good as anything not called Otus. My only nitpicks are that I’d like a bit faster focus and a lot less CA. But these principle shortcomings (along with a smaller than f/1.4 aperture) seem positively offset by so many strengths. Unless you absolutely feel like you need f/1.4 this lens is a stunning pick and highlights just how desperately Canon’s own EF 50mm f/1.4 needs an update. Tamron has undercut the price of the Sigma 50mm f/1.4 ART by $350 in this lens, and it is a LOT of lens for $599. Remember too that these lenses come with Tamron’s 6 year North American warranty. That in itself is a great value. I’m strongly considering adding this particular lens to my own kit as it seems to be filling the void I hoped Canon would fill with an equivalent to the 35mm f/2 IS in the 50mm focal length. Canon hasn’t (yet) built that lens, but it seems like Tamron has in the Tamron SP 45mm f/1.8 Di VC USD. My understanding is that these lenses are only the first in a new line of Tamron prime lenses. All I can say is, “Bring them on!”
Pros:
Exceptional build quality
Better weather sealing than any other 50mm lens
Fluorine coating
Amazing .29x maximum magnification
Excellent manual focus ring with good focus throw
Excellent resolution from wide open on
Low vignetting
Quality bokeh from nine blade aperture
Well performing VC system
Accurate autofocus
Cons:
Larger than other 50mm f/1.8 lenses
More chromatic aberrations than expected
Autofocus speed could be faster
Doesn’t include a case/pouch
Smaller maximum aperture than main competitors
A big “thank you!” to Canada’s Amplis Foto for providing these retail samples for review. I’ve bought many lenses and accessories from Amplis myself, and they are great to deal with! You can use the Coupon Code AMPLIS52014 to get 5% anything in their store, including these new lenses!
Purchasing your gear through B&H and these links helps fund this website and keeps the articles coming. Thank you for your support.
Great News! I can now offer a 5% discount on all purchases at Amplis Foto, Canada’s Leading Photographic Supplier. Please enter discount code: AMPLIS52014 in your cart. It is good for everything in your cart, and is stackable with other coupons, too! It will take 5% off your entire order! Proceeds go towards keeping this site going and providing you with new reviews!
DISCLAIMER: This article and description contains affiliate links, which means that if you click on one of the product links, I’ll receive a small commission. As an Amazon Associate I earn from qualifying purchases.
My love for vintage glass has been well documented. I’ve written articles for my own website, for Alien Skin Software, and even for Digital Photography School. Many of you know that I’m a lens/gear reviewer, and I see a ton of new lenses come across my desk. I’m currently working on my 19th and 20th lens reviews of the year. I’ve reviewed lenses that cost into the thousands, and I’ve reviewed Canon’s new $125 50mm STM lens. Last year was no different. I’ve reviewed lenses from Canon, Zeiss, Tamron, Sigma, Rokinon, and Samyang this year alone. I say that to say I see pretty much all the new gear, and some of it is devastatingly good. But I’ve made the point in several articles that there is still something special about old lenses. Sometimes new lenses can be so good that they lack character – like photos with a perfect histogram and exposure but without any soul. It is rare that old lenses are perfect. They are frequently flare prone, or perhaps a little “dreamy” wide open, or, like some of the Helios lenses, a unique optical defect can cause a “swirly” bokeh pattern that is completely unique.
But there’s one major problem in getting those great old lenses onto my cameras – none of them have the EF, EF-S or EF-M lens mount that my stable of Canon camera bodies take.
That’s where the adapter comes in. An adapter is usually relatively simple (particularly for Canon shooters). It is often a thin bit of metal that has the old mount on one side and the “new” mount (in my case, a Canon mount) on the other. Lock the lens into its native mount on one side, and then clip the adapted lens into the proper mount for your camera…and away you go…at least in theory.
There are complications. Sometimes the design of certain lenses cause their rear flange to be too deep, and when the mirror of a camera (usually only full frame cameras) tries to open or close during shutter operation, the flange can catch on the edge of the mirror and prevent the mirror from going back down. In other cases you might have a mount that doesn’t lock in a particularly stable way, leading to the lens feeling a bit wobbly (and perhaps worse…as we’ll discover in a moment). In a few cases (more frequent on Nikon bodies), an adapter will actually require glass elements for the adapted lens to work properly, and those adapters can either degrade image quality or cost a lot more. One other issue that I’ve encountered is that some lenses had a pin in the back that would switch the lens from manual aperture to auto aperture. In that case you need an adapter with a flange that will depress that pin so that you can use the manual aperture ring (as it is extremely unlikely that you will be able to control aperture from the camera body).
When I started using vintage glass about 5 years ago I initially started cheap all around. I raided the local pawn shops and bought a number of lenses for $20 or less (often around $10). I bought cheap adapters off Ebay in various mounts. I’ve used M42 mounts, Pentax K mounts, Contax/Yashica, Konica, and even an M39 type mount. I quickly discovered my favorite mount to adapt was M42, or what was commonly called a “screw mount”. The fact that the lens screws into the mounts threads rather than a bayonet type mount meant that the lens connection was nice and tight. My first Pentax K mount felt completely insecure and wobbly by comparison. I tried multiple adapters, some better, some worse. Some had focus confirm chips that would allow the camera to give a beep and light up the appropriate focus point when it felt manual focus had accurately been achieved. But always cheapos off Ebay.
Until one day I smartened up.
I had wanted a vintage Zeiss 50mm lens after reviewing 3 modern Zeiss 50mm lenses (Planar T* 1.4/50mm, Makro-Planar T* 2/50mm, and the Otus 1.4/55mm). All very cool lenses in different ways. I wanted to see how older Zeiss lenses stacked up. I saw a nice copy of a Planar T* 1.7/50mm on Ebay, and spent a fair bit for it ($175 USD shipped). One problem: it had a different mount than what I had previously used. It needed a C/Y (Contax/Yashica) mount. So, I did my usual thing and got an adapter off Ebay. I paid $10 USD for it…and I got what I paid for. The C/Y mount is a bayonet style mount, and as soon as I mounted the lens I knew I was going to be disappointed. The lens felt like it could still rotate a bit side to side, like it wasn’t completely locked in. I learned that there should be a leaf compression spring there to help to achieve a tight lock. My adapter didn’t have it.
The worst thing was that I really actually liked the lens. Great Zeiss color, nice sharpness when focus was nailed even wide open, and great sharpness when the aperture was closed down a bit. It even had a unique flare pattern (see the image above) that was very artistic and cool. But I wasn’t even close to getting infinity focus wide open. I had to stop way down to get reasonably decent infinity results, and that wasn’t always ideal.
I did an article earlier this year comparing the new Rokinon 50mm f/1.4 manual focus lens to a number of older manual focus lenses that I owned (including the afore mentioned Helios 44-2 (58mm f/2), SMC Takumar 50mm f/1.4 and 55mm f/1.8, and this Zeiss lens. I did a standardized test of them on a cold day at the frozen river. My wide open Zeiss results were just terrible, but I discovered something in that test. The lousy adapter I was using was actually allowing the lens to sag. Here is what my wide open result looked like:
Yuck! The lens wasn’t even getting a chance to focus in the right place because the top half the lens was sagging forwards a bit. I faced a choice at that point; I could either sell the lens and give up on it, or I could invest in a better adapter. I elected to do the latter. FotodioX made a simple claim with their adapter: infinity focus guaranteed. Perfect!
The FotodioX Pro C/Y to EF adapter wasn’t cheap; it was $69.95 at B&H Photo. That was definitely more than what I was used to paying, but the thought of potentially having a fully functional Zeiss lens for less than $250 intrigued me. I ordered the FotodioX adapter.
The difference was night and day. The adapter had a much higher grade look and build. It was made of a brass with a stainless steel finish in black. It had the leaf spring mount that I needed, and the lens clicked very definitely into place. Once the adapter was mounted it looked pretty much like a part of the lens, and there was no movement even when I physically tried to move it. I quickly discovered that I now had the full use of the lens, and the lens would easily focus out to infinity. In fact, last night I purposefully took the lens to the same spot (although it looks a LOT different this time of year!) and the difference is night and day. Here’s a series of crops from a similarly wide open shot (no processing of any kind).
The lighting was obviously more gentle, but my ability to achieve accurate focus was remarkably different. I simply could not focus properly with my previous adapter, and, as the second crop shows, there is as much detail as the lens can resolve at that aperture even on the distant shore (which is actually pretty great for an old lens at f/1.7…or even a new lens, for that matter.)
One other key feature is that while many cheap adapters have some kind of focus confirm chip, the FotodioX Pro adapters have a more premium “Dandelion” Focus Confirm Chip V.2. This chip allows you to program in a variety of details, including the appropriate focal length and maximum aperture, the ability to change the aperture setting in the camera to the appropriate aperture in the shot (you still need to change the aperture on the lens), and even the ability to fine-tune the focus confirm to help you get the best value from the lens. The programming process is a bit clunky, but once it is done you can just forget about it. I found the investment in time (about 30-40 minutes for me the first time) to be well worth the satisfaction of getting the most of my beloved old lenses. You don’t have to program the chip if you don’t want do. You can just put on the adapter and start shooting if that is your preference.
I’m so glad that I made the investment, however, because here’s just a few of the images I’ve gotten since getting the right adapter!
Despite having a pile of cheaper M42 adapters, I have started purchasing the FotodioX Pro M42 to EF adapters for some of my favorite M42 lenses. It’s not just the ability to program; it’s the tighter manufacturing tolerances that allow the lenses to work better, period. Even a micrometer or two here and there can change the way a lens interacts with your camera body, and FotodioX Pro adapters are more consistently tooled and made of better materials in my experience. As an added bonus, the M42 adapters are still very cheap. You can buy them from B&H for only $19.95. You can get one without the focus confirm chip for only $10 if that isn’t a big deal to you. You can find a ton of other FotodioX adapters and filters here.
Some of the old lenses are well worth a little investment in. They are low risk and high reward. Here is a few of the images that I’ve taken with an SMC Takumar 50mm f/1.4 and the FotodioX M42 to EF adapter:
There’s a lot of amazing images still waiting in old glass…and you may have some great lenses sitting around in a box in the attic already or available for a few bucks from a pawn shop or off Ebay. So what are you waiting for? Grab yourself an adapter and start shooting already!
DISCLAIMER: This article and description contains affiliate links, which means that if you click on one of the product links, I’ll receive a small commission. As an Amazon Associate I earn from qualifying purchases.
You’ve probably already figured out that there is a growing market for Senior Sessions. Gone are the days when it was sufficient for the crew to pull up at the school, unload some backdrops, and take cookie cutter photos of all the seniors. Today’s young people want custom photography that immortalizes their youth and is tailored to their personality and interests. Senior Photography now runs the gamut from professional to glamour to fantasy. So what kind of gear does an aspiring senior sessions photographer need?
My first stop is always glass. Not just any lens will do. One of the key things that any portrait photographer needs is versatility, but perhaps not in the way that you might think. I’m not talking about zoom range. Forget 5x, 10x, or 20x zoom. What I’m talking about is versatility when it comes to the aperture that you shoot at. I also encourage you to consider investing in a full frame sensor camera at some point. The larger sensor makes a big difference in the light gathering ability along with a smaller depth of field. Canon and Nikon both have full frame cameras in the 6D and D610 that are more affordable than any full frame bodies before them.
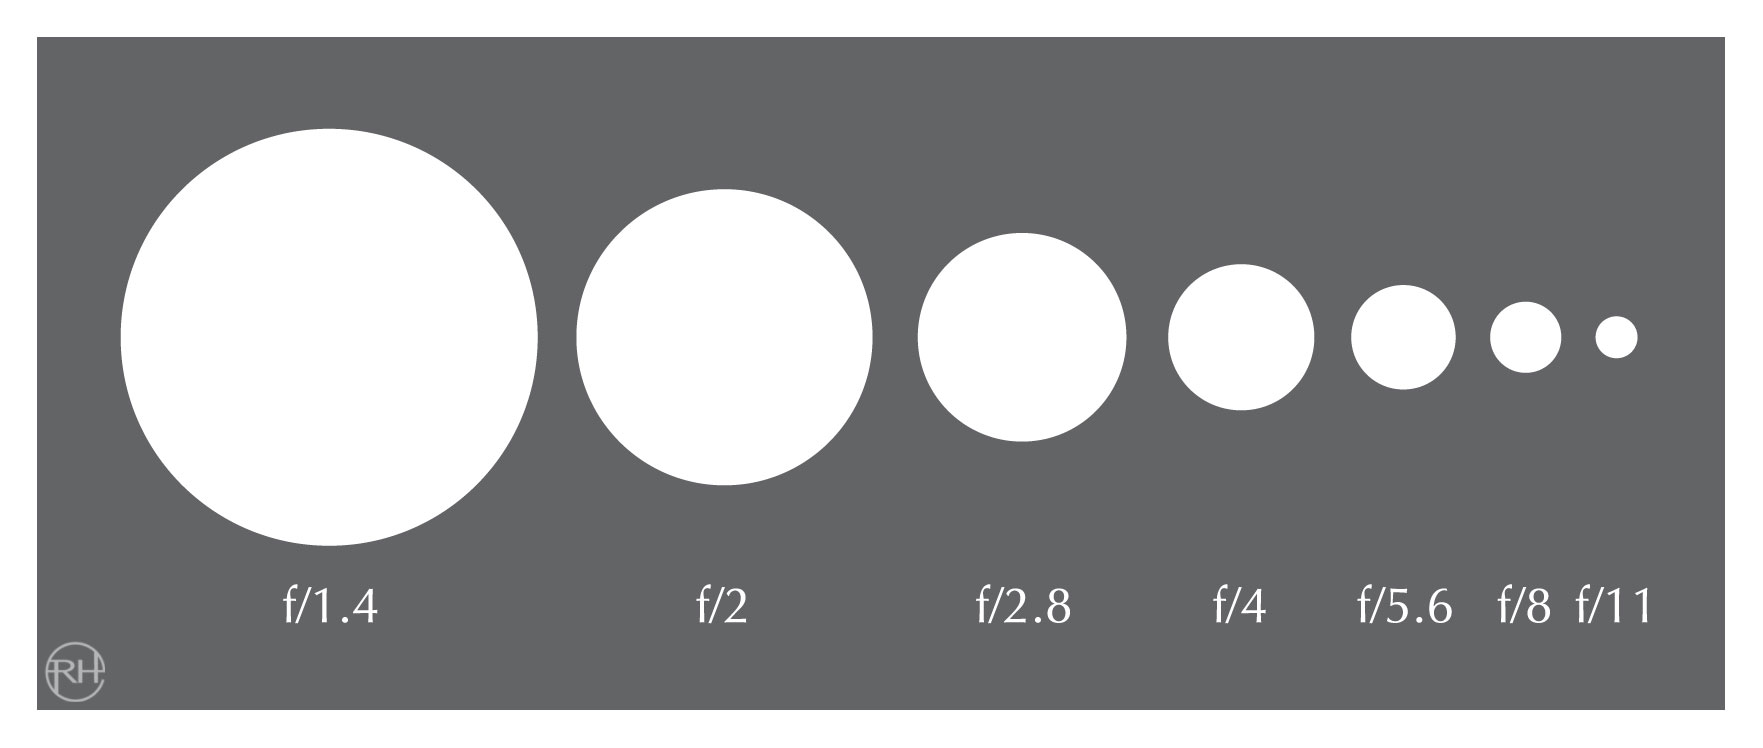
If your budget doesn’t allow for that upgrade yet, I would recommend getting a large aperture lens first. It will give you the most “bang for your buck.” Most kit lenses have a maximum aperture on the wide end of f/3.5 at the fastest, but only f/5.6 on the telephoto end. Take a look at this little chart.
That f/5.6 circle looks pretty small, doesn’t it? This shows what a disadvantage photographers with only small aperture lenses have. There is a direct correlation between aperture size and the amount of background blur (or bokeh) that can be produced (longer focal lengths help achieve more bokeh as well). That separation of the subject from the background is what gives portraits a “professional” look; this is the look that today’s seniors want. They have thousands of photos taken with their smartphones, but those photos will never have the look of DSLRs (particularly full frame sensor DSLRs) taken with large aperture lenses. If you want to create beautiful, professional looking portrait photography you need to invest in either a large aperture prime lens or two or a large aperture zoom lens, like a 24-70mm f/2.8 or 70-200mm f/2.8. What follows are some suggestions for every budget.
The point of entry for budget minded photographers is what is often referred to as a “nifty-fifty”. These 50mm primes commonly have a maximum aperture of f/1.8 and a 50mm focal length. They are readily available for less than $200, and while they have their shortcomings, they can produce some beautiful portrait shots when used properly. The new EF 50mm f/1.8 STM is a surprisingly good performer considering its bargain price. If you want even more background blur (and image quality), consider spending a couple of hundred dollars more and invest in one of the excellent 85mm f/1.8 prime lenses or a 50mm f/1.4.
A medium budget ($700-1000) allows you to consider either an 85mm f/1.4 or move to one of the favorite focal lengths of portrait photographers – 135mm. These lenses usually have an f/2 aperture but create even more background blur thanks to the longer focal length. Just to give you an idea of what size the depth of field (DOF) will be (and thus the amount of background blur), take a look at this little chart (this assumes a full frame camera is being used):
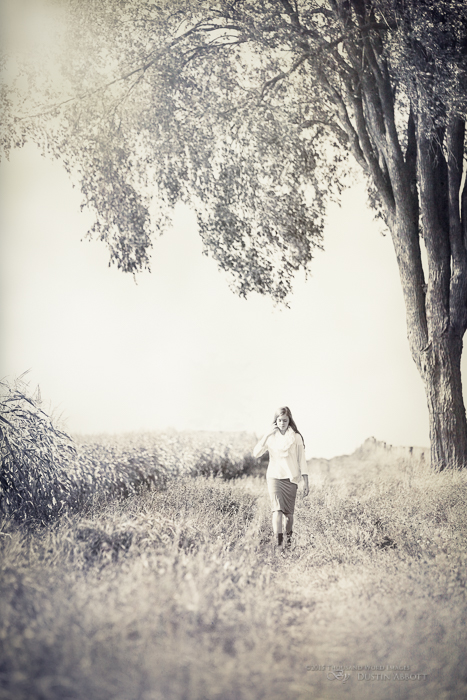
The smaller the DOF, the greater amount of separation of your subject from the background. The 50mm f/5.6 column gives you an idea that the DOF is pretty huge for most kit lenses even at their widest aperture, and this means that it is really hard to get much separation of your subject from the background. Notice how much more shallow the depth of field becomes with the longer focal length. I love the Canon EF 135mm f/2L for this reason. You have to be careful when focusing, but it creates absolutely wonderful subject isolation. (Like this photo below)
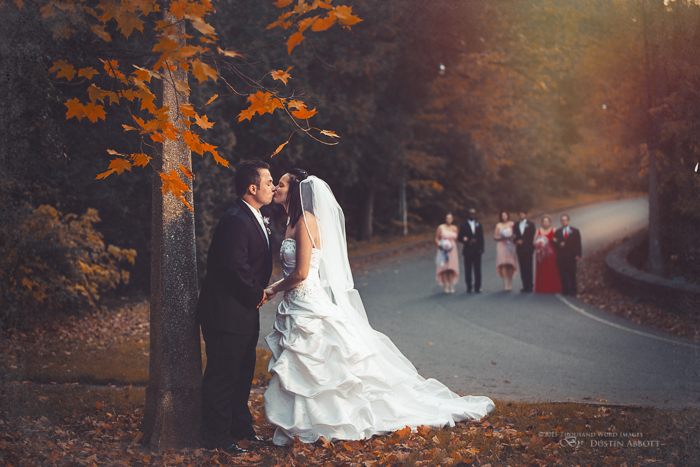
Many portrait photographers choose to go the zoom route because of the added versatility. I own both a 24-70mm f/2.8 zoom for wider shots and a 70-200mm f/2.8 telephoto. The latter (a Tamron SP 70-200mm f/2.8 Di VC USD) has become my favorite portrait lens because it has a highly effective image stabilizer and amazing image quality. I’m able to get more sharp shots because the image stabilizer helps eliminate camera shake from the equation. While the f/2.8 aperture isn’t as wide as the primes can go, modern zooms are incredibly sharp wide open. Using our example above the depth of field at 200mm f/2.8 is even smaller at only 1.54 inches while the depth of field at 135mm f/2.8 is a still tiny 3.37 inches. The Tamron is optically as good as the “first party” options from Canon and Nikon and costs more than a third less. These zoom lenses make it very easy to switch from wider framing (at 70mm) to head and shoulders at longer focal lengths even when space is tight. Here’s one from the Tamron below.
The added versatility of having a wide aperture lens will open up all kinds of creative options for you that just aren’t there with your kit lens. By the way, all of these photos have also been processed in Alien Skin Exposure. It furthers expands your creative options. Now add that to your own creativity and go out and make some senior’s dreams come true!
This article first appeared in the Alien Skin blog. You can read it here:
DISCLAIMER: This article and description contains affiliate links, which means that if you click on one of the product links, I’ll receive a small commission. As an Amazon Associate I earn from qualifying purchases.
We live in a somewhat ironic day. Many of the optical defects of past years have been resolved, and lenses are no longer prone to flare or odd optical quirks like bokeh that “swirls” around the periphery of the image. Most modern lenses have rich contrast and are sharp wide open. Modern DSLR sensors have amazing high ISO performance, so the days of heavy grain/noise are behind us. So what do we do? We purchase a cool piece of software like Alien Skin Exposure to electronically emulate all of those defects that our gear no longer has. Light leaks, grain, reduced contrast and faded colors. Weird!
This started as a pristine image until I used Alien Skin Exposure to add all the “defects”.
And yet those looks are so magical!
Our advantage today is that we can selectively apply those looks when and where we want them, and can minimize the downsides by masking off areas we don’t want affected.
Few modern photographers are interested in really returning to the days of film, but it is a lot of those film stocks and their unique qualities that have inspired a good number of the presets in Exposure. But this article focuses on another aspect of Exposure’s “analog soul”, and that is the influence of vintage glass.
I have some photographer friends that just love film. They simply get more stubborn as their opportunities to get film dwindle and development shops drop like flies. I must confess that film has no attraction to me; I’m delighted to have full frame bodies where I can occasionally shoot ISO 25,600 and still get acceptable results! But vintage/analog glass is another matter. I fell in love with a number of vintage lenses that I pull out and use regularly despite a kit full (12, I believe!) of high end modern lenses.
Why?
I’m a professional lens reviewer. I have a lot of lenses flow through my hands (13 so far this year) and so I get a little spoiled and jaded by getting to use the best all the time. If I could offer up one criticism of many modern lenses, it is that they are often a bit “clinical”. They lack personality. In the process of engineering out all of the defects lenses sometimes lose their souls.
This just isn’t the case with vintage glass. For example, right now I have an SMC Takumar 50mm f/1.4 sitting on my workbench with a black light shining down into it. Why would I do such a crazy thing? Because a lot of these 40+ year 50mm Takumars have elements that can yellow a bit over time due to…wait for it…a slightly radioactive Thorium element that is part of the optical formula. I kid you not! Black light (UV) actually helps to clear the yellowing from the elements and improves light transmission. It’s a bit of a conundrum, though, as the yellowing produces really unique, warm colors that set the end result apart from other lenses. A lot of shots look wonderful right out of camera in a way that more color neutral lenses do not. I’m hoping that I don’t regret eliminating that character. I’ll probably end up adding a warming filter back into a lot of the images through Exposure! Here are few right out of camera from the SMC Takumar (while it was still yellow!)
Likewise one of my all-time favorite vintage lenses – a Soviet era Helios 44-2 (58mm f/2 lens). I got my copy shipped from Russia for less than $30, but pretty much every image I’ve ever shared from it has been a critical success and a good number of them have been commercial successes. It just has a very unique rendering due to its unique optical imperfections. It is extremely flare prone, but in a wonderfully artistic way.
You know that cool swirling bokeh effect in the Bokeh section of Exposure? That is actually the way this lens renders bokeh at certain distances. This bokeh is straight out of camera (or the lens, rather!):
You can check out this article that compares a modern 50mm f/1.4 prime (Rokinon) against a rogue’s gallery of vintage 50mm primes. The article has both mini reviews and art galleries from each vintage lens. I’m willing to bet you’ll find a lot of images there that you just love the look of!
There are a ton of great vintage 135mm lenses that are fabulous portrait lenses. They tend to be very compact and easy to bring along, too. I’ve got 28mm and 35mm SMC Takumar primes that still produce amazingly unique images and get into my portrait rotation and a vintage Zeiss prime that is my go-to video lens for my YouTube videos.
Want to set your work apart from every other guy with a DSLR? Look no further than some vintage glass.
OK, so there are downsides. None of these lenses have mounts native to your modern DSLR, but fortunately very cheap adapters can be had off Ebay for often no more than $10. Spend a couple of bucks more and get one with a focus confirm chip on it. Yes, they will be both manual focus and you will have to control the aperture through an aperture ring on the lens, but the lenses meter fine and produce some great pictures. The good news is that there are some beautifully made and optically unique and wonderful lenses out there for not much money. The popularity of some models has driven up their price on Ebay, but you might lucky at pawn shops or estate sales, too. Just beware: using vintage glass can get a little addictive.
And if you can’t handle the hassle, fortunately Exposure is very easy to use. Just go ahead and add some imperfections to your otherwise perfect modern images…weird! P.S. If you use my name “dustinabbott” as a coupon code it will give you 10% off everything in the Alien Skin store. Enjoy!
DISCLAIMER: This article and description contains affiliate links, which means that if you click on one of the product links, I’ll receive a small commission. As an Amazon Associate I earn from qualifying purchases.
Hello all! Many of you have got some gear on your “wish list”. One of my partners, B&H Photo has got a lot deals for you. Purchasing through these links will both save you money and help support this website.
DISCLAIMER: This article and description contains affiliate links, which means that if you click on one of the product links, I’ll receive a small commission. As an Amazon Associate I earn from qualifying purchases.
Over the past several years I have become the “guy” that a lot of people go to when they want to buy gear. I do my very best to strike the balance for others that I do for myself. I want to get good quality gear, and I want to spend as little money as possible! Most of my reviews do consider price as a factor, because in the real world very people are having their gear given to them. They are buying it with their own hard earned money. I’ve partnered with retailers both here in Canada and in the US to help to get you good deals, and by purchasing through these links you also help me to keep this website going and expanding. This link will update every week, so check back for more great deals!
(P.S. This info may not show if you have ad-blocking software in place).
If you can’t see the banner, just click on this link to see the latest deals and promotions from B&H.
If you are in Canada, you can also get a 5% discount off everything in the Amplis Foto store by entering the following code: AMPLIS52014. This coupon code is stackable with other discounts!
As always, thank you for your support, and I will keep working to provide fresh content coming your way!
DISCLAIMER: This article and description contains affiliate links, which means that if you click on one of the product links, I’ll receive a small commission. As an Amazon Associate I earn from qualifying purchases.


 Viltrox AF 35mm F1.2 LAB FE Gallery
  Viltrox AF 35mm F1.2 LAB FE Review
  llano 2-in-1 Dual Bay Camera Battery Charger Review
  Nikkor Z 135mm F1.8 S Plena Gallery


")


")

")